目录
七. 常用模块 - json & pickle & shelve
time.altzone # 函数返回格林威治西部的夏令时地区的偏移秒数. 如果该地区在格林威治东部会返回负值(如西欧, 包括英国). 对夏令时启用地区才能使用.
1 # Python 3.x
2 import time
3 print("time.altzone %d " % time.altzone)
4 # 以上实例输出结果为:
5 time.altzone -32400
time.asctime([t])) # 函数接受时间元组并返回一个可读的形式为"Tue Dec 11 18:07:14 2008"(2008年12月11日 周二18时07分14秒)的24个字符的字符串. 格式固定, 无法更改
- t -- 9个元素的元组或者通过函数 gmtime() 或 localtime() 返回的时间值.
1 # Python 3.x
2 import time
3 t = time.localtime()
4 print("time.asctime(t): %s " % time.asctime(t))
5 # 以上实例输出结果为:
6 time.asctime(t): Tue Feb 17 09:42:58 2009
time.clock() # 函数以浮点数计算的秒数返回当前的CPU时间.
用来衡量不同程序的耗时, 比time.time()更有用.
这个需要注意, 在不同的系统上含义不同. 在UNIX系统上, 它返回的是"进程时间", 它是用秒表示的浮点数(时间戳). 而在WINDOWS中, 第一次调用, 返回的是进程运行的实际时间. 而第二次之后的调用是自第一次调用以后到现在的运行时间. (实际上是以WIN32上QueryPerformanceCounter()为基础, 它比毫秒表示更为精确)
 1 # Python 3.x
 2 import time
 3
 4 def procedure():
 5 time.sleep(2.5)
 6
 7 # measure process time
 8 t0 = time.clock()
 9 procedure()
10 print(time.clock() - t0, "seconds process time")
11
12 # measure wall time
13 t0 = time.time()
14 procedure()
15 print(time.time() - t0, "seconds wall time")
16 # 以上实例输出结果为:
17 0.0 seconds process time
18 2.50023603439 seconds wall time
time.ctime([ sec ]) # 函数把一个时间戳(按秒计算的浮点数)转化为time.asctime()的形式. 如果参数未给或者为None的时候, 将会默认time.time()为参数. 它的作用相当于 asctime(localtime(secs)).
- sec -- 要转换为字符串时间的秒数.
1 # Python 3.x
2 import time
3
4 print("time.ctime() : %s" % time.ctime())
5 # 以上实例输出结果为:
6 time.ctime() : Tue Feb 17 10:00:18 2013
time.daylight #
time.get_clock_info() #
time.gmtime([ sec ]) # 将一个时间戳转换为UTC时区(0时区)的struct_time, 可选的参数sec表示从1970-1-1以来的秒数. 其默认值为time.time(), 函数返回time.struct_time类型的对象. (struct_time是在time模块中定义的表示时间的对象).
- sec -- 转换为time.struct_time类型的对象的秒数.
1 # Python 3.x
2 import time
3
4 print("time.gmtime() : %s" % time.gmtime())
5 # 以上实例输出结果为:
6 time.gmtime() : time.struct_time(tm_year=2016, tm_mon=4, tm_mday=7, tm_hour=2, tm_min=55, tm_sec=45, tm_wday=3, tm_yday=98, tm_isdst=0)
time.localtime([ sec ]) # 类似gmtime(), 作用是格式化时间戳为本地的时间. 如果sec参数未输入, 则以当前时间为转换标准. DST (Daylight Savings Time) flag (-1, 0 or 1) 是否是夏令时.
- sec -- 转换为time.struct_time类型的对象的秒数.
1 # Python 3.x
2 import time
3
4 print("time.localtime() : %s" % time.localtime())
5 # 以上实例输出结果为:
6 time.localtime() : time.struct_time(tm_year=2016, tm_mon=11, tm_mday=27, tm_hour=10, tm_min=26, tm_sec=5, tm_wday=6, tm_yday=332, tm_isdst=0)
time.mktime(t) # 执行与gmtime(), localtime()相反的操作, 它接收struct_time对象作为参数, 返回用秒数来表示时间的浮点数.
如果输入的值不是一个合法的时间, 将触发 OverflowError 或 ValueError.
- t -- 结构化的时间或者完整的9位元组元素.
 1 # Python 3.x
 2 import time
 3
 4 t = (2009, 2, 17, 17, 3, 38, 1, 48, 0)
 5 secs = time.mktime(t)
 6 print("time.mktime(t) : %f" % secs)
 7 print("asctime(localtime(secs)): %s" % time.asctime(time.localtime(secs)))
 8 # 以上实例输出结果为:
 9 time.mktime(t) : 1234915418.000000
10 asctime(localtime(secs)): Tue Feb 17 17:03:38 2009
time.monotonic() #
time.perf_counter() #
time.process_time() #
time.sleep(t) # 推迟调用线程的运行, 可通过参数secs指秒数, 表示进程挂起的时间.
- t -- 推迟执行的秒数.
1 # Python 3.x
2 import time
3
4 print("Start : %s" % time.ctime())
5 time.sleep( 5 )
6 print("End : %s" % time.ctime())
7 # 以上实例输出结果为:
8 Start : Tue Feb 17 10:19:18 2013
9 End : Tue Feb 17 10:19:23 2013
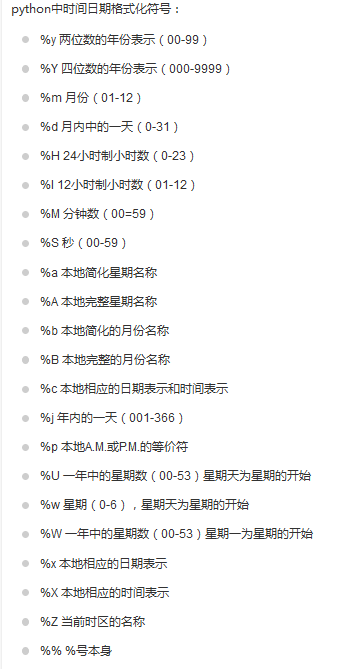
time.strftime(format[, t]) # 接收以时间元组, 并返回以可读字符串表示的当地时间, 格式由参数format决定.
- format -- 格式字符串.
- t -- 可选的参数t是一个struct_time对象.
1 # Python 3.x
2 import time
3
4 t = (2009, 2, 17, 17, 3, 38, 1, 48, 0)
5 t = time.mktime(t)
6 print(time.strftime("%b %d %Y %H:%M:%S", time.gmtime(t)))
7 # 以上实例输出结果为:
8 Feb 17 2009 09:03:38
time.strptime(string[, format]) # 根据指定的格式把一个时间字符串解析为时间元组.
- string -- 时间字符串.
- format -- 格式化字符串.
1 # Python 3.x
2 import time
3
4 struct_time = time.strptime("30 Nov 00", "%d %b %y")
5 print("returned tuple: %s " % struct_time)
6 # 以上实例输出结果为:
7 returned tuple: (2000, 11, 30, 0, 0, 0, 3, 335, -1)
time.struct_time() #
time.time() # 当前时间的时间戳(1970纪元后经过的浮点秒数).
 1 # Python 3.x
 2 import time
 3
 4 print("time.time(): %f " % time.time())
 5 print(time.localtime( time.time() ))
 6 print(time.asctime( time.localtime(time.time())))
 7 # 以上实例输出结果为:
 8 time.time(): 1234892919.655932
 9 (2009, 2, 17, 10, 48, 39, 1, 48, 0)
10 Tue Feb 17 10:48:39 2009
time.timezone #
time.tzname #

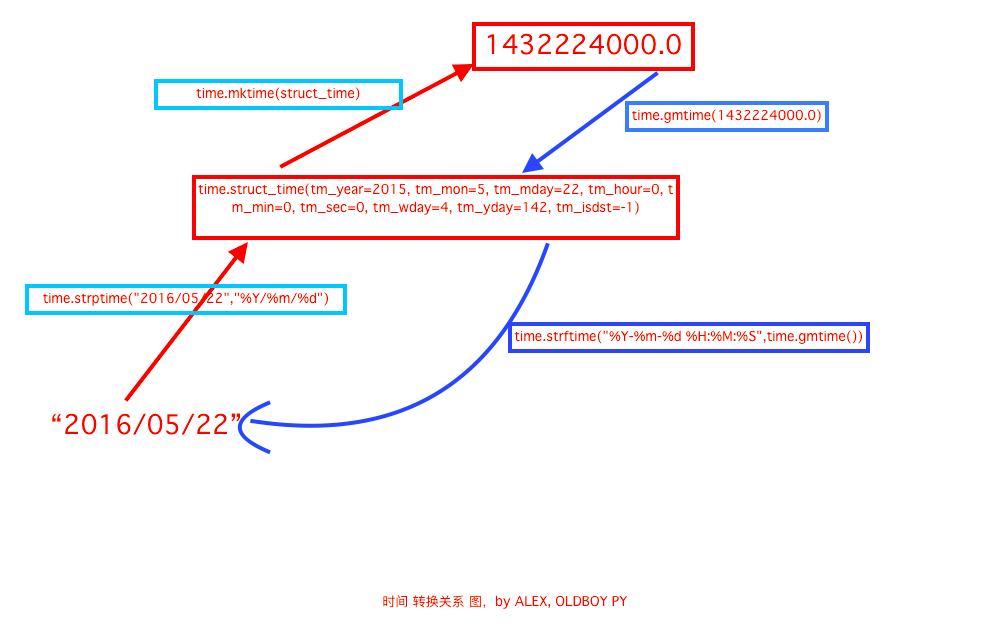
时间字符串与时间戳相关转换的关系图:

 1 import datetime, time
 2 print(datetime.datetime.now()) # 打印当前日期与时间
 3 print(datetime.date.fromtimestamp(time.time())) # 时间戳转字符串, 2017-02-22 无法改变格式
 4 print(datetime.datetime.now() + datetime.timedelta(3)) # 时间的加减 正数加 负数减 days=0, seconds=0, microseconds=0, milliseconds=0, minutes=0, hours=0, weeks=0
 5 # 执行结果
 6 2017-02-22 14:38:08.984240
 7 2017-02-22
 8 2017-02-25 14:38:08.984240
 9
10 # 时间替换
11 c_time = datetime.datetime.now()
12 print(c_time)
13 print(c_time.replace(minute=3, hour=2))
14 # 执行结果
15 2017-02-22 14:37:06.500666
16 2017-02-22 02:03:06.500666
random.randrange(start, stop[, step]) # 随机一个数字, 范围为[start:stop], step为步长值
1 # Python 3.x
2 print(randdom.randrange(1, 10, 2))
3 print(randdom.randrange(1, 10, 2))
4 print(randdom.randrange(1, 10, 2))
5 #
6 3
7 1
8 3
random.randint(a, b) # 返回一个证书N 范围[a, b+1]
1 # Python 3.x
2 import random
3 print(random.randint(1, 10))
4 print(random.randint(1, 10))
5 print(random.randint(1, 10))
6 #
7 9
8 5
9 9
random.choice(seq) # 接受一个序列, 随机返回其中一个元素, 如果序列为空抛出IndexError
 1 # Python 3.x
 2 import random
 3 seq = range(10)
 4 print(random.choice(seq))
 5 print(random.choice(seq))
 6 seq = []
 7 print(random.choice(seq))
 8 #
 9 2
10 8
11 Traceback (most recent call last):
12 File "times.py", line 7, in <module>
13 print(random.choice(seq))
14 File "C:Python36lib
andom.py", line 257, in choice
15 raise IndexError('Cannot choose from an empty sequence')
16 IndexError: Cannot choose from an empty sequence
random.random() # 返回0<=n<1之间的随机数
1 # Python 3.x
2 import random
3 print(random.random())
4 print(random.random())
5 print(random.random())
6 #
7 0.12529181534548717
8 0.17046733942054138
9 0.44022267123668235
random.shuffle(x[, random]) # 洗牌序列, 将一个序列的顺序打乱
 1 # Python 3.x
 2 import random
 3 li = list(range(10))
 4 random.shuffle(li)
 5 print(li)
 6 random.shuffle(li)
 7 print(li)
 8 random.shuffle(li)
 9 print(li)
10 #
11 [9, 6, 3, 7, 1, 8, 4, 2, 0, 5]
12 [6, 2, 0, 1, 5, 7, 8, 4, 9, 3]
13 [9, 4, 0, 8, 1, 7, 5, 3, 2, 6]
random.sample(seq, n) # 从序列中随机取n个值
 1 # Python 3.x
 2 import random
 3 li = list(range(10))
 4
 5 print(random.sample(li, 2))
 6 print(random.sample(li, 2))
 7 print(random.sample(li, 2))
 8 #
 9 [2, 1]
10 [7, 2]
11 [1, 7]
使用random模块实现随机验证码:
 1 ```python
 2 # 随机验证码实现方法
 3 import random
 4 # 第一版
 5 def authcode(n):
 6     checkcode = ""
 7     for i in range(4):
 8         current = random.randrange(0, 4)
 9         if current != i:
10             temp = chr(random.randint(65, 90))
11         else:
12             temp = random.randint(0, 9)
13         checkcode += str(temp)
14     return checkcode
15 print(authcode(4))
16
17 # 第二版
18 import string
19 source = string.digits + string.ascii_uppercase + string.ascii_lowercase
20 print("".join(random.sample(source, 4)))
 1 os.getcwd() 获取当前工作目录,即当前python脚本工作的目录路径
 2 os.chdir("dirname")  改变当前脚本工作目录;相当于shell下cd
 3 os.curdir  返回当前目录: ('.')
 4 os.pardir  获取当前目录的父目录字符串名:('..')
 5 os.makedirs('dirname1/dirname2')    可生成多层递归目录
 6 os.removedirs('dirname1')    若目录为空,则删除,并递归到上一级目录,如若也为空,则删除,依此类推
 7 os.mkdir('dirname')    生成单级目录;相当于shell中mkdir dirname
 8 os.rmdir('dirname')    删除单级空目录,若目录不为空则无法删除,报错;相当于shell中rmdir dirname
 9 os.listdir('dirname')    列出指定目录下的所有文件和子目录,包括隐藏文件,并以列表方式打印
10 os.remove()  删除一个文件
11 os.rename("oldname","newname")  重命名文件/目录
12 os.stat('path/filename')  获取文件/目录信息
13 os.sep    输出操作系统特定的路径分隔符,win下为"\",Linux下为"/"
14 os.linesep    输出当前平台使用的行终止符,win下为"
",Linux下为"
"
15 os.pathsep    输出用于分割文件路径的字符串
16 os.name    输出字符串指示当前使用平台。win->'nt'; Linux->'posix'
17 os.system("bash command")  运行shell命令,直接显示
18 os.environ  获取系统环境变量
19 os.path.abspath(path)  返回path规范化的绝对路径
20 os.path.split(path)  将path分割成目录和文件名二元组返回
21 os.path.dirname(path)  返回path的目录。其实就是os.path.split(path)的第一个元素
22 os.path.basename(path)  返回path最后的文件名。如何path以/或结尾,那么就会返回空值。即os.path.split(path)的第二个元素
23 os.path.exists(path)  如果path存在,返回True;如果path不存在,返回False
24 os.path.isabs(path)  如果path是绝对路径,返回True
25 os.path.isfile(path)  如果path是一个存在的文件,返回True。否则返回False
26 os.path.isdir(path)  如果path是一个存在的目录,则返回True。否则返回False
27 os.path.join(path1[, path2[, ...]])  将多个路径组合后返回,第一个绝对路径之前的参数将被忽略
28 os.path.getatime(path)  返回path所指向的文件或者目录的最后存取时间
29 os.path.getmtime(path)  返回path所指向的文件或者目录的最后修改时间
1 sys.argv           命令行参数List,第一个元素是程序本身路径
2 sys.exit(n)        退出程序,正常退出时exit(0)
3 sys.version        获取Python解释程序的版本信息
4 sys.maxint         最大的Int值
5 sys.path           返回模块的搜索路径,初始化时使用PYTHONPATH环境变量的值
6 sys.platform       返回操作系统平台名称
7 sys.stdout.write('please:')  将字符串打印到标准输出
8 val = sys.stdin.readline()[:-1]  获取标准输入, 等同于val = input("")
shutil模块提供了大量的文件的高级操作. 特别针对文件拷贝和删除, 主要功能为目录和文件操作以及压缩操作. 对单个文件的操作也可参见os模块.
shutil 相关模块: os, zipfile, tarfile
shutil.copyfileobj(fsrc, fdst[,length])

1 def copyfileobj(fsrc, fdst, length=16*1024):
2     """copy data from file-like object fsrc to file-like object fdst"""
3     while 1:
4         buf = fsrc.read(length)
5         if not buf:
6             break
7         fdst.write(buf)
拷贝文件
- fsrc 原文件对象
- fdst 目标文件对象
- length 每次拷贝多少byte
shutil.copyfile(src, dst)

 1 def copyfile(src, dst, *, follow_symlinks=True):
 2     """Copy data from src to dst.
 3
 4     If follow_symlinks is not set and src is a symbolic link, a new
 5     symlink will be created instead of copying the file it points to.
 6
 7     """
 8     if _samefile(src, dst):
 9         raise SameFileError("{!r} and {!r} are the same file".format(src, dst))
10
11     for fn in [src, dst]:
12         try:
13             st = os.stat(fn)
14         except OSError:
15             # File most likely does not exist
16             pass
17         else:
18             # XXX What about other special files? (sockets, devices...)
19             if stat.S_ISFIFO(st.st_mode):
20                 raise SpecialFileError("`%s` is a named pipe" % fn)
21
22     if not follow_symlinks and os.path.islink(src):
23         os.symlink(os.readlink(src), dst)
24     else:
25         with open(src, 'rb') as fsrc:
26             with open(dst, 'wb') as fdst:
27                 copyfileobj(fsrc, fdst)
28     return dst
拷贝文件
- src 原文件路径
- dst 目标文件路径
shutil.copymode(src, dst)

 1 def copymode(src, dst, *, follow_symlinks=True):
 2     """Copy mode bits from src to dst.
 3
 4     If follow_symlinks is not set, symlinks aren't followed if and only
 5     if both `src` and `dst` are symlinks.  If `lchmod` isn't available
 6     (e.g. Linux) this method does nothing.
 7
 8     """
 9     if not follow_symlinks and os.path.islink(src) and os.path.islink(dst):
10         if hasattr(os, 'lchmod'):
11             stat_func, chmod_func = os.lstat, os.lchmod
12         else:
13             return
14     elif hasattr(os, 'chmod'):
15         stat_func, chmod_func = os.stat, os.chmod
16     else:
17         return
18
19     st = stat_func(src)
20     chmod_func(dst, stat.S_IMODE(st.st_mode))
仅拷贝文件的权限, 目标文件与原文件必须存在
- src 原文件路径
- dst 目标文件路径
shutil.copystat(src, dst)

 1 def copystat(src, dst, *, follow_symlinks=True):
 2     """Copy all stat info (mode bits, atime, mtime, flags) from src to dst.
 3
 4     If the optional flag `follow_symlinks` is not set, symlinks aren't followed if and
 5     only if both `src` and `dst` are symlinks.
 6
 7     """
 8     def _nop(*args, ns=None, follow_symlinks=None):
 9         pass
10
11     # follow symlinks (aka don't not follow symlinks)
12     follow = follow_symlinks or not (os.path.islink(src) and os.path.islink(dst))
13     if follow:
14         # use the real function if it exists
15         def lookup(name):
16             return getattr(os, name, _nop)
17     else:
18         # use the real function only if it exists
19         # *and* it supports follow_symlinks
20         def lookup(name):
21             fn = getattr(os, name, _nop)
22             if fn in os.supports_follow_symlinks:
23                 return fn
24             return _nop
25
26     st = lookup("stat")(src, follow_symlinks=follow)
27     mode = stat.S_IMODE(st.st_mode)
28     lookup("utime")(dst, ns=(st.st_atime_ns, st.st_mtime_ns),
29         follow_symlinks=follow)
30     try:
31         lookup("chmod")(dst, mode, follow_symlinks=follow)
32     except NotImplementedError:
33         # if we got a NotImplementedError, it's because
34         #   * follow_symlinks=False,
35         #   * lchown() is unavailable, and
36         #   * either
37         #       * fchownat() is unavailable or
38         #       * fchownat() doesn't implement AT_SYMLINK_NOFOLLOW.
39         #         (it returned ENOSUP.)
40         # therefore we're out of options--we simply cannot chown the
41         # symlink.  give up, suppress the error.
42         # (which is what shutil always did in this circumstance.)
43         pass
44     if hasattr(st, 'st_flags'):
45         try:
46             lookup("chflags")(dst, st.st_flags, follow_symlinks=follow)
47         except OSError as why:
48             for err in 'EOPNOTSUPP', 'ENOTSUP':
49                 if hasattr(errno, err) and why.errno == getattr(errno, err):
50                     break
51             else:
52                 raise
53     _copyxattr(src, dst, follow_symlinks=follow)
仅拷贝 权限位(mode bits), 最后访问时间(atime), 最后修改时间(mtime), flags. 目标文件与原文件必须存在
- src 原文件路径
- dst 目标文件路径
shutil.copy(src, dst) # 对copyfile与copymode的封装

 1 def copy(src, dst, *, follow_symlinks=True):
 2     """Copy data and mode bits ("cp src dst"). Return the file's destination.
 3
 4     The destination may be a directory.
 5
 6     If follow_symlinks is false, symlinks won't be followed. This
 7     resembles GNU's "cp -P src dst".
 8
 9     If source and destination are the same file, a SameFileError will be
10     raised.
11
12     """
13     if os.path.isdir(dst):
14         dst = os.path.join(dst, os.path.basename(src))
15     copyfile(src, dst, follow_symlinks=follow_symlinks)
16     copymode(src, dst, follow_symlinks=follow_symlinks)
17     return dst
先拷贝文件, 在拷贝权限
- src 原文件路径
- dst 目标文件路径
shutil.copy2(src, dst) # 对copyfile与copymode与copystat的封装

 1 def copy2(src, dst, *, follow_symlinks=True):
 2     """Copy data and all stat info ("cp -p src dst"). Return the file's
 3     destination."
 4
 5     The destination may be a directory.
 6
 7     If follow_symlinks is false, symlinks won't be followed. This
 8     resembles GNU's "cp -P src dst".
 9
10     """
11     if os.path.isdir(dst):
12         dst = os.path.join(dst, os.path.basename(src))
13     copyfile(src, dst, follow_symlinks=follow_symlinks)
14     copystat(src, dst, follow_symlinks=follow_symlinks)
15     return dst
内容, 权限, 状态都拷贝
- src 原文件路径
- dst 目标文件路径
shutil.ignore_patterns(*patterns)
为copytree的辅助函数, 创建过滤规则
shutil.copytree(src, dst, symlinks=False, ignore=None, copy_function=copy2, ignore_dangling_symlinks=False)

 1 def copytree(src, dst, symlinks=False, ignore=None, copy_function=copy2,
 2              ignore_dangling_symlinks=False):
 3     """Recursively copy a directory tree.
 4
 5     The destination directory must not already exist.
 6     If exception(s) occur, an Error is raised with a list of reasons.
 7
 8     If the optional symlinks flag is true, symbolic links in the
 9     source tree result in symbolic links in the destination tree; if
10     it is false, the contents of the files pointed to by symbolic
11     links are copied. If the file pointed by the symlink doesn't
12     exist, an exception will be added in the list of errors raised in
13     an Error exception at the end of the copy process.
14
15     You can set the optional ignore_dangling_symlinks flag to true if you
16     want to silence this exception. Notice that this has no effect on
17     platforms that don't support os.symlink.
18
19     The optional ignore argument is a callable. If given, it
20     is called with the `src` parameter, which is the directory
21     being visited by copytree(), and `names` which is the list of
22     `src` contents, as returned by os.listdir():
23
24         callable(src, names) -> ignored_names
25
26     Since copytree() is called recursively, the callable will be
27     called once for each directory that is copied. It returns a
28     list of names relative to the `src` directory that should
29     not be copied.
30
31     The optional copy_function argument is a callable that will be used
32     to copy each file. It will be called with the source path and the
33     destination path as arguments. By default, copy2() is used, but any
34     function that supports the same signature (like copy()) can be used.
35
36     """
37     names = os.listdir(src)
38     if ignore is not None:
39         ignored_names = ignore(src, names)
40     else:
41         ignored_names = set()
42
43     os.makedirs(dst)
44     errors = []
45     for name in names:
46         if name in ignored_names:
47             continue
48         srcname = os.path.join(src, name)
49         dstname = os.path.join(dst, name)
50         try:
51             if os.path.islink(srcname):
52                 linkto = os.readlink(srcname)
53                 if symlinks:
54                     # We can't just leave it to `copy_function` because legacy
55                     # code with a custom `copy_function` may rely on copytree
56                     # doing the right thing.
57                     os.symlink(linkto, dstname)
58                     copystat(srcname, dstname, follow_symlinks=not symlinks)
59                 else:
60                     # ignore dangling symlink if the flag is on
61                     if not os.path.exists(linkto) and ignore_dangling_symlinks:
62                         continue
63                     # otherwise let the copy occurs. copy2 will raise an error
64                     if os.path.isdir(srcname):
65                         copytree(srcname, dstname, symlinks, ignore,
66                                  copy_function)
67                     else:
68                         copy_function(srcname, dstname)
69             elif os.path.isdir(srcname):
70                 copytree(srcname, dstname, symlinks, ignore, copy_function)
71             else:
72                 # Will raise a SpecialFileError for unsupported file types
73                 copy_function(srcname, dstname)
74         # catch the Error from the recursive copytree so that we can
75         # continue with other files
76         except Error as err:
77             errors.extend(err.args[0])
78         except OSError as why:
79             errors.append((srcname, dstname, str(why)))
80     try:
81         copystat(src, dst)
82     except OSError as why:
83         # Copying file access times may fail on Windows
84         if getattr(why, 'winerror', None) is None:
85             errors.append((src, dst, str(why)))
86     if errors:
87         raise Error(errors)
88     return dst
89
90 # version vulnerable to race conditions
递归的去拷贝文件夹
- src 原文件路径
- dst 目标文件路径
- symlinks # 待更新
- ignore 过滤条件
- copy_function 使用的copy函数
- ignore_dangling_symlinks 忽略连接文件
实例1:
1 import shutil
2 shutil.copytree('folder1', 'folder2', ignore=shutil.ignore_patterns('*.pyc', 'tmp*'))
3 #目标目录不能存在, 注意对folder2目录父级目录要有可写权限, ignore的意思是排除
实例2:
 1 [root@slyoyo python_test]# tree copytree_test/
 2 copytree_test/
 3 └── test
 4     ├── test1
 5     ├── test2
 6     └── hahaha
 7
 8 [root@slyoyo test]# ls -l
 9 total 0
10 -rw-r--r--. 1 python python 0 May 14 19:36 hahaha
11 -rw-r--r--. 1 python python 0 May 14 19:36 test1
12 -rw-r--r--. 1 root   root   0 May 14 19:36 test2
13
14 >>> shutil.copytree('copytree_test','copytree_copy')
15 'copytree_copy'
16
17 [root@slyoyo python_test]# ls -l
18 total 12
19 drwxr-xr-x. 3 root   root   4096 May 14 19:36 copytree_copy
20 drwxr-xr-x. 3 root   root   4096 May 14 19:36 copytree_test
21 -rw-r--r--. 1 python python   79 May 14 05:17 test1
22 -rw-r--r--. 1 root   root      0 May 14 19:10 test2
23 [root@slyoyo python_test]# tree copytree_copy/
24 copytree_copy/
25 └── test
26     ├── hahaha
27     ├── test1
28     └── test2
rmtree(path, ignore_errors=False, onerror=None)

 1 def rmtree(path, ignore_errors=False, onerror=None):
 2     """Recursively delete a directory tree.
 3
 4     If ignore_errors is set, errors are ignored; otherwise, if onerror
 5     is set, it is called to handle the error with arguments (func,
 6     path, exc_info) where func is platform and implementation dependent;
 7     path is the argument to that function that caused it to fail; and
 8     exc_info is a tuple returned by sys.exc_info().  If ignore_errors
 9     is false and onerror is None, an exception is raised.
10
11     """
12     if ignore_errors:
13         def onerror(*args):
14             pass
15     elif onerror is None:
16         def onerror(*args):
17             raise
18     if _use_fd_functions:
19         # While the unsafe rmtree works fine on bytes, the fd based does not.
20         if isinstance(path, bytes):
21             path = os.fsdecode(path)
22         # Note: To guard against symlink races, we use the standard
23         # lstat()/open()/fstat() trick.
24         try:
25             orig_st = os.lstat(path)
26         except Exception:
27             onerror(os.lstat, path, sys.exc_info())
28             return
29         try:
30             fd = os.open(path, os.O_RDONLY)
31         except Exception:
32             onerror(os.lstat, path, sys.exc_info())
33             return
34         try:
35             if os.path.samestat(orig_st, os.fstat(fd)):
36                 _rmtree_safe_fd(fd, path, onerror)
37                 try:
38                     os.rmdir(path)
39                 except OSError:
40                     onerror(os.rmdir, path, sys.exc_info())
41             else:
42                 try:
43                     # symlinks to directories are forbidden, see bug #1669
44                     raise OSError("Cannot call rmtree on a symbolic link")
45                 except OSError:
46                     onerror(os.path.islink, path, sys.exc_info())
47         finally:
48             os.close(fd)
49     else:
50         return _rmtree_unsafe(path, onerror)
51
52 # Allow introspection of whether or not the hardening against symlink
53 # attacks is supported on the current platform
54 rmtree.avoids_symlink_attacks = _use_fd_functions
递归的去删除文件
- path 目标路径
- ignore_errors 如果为True , 错误将被忽略
- onerror 处理错误的函数, 需支持(func, path, exc_info)参数
shutil.move(src,dst)

 1 def move(src, dst):
 2     """Recursively move a file or directory to another location. This is
 3     similar to the Unix "mv" command. Return the file or directory's
 4     destination.
 5
 6     If the destination is a directory or a symlink to a directory, the source
 7     is moved inside the directory. The destination path must not already
 8     exist.
 9
10     If the destination already exists but is not a directory, it may be
11     overwritten depending on os.rename() semantics.
12
13     If the destination is on our current filesystem, then rename() is used.
14     Otherwise, src is copied to the destination and then removed. Symlinks are
15     recreated under the new name if os.rename() fails because of cross
16     filesystem renames.
17
18     A lot more could be done here...  A look at a mv.c shows a lot of
19     the issues this implementation glosses over.
20
21     """
22     real_dst = dst
23     if os.path.isdir(dst):
24         if _samefile(src, dst):
25             # We might be on a case insensitive filesystem,
26             # perform the rename anyway.
27             os.rename(src, dst)
28             return
29
30         real_dst = os.path.join(dst, _basename(src))
31         if os.path.exists(real_dst):
32             raise Error("Destination path '%s' already exists" % real_dst)
33     try:
34         os.rename(src, real_dst)
35     except OSError:
36         if os.path.islink(src):
37             linkto = os.readlink(src)
38             os.symlink(linkto, real_dst)
39             os.unlink(src)
40         elif os.path.isdir(src):
41             if _destinsrc(src, dst):
42                 raise Error("Cannot move a directory '%s' into itself '%s'." % (src, dst))
43             copytree(src, real_dst, symlinks=True)
44             rmtree(src)
45         else:
46             copy2(src, real_dst)
47             os.unlink(src)
48     return real_dst
递归的移动文件
shutil.make_archive(base_name, format, root_dir=None, base_dir=None, verbose=0,dry_run=0, owner=None, group=None, logger=None)

 1 def make_archive(base_name, format, root_dir=None, base_dir=None, verbose=0,
 2                  dry_run=0, owner=None, group=None, logger=None):
 3     """Create an archive file (eg. zip or tar).
 4
 5     'base_name' is the name of the file to create, minus any format-specific
 6     extension; 'format' is the archive format: one of "zip", "tar", "bztar"
 7     or "gztar".
 8
 9     'root_dir' is a directory that will be the root directory of the
10     archive; ie. we typically chdir into 'root_dir' before creating the
11     archive.  'base_dir' is the directory where we start archiving from;
12     ie. 'base_dir' will be the common prefix of all files and
13     directories in the archive.  'root_dir' and 'base_dir' both default
14     to the current directory.  Returns the name of the archive file.
15
16     'owner' and 'group' are used when creating a tar archive. By default,
17     uses the current owner and group.
18     """
19     save_cwd = os.getcwd()
20     if root_dir is not None:
21         if logger is not None:
22             logger.debug("changing into '%s'", root_dir)
23         base_name = os.path.abspath(base_name)
24         if not dry_run:
25             os.chdir(root_dir)
26
27     if base_dir is None:
28         base_dir = os.curdir
29
30     kwargs = {'dry_run': dry_run, 'logger': logger}
31
32     try:
33         format_info = _ARCHIVE_FORMATS[format]
34     except KeyError:
35         raise ValueError("unknown archive format '%s'" % format)
36
37     func = format_info[0]
38     for arg, val in format_info[1]:
39         kwargs[arg] = val
40
41     if format != 'zip':
42         kwargs['owner'] = owner
43         kwargs['group'] = group
44
45     try:
46         filename = func(base_name, base_dir, **kwargs)
47     finally:
48         if root_dir is not None:
49             if logger is not None:
50                 logger.debug("changing back to '%s'", save_cwd)
51             os.chdir(save_cwd)
52
53     return filename
创建压缩包并返回文件路径, 例如:zip、tar
- base_name: 压缩包的文件名, 也可以是压缩包的路径. 只是文件名时, 则保存至当前目录, 否则保存至指定路径,
- format: 压缩包种类, “zip”, “tar”, “bztar”, “gztar”
- root_dir: 要压缩的文件夹路径(默认当前目录)
- owner: 用户, 默认当前用户
- group: 组, 默认当前组
- logger: 用于记录日志, 通常是logging.Logger对象
实例:
1 # 将 /data 下的文件打包放置当前程序目录
2 import shutil
3 ret = shutil.make_archive("data_bak", 'gztar', root_dir='/data')
4
5 # 将 /data下的文件打包放置 /tmp/目录
6 import shutil
7 ret = shutil.make_archive("/tmp/data_bak", 'gztar', root_dir='/data')
pickle,用于python特有的类型 和 python的数据类型间进行转换
pickle模块提供了四个功能:dumps、dump、loads、load
 1 # Python 3.x
 2 import pickle
 3
 4 data = {"1":1, "2":2, "3":3}
 5 pickle_str = pickle.dumps(data)  # dumps 将python对象转成pickle格式的bytes类型
 6 print(pickle_str)
 7 # b'x80x03}qx00(Xx01x00x00x001qx01Kx01Xx01x00x00x002qx02Kx02Xx01x00x00x003qx03Kx03u.'
 8 python_ojb = pickle.loads(pickle_str)  # loads 将pickle格式的bytes类型转成python对象
 9 print(python_ojb, type(python_ojb))
10 # {'1': 1, '2': 2, '3': 3} <class 'dict'>
11
12 with open("test.pkl", "wb") as f:  # dump 将python对象转成pickle格式的bytes类型并写入文件
13     pickle.dump(data, f)
14
15 with open("test.pkl", "rb") as f:  # load 将文件读取出来的内容转成python对象
16     python_ojb = pickle.load(f)
17     print(python_ojb, type(python_ojb))
18 # {'1': 1, '2': 2, '3': 3} <class 'dict'>
json,用于字符串 和 python数据类型间进行转换
Json模块提供了四个功能:dumps、dump、loads、load
 1 # Python 3.x
 2 import json
 3
 4 data = {1:1, 2:2, 3:3}
 5 json_str = json.dumps(data)  # dumps 将python对象转成json格式的字符串
 6 print(json_str)
 7 # {"1": 1, "2": 2, "3": 3}
 8 python_ojb = json.loads(json_str)  # loads 将json格式的字符串转成python对象
 9 print(python_ojb, type(python_ojb))
10 # {'1': 1, '2': 2, '3': 3} <class 'dict'>
11
12 with open("test.pkl", "w") as f:  # dump 将python对象转成json格式的字符串并写入文件
13     json.dump(data, f)
14
15 with open("test.pkl", "r") as f:  # load 将文件读取出来的json格式的字符串内容转成python对象
16     python_ojb = json.load(f)
17     print(python_ojb, type(python_ojb))
18 # {'1': 1, '2': 2, '3': 3} <class 'dict'>
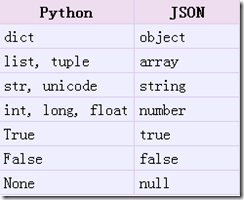
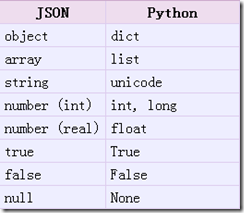
仔细看的朋友会发现一个问题, 我的元数据key的类型是int, 但经过json转换后key的类型变成了str. 这是为啥啊.
这就与python对象和json对象之间转换的对应关系又关了. 请看下图:


shelve模块比pickle模块简单,只有一个open函数,返回类似字典的对象,可读可写;key必须为字符串,而值可以是python所支持的数据类型
 1 import shelve
 2
 3 f = shelve.open(r'shelve.txt')
 4
 5 f['stu1_info']={'name':'alex','age':'18'}
 6 f['stu2_info']={'name':'alvin','age':'20'}
 7 f['school_info']={'website':'oldboyedu.com','city':'beijing'}
 8
 9 f.close()
10
11 print(f.get('stu_info')['age'])
注意, 通过shelve或pickle序列化 类 和 函数 的时候 只是序列化他的名称,
如果需要在其他模块调用, 要么自己写一个同名的 函数 或 类, 要么导入之前的模块
 1 import xml.etree.ElementTree as xml  # 导入模块 设置别名 xml
 2
 3 tree = xml.parse("test.xml")  # 解析xml文档
 4 root = tree.getroot()  # 获取根对象
 5 print(root.tag)  # 打印根标签
 6
 7 # 遍历整个xml文档, 根据具体xml文档有所变化
 8 for child in root:
 9     print(child.tag, child.attrib)  # 打印第二层标签, 属性
10
11     for i in child:
12         print(i.tag, i.text, i.attrib)  # 打印第三层标签, 值, 属性
13
14 # 只遍历指定xml节点
15 for node in root.iter("year"):  # 全文搜索year标签的内容
16     print(node.tag, node.text, node.attrib)
17
18 # 修改xml内容
19 for node in root.iter("year"):
20     new_year = int(node.text) + 1
21     node.text = str(new_year)  # 修改值
22     node.set("updated", "yes")  # 加属性
23 tree.write("test2.xml")  # 将内存中新的xml数据写入文件
24
25 # 删除xml内容
26 for country in root.findall("country"):  # 找到当前层所有的country标签
27     print(country)
28     rank = int(country.find("rank").text)
29     if rank > 50: root.remove(country)  # 删除标签
30 tree.write("test3.xml", encoding="utf-8")
31
32 # 创建xml文档
33 new_xml = xml.Element("namelist")  # 生成一个根节点
34 name = xml.SubElement(new_xml, "name",
35                       attrib={"testenrolled": "asdfb"})  # 生成一个子节点, 第一个参数为子节点的父节点, 第二个参数是子节点的名称, 第三个参数是子节点的属性
36 age = xml.SubElement(name, "age", attrib={"checked": "no"})
37 sex = xml.SubElement(name, "sex")
38 sex.text = '33'  # 设置 sex 子节点的值
39 name2 = xml.SubElement(new_xml, "name", attrib={"enrolled": "no"})
40 age = xml.SubElement(name2, "age")
41 age.text = '19'  # 设置 age 子节点的值
42
43 et = xml.ElementTree(new_xml)  # 生成文档对象
44 et.write("namelist.xml", encoding="utf-8", xml_declaration=True)  # 将生成的xml对象写入文件, xml_declaration 为True会自动添加xml版本的头信息
45 xml.dump(new_xml)  # 打印生成的格式
 1 用configparser生成配置文件
 2 import configparser  # Python 2.7上 是Configparser
 3 config = configparser.ConfigParser()  # 获取配置对象
 4 config["DEFAULT"] = {'abc':45,'cdf': 'yes','coasdf': '0'}  # 为default添加配置属性
 5 config["bitbucket.org"] = {}  # 创建bitbucket.org配置块, 暂无配置属性
 6 config["bitbucket.org"]["asdf"] = "aweasdf"  # 为bitbucket.org配置块添加一条配置属性
 7
 8 config["server.com"] = {}  # 创建server.com配置块, 暂无配置属性
 9 server = config["server.com"]  # 获取server.com配置块字典
10 server["Host"] = "123"  # 通过字典形式添加属性
11 server["Port"] = "80"
12 with open("example.conf", 'w') as f:
13     config.write(f)  # 将配置写入文件
14
15 # 用configparser 解析配置文件
16 conf = configparser.ConfigParser()  # 获取配置对象
17 conf.read("example.conf")  # 打开配置文件
18 print(conf.sections())  # 看配置文件有几个配置块, DEFAULT不显示
19 default = conf["DEFAULT"]  # 获取default配置块字典
20 print(list(default.keys()), type(default))
21 # 增删改 就是字典的操作, 这里不再细说, 做了修改最后保存到文件中.
