感觉语音识别实现刷缓存有点不太现实,总不能在公司一天到晚的(开始发布,开始刷缓存,我要刷这个哪个。。。。)自言自语太傻了,准备做个类似QQ机器人的东西,识别群里
需求,根据提示,进行相应操作。。QQ机器人还在研究中,主要是基于webqq进行的。
首先把根据输入刷缓存的实现来一波。
实现这个,首先我研究了下selenium 实现人工操作点击类的操作,后来发现,开发太坑了,标签不用id,全是class,说是用的vue绑定变量,类似
总之,我实现自动编译失败了脚本总是不知道该点哪。
学习selenuim记录一波
参考地址: http://selenium-python.readthedocs.io/api.html#module-selenium.webdriver.common.action_chains
selenium API
导入selenium模块的webdriver来操作浏览器
from selenium import webdriver
可操作浏览器类型
webdriver.Firefox 火狐
webdriver.FirefoxProfile
webdriver.Chrome 谷歌
webdriver.ChromeOptions
webdriver.Ie ie
webdriver.Opera
webdriver.PhantomJS
webdriver.Remote
webdriver.DesiredCapabilities
webdriver.ActionChains
webdriver.TouchActions
webdriver.Proxy


方法:
driver.current_url(获取当前访问的url)
driver.close()(关闭当前窗口)

调用链
class selenium.webdriver.common.action_chains.ActionChains(driver):
actionchain是一种自动化低层次交互的方法,例如鼠标移动、鼠标按钮操作、按键和上下文菜单交互。这对于执行更复杂的操作是很有用的,比如悬停和拖放。
生成用户操作。
当您调用actionchain对象上的动作方法时,动作就会存储在actionchain对象的队列中。当您调用perform()时,事件会按照它们排队的顺序被触发。

链模式调用方法
menu = driver.find_element_by_css_selector(".nav")
hidden_submenu = driver.find_element_by_css_selector(".nav #submenu1")

ActionChains(driver).move_to_element(menu).click(hidden_submenu).perform()

相当于拆开后如下方式
menu = driver.find_element_by_css_selector(".nav")
hidden_submenu = driver.find_element_by_css_selector(".nav #submenu1")

actions = ActionChains(driver)
actions.move_to_element(menu)
actions.click(hidden_submenu)
actions.perform()

无论哪种方式,动作都是按照它们被调用的顺序执行的

selenium 事件操作
click(标签元素)单击事件
click_and_hold(标签元素)单击保持事件
context_click(on_element=None)上下文点击
double_click(标签元素)双击事件
drag_and_drop(source, target)拖放事件在源元件上按下鼠标左键,然后移动到目标元素并释放鼠标按钮
source 按下鼠标所在元素
target 放开鼠标所在元素


drag_and_drop_by_offset(source, xoffset, yoffset)拖动事件,固定坐标
source 按下鼠标所在元素
xoffset x坐标轴
yoffset y坐标轴

key_down(value, element=None)按下 Control, Alt and Shift 键的事件
    ctrl+c如此表示:
        ActionChains(driver).key_down(Keys.CONTROL).send_keys('c').key_up(Keys.CONTROL).perform()

key_up(value, element=None)Control, Alt and Shift放开键

move_by_offset(xoffset, yoffset)将鼠标移动到当前鼠标位置的偏移位置。

move_to_element(to_element)将鼠标移动到元素的中间触发

move_to_element_with_offset(to_element, xoffset, yoffset)鼠标偏移指定位置事件

pause(seconds) 多少秒内没有任何操作

perform()执行储存的操作

release(on_element=None)鼠标释放事件

release(on_element=None)清除指定储存的操作

send_keys(*keys_to_send) 发送键到指定焦点

send_keys_to_element(element, *keys_to_send) 向指定元素中键入


警告
class selenium.webdriver.common.alert.Alert(driver)
使用这个类与警告提示进行交互。它包含了从警告提示中排除、接受、输入和获取文本的方法
Alert(driver).accept() 接受警报提示
Alert(driver).dismiss() 解除警报提示

例:
name_prompt = Alert(driver)
name_prompt.send_keys(“Willian Shakesphere”)
name_prompt.accept()


authenticate(username, password) 发送用户名密码
    driver.switch_to.alert.authenticate(‘cheese’, ‘secretGouda’)

dismiss()解除警告

send_keys(keysToSend)发送按键到警告

text 获取警告的文本

特殊的键
自定义键的类
 class selenium.webdriver.common.keys.Keys

    ADD = u'ue025'

    ALT = u'ue00a'

    ARROW_DOWN = u'ue015'

    ARROW_LEFT = u'ue012'

    ARROW_RIGHT = u'ue014'

    ARROW_UP = u'ue013'

    BACKSPACE = u'ue003'

    BACK_SPACE = u'ue003'

    CANCEL = u'ue001'

    CLEAR = u'ue005'

    COMMAND = u'ue03d'

    CONTROL = u'ue009'

    DECIMAL = u'ue028'

    DELETE = u'ue017'

    DIVIDE = u'ue029'

    DOWN = u'ue015'

    END = u'ue010'

    ENTER = u'ue007'

    EQUALS = u'ue019'

    ESCAPE = u'ue00c'

    F1 = u'ue031'

    F10 = u'ue03a'

    F11 = u'ue03b'

    F12 = u'ue03c'

    F2 = u'ue032'

    F3 = u'ue033'

    F4 = u'ue034'

    F5 = u'ue035'

    F6 = u'ue036'

    F7 = u'ue037'

    F8 = u'ue038'

    F9 = u'ue039'

    HELP = u'ue002'

    HOME = u'ue011'

    INSERT = u'ue016'

    LEFT = u'ue012'

    LEFT_ALT = u'ue00a'

    LEFT_CONTROL = u'ue009'

    LEFT_SHIFT = u'ue008'

    META = u'ue03d'

    MULTIPLY = u'ue024'

    NULL = u'ue000'

    NUMPAD0 = u'ue01a'

    NUMPAD1 = u'ue01b'

    NUMPAD2 = u'ue01c'

    NUMPAD3 = u'ue01d'

    NUMPAD4 = u'ue01e'

    NUMPAD5 = u'ue01f'

    NUMPAD6 = u'ue020'

    NUMPAD7 = u'ue021'

    NUMPAD8 = u'ue022'

    NUMPAD9 = u'ue023'

    PAGE_DOWN = u'ue00f'

    PAGE_UP = u'ue00e'

    PAUSE = u'ue00b'

    RETURN = u'ue006'

    RIGHT = u'ue014'

    SEMICOLON = u'ue018'

    SEPARATOR = u'ue026'

    SHIFT = u'ue008'

    SPACE = u'ue00d'

    SUBTRACT = u'ue027'

    TAB = u'ue004'

    UP = u'ue013'


定位元素

drive = webdriver.Chrome()
drive.get("http://www.taobao.com")
drive.find_element_by_name
drive.find_element_by_id
drive.find_element_by_xpath
drive.find_element_by_link_text
drive.find_element_by_partial_link_text
drive.find_element_by_tag_name
drive.find_element_by_class_name
drive.find_element_by_css_selector

xpath实例
username = driver.find_element_by_xpath(".//input[@placeholder='用户名']").send_keys('cmp')
password = driver.find_element_by_xpath(".//input[@placeholder='密码']").send_keys('cmp-1234')
login = drive.find_elements_by_class_name('el-button el-button--primary').click()

代理
add_to_capabilities(capabilities) 在指定的功能中添加代理信息作为功能

auto_detect 返回自动检测设置
http_proxy 返回http代理设置
proxyType = {'ff_value': 6, 'string': 'UNSPECIFIED'}
proxy_autoconfig_url 返回代理自动配置url设置
好吧,还是刷缓存的平台友好啊,,用requests模块走一波。
首先登陆,post请求,url如图,添加请求头,请求url,拿缓存
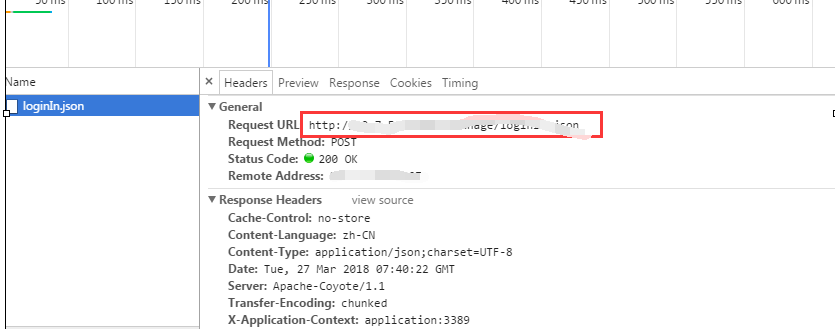
def get_cookie():
    r1 = requests.post(url='http://*****',
                       headers={
                            'User-Agent':'Mozilla/5.0 (Windows NT 6.1; WOW64) AppleWebKit/537.36 (KHTML, like Gecko) Chrome/55.0.2883.87 Safari/537.36',
                            'Host':'******:8027',
                            'Referer':'http://*****:8027/manage/login',
                           },
        data={
            'userName':'admin',
            'password':'admin',
            'isAdmin':True,        }
                       )
#    print(r1)
    return r1.cookies.get_dict()
#    print(r1.text)
登录搞定
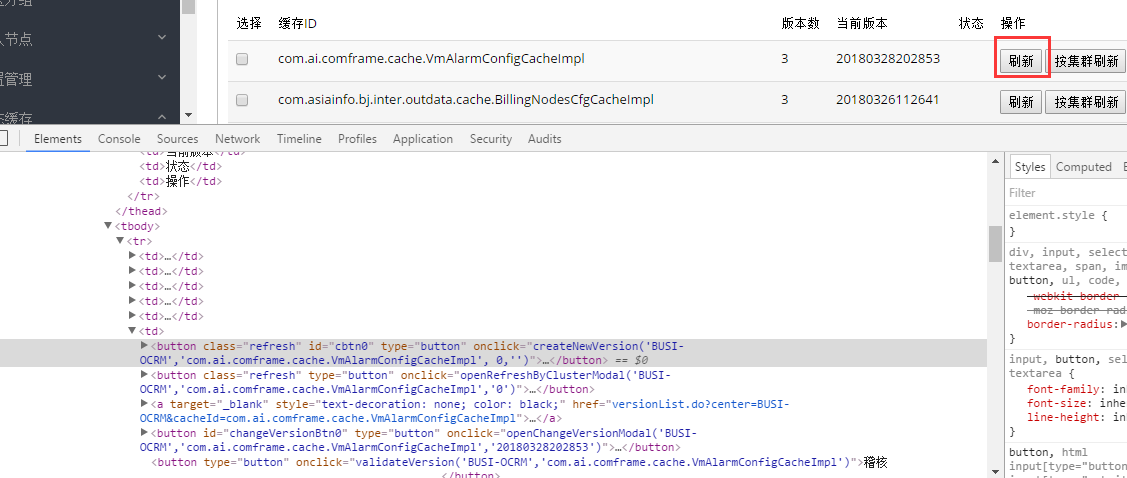
看上图,每个刷新的按钮,都可获取到每个缓存的中心,和缓存配置的code。拿到所有保存下来,不必每次都拿。。
def get_center_class(url_center,cook):
    for i in url_center:
        r2 = requests.get(url='http://***/manage/static/versionmgr.do?center=%s'%i,
                          cookies=cook,)
        soup = BeautifulSoup(r2.text,'html.parser')
        li = soup.find_all(class_='refresh')
        for line in li:
            try:
                ret= str(line).split(',',2)
                center = ret[0].rsplit("'",2)[-2]
                cache = ret[1].strip("'")
                if (center,cache) not in ret_list:
                    ret_list.append((center,cache))
            except:
                pass

    with open('save_center_class.txt','w') as w:
        json.dump(ret_list,w)
刷新缓存就是往http://***/manage/static/addVersion.json 这个地址发送包含中心和缓存code的post请求
def refresh_cache(ret_list,cook):
    print(cook)
    print('请输入要刷新缓存!')
    inp = input('>>>').strip()
    for i in ret_list:
        if inp in i[1]:
            req = requests.post(url='http://***/manage/static/addVersion.json',
                          cookies=cook,
                          data ={
                            'center':i[0],
                            'cacheId':i[1],
                            'clusterName':None,
                              },
                    headers={
                            'User-Agent':'Mozilla/5.0 (Windows NT 6.1; WOW64) AppleWebKit/537.36 (KHTML, like Gecko) Chrome/55.0.2883.87 Safari/537.36',
                            'Host':'10.7.5.48:8027',
                            'Referer':'http://bjenv:8027/manage/login',
                           },
)
            if i[0]  in req.text and i[1]  in req.text:
                print(i[0],i[1]+'刷新完成')
            else:
                print(i[0],i[1]+'刷新失败')
完整代码
import requests
from bs4 import BeautifulSoup
ret_list = []
import json

url_center = ['BUSI-IOT','CSF','INTER-UIP','BUSI-BROAD','BUSI-RULE','BUSI-ACCOUNT','BUSI-GSM','ORDER-COMMON','BUSI-SSO','BUSI-OCRM']
def get_cookie():
    r1 = requests.post(url='http://10.7.5.48:8027/manage/loginIn.json',
                       headers={
                            'User-Agent':'Mozilla/5.0 (Windows NT 6.1; WOW64) AppleWebKit/537.36 (KHTML, like Gecko) Chrome/55.0.2883.87 Safari/537.36',
                            'Host':'10.7.5.48:8027',
                            'Referer':'http://bjenv:8027/manage/login',
                           },
        data={
            'userName':'admin',
            'password':'admin',
            'isAdmin':True,        }
                       )
#    print(r1)
    return r1.cookies.get_dict()
#    print(r1.text)


def get_center_class(url_center,cook):
    for i in url_center:
        r2 = requests.get(url='http://10.7.5.48:8027/manage/static/versionmgr.do?center=%s'%i,
                          cookies=cook,)
        soup = BeautifulSoup(r2.text,'html.parser')
        li = soup.find_all(class_='refresh')
        for line in li:
            try:
                ret= str(line).split(',',2)
                center = ret[0].rsplit("'",2)[-2]
                cache = ret[1].strip("'")
                if (center,cache) not in ret_list:
                    ret_list.append((center,cache))
            except:
                pass

    with open('save_center_class.txt','w') as w:
        json.dump(ret_list,w)

def read_file():
    with open('save_center_class.txt','r') as f:
        ret_list = json.load(f)
    return ret_list

def refresh_cache(ret_list,cook):
    print(cook)
    print('请输入要刷新缓存!')
    inp = input('>>>').strip()
    for i in ret_list:
        if inp in i[1]:
            req = requests.post(url='http://10.7.5.48:8027/manage/static/addVersion.json',
                          cookies=cook,
                          data ={
                            'center':i[0],
                            'cacheId':i[1],
                            'clusterName':None,
                              },
                    headers={
                            'User-Agent':'Mozilla/5.0 (Windows NT 6.1; WOW64) AppleWebKit/537.36 (KHTML, like Gecko) Chrome/55.0.2883.87 Safari/537.36',
                            'Host':'10.7.5.48:8027',
                            'Referer':'http://bjenv:8027/manage/login',
                           },
)
            if i[0]  in req.text and i[1]  in req.text:
                print(i[0],i[1]+'刷新完成')
            else:
                print(i[0],i[1]+'刷新失败')

if __name__ == '__main__':

    cookie = get_cookie()
    #获取中心与类
    #get_center_class(url_center,cookie)
    ret_list = read_file()
    refresh_cache(ret_list,cookie)