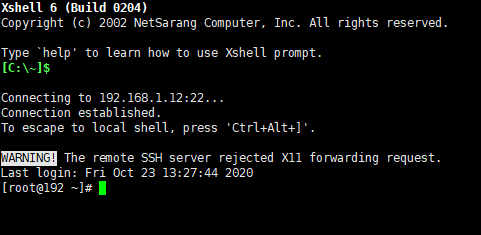
一、连接虚拟机
打开Xshell
点击文件——新建

点击连接


这个界面为连接成功
二、修改主机名
三台虚拟机都成功连接后
发现好像root@的名字都一样,修改一下以便区分
输入命令 hostname 查看当前hostname
一般都装了的
输入
rpm -qa|grep vim可以查看是否安装了Vim
没有安装vim就只能用vi编辑器
命令 yum -y install vim 下载
通过命令 hostnamectl set-hostname 主机名 修改
输入命令 hostnamectl set-hostname hadoop001
输入命令 hostname 查看
输入vi /etc/hostname 进入配置文件验证

按esc进入命令模式
输入 :q 退出
三、修改hosts
输入vi /etc/hosts
添加三台机器的ip
1 192.168.1.11 hadoop001
2 192.168.1.12 hadoop002
3 192.168.1.13 hadoop003
查看一下
1 [root@localhost ~]# cat /etc/hosts
2 127.0.0.1   localhost localhost.localdomain localhost4 localhost4.localdomain4
3 ::1         localhost localhost.localdomain localhost6 localhost6.localdomain6
4
5
6
7 192.168.1.11 hadoop001
8 192.168.1.12 hadoop002
9 192.168.1.13 hadoop003
然后发到其他两台机器
[root@hadoop001 ~]# scp /etc/hosts root@hadoop002:/etc/hosts
The authenticity of host 'hadoop002 (192.168.1.12)' can't be established.
ECDSA key fingerprint is SHA256:o0//3h59dXIGX0cEtvk4YUoDH1CFC3fxP7+ObHq7I7Y.
ECDSA key fingerprint is MD5:72:b1:af:ce:b1:4d:a4:94:de:a1:6f:27:4c:77:16:7a.
Are you sure you want to continue connecting (yes/no)? yes
Warning: Permanently added 'hadoop002' (ECDSA) to the list of known hosts.
hosts                                                                                                         100%  232    64.1KB/s   00:00
[root@hadoop001 ~]# scp /etc/hosts root@hadoop003:/etc/hosts
The authenticity of host 'hadoop003 (192.168.1.13)' can't be established.
ECDSA key fingerprint is SHA256:dEYenaLjBK1VO+MdHDfa34gvDVfvwYtL+3FuOJFTwvw.
ECDSA key fingerprint is MD5:48:69:70:a5:eb:b6:d2:f2:ac:17:4c:37:24:e1:3c:fb.
Are you sure you want to continue connecting (yes/no)? yes
Warning: Permanently added 'hadoop003' (ECDSA) to the list of known hosts.
hosts                                                                                                         100%  232   257.9KB/s   00:00
[root@hadoop001 ~]#
四、配置ssh
输入 ssh-keygen -t rsa 命令生成密钥,后面全部回车
 1 [root@localhost ~]# ssh-keygen -t rsa
 2 Generating public/private rsa key pair.
 3 Enter file in which to save the key (/root/.ssh/id_rsa):
 4 Enter passphrase (empty for no passphrase):
 5 Enter same passphrase again:
 6 Your identification has been saved in /root/.ssh/id_rsa.
 7 Your public key has been saved in /root/.ssh/id_rsa.pub.
 8 The key fingerprint is:
 9 SHA256:G+91KE1IQPL4IxqJpimX3va0LujewCWHGDKRWfbspXo root@hadoop001
10 The key's randomart image is:
11 +---[RSA 2048]----+
12 |.+o   ..o        |
13 |oo o   + .       |
14 |+   o o . .      |
15 |.+ + + . . .     |
16 |. = B . S . .    |
17 | = * o . = o .   |
18 |+ *.E . . o + .  |
19 |.o.=o. . . o .   |
20 | o+.o++   .      |
21 +----[SHA256]-----+
22 [root@localhost ~]#
23 [root@localhost ~]#
输入cat ~/.ssh/id_rsa.pub查看文件
1 [root@localhost ~]# cat ~/.ssh/id_rsa.pub
2 ssh-rsa AAAAB3NzaC1yc2EAAAADAQABAAABAQDV3WRMYEOfPCK/en/G9+mHUoVulUwTrcNwlwm04vXu0XWaSlk/jib7o1x+HAGdutsNYXNL8Cs7opmvVnUv31fkQHzEvDq8sqOEgGkvwNEdhhMTGNIxzgaUZwBJjZThsfGFgL0SV/nWwDqP2LEdmNcT1pL6mO65aPl4G/0ZgDH5OhwIelfWSHrQIWIPMEht1drmWxqA4TzRj8ubCU87qfvSXibz8CA9YUxB9dpcE8PLa9U1UBiZBNGr8xRnZOyJYWQlSl9J896mDFoPrJpoHgnb6X9PYZLH7Kivx+GUVQyi+mtB9apCuM5PaKaWtwgxFT3gW+AW54L4yM6Kf18uByR3 root@hadoop_a
3 [root@localhost ~]#
将密钥copy分发到其他机器
输入 ssh-copy-id root@hadoop_b 命令
中间要输入hadoop002的密码
 1 [root@localhost ~]# ssh-copy-id root@hadoop_b
 2 /usr/bin/ssh-copy-id: INFO: Source of key(s) to be installed: "/root/.ssh/id_rsa.pub"
 3 /usr/bin/ssh-copy-id: INFO: attempting to log in with the new key(s), to filter out any that are already installed
 4 /usr/bin/ssh-copy-id: INFO: 1 key(s) remain to be installed -- if you are prompted now it is to install the new keys
 5 root@hadoop002's password:
 6
 7 Number of key(s) added: 1
 8
 9 Now try logging into the machine, with:   "ssh 'root@hadoop_b'"
10 and check to make sure that only the key(s) you wanted were added.
11
12 [root@localhost ~]#
验证一下
1 [root@localhost ~]# ssh hadoop002
2 Last login: Fri Oct 23 13:41:13 2020 from 192.168.1.3
3 [root@hadoop002 ~]# exit
4 登出
5 Connection to hadoop002 closed.
6 [root@localhost ~]#
其他机器如上操作
 1 [root@localhost ~]# ssh-copy-id root@hadoop003
 2 /usr/bin/ssh-copy-id: INFO: Source of key(s) to be installed: "/root/.ssh/id_rsa.pub"
 3 /usr/bin/ssh-copy-id: INFO: attempting to log in with the new key(s), to filter out any that are already installed
 4 /usr/bin/ssh-copy-id: INFO: 1 key(s) remain to be installed -- if you are prompted now it is to install the new keys
 5 root@hadoop003's password:
 6
 7 Number of key(s) added: 1
 8
 9 Now try logging into the machine, with:   "ssh 'root@hadoop003'"
10 and check to make sure that only the key(s) you wanted were added.
11
12 [root@localhost ~]# ssh hadoop003
13 Last login: Fri Oct 23 13:42:01 2020 from 192.168.1.3
14 [root@hadoop003 ~]# exit
15 登出
16 Connection to hadoop003 closed.
详情可参考https://www.jianshu.com/p/1e793e386beb
输入reboot重启