1 Creating a Cluster
1.1 Using Minikube to Create a Cluster
Kubernetes Clusters
Kubernetes coordinates a highly available cluster of computers that are connected to work as a single unit. The abstractions in Kubernetes allow you to deploy containerized applications to a cluster without tying them specifically to individual machines. To make use of this new model of deployment, applications need to be packaged in a way that decouples them from individual hosts: they need to be containerized. Containerized applications are more flexible and available than in past deployment models, where applications were installed directly onto specific machines as packages deeply integrated into the host. Kubernetes automates the distribution and scheduling of application containers across a cluster in a more efficient way. Kubernetes is an open-source platform and is production-ready.
A Kubernetes cluster consists of two types of resources:
- The Master coordinates the cluster
- Nodes are the workers that run applications
Kubernetes is a production-grade, open-source platform that orchestrates the placement (scheduling) and execution of application containers within and across computer clusters.
Cluster Diagram
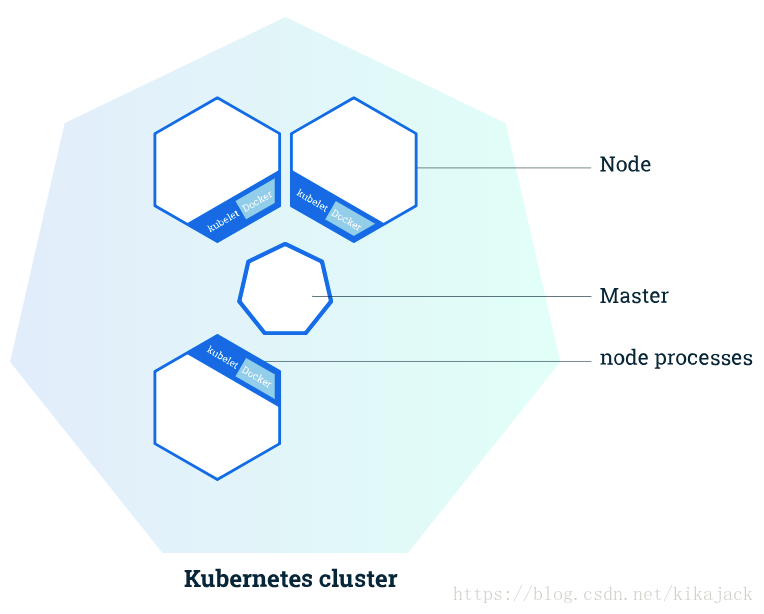
The Master is responsible for managing the cluster. The master coordinates all activities in your cluster, such as scheduling applications, maintaining applications’ desired state, scaling applications, and rolling out new updates.
A node is a VM or a physical computer that serves as a worker machine in a Kubernetes cluster. Each node has a Kubelet, which is an agent for managing the node and communicating with the Kubernetes master. The node should also have tools for handling container operations, such as Docker or rkt. A Kubernetes cluster that handles production traffic should have a minimum of three nodes.
Masters manage the cluster and the nodes are used to host the running applications.
When you deploy applications on Kubernetes, you tell the master to start the application containers. The master schedules the containers to run on the cluster’s nodes. The nodes communicate with the master using the Kubernetes API, which the master exposes. End users can also use the Kubernetes API directly to interact with the cluster.
A Kubernetes cluster can be deployed on either physical or virtual machines. To get started with Kubernetes development, you can use Minikube. Minikube is a lightweight Kubernetes implementation that creates a VM on your local machine and deploys a simple cluster containing only one node. Minikube is available for Linux, macOS, and Windows systems. The Minikube CLI provides basic bootstrapping operations for working with your cluster, including start, stop, status, and delete. For this tutorial, however, you’ll use a provided online terminal with Minikube pre-installed.
Now that you know what Kubernetes is, let’s go to the online tutorial and start our first cluster!
1.2 Interactive Tutorial
Step 1 Cluster up and running
We already installed minikube for you. Check that it is properly installed, by running the minikube version command:
minikube versionOK, we can see that minikube is in place.
Start the cluster, by running the minikube start command:
minikube startGreat! You now have a running Kubernetes cluster in your online terminal. Minikube started a virtual machine for you, and a Kubernetes cluster is now running in that VM.
Step 2 Cluster version
To interact with Kubernetes during this bootcamp we’ll use the command line interface, kubectl. We’ll explain kubectl in detail in the next modules, but for now, we’re just going to look at some cluster information. To check if kubectl is installed you can run the kubectl version command:
kubectl versionOK, kubectl is configured and we can see both the version of the client and as well as the server. The client version is the kubectl version; the server version is the Kubernetes version installed on the master. You can also see details about the build.
Step 3 Cluster details
Let’s view the cluster details. We’ll do that by running kubectl cluster-info:
kubectl cluster-infoWe have a running master and a dashboard. The Kubernetes dashboard allows you to view your applications in a UI. During this tutorial, we’ll be focusing on the command line for deploying and exploring our application. To view the nodes in the cluster, run the kubectl get nodes command:
kubectl get nodesThis command shows all nodes that can be used to host our applications. Now we have only one node, and we can see that it’s status is ready (it is ready to accept applications for deployment).
2 Deploying an App
2.1 Using kubectl to Create a Deployment
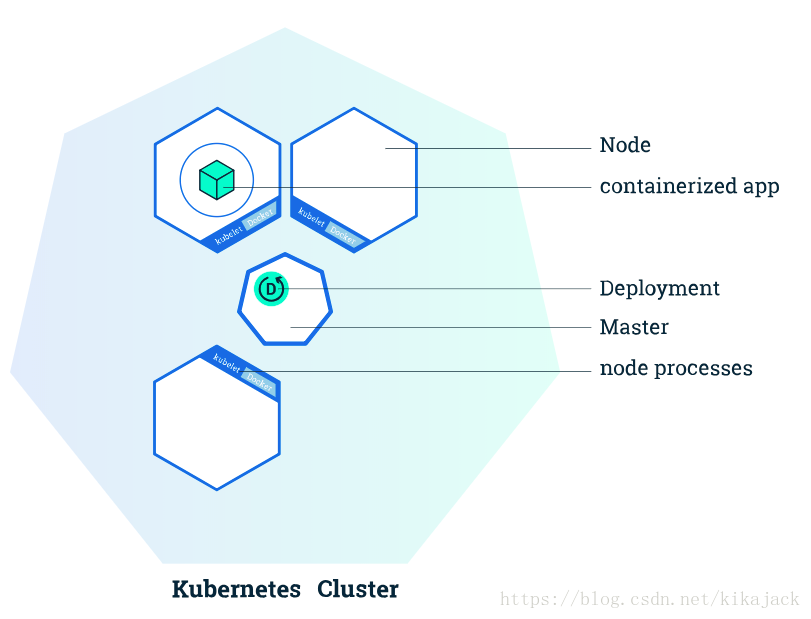
Kubernetes Deployments
Once you have a running Kubernetes cluster, you can deploy your containerized applications on top of it. To do so, you create a Kubernetes Deployment configuration. The Deployment instructs Kubernetes how to create and update instances of your application. Once you’ve created a Deployment, the Kubernetes master schedules mentioned application instances onto individual Nodes in the cluster.
Once the application instances are created, a Kubernetes Deployment Controller continuously monitors those instances. If the Node hosting an instance goes down or is deleted, the Deployment controller replaces it. This provides a self-healing mechanism to address machine failure or maintenance.
In a pre-orchestration world, installation scripts would often be used to start applications, but they did not allow recovery from machine failure. By both creating your application instances and keeping them running across Nodes, Kubernetes Deployments provide a fundamentally different approach to application management.
A Deployment is responsible for creating and updating instances of your application
Deploying your first app on Kubernetes
You can create and manage a Deployment by using the Kubernetes command line interface, Kubectl. Kubectl uses the Kubernetes API to interact with the cluster. In this module, you’ll learn the most common Kubectl commands needed to create Deployments that run your applications on a Kubernetes cluster.
When you create a Deployment, you’ll need to specify the container image for your application and the number of replicas that you want to run. You can change that information later by updating your Deployment; Modules 5 and 6 of the bootcamp discuss how you can scale and update your Deployments.
Applications need to be packaged into one of the supported container formats in order to be deployed on Kubernetes
For our first Deployment, we’ll use a Node.js application packaged in a Docker container. The source code and the Dockerfile are available in the GitHub repository for the Kubernetes Bootcamp.
Now that you know what Deployments are, let’s go to the online tutorial and deploy our first app!
2.2 Interactive Tutorial
Step 1 kubectl basics
Like minikube, kubectl comes installed in the online terminal. Type kubectl in the terminal to see its usage. The common format of a kubectl command is: kubectl action resource This performs the specified action (like create, describe) on the specified resource (like node, container). You can use –help after the command to get additional info about possible parameters (kubectl get nodes –help).
$ kubectl
kubectl controls the Kubernetes cluster manager.

Find more information at: https://kubernetes.io/docs/reference/kubectl/overview/

Basic Commands (Beginner):
  create         Create a resource from a file or from stdin.
  expose         Take a replication controller, service, deployment or pod and expose it as a new Kubernetes Service
  run            Run a particular image on the cluster
  set            Set specific features on objects
  run-container  Run a particular image on the cluster. This command is deprecated, use "run" instead

Basic Commands (Intermediate):
  get            Display one or many resources
  explain        Documentation of resources
  edit           Edit a resource on the server
  delete         Delete resources by filenames, stdin, resources and names, or by resources and label selector

Deploy Commands:
  rollout        Manage the rollout of a resource
  rolling-update Perform a rolling update of the given ReplicationController
  scale          Set a new size for a Deployment, ReplicaSet, Replication Controller, or Job
  autoscale      Auto-scale a Deployment, ReplicaSet, or ReplicationController

Cluster Management Commands:
  certificate    Modify certificate resources.
  cluster-info   Display cluster info
  top            Display Resource (CPU/Memory/Storage) usage.
  cordon         Mark node as unschedulable
  uncordon       Mark node as schedulable
  drain          Drain node in preparation for maintenance
  taint          Update the taints on one or more nodes

Troubleshooting and Debugging Commands:
  describe       Show details of a specific resource or group of resources
  logs           Print the logs for a container in a pod
  attach         Attach to a running container
  exec           Execute a command in a container
  port-forward   Forward one or more local ports to a pod
  proxy          Run a proxy to the Kubernetes API server
  cp             Copy files and directories to and from containers.
  auth           Inspect authorization

Advanced Commands:
  apply          Apply a configuration to a resource by filename or stdin
  patch          Update field(s) of a resource using strategic merge patch
  replace        Replace a resource by filename or stdin
  convert        Convert config files between different API versions

Settings Commands:
  label          Update the labels on a resource
  annotate       Update the annotations on a resource
  completion     Output shell completion code for the specified shell (bash or zsh)

Other Commands:
  api-versions   Print the supported API versions on the server, in the form of "group/version"
  config         Modify kubeconfig files
  help           Help about any command
  plugin         Runs a command-line plugin
  version        Print the client and server version information

Usage:
  kubectl [flags] [options]

Use "kubectl <command> --help" for more information about a given command.
Use "kubectl options" for a list of global command-line options (applies to all
commands).
Check that kubectl is configured to talk to your cluster, by running the kubectl version command:
kubectl versionOK, kubectl is installed and you can see both the client and the server versions.
To view the nodes in the cluster, run the kubectl get nodes command:
kubectl get nodesHere we see the available nodes (1 in our case). Kubernetes will choose where to deploy our application based on Node available resources.
Step 2 Deploy our app
Let’s run our first app on Kubernetes with the kubectl run command. The run command creates a new deployment. We need to provide the deployment name and app image location (include the full repository url for images hosted outside Docker hub). We want to run the app on a specific port so we add the –port parameter:
kubectl run kubernetes-bootcamp --image=gcr.io/google-samples/kubernetes-bootcamp:v1 --port=8080注意,这里因为 墙 的问题,需要替换镜像路径为 jocatalin/kubernetes-bootcamp,完整命令如下:
kubectl run kubernetes-bootcamp --image=jocatalin/kubernetes-bootcamp:v1 --port=8080如果需要删除所有通过 kubectl run 命令创建的 Deployment,可以运行下面命令:
kubectl delete deployments --allGreat! You just deployed your first application by creating a deployment. This performed a few things for you:
- searched for a suitable node where an instance of the application could be run (we have only 1 available node)
- scheduled the application to run on that Node
- configured the cluster to reschedule the instance on a new Node when needed
To list your deployments use the get deployments command:
kubectl get deploymentsWe see that there is 1 deployment running a single instance of your app. The instance is running inside a Docker container on your node.
Step 3 View our app
Pods that are running inside Kubernetes are running on a private, isolated network. By default they are visible from other pods and services within the same kubernetes cluster, but not outside that network. When we use kubectl, we’re interacting through an API endpoint to communicate with our application.
We will cover other options on how to expose your application outside the kubernetes cluster in Module 4.
The kubectl command can create a proxy that will forward communications into the cluster-wide, private network. The proxy can be terminated by pressing control-C and won’t show any output while its running.
We will open a second terminal window to run the proxy.
kubectl proxyWe now have a connection between our host (the online terminal) and the Kubernetes cluster. The proxy enables direct access to the API from these terminals.
You can see all those APIs hosted through the proxy endpoint, now available at through http://localhost:8001. For example, we can query the version directly through the API using the curl command:
curl http://localhost:8001/versionThe API server will automatically create an endpoint for each pod, based on the pod name, that is also accessible through the proxy.
First we need to get the Pod name, and we’ll store in the environment variable POD_NAME:
export POD_NAME=$(kubectl get pods -o go-template --template '{{range .items}}{{.metadata.name}}{{"
"}}{{end}}')
echo Name of the Pod: $POD_NAME
Now we can make an HTTP request to the application running in that pod:
curl http://localhost:8001/api/v1/namespaces/default/pods/$POD_NAME/proxy/The url is the route to the API of the Pod.
Note: Check the top of the terminal. The proxy was run in a new tab (Terminal 2), and the recent commands were executed the original tab (Terminal 1). The proxy still runs in the second tab, and this allowed our curl command to work using localhost:8001.
3 Explore Your App
3.1 Viewing Pods and Nodes
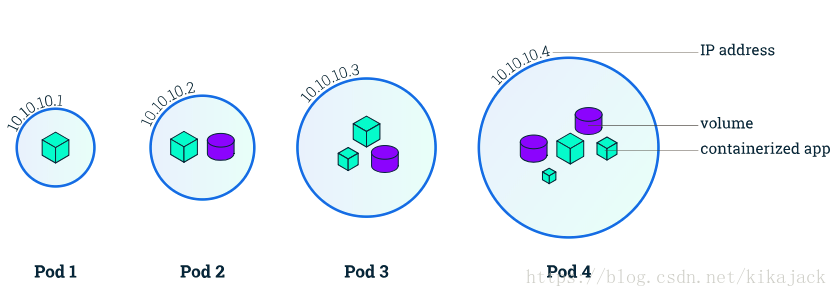
Kubernetes Pods
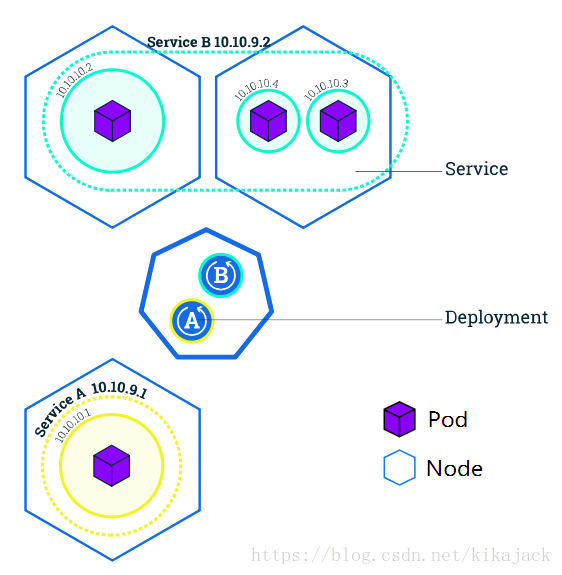
When you created a Deployment in Module 2, Kubernetes created a Pod to host your application instance. A Pod is a Kubernetes abstraction that represents a group of one or more application containers (such as Docker or rkt), and some shared resources for those containers. Those resources include:
- Shared storage, as Volumes
- Networking, as a unique cluster IP address
- Information about how to run each container, such as the container image version or specific ports to use
A Pod models an application-specific “logical host” and can contain different application containers which are relatively tightly coupled. For example, a Pod might include both the container with your Node.js app as well as a different container that feeds the data to be published by the Node.js webserver. The containers in a Pod share an IP Address and port space, are always co-located and co-scheduled, and run in a shared context on the same Node.
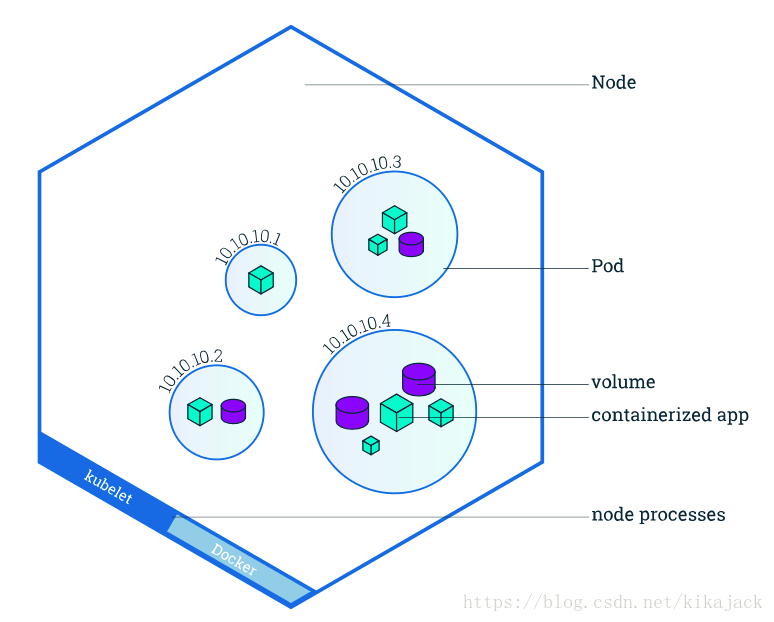
Pods are the atomic unit on the Kubernetes platform. When we create a Deployment on Kubernetes, that Deployment creates Pods with containers inside them (as opposed to creating containers directly). Each Pod is tied to the Node where it is scheduled, and remains there until termination (according to restart policy) or deletion. In case of a Node failure, identical Pods are scheduled on other available Nodes in the cluster.
A Pod is a group of one or more application containers (such as Docker or rkt) and includes shared storage (volumes), IP address and information about how to run them.
Pods overview
Nodes
A Pod always runs on a Node. A Node is a worker machine in Kubernetes and may be either a virtual or a physical machine, depending on the cluster. Each Node is managed by the Master. A Node can have multiple pods, and the Kubernetes master automatically handles scheduling the pods across the Nodes in the cluster. The Master’s automatic scheduling takes into account the available resources on each Node.
Every Kubernetes Node runs at least:
- Kubelet, a process responsible for communication between the Kubernetes Master and the Node; it manages the Pods and the containers running on a machine.
- A container runtime (like Docker, rkt) responsible for pulling the container image from a registry, unpacking the container, and running the application.
Containers should only be scheduled together in a single Pod if they are tightly coupled and need to share resources such as disk.
Node overview
Troubleshooting with kubectl
In Module 2, you used Kubectl command-line interface. You’ll continue to use it in Module 3 to get information about deployed applications and their environments. The most common operations can be done with the following kubectl commands:
- kubectl get - list resources
- kubectl describe - show detailed information about a resource
- kubectl logs - print the logs from a container in a pod
- kubectl exec - execute a command on a container in a pod
You can use these commands to see when applications were deployed, what their current statuses are, where they are running and what their configurations are.
Now that we know more about our cluster components and the command line, let’s explore our application.
A node is a worker machine in Kubernetes and may be a VM or physical machine, depending on the cluster. Multiple Pods can run on one Node.
3.2 Interactive Tutorial
Step 1 Check application configuration
Let’s verify that the application we deployed in the previous scenario is running. We’ll use the kubectl get command and look for existing Pods:
kubectl get podsIf no pods are running, list the Pods again.
Next, to view what containers are inside that Pod and what images are used to build those containers we run the describe pods command:
kubectl describe podsWe see here details about the Pod’s container: IP address, the ports used and a list of events related to the lifecycle of the Pod.
The output of the describe command is extensive and covers some concepts that we didn’t explain yet, but don’t worry, they will become familiar by the end of this bootcamp.
Note: the describe command can be used to get detailed information about most of the kubernetes primitives: node, pods, deployments. The describe output is designed to be human readable, not to be scripted against.
Step 2 Show the app in the terminal
Recall that Pods are running in an isolated, private network - so we need to proxy access to them so we can debug and interact with them. To do this, we’ll use the kubectl proxy command to run a proxy in a second terminal window. Click on the command below to automatically open a new terminal and run the proxy:
kubectl proxyNow again, we’ll get the Pod name and query that pod directly through the proxy. To get the Pod name and store it in the POD_NAME environment variable:
export POD_NAME=$(kubectl get pods -o go-template --template '{{range .items}}{{.metadata.name}}{{"
"}}{{end}}')
echo Name of the Pod: $POD_NAME
To see the output of our application, run a curl request.
curl http://localhost:8001/api/v1/proxy/namespaces/default/pods/$POD_NAME/The url is the route to the API of the Pod.
Step 3 View the container logs
Anything that the application would normally send to STDOUT becomes logs for the container within the Pod. We can retrieve these logs using the kubectl logs command:
kubectl logs $POD_NAMENote: We don’t need to specify the container name, because we only have one container inside the pod.
Step 4 Executing command on the container
We can execute commands directly on the container once the Pod is up and running. For this, we use the exec command and use the name of the Pod as a parameter. Let’s list the environment variables:
kubectl exec $POD_NAME envAgain, worth mentioning that the name of the container itself can be omitted since we only have a single container in the Pod.
Next let’s start a bash session in the Pod’s container:
kubectl exec -ti $POD_NAME bashWe have now an open console on the container where we run our NodeJS application. The source code of the app is in the server.js file:
cat server.jsYou can check that the application is up by running a curl command:
curl localhost:8080Note: here we used localhost because we executed the command inside the NodeJS container
To close your container connection type exit.
4 Expose Your App Publicly
4.1 Using a Service to Expose Your App
Overview of Kubernetes Services
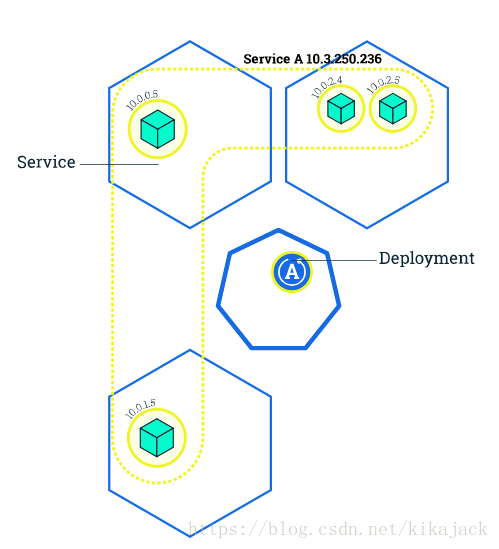
Kubernetes Pods are mortal. Pods in fact have a lifecycle. When a worker node dies, the Pods running on the Node are also lost. A ReplicationController might then dynamically drive the cluster back to desired state via creation of new Pods to keep your application running. As another example, consider an image-processing backend with 3 replicas. Those replicas are fungible; the front-end system should not care about backend replicas or even if a Pod is lost and recreated. That said, each Pod in a Kubernetes cluster has a unique IP address, even Pods on the same Node, so there needs to be a way of automatically reconciling changes among Pods so that your applications continue to function.
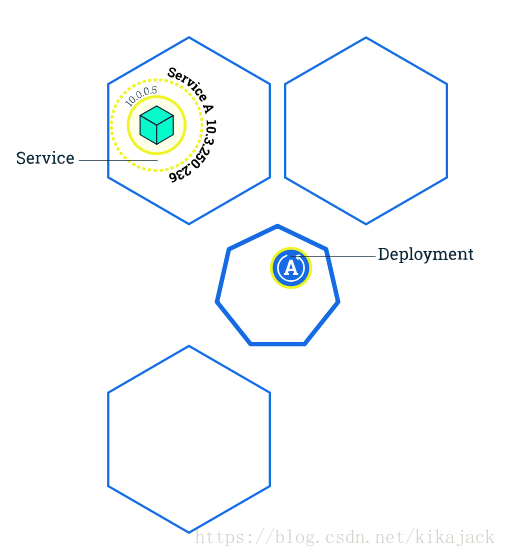
A Service in Kubernetes is an abstraction which defines a logical set of Pods and a policy by which to access them. Services enable a loose coupling between dependent Pods. A Service is defined using YAML (preferred) or JSON, like all Kubernetes objects. The set of Pods targeted by a Service is usually determined by a LabelSelector (see below for why you might want a Service without including selector in the spec).
Although each Pod has a unique IP address, those IPs are not exposed outside the cluster without a Service. Services allow your applications to receive traffic. Services can be exposed in different ways by specifying a type in the ServiceSpec:
- ClusterIP (default) - Exposes the Service on an internal IP in the cluster. This type makes the Service only reachable from within the cluster.
- NodePort - Exposes the Service on the same port of each selected Node in the cluster using NAT. Makes a Service accessible from outside the cluster using
<NodeIP>:<NodePort>. Superset of ClusterIP. - LoadBalancer - Creates an external load balancer in the current cloud (if supported) and assigns a fixed, external IP to the Service. Superset of NodePort.
- ExternalName - Exposes the Service using an arbitrary name (specified by externalName in the spec) by returning a CNAME record with the name. No proxy is used. This type requires v1.7 or higher of kube-dns.
More information about the different types of Services can be found in the Using Source IP tutorial. Also see Connecting Applications with Services.
Additionally, note that there are some use cases with Services that involve not defining selector in the spec. A Service created without selector will also not create the corresponding Endpoints object. This allows users to manually map a Service to specific endpoints. Another possibility why there may be no selector is you are strictly using type: ExternalName.
A Kubernetes Service is an abstraction layer which defines a logical set of Pods and enables external traffic exposure, load balancing and service discovery for those Pods.
Services and Labels
A Service routes traffic across a set of Pods. Services are the abstraction that allow pods to die and replicate in Kubernetes without impacting your application. Discovery and routing among dependent Pods (such as the frontend and backend components in an application) is handled by Kubernetes Services.
Services match a set of Pods using labels and selectors, a grouping primitive that allows logical operation on objects in Kubernetes. Labels are key/value pairs attached to objects and can be used in any number of ways:
- Designate objects for development, test, and production
- Embed version tags
- Classify an object using tags

You can create a Service at the same time you create a Deployment by using
--exposein kubectl.
Labels can be attached to objects at creation time or later on. They can be modified at any time. Let’s expose our application now using a Service and apply some labels.
4.2 Interactive Tutorial
Step 1 Create a new service
Let’s verify that our application is running. We’ll use the kubectl get command and look for existing Pods:
kubectl get podsNext let’s list the current Services from our cluster:
kubectl get services
NAME                  TYPE        CLUSTER-IP       EXTERNAL-IP   PORT(S)          AGE
kubernetes            ClusterIP   10.96.0.1        <none>        443/TCP          3m
We have a Service called kubernetes that is created by default when minikube starts the cluster. To create a new service and expose it to external traffic we’ll use the expose command with NodePort as parameter (minikube does not support the LoadBalancer option yet)
kubectl expose deployment/kubernetes-bootcamp --type="NodePort" --port 8080Let’s run again the get services command:
kubectl get services
NAME                  TYPE        CLUSTER-IP       EXTERNAL-IP   PORT(S)          AGE
kubernetes            ClusterIP   10.96.0.1        <none>        443/TCP          3m
kubernetes-bootcamp   NodePort    10.105.185.171   <none>        8080:32327/TCP   9s
We have now a running Service called kubernetes-bootcamp. Here we see that the Service received a unique cluster-IP, an internal port and an external-IP (the IP of the Node).
To find out what port was opened externally (by the NodePort option) we’ll run the describe service command:
kubectl describe services/kubernetes-bootcampCreate an environment variable called NODE_PORT that has the value of the Node port assigned:
export NODE_PORT=$(kubectl get services/kubernetes-bootcamp -o go-template='{{(index .spec.ports 0).nodePort}}')
echo NODE_PORT=$NODE_PORT
Now we can test that the app is exposed outside of the cluster using curl, the IP of the Node and the externally exposed port:
curl $(minikube ip):$NODE_PORTAnd we get a response from the server. The Service is exposed.
Step 2: Using labels
The Deployment created automatically a label for our Pod. With describe deployment command you can see the name of the label:
# kubectl describe deployment
Name:                   kubernetes-bootcamp
Namespace:              default
CreationTimestamp:      Mon, 09 Apr 2018 07:26:15 +0000
Labels:                 run=kubernetes-bootcamp
Annotations:            deployment.kubernetes.io/revision=1
Selector:               run=kubernetes-bootcamp
Replicas:               1 desired | 1 updated | 1 total | 1 available | 0 unavailable
StrategyType:           RollingUpdate
MinReadySeconds:        0
RollingUpdateStrategy:  1 max unavailable, 1 max surge
Pod Template:
  Labels:  run=kubernetes-bootcamp
  Containers:
   kubernetes-bootcamp:
    Image:        gcr.io/google-samples/kubernetes-bootcamp:v1
    Port:         8080/TCP
    Environment:  <none>
    Mounts:       <none>
  Volumes:        <none>
Conditions:
  Type           Status  Reason
  ----           ------  ------
  Available      True    MinimumReplicasAvailable
OldReplicaSets:  <none>
NewReplicaSet:   kubernetes-bootcamp-5dbf48f7d4 (1/1 replicas created)
Events:
  Type    Reason             Age   From                   Message
  ----    ------             ----  ----                   -------
  Normal  ScalingReplicaSet  32m   deployment-controller  Scaled up replica set kubernetes-bootcamp-5dbf48f7d4 to 1
Let’s use this label to query our list of Pods. We’ll use the kubectl get pods command with -l as a parameter, followed by the label values:
# kubectl get pods -l run=kubernetes-bootcamp
NAME                                   READY     STATUS    RESTARTS   AGE
kubernetes-bootcamp-5dbf48f7d4-c8jwv   1/1       Running   0          35m
You can do the same to list the existing services:
# kubectl get services -l run=kubernetes-bootcamp
NAME                  TYPE       CLUSTER-IP       EXTERNAL-IP   PORT(S)          AGE
kubernetes-bootcamp   NodePort   10.105.185.171   <none>        8080:32327/TCP   32m
Get the name of the Pod and store it in the POD_NAME environment variable:
export POD_NAME=$(kubectl get pods -o go-template --template '{{range .items}}{{.metadata.name}}{{"
"}}{{end}}')
echo Name of the Pod: $POD_NAME
To apply a new label we use the label command followed by the object type, object name and the new label:
kubectl label pod $POD_NAME app=v1This will apply a new label to our Pod (we pinned the application version to the Pod), and we can check it with the describe pod command:
kubectl describe pods $POD_NAMEWe see here that the label is attached now to our Pod. And we can query now the list of pods using the new label:
kubectl get pods -l app=v1And we see the Pod.
Step 3 Deleting a service
To delete Services you can use the delete service command. Labels can be used also here:
kubectl delete service -l run=kubernetes-bootcampConfirm that the service is gone:
kubectl get servicesThis confirms that our Service was removed. To confirm that route is not exposed anymore you can curl the previously exposed IP and port:
curl $(minikube ip):$NODE_PORTThis proves that the app is not reachable anymore from outside of the cluster. You can confirm that the app is still running with a curl inside the pod:
kubectl exec -ti $POD_NAME curl localhost:8080We see here that the application is up.
5 Scale Your App
5.1 Running Multiple Instances of Your App
Scaling an application
In the previous modules we created a Deployment, and then exposed it publicly via a Service. The Deployment created only one Pod for running our application. When traffic increases, we will need to scale the application to keep up with user demand.
Scaling is accomplished by changing the number of replicas in a Deployment
You can create from the start a Deployment with multiple instances using the –replicas parameter for the kubectl run command
Scaling overview
Scaling is accomplished by changing the number of replicas in a Deployment.
Scaling out a Deployment will ensure new Pods are created and scheduled to Nodes with available resources. Scaling in will reduce the number of Pods to the new desired state. Kubernetes also supports autoscaling of Pods, but it is outside of the scope of this tutorial. Scaling to zero is also possible, and it will terminate all Pods of the specified Deployment.
Running multiple instances of an application will require a way to distribute the traffic to all of them. Services have an integrated load-balancer that will distribute network traffic to all Pods of an exposed Deployment. Services will monitor continuously the running Pods using endpoints, to ensure the traffic is sent only to available Pods.
Scaling is accomplished by changing the number of replicas in a Deployment.
Once you have multiple instances of an Application running, you would be able to do Rolling updates without downtime. We’ll cover that in the next module. Now, let’s go to the online terminal and scale our application.
5.2 Interactive Tutorial
Step 1: Scaling a deployment
$ kubectl get pods -o wide
NAME                                   READY     STATUS    RESTARTS   AGE       IP         NODE
kubernetes-bootcamp-5c69669756-56z44   1/1       Running   0          11s       172.18.0.2   minikube
To list your deployments use the get deployments command:
$ kubectl get deployments
NAME                  DESIRED   CURRENT   UP-TO-DATE   AVAILABLE   AGE
kubernetes-bootcamp   1         1         1            1           2m
We should have 1 Pod. If not, run the command again. This shows:
The DESIRED state is showing the configured number of replicas
The CURRENT state show how many replicas are running now
The UP-TO-DATE is the number of replicas that were updated to match the desired (configured) state
The AVAILABLE state shows how many replicas are actually AVAILABLE to the users
Next, let’s scale the Deployment to 4 replicas. We’ll use the kubectl scale command, followed by the deployment type, name and desired number of instances:
$ kubectl scale deployments/kubernetes-bootcamp --replicas=4
deployment.extensions "kubernetes-bootcamp" scaled
To list your Deployments once again, use get deployments:
$ kubectl get deployments
NAME                  DESIRED   CURRENT   UP-TO-DATE   AVAILABLE   AGE
kubernetes-bootcamp   4         4         4            4           4m
The change was applied, and we have 4 instances of the application available. Next, let’s check if the number of Pods changed:
$ kubectl get pods -o wide
NAME                                   READY     STATUS    RESTARTS   AGE       IP         NODE
kubernetes-bootcamp-5c69669756-4xrp6   1/1       Running   0          57s       172.18.0.6   minikube
kubernetes-bootcamp-5c69669756-56z44   1/1       Running   0          5m        172.18.0.2   minikube
kubernetes-bootcamp-5c69669756-8lccx   1/1       Running   0          57s       172.18.0.7   minikube
kubernetes-bootcamp-5c69669756-z97gr   1/1       Running   0          57s       172.18.0.5   minikube
There are 4 Pods now, with different IP addresses. The change was registered in the Deployment events log. To check that, use the describe command:
$ kubectl describe deployments/kubernetes-bootcamp
Name:                   kubernetes-bootcamp
Namespace:              default
CreationTimestamp:      Thu, 03 May 2018 13:21:05 +0000
Labels:                 run=kubernetes-bootcamp
Annotations:            deployment.kubernetes.io/revision=1
Selector:               run=kubernetes-bootcamp
Replicas:               4 desired | 4 updated | 4 total | 4 available | 0 unavailable
StrategyType:           RollingUpdate
MinReadySeconds:        0
RollingUpdateStrategy:  1 max unavailable, 1 max surge
Pod Template:
  Labels:  run=kubernetes-bootcamp
  Containers:
   kubernetes-bootcamp:
    Image:        gcr.io/google-samples/kubernetes-bootcamp:v1
    Port:         8080/TCP
    Host Port:    0/TCP
    Environment:  <none>
    Mounts:       <none>
  Volumes:        <none>
Conditions:
  Type           Status  Reason
  ----           ------  ------
  Progressing    True    NewReplicaSetAvailable
  Available      True    MinimumReplicasAvailable
OldReplicaSets:  <none>
NewReplicaSet:   kubernetes-bootcamp-5c69669756 (4/4 replicas created)
Events:
  Type    Reason             Age   From                   Message
  ----    ------             ----  ----                   -------
  Normal  ScalingReplicaSet  6m    deployment-controller  Scaled up replica set kubernetes-bootcamp-5c69669756 to 1
  Normal  ScalingReplicaSet  2m    deployment-controller  Scaled up replica set kubernetes-bootcamp-5c69669756 to 4
You can also view in the output of this command that there are 4 replicas now.
Step 2: Load Balancing
Let’s check that the Service is load-balancing the traffic. To find out the exposed IP and Port we can use the describe service as we learned in the previously Module:
kubectl describe services/kubernetes-bootcampCreate an environment variable called NODE_PORT that has a value as the Node port:
$ export NODE_PORT=$(kubectl get services/kubernetes-bootcamp -o go-template='{{(index .spec.ports 0).nodePort}}')
$ echo NODE_PORT=$NODE_PORT
NODE_PORT=30999
Next, we’ll do a curl to the exposed IP and port. Execute the command multiple times:
$ curl $(minikube ip):$NODE_PORT
Hello Kubernetes bootcamp! | Running on: kubernetes-bootcamp-5c69669756-j58hc | v=1
We hit a different Pod with every request. This demonstrates that the load-balancing is working.
Step 3: Scale Down
To scale down the Service to 2 replicas, run again the scale command:
$ kubectl scale deployment/kubernetes-bootcamp --replicas=2
deployment.extensions "kubernetes-bootcamp" scaled
List the Deployments to check if the change was applied with the get deployments command:
$ kubectl get deployments
NAME                  DESIRED   CURRENT   UP-TO-DATE   AVAILABLE   AGE
kubernetes-bootcamp   2         2         2            2           2m
The number of replicas decreased to 2. List the number of Pods, with get pods:
$ kubectl get pods -o wide
NAME                                   READY     STATUS        RESTARTS   AGEIP           NODE
kubernetes-bootcamp-5c69669756-dmbj8   1/1       Terminating   0          2m172.18.0.5   minikube
kubernetes-bootcamp-5c69669756-j58hc   1/1       Terminating   0          2m172.18.0.2   minikube
kubernetes-bootcamp-5c69669756-mvj7v   1/1       Running       0          2m172.18.0.3   minikube
kubernetes-bootcamp-5c69669756-n47zs   1/1       Running       0          2m172.18.0.4   minikube
This confirms that 2 Pods were terminated.
6 Update Your App
6.1 Performing a Rolling Update
Updating an application
Users expect applications to be available all the time and developers are expected to deploy new versions of them several times a day. In Kubernetes this is done with rolling updates. Rolling updates allow Deployments’ update to take place with zero downtime by incrementally updating Pods instances with new ones. The new Pods will be scheduled on Nodes with available resources.
In the previous module we scaled our application to run multiple instances. This is a requirement for performing updates without affecting application availability. By default, the maximum number of Pods that can be unavailable during the update and the maximum number of new Pods that can be created, is one. Both options can be configured to either numbers or percentages (of Pods). In Kubernetes, updates are versioned and any Deployment update can be reverted to previous (stable) version.
Rolling updates allow Deployments’ update to take place with zero downtime by incrementally updating Pods instances with new ones.
Rolling updates overview
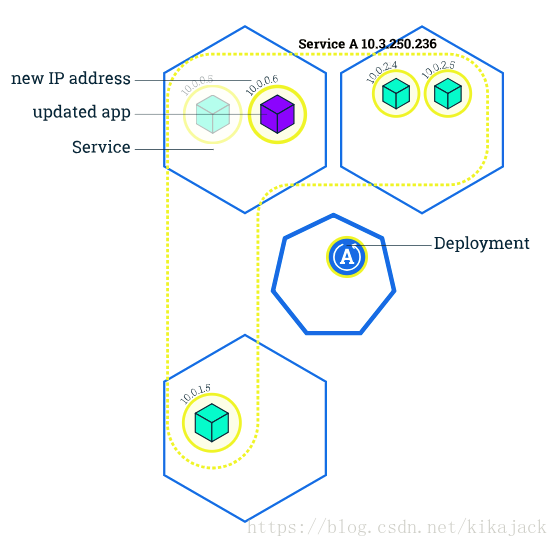
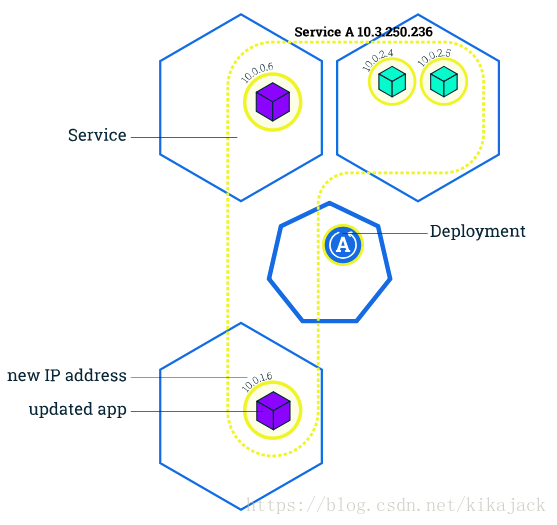
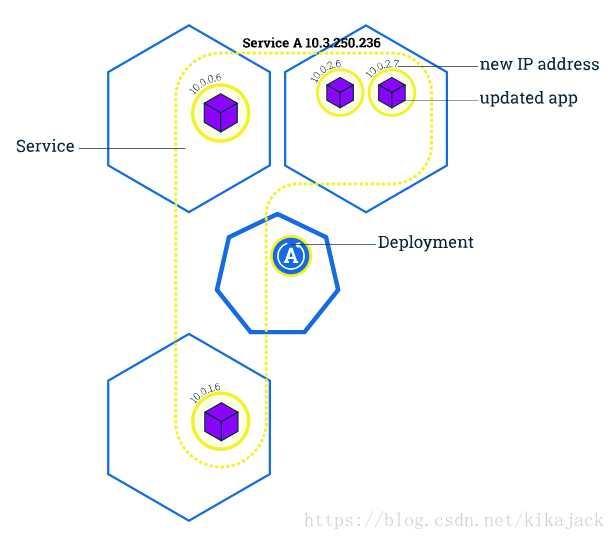
Similar to application Scaling, if a Deployment is exposed publicly, the Service will load-balance the traffic only to available Pods during the update. An available Pod is an instance that is available to the users of the application.
Rolling updates allow the following actions:
- Promote an application from one environment to another (via container image updates)
- Rollback to previous versions
- Continuous Integration and Continuous Delivery of applications with zero downtime
If a Deployment is exposed publicly, the Service will load-balance the traffic only to available Pods during the update.
In the following interactive tutorial, we’ll update our application to a new version, and also perform a rollback.
6.2 Interactive Tutorial
Step 1: Update the version of the app
To list your deployments use the get deployments command:
$ kubectl get deployments
NAME                  DESIRED   CURRENT   UP-TO-DATE   AVAILABLE   AGE
kubernetes-bootcamp   4         4         4            4           16s
To list the running Pods use the get pods command:
$ kubectl get pods
NAME                                   READY     STATUS    RESTARTS   AGE
kubernetes-bootcamp-5c69669756-2qclp   1/1       Running   0          35s
kubernetes-bootcamp-5c69669756-btznb   1/1       Running   0          35s
kubernetes-bootcamp-5c69669756-dfjzr   1/1       Running   0          35s
kubernetes-bootcamp-5c69669756-kl225   1/1       Running   0          35s
To view the current image version of the app, run a describe command against the Pods (look at the Image field):
$ kubectl describe pods
Name:           kubernetes-bootcamp-5c69669756-2qclp
Namespace:      default
Node:           minikube/172.17.0.33
Start Time:     Thu, 03 May 2018 14:39:49 +0000
Labels:         pod-template-hash=1725225312
                run=kubernetes-bootcamp
Annotations:    <none>
Status:         Running
IP:             172.18.0.2
Controlled By:  ReplicaSet/kubernetes-bootcamp-5c69669756
Containers:
  kubernetes-bootcamp:
    Container ID:   docker://bd2acdb49f2d9a2e9f796065372425562818156e8f121c69b11c29c260f2f106
    Image:          gcr.io/google-samples/kubernetes-bootcamp:v1
    Image ID:       docker-pullable://gcr.io/google-samples/kubernetes-bootcamp@sha256:0d6b8ee63bb57c5f5b6156f446b3bc3b3c143d233037f3a2f00e279c8fcc64af
    Port:           8080/TCP
    Host Port:      0/TCP
    State:          Running
      Started:      Thu, 03 May 2018 14:39:51 +0000
    Ready:          True
    Restart Count:  0
    Environment:    <none>
    Mounts:
      /var/run/secrets/kubernetes.io/serviceaccount from default-token-86srb (ro)
Conditions:
  Type           Status
  Initialized    True
  Ready          True
  PodScheduled   True
Volumes:
  default-token-86srb:
    Type:        Secret (a volume populated by a Secret)
    SecretName:  default-token-86srb
    Optional:    false
QoS Class:       BestEffort
Node-Selectors:  <none>
Tolerations:     node.kubernetes.io/not-ready:NoExecute for 300s
                 node.kubernetes.io/unreachable:NoExecute for 300s
Events:
  Type     Reason                 Age              From               Message
  ----     ------                 ----             ----               -------
  Warning  FailedScheduling       1m (x2 over 1m)  default-scheduler  0/1 nodes areavailable: 1 node(s) were not ready.
  Normal   Scheduled              1m               default-scheduler  Successfully assigned kubernetes-bootcamp-5c69669756-2qclp to minikube
  Normal   SuccessfulMountVolume  1m               kubelet, minikube  MountVolume.SetUp succeeded for volume "default-token-86srb"
  Normal   Pulled                 1m               kubelet, minikube  Container image "gcr.io/google-samples/kubernetes-bootcamp:v1" already present on machine
  Normal   Created                1m               kubelet, minikube  Created container
  Normal   Started                1m               kubelet, minikube  Started container


Name:           kubernetes-bootcamp-5c69669756-btznb
Namespace:      default
Node:           minikube/172.17.0.33
Start Time:     Thu, 03 May 2018 14:39:49 +0000
Labels:         pod-template-hash=1725225312
                run=kubernetes-bootcamp
Annotations:    <none>
Status:         Running
IP:             172.18.0.3
Controlled By:  ReplicaSet/kubernetes-bootcamp-5c69669756
Containers:
  kubernetes-bootcamp:
    Container ID:   docker://40dfdafb48176b77efaa6eaf3c8ed256feffd15e60743d4da51419eb3d5c9a33
    Image:          gcr.io/google-samples/kubernetes-bootcamp:v1
    Image ID:       docker-pullable://gcr.io/google-samples/kubernetes-bootcamp@sha256:0d6b8ee63bb57c5f5b6156f446b3bc3b3c143d233037f3a2f00e279c8fcc64af
    Port:           8080/TCP
    Host Port:      0/TCP
    State:          Running
      Started:      Thu, 03 May 2018 14:39:52 +0000
    Ready:          True
    Restart Count:  0
    Environment:    <none>
    Mounts:
      /var/run/secrets/kubernetes.io/serviceaccount from default-token-86srb (ro)
Conditions:
  Type           Status
  Initialized    True
  Ready          True
  PodScheduled   True
Volumes:
  default-token-86srb:
    Type:        Secret (a volume populated by a Secret)
    SecretName:  default-token-86srb
    Optional:    false
QoS Class:       BestEffort
Node-Selectors:  <none>
Tolerations:     node.kubernetes.io/not-ready:NoExecute for 300s
                 node.kubernetes.io/unreachable:NoExecute for 300s
Events:
  Type     Reason                 Age              From               Message
  ----     ------                 ----             ----               -------
  Warning  FailedScheduling       1m (x3 over 1m)  default-scheduler  0/1 nodes areavailable: 1 node(s) were not ready.
  Normal   Scheduled              1m               default-scheduler  Successfully assigned kubernetes-bootcamp-5c69669756-btznb to minikube
  Normal   SuccessfulMountVolume  1m               kubelet, minikube  MountVolume.SetUp succeeded for volume "default-token-86srb"
  Normal   Pulled                 1m               kubelet, minikube  Container image "gcr.io/google-samples/kubernetes-bootcamp:v1" already present on machine
  Normal   Created                1m               kubelet, minikube  Created container
  Normal   Started                1m               kubelet, minikube  Started container


Name:           kubernetes-bootcamp-5c69669756-dfjzr
Namespace:      default
Node:           minikube/172.17.0.33
Start Time:     Thu, 03 May 2018 14:39:50 +0000
Labels:         pod-template-hash=1725225312
                run=kubernetes-bootcamp
Annotations:    <none>
Status:         Running
IP:             172.18.0.5
Controlled By:  ReplicaSet/kubernetes-bootcamp-5c69669756
Containers:
  kubernetes-bootcamp:
    Container ID:   docker://822193c72cdd69142f355c1e514b9a63246c9b29b34e8c3424d74e422dbc2461
    Image:          gcr.io/google-samples/kubernetes-bootcamp:v1
    Image ID:       docker-pullable://gcr.io/google-samples/kubernetes-bootcamp@sha256:0d6b8ee63bb57c5f5b6156f446b3bc3b3c143d233037f3a2f00e279c8fcc64af
    Port:           8080/TCP
    Host Port:      0/TCP
    State:          Running
      Started:      Thu, 03 May 2018 14:39:52 +0000
    Ready:          True
    Restart Count:  0
    Environment:    <none>
    Mounts:
      /var/run/secrets/kubernetes.io/serviceaccount from default-token-86srb (ro)
Conditions:
  Type           Status
  Initialized    True
  Ready          True
  PodScheduled   True
Volumes:
  default-token-86srb:
    Type:        Secret (a volume populated by a Secret)
    SecretName:  default-token-86srb
    Optional:    false
QoS Class:       BestEffort
Node-Selectors:  <none>
Tolerations:     node.kubernetes.io/not-ready:NoExecute for 300s
                 node.kubernetes.io/unreachable:NoExecute for 300s
Events:
  Type     Reason                 Age              From               Message
  ----     ------                 ----             ----               -------
  Warning  FailedScheduling       1m (x3 over 1m)  default-scheduler  0/1 nodes areavailable: 1 node(s) were not ready.
  Normal   Scheduled              1m               default-scheduler  Successfully assigned kubernetes-bootcamp-5c69669756-dfjzr to minikube
  Normal   SuccessfulMountVolume  1m               kubelet, minikube  MountVolume.SetUp succeeded for volume "default-token-86srb"
  Normal   Pulled                 1m               kubelet, minikube  Container image "gcr.io/google-samples/kubernetes-bootcamp:v1" already present on machine
  Normal   Created                1m               kubelet, minikube  Created container
  Normal   Started                1m               kubelet, minikube  Started container


Name:           kubernetes-bootcamp-5c69669756-kl225
Namespace:      default
Node:           minikube/172.17.0.33
Start Time:     Thu, 03 May 2018 14:39:50 +0000
Labels:         pod-template-hash=1725225312
                run=kubernetes-bootcamp
Annotations:    <none>
Status:         Running
IP:             172.18.0.4
Controlled By:  ReplicaSet/kubernetes-bootcamp-5c69669756
Containers:
  kubernetes-bootcamp:
    Container ID:   docker://60f8bd1b989b701a5a51371db665886aba700839e9cf21651bc8385781f13b34
    Image:          gcr.io/google-samples/kubernetes-bootcamp:v1
    Image ID:       docker-pullable://gcr.io/google-samples/kubernetes-bootcamp@sha256:0d6b8ee63bb57c5f5b6156f446b3bc3b3c143d233037f3a2f00e279c8fcc64af
    Port:           8080/TCP
    Host Port:      0/TCP
    State:          Running
      Started:      Thu, 03 May 2018 14:39:52 +0000
    Ready:          True
    Restart Count:  0
    Environment:    <none>
    Mounts:
      /var/run/secrets/kubernetes.io/serviceaccount from default-token-86srb (ro)
Conditions:
  Type           Status
  Initialized    True
  Ready          True
  PodScheduled   True
Volumes:
  default-token-86srb:
    Type:        Secret (a volume populated by a Secret)
    SecretName:  default-token-86srb
    Optional:    false
QoS Class:       BestEffort
Node-Selectors:  <none>
Tolerations:     node.kubernetes.io/not-ready:NoExecute for 300s
                 node.kubernetes.io/unreachable:NoExecute for 300s
Events:
  Type     Reason                 Age              From               Message
  ----     ------                 ----             ----               -------
  Warning  FailedScheduling       1m (x3 over 1m)  default-scheduler  0/1 nodes areavailable: 1 node(s) were not ready.
  Normal   Scheduled              1m               default-scheduler  Successfully assigned kubernetes-bootcamp-5c69669756-kl225 to minikube
  Normal   SuccessfulMountVolume  1m               kubelet, minikube  MountVolume.SetUp succeeded for volume "default-token-86srb"
  Normal   Pulled                 1m               kubelet, minikube  Container image "gcr.io/google-samples/kubernetes-bootcamp:v1" already present on machine
  Normal   Created                1m               kubelet, minikube  Created container
  Normal   Started                1m               kubelet, minikube  Started container
To update the image of the application to version 2, use the set image command, followed by the deployment name and the new image version:
$ kubectl set image deployments/kubernetes-bootcamp kubernetes-bootcamp=jocatalin/kubernetes-bootcamp:v2
deployment.apps "kubernetes-bootcamp" image updated
The command notified the Deployment to use a different image for your app and initiated a rolling update. Check the status of the new Pods, and view the old one terminating with the get pods command:
kubectl get podsStep 2: Verify an update
First, let’s check that the App is running. To find out the exposed IP and Port we can use describe service:
kubectl describe services/kubernetes-bootcampCreate an environment variable called NODE_PORT that has the value of the Node port assigned:
export NODE_PORT=$(kubectl get services/kubernetes-bootcamp -o go-template='{{(index .spec.ports 0).nodePort}}')
echo NODE_PORT=$NODE_PORT
Next, we’ll do a curl to the the exposed IP and port:
curl $(minikube ip):$NODE_PORTWe hit a different Pod with every request and we see that all Pods are running the latest version (v2).
The update can be confirmed also by running a rollout status command:
kubectl rollout status deployments/kubernetes-bootcampTo view the current image version of the app, run a describe command against the Pods:
kubectl describe podsWe run now version 2 of the app (look at the Image field)
Step 3: Rollback an update
Let’s perform another update, and deploy image tagged as v10 :
kubectl set image deployments/kubernetes-bootcamp kubernetes-bootcamp=gcr.io/google-samples/kubernetes-bootcamp:v10Use get deployments to see the status of the deployment:
kubectl get deploymentsAnd something is wrong… We do not have the desired number of Pods available. List the Pods again:
kubectl get podsA describe command on the Pods should give more insights:
kubectl describe podsThere is no image called v10 in the repository. Let’s roll back to our previously working version. We’ll use the rollout undo command:
kubectl rollout undo deployments/kubernetes-bootcampThe rollout command reverted the deployment to the previous known state (v2 of the image). Updates are versioned and you can revert to any previously know state of a Deployment. List again the Pods:
kubectl get podsFour Pods are running. Check again the image deployed on the them:
kubectl describe podsWe see that the deployment is using a stable version of the app (v2). The Rollback was successful.