1. @ConditionalOnProperty 根据配置加载不同的 bean
场景:对 redis 配置进行封装,实现自动化配置,能兼容哨兵模式和集群模式。
想到在 redis 配置中加一个 redis.type 来区分集群和哨兵模式(redis.type=cluster 或 sentinel),然后根据 type 来分别加载 JedisConnectionFactory、RedisClusterConfiguration、RedisSentinelConfiguration
配置如下:但是一直不成功,报没有 JedisConnectionFactory 这个 bean


@ConditionalOnProperty(name = "redis.type", havingValue = "cluster")
@ConditionalOnMissingBean
@Bean
public RedisClusterConfiguration redisClusterConfiguration() {
    List<RedisNode> nodeList = new ArrayList<>();
    String[] cNodes = hostName.split(",");
    //分割出集群节点
    for (String node : cNodes) {
        String[] hp = node.split(":");
        nodeList.add(new RedisNode(hp[0], Integer.parseInt(hp[1])));
    }
    RedisClusterConfiguration redisClusterConfiguration = new RedisClusterConfiguration();
    redisClusterConfiguration.setClusterNodes(nodeList);
    redisClusterConfiguration.setMaxRedirects(maxRedirects);
    return redisClusterConfiguration;
}

@ConditionalOnProperty(name = "redis.type", havingValue = "cluster")
@ConditionalOnMissingBean
@Bean
public JedisConnectionFactory jedisConnectionFactory(JedisPoolConfig jedisPoolConfig, RedisClusterConfiguration redisClusterConfiguration) {
    JedisConnectionFactory jedisConnectionFactory = new JedisConnectionFactory(redisClusterConfiguration, jedisPoolConfig);
    jedisConnectionFactory.setTimeout(timeout);
    jedisConnectionFactory.setPassword(password);
    return jedisConnectionFactory;
}

@ConditionalOnProperty(name = "redis.type", havingValue = "sentinel")
@ConditionalOnMissingBean
@Bean
public RedisSentinelConfiguration redisSentinelConfiguration() {
    Set<String> sentinelHostAndPorts = Sets.newHashSet(Splitter.on(",").split(hostName).iterator());
    RedisSentinelConfiguration redisSentinelConfiguration = new RedisSentinelConfiguration(masterName, sentinelHostAndPorts);
    return redisSentinelConfiguration;
}

@ConditionalOnProperty(name = "redis.type", havingValue = "sentinel")
@ConditionalOnMissingBean
@Bean
public JedisConnectionFactory jedisConnectionFactory(JedisPoolConfig jedisPoolConfig, RedisSentinelConfiguration redisSentinelConfiguration) {
    JedisConnectionFactory jedisConnectionFactory = new JedisConnectionFactory(redisSentinelConfiguration, jedisPoolConfig);
    jedisConnectionFactory.setTimeout(timeout);
    jedisConnectionFactory.setPassword(password);
    return jedisConnectionFactory;
}
后来发现,将两个定义 JedisConnectionFactory 的方法改成不相同才可以,原因暂时不详
@ConditionalOnProperty(name = "redis.type", havingValue = "cluster")
@ConditionalOnMissingBean
@Bean
public RedisClusterConfiguration redisClusterConfiguration() {
    List<RedisNode> nodeList = new ArrayList<>();
    String[] cNodes = hostName.split(",");
    //分割出集群节点
    for (String node : cNodes) {
        String[] hp = node.split(":");
        nodeList.add(new RedisNode(hp[0], Integer.parseInt(hp[1])));
    }
    RedisClusterConfiguration redisClusterConfiguration = new RedisClusterConfiguration();
    redisClusterConfiguration.setClusterNodes(nodeList);
    redisClusterConfiguration.setMaxRedirects(maxRedirects);
    return redisClusterConfiguration;
}

@ConditionalOnProperty(name = "redis.type", havingValue = "cluster")
@ConditionalOnMissingBean
@Bean
public JedisConnectionFactory jedisConnectionFactory1(JedisPoolConfig jedisPoolConfig, RedisClusterConfiguration redisClusterConfiguration) {
    JedisConnectionFactory jedisConnectionFactory = new JedisConnectionFactory(redisClusterConfiguration, jedisPoolConfig);
    jedisConnectionFactory.setTimeout(timeout);
    jedisConnectionFactory.setPassword(password);
    return jedisConnectionFactory;
}

@ConditionalOnProperty(name = "redis.type", havingValue = "sentinel")
@ConditionalOnMissingBean
@Bean
public RedisSentinelConfiguration redisSentinelConfiguration() {
    Set<String> sentinelHostAndPorts = Sets.newHashSet(Splitter.on(",").split(hostName).iterator());
    RedisSentinelConfiguration redisSentinelConfiguration = new RedisSentinelConfiguration(masterName, sentinelHostAndPorts);
    return redisSentinelConfiguration;
}

@ConditionalOnProperty(name = "redis.type", havingValue = "sentinel")
@ConditionalOnMissingBean
@Bean
public JedisConnectionFactory jedisConnectionFactory2(JedisPoolConfig jedisPoolConfig, RedisSentinelConfiguration redisSentinelConfiguration) {
    JedisConnectionFactory jedisConnectionFactory = new JedisConnectionFactory(redisSentinelConfiguration, jedisPoolConfig);
    jedisConnectionFactory.setTimeout(timeout);
    jedisConnectionFactory.setPassword(password);
    return jedisConnectionFactory;
}
2. SpringBoot 启动程拉起了两个 spring 容器,且父容器不受使用者控制
SpringBoot 应用在启动时,一般只会启动一个 spring 容器(AnnotationConfigServletWebServerApplicationContext);
但是当项目中引用了 spring-cloud-context-xxx.jar 时,默认会启动两个 spring 容器。AnnotationConfigApplicationContext(父)、AnnotationConfigServletWebServerApplicationContext(子, parent 指向父)
这是由于 spring-cloud-context-xxx.jar 中的 BootstrapApplicationListener 会再启动一个容器
public ConfigurableApplicationContext run(String... args) {
    StopWatch stopWatch = new StopWatch();
    stopWatch.start();
    ConfigurableApplicationContext context = null;
    Collection<SpringBootExceptionReporter> exceptionReporters = new ArrayList<>();
    configureHeadlessProperty();
    SpringApplicationRunListeners listeners = getRunListeners(args);
    listeners.starting();
    try {
        ApplicationArguments applicationArguments = new DefaultApplicationArguments(args);
        ConfigurableEnvironment environment = prepareEnvironment(listeners, applicationArguments); // 准备环境
        configureIgnoreBeanInfo(environment);
        Banner printedBanner = printBanner(environment);
        context = createApplicationContext();
        exceptionReporters = getSpringFactoriesInstances(SpringBootExceptionReporter.class,
                new Class[] { ConfigurableApplicationContext.class }, context);
        prepareContext(context, environment, listeners, applicationArguments, printedBanner);
        refreshContext(context); // 刷新上下文
        afterRefresh(context, applicationArguments);
        stopWatch.stop();
        if (this.logStartupInfo) {
            new StartupInfoLogger(this.mainApplicationClass).logStarted(getApplicationLog(), stopWatch);
        }
        listeners.started(context);
        callRunners(context, applicationArguments);
    }
    catch (Throwable ex) {
        handleRunFailure(context, ex, exceptionReporters, listeners);
        throw new IllegalStateException(ex);
    }

    try {
        listeners.running(context);
    }
    catch (Throwable ex) {
        handleRunFailure(context, ex, exceptionReporters, null);
        throw new IllegalStateException(ex);
    }
    return context;
}
1. prepareEnvironment(listeners, applicationArguments)
    2. EventPublishingRunListener#environmentPrepared(environment)
        3. SimpleApplicationEventMulticaster#multicastEvent()
           先获取 getApplicationListeners
           0 = {BootstrapApplicationListener@2536}  // 会再启动一个容器
           1 = {LoggingSystemShutdownListener@2628}
           2 = {ConfigFileApplicationListener@2629}
           3 = {AnsiOutputApplicationListener@2630}
           4 = {LoggingApplicationListener@2631}
           5 = {ClasspathLoggingApplicationListener@2632}
           6 = {BackgroundPreinitializer@2633}
           7 = {DelegatingApplicationListener@2634}
           8 = {FileEncodingApplicationListener@2635}
           --> 循环调用 ApplicationListener.onApplicationEvent(event);
这样带来了一个问题,我们无法控制 BootstrapApplicationListener 拉起的容器。
场景:
springboot 与 disconf 整合时,项目中同时引入了 spring-cloud-context-xxx.jar, spring-boot-autoconfigure-xxx.jar,spring-boot-autoconfigure-xxx.jar 的 spring.factories 文件中会自动配置 PropertyPlaceholderAutoConfiguration,它注册了一个 bean : PropertySourcesPlaceholderConfigurer。
PropertySourcesPlaceholderConfigurer 默认情况下解析配置占位符取不到结果时会报错(ignoreUnresolvablePlaceholders = false),而且它的优先级最高。导致 disconf 自定义的 PlaceholderConfigurer 无法执行解析就已经报错了。
最容易想到的办法就是排除掉自动注册的 PropertySourcesPlaceholderConfigurer,但是使用 @SpringBootApplication(exclude = PropertyPlaceholderAutoConfiguration.class) 不起作用,因为自动注册的 PropertySourcesPlaceholderConfigurer 是在父容器里面,而项目的启动类拉起的是子容器,导致这个 bean 无法被排除。
解决办法:
我们可以设置 spring.cloud.bootstrap.enabled=false 来禁止 BootstrapApplicationListener 启动新的 spring 容器
3. spring.config.location 的功能在 1.5.9 和 2.2.0 版本下有不同的表现
场景:
在开发阶段,application.yml 存放在 classpath 下,上测试或生产环境时,将配置文件外部化,aplication.yml 存放在与 jar 同级的 conf/ 目录下。
SpringBoot 2.2.0 版本下指定 --spring.config.location=conf/ 时,只会加载 conf/目录下的 application.yml,而 SpringBoot 1.5.9 版本下,会加载 conf/ 目录下和 jar 包里面 classpath 下的 application.yml,导致 jar 包里面的本地开发配置也被加载了
原因:
SpringBoot 1.5.9 与 2.2.0 版本的外部化配置 spring.config.location 逻辑不相同
ConfigFileApplicationListener.Loader#getSearchLocations()
v1.5.9: 将指定的搜索路径添加到默认的搜索路径(classpath:/,classpath:/config/,file:./,file:./config/)中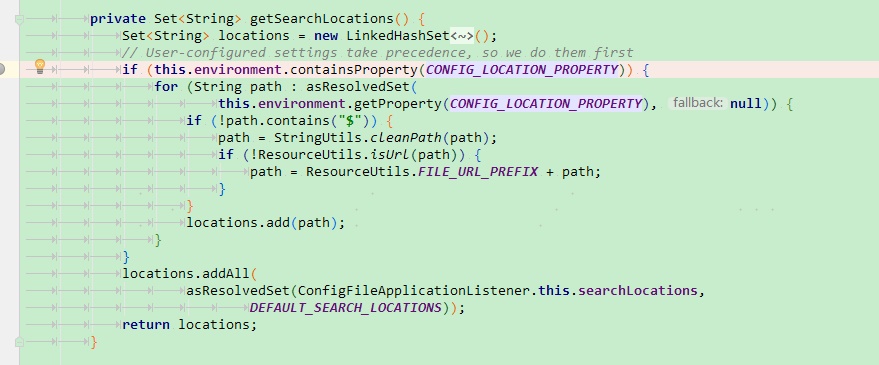
v2.2.0: 直接使用指定搜索路径下的配置文件 
4. 使用 SpringBoot 2.2.2Release + MyBatisPlus 3.1.1 操作数据库时,更新时间有时不准确,有时差问题
场景:
数据库中有一条数据,使用 selectById 将它查出来,再使用 udpateById 进行更新(所有非空字段都会更新),将 SQL 打印出来时,会发现日期更新会出错,偏差 13 h
SpringBoot 2.2.2Release 依赖的 MySQL 驱动是 mysql:mysql-connector-java:8.0.18 ,对应的驱动类是 com.mysql.cj.jdbc.Driver,连接串如果不设置时区,很有可能有时区问题
时间在转换时出了问题,实体使用的是 LocalDateTime 类,不知道使用 Date 类会不会有问题,有待验证
解决办法:
将 DB 连接串加上时区serverTimezone=GMT%2B8(北京时间东八区)
jdbc:mysql://localhost:3306/mydb3?serverTimezone=GMT%2B8&useSSL=false
参考:https://blog.csdn.net/love20yh/article/details/80799610
https://blog.csdn.net/m0_37997811/article/details/97113252 (有可能设置 mysql 服务器的时区也可以,但是改连接串更好)
https://juejin.im/post/5902e087da2f60005df05c3d
值得注意的是:
经测试发现, insert 时,时间是没有问题的(没有带时间插入,让数据库自动填充的);更新数据时,如果不带时间,让数据库自动更新 update_time 字段,也是没有问题的。只有带时间更新时,java 类中的时间对象转成 sql 语句中的时间时,才出问题
DDL 中时间的设置为:
`create_time` timestamp NULL DEFAULT CURRENT_TIMESTAMP COMMENT '创建时间',
`update_time` timestamp NULL DEFAULT NULL ON UPDATE CURRENT_TIMESTAMP COMMENT '修改时间',
其实,如果只是更新创建修改时间的话,完全没有必要带时间更新,让数据库帮我们来完成即可规避这个问题了。如果是其他时间,就必须要用上面的方法来解决了
5. 调整 bean 的加载顺序
调整 bean 的加载顺序的方式有很多种:
1. 可以通过 @Autowired 的方式,让一个 bean 进行初始化
例如: ServiceA 加载之前,一定要初始化 ServiceB,则可以将 ServiceB 通过 @Autowired 时行注入,让 ServiceB 在 ServiceA 之前时行初始化
2. @ConditionalOnBean(xxx)
6. 使用 IDEA 运行 springboot 程序与 java -jar 运行 springboot 程序时 ClassLoader 不同,导致 classloader.getResource() 拿不到资源
使用 this.getClass().getClassLoader() 获取 classloader 时,运行方式不同,结果不一样
使用 IDEA 运行 springboot 程序时,sun.misc.Launcher$AppClassLoader@18b4aac2
使用 java -jar 运行打包后的 jar 包时,org.springframework.boot.loader.LaunchedURLClassLoader@71dac704
LaunchedURLClassLoader 在以下 jar 包依赖中:
<dependency>
    <groupId>org.springframework.boot</groupId>
    <artifactId>spring-boot-loader</artifactId>
</dependency>
使用下面的代码,可以拿到类的代码的路径:
如:jar:file:/data/spring-boot-theory.jar!/BOOT-INF/lib/spring-aop-5.0.4.RELEASE.jar!/org/springframework/aop/SpringProxy.class
ProtectionDomain protectionDomain = getClass().getProtectionDomain();
CodeSource codeSource = protectionDomain.getCodeSource();
URI location = (codeSource == null ? null : codeSource.getLocation().toURI());
对于原始的JarFile URL,只支持一个'!/',SpringBoot 扩展了此协议,使其支持多个'!/',以实现 jar in jar 的加载资源方式。
但是,取到了资源路径,原生的 new File() 还是处理不了这种资源路径的。
我们通过传统的方式取不到资源了,即使取到了,也没法直接使用,那在 SpringBoot 中我们应该怎么获取资源呢?
可以参考 MyBatisPlus 中对 xml 文件的处理:com.baomidou.mybatisplus.autoconfigure.MybatisPlusProperties#mapperLocations (有待研究)
classloader不同引发的错误现象:https://blog.csdn.net/qq_38366063/article/details/97382500
LaunchedURLClassLoader 原理:https://segmentfault.com/a/1190000013532009
spring-boot-load 原理:https://www.jianshu.com/p/bedf5f3a2ad9
springboot classload 的继承关系和影响:http://hengyunabc.github.io/spring-boot-classloader/