完成天空、陆地、河流模块的构建之后,这一节再为我们的游戏场景添加一点其他的装饰——植被~
游戏中的植被可以选用D3D中的广告板来实现,这个后续我们会讲解,不过为了增加其立体感,大都会构建一个这样形状的结构:
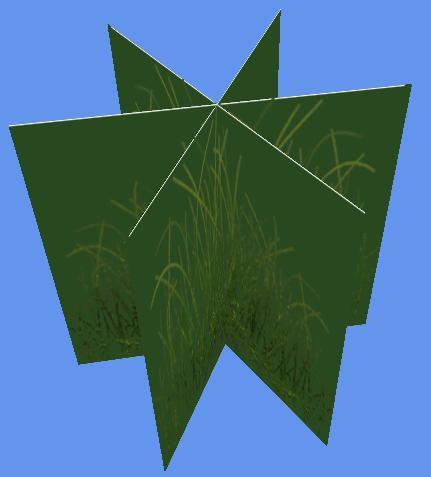
三个方形表面分别成120度交叉对齐,而后贴上植被的纹理,再开启Alpha通道,便可实现一个很好的视觉体验:
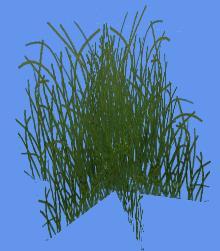
我习惯称这个形状为“PlantBoard” ^ ^
下面,我们首先着手来完成CPlantBoard对象的构建:
代码清单:PlantBoard.h
来自:http://www.cnblogs.com/kenkao
-------------------------------------*/
#include "D3DInit.h"
#pragma once
class CPlantBoard
{
public:
CPlantBoard(D3DXVECTOR3 CenterPos, float bWidth, float bHeight);
~CPlantBoard(void);
public:
void FlushVertexBuffer(VertexPositionTex* pVertices, int& index); // 序列化顶点缓冲
void FlushIndexBuffer(DWORD* pIndices, int& index); // 序列化索引缓冲
private:
D3DXVECTOR3 m_CenterPos; // 中心位置
int m_bWidth; // 宽度
int m_bHeight; // 高度
};
float GetRandomFloat(float min, float max); // 获取一个float随机数
 PlantBoard.cpp

代码清单:PlantBoard.cpp
来自:http://www.cnblogs.com/kenkao
-------------------------------------*/
#include "StdAfx.h"
#include "PlantBoard.h"
float GetRandomFloat(float min, float max)
{
return min + rand()%((int)max + 1 - (int)min);
}
CPlantBoard::CPlantBoard(D3DXVECTOR3 CenterPos, float bWidth, float bHeight):
m_CenterPos(CenterPos),
m_bWidth(bWidth),
m_bHeight(bHeight)
{
}
CPlantBoard::~CPlantBoard(void)
{
}
void CPlantBoard::FlushVertexBuffer(VertexPositionTex* pVertices, int& index)
{
// 第一面各点偏移位置
D3DXVECTOR3 pos_LU = D3DXVECTOR3(- m_bWidth / 2, + m_bHeight / 2, 0);
D3DXVECTOR3 pos_RU = D3DXVECTOR3(+ m_bWidth / 2, + m_bHeight / 2, 0);
D3DXVECTOR3 pos_LB = D3DXVECTOR3(- m_bWidth / 2, - m_bHeight / 2, 0);
D3DXVECTOR3 pos_RB = D3DXVECTOR3(+ m_bWidth / 2, - m_bHeight / 2, 0);
// 通用的纹理映射坐标
D3DXVECTOR2 uv_LU = D3DXVECTOR2(0,0);
D3DXVECTOR2 uv_RU = D3DXVECTOR2(1,0);
D3DXVECTOR2 uv_LB = D3DXVECTOR2(0,1);
D3DXVECTOR2 uv_RB = D3DXVECTOR2(1,1);
// 产生一个随机的偏转角,使得植被看起来形状各异
float randomAngle = GetRandomFloat(MATH_PI/4.0f, MATH_PI*5.0f/12.0f);
D3DXMATRIX rotateMatrix;
D3DXMatrixRotationY(&rotateMatrix, randomAngle);
D3DXMATRIX rotateMatrix2;
D3DXMatrixRotationY(&rotateMatrix2, MATH_PI - randomAngle);
// 第二面各点偏移位置
D3DXVECTOR3 pos_LU2;
D3DXVECTOR3 pos_RU2;
D3DXVECTOR3 pos_LB2;
D3DXVECTOR3 pos_RB2;
D3DXVec3TransformCoord(&pos_LU2, &pos_LU, &rotateMatrix);
D3DXVec3TransformCoord(&pos_RU2, &pos_RU, &rotateMatrix);
D3DXVec3TransformCoord(&pos_LB2, &pos_LB, &rotateMatrix);
D3DXVec3TransformCoord(&pos_RB2, &pos_RB, &rotateMatrix);
// 第三面各点偏移位置
D3DXVECTOR3 pos_LU3;
D3DXVECTOR3 pos_RU3;
D3DXVECTOR3 pos_LB3;
D3DXVECTOR3 pos_RB3;
D3DXVec3TransformCoord(&pos_LU3, &pos_LU, &rotateMatrix2);
D3DXVec3TransformCoord(&pos_RU3, &pos_RU, &rotateMatrix2);
D3DXVec3TransformCoord(&pos_LB3, &pos_LB, &rotateMatrix2);
D3DXVec3TransformCoord(&pos_RB3, &pos_RB, &rotateMatrix2);
// 各面顶点序列化到顶点缓冲
pVertices[index++] = VertexPositionTex(m_CenterPos + pos_LU, uv_LU);
pVertices[index++] = VertexPositionTex(m_CenterPos + pos_RU, uv_RU);
pVertices[index++] = VertexPositionTex(m_CenterPos + pos_LB, uv_LB);
pVertices[index++] = VertexPositionTex(m_CenterPos + pos_RB, uv_RB);
pVertices[index++] = VertexPositionTex(m_CenterPos + pos_LU2, uv_LU);
pVertices[index++] = VertexPositionTex(m_CenterPos + pos_RU2, uv_RU);
pVertices[index++] = VertexPositionTex(m_CenterPos + pos_LB2, uv_LB);
pVertices[index++] = VertexPositionTex(m_CenterPos + pos_RB2, uv_RB);
pVertices[index++] = VertexPositionTex(m_CenterPos + pos_LU3, uv_LU);
pVertices[index++] = VertexPositionTex(m_CenterPos + pos_RU3, uv_RU);
pVertices[index++] = VertexPositionTex(m_CenterPos + pos_LB3, uv_LB);
pVertices[index++] = VertexPositionTex(m_CenterPos + pos_RB3, uv_RB);
}
void CPlantBoard::FlushIndexBuffer(DWORD* pIndices, int& index)
{
// 每面4个顶点对应6个索引,其比率为2:3
DWORD vindex = (DWORD)index * 2 / 3;
// 序列化第一面各点索引
pIndices[index++] = vindex;
pIndices[index++] = vindex + 1;
pIndices[index++] = vindex + 2;
pIndices[index++] = vindex + 1;
pIndices[index++] = vindex + 3;
pIndices[index++] = vindex + 2;
// 序列化第二面各点索引
pIndices[index++] = vindex + 4;
pIndices[index++] = vindex + 5;
pIndices[index++] = vindex + 6;
pIndices[index++] = vindex + 5;
pIndices[index++] = vindex + 7;
pIndices[index++] = vindex + 6;
// 序列化第三面各点索引
pIndices[index++] = vindex + 8;
pIndices[index++] = vindex + 9;
pIndices[index++] = vindex + 10;
pIndices[index++] = vindex + 9;
pIndices[index++] = vindex + 11;
pIndices[index++] = vindex + 10;
}
有了前几节的基础,构建这样一个结构相信对大家而言已不再是什么难事~
需要大致提一下的是这个类的一点设计思路。
CPlantBoard自身并不持有自己的顶点缓冲与索引缓冲,而是通过两个主要方法FlushVertexBuffer跟FlushIndexBuffer将自身所要形成的顶点缓冲与索引缓冲序列化到外部传入的一个更大的缓冲区内,同时自行累加传入的索引下标。——这样做无疑是灵活而高效的。
如我们所知,一个场景中的植被单位数量有很多,而如果每个CPlantBoard都含有自己的顶点与索引缓冲,那么绘制多个CPlantBoard的方法无非有二:
1> 设备反复调用顶点绘制,渲染全部的CPlantBoard——这无疑是下下策。反复调用顶点绘制,而每次都绘制少量顶点,在任何GraphySdk设计中都是费力不讨好的事情~
2> 合并每个CPlantBoard持有的顶点缓冲与索引缓冲,而后统一绘制——既然以后还要做同样的工作,不如直接写入一个统一的缓冲区中。
完成基本单位的构建之后,我们再来实现一个CPlantBoard的集合类CPlantCollect:
代码清单:PlantCollect.h
来自:http://www.cnblogs.com/kenkao
-------------------------------------*/
#include "PlantBoard.h"
#include <list>
using namespace std;
#pragma once
class CPlantCollect
{
public:
CPlantCollect(void);
~CPlantCollect(void);
public:
bool Create( // 生成植被
float minHeight, // 最低海拔
float maxHeight, // 最高海拔
float density); // 密度(间距)
void Draw(float gameTick); // 绘制植被
void Release(); // 资源释放
private:
bool LoadContent(); // 加载资源
void CreateVertices(); // 生成顶点及索引缓冲
void CreatePlantNode(); // 生成植被节点
POINT GetPlantSize(); // 获得植被尺寸
private:
list<CPlantBoard>* m_pPlantNodeList; // 植被节点列表
IDirect3DTexture9* m_pGrassTexture; // 草地纹理
IDirect3DVertexBuffer9* m_pVB; // 顶点缓冲
IDirect3DIndexBuffer9* m_pIB; // 索引缓冲
private:
float m_minHeight; // 最低海拔
float m_maxHeight; // 最高海拔
float m_density; // 密度
int m_vertexNum; // 顶点总数
int m_indexNum; // 索引总数
};
PlantCollect.cpp
代码清单:PlantCollect.cpp
来自:http://www.cnblogs.com/kenkao
-------------------------------------*/
#include "StdAfx.h"
#include "PlantCollect.h"
#include "D3DGame.h"
#include "BaseTerrain.h"
extern IDirect3DDevice9 *g_pD3DDevice;
extern CBaseTerrain *g_pBaseTerrain;
CPlantCollect::CPlantCollect(void) : m_pPlantNodeList(NULL),
m_pGrassTexture(NULL),
m_pVB(NULL),
m_pIB(NULL),
m_minHeight(0),
m_maxHeight(0),
m_density(0),
m_vertexNum(0),
m_indexNum(0)
{
m_pPlantNodeList = new list<CPlantBoard>;
}
CPlantCollect::~CPlantCollect(void)
{
}
void CPlantCollect::Release()
{
ReleaseCOM(m_pVB);
ReleaseCOM(m_pIB);
ReleaseCOM(m_pGrassTexture);
if(m_pPlantNodeList->size()>0)
m_pPlantNodeList->clear();
delete m_pPlantNodeList;
}
bool CPlantCollect::Create(float minHeight, float maxHeight, float density)
{
// 异常检测,如果没有创建陆地,则不予创建植被
if(!g_pBaseTerrain)
return false;
m_minHeight = minHeight;
m_maxHeight = maxHeight;
m_density = density;
// 内容加载
if(!LoadContent())
{
Release();
return false;
}
// 创建植被节点
CreatePlantNode();
// 创建顶点缓冲及索引缓冲
CreateVertices();
return true;
}
bool CPlantCollect::LoadContent()
{
// 创建纹理
HRESULT hr = D3DXCreateTextureFromFile(g_pD3DDevice,"grass.png",&m_pGrassTexture);
if(FAILED(hr))
return false;
return true;
}
void CPlantCollect::CreatePlantNode()
{
// 遍历整个陆地区域
for (int j=0;j<g_pBaseTerrain->GetSizeY();j+=m_density)
{
for (int i=0;i<g_pBaseTerrain->GetSizeX();i+=m_density)
{
// 横纵坐标各添加一个随机值,以防种草变成种麦子 ^_^
float posX = g_pBaseTerrain->GetPosX() + i + rand()%(int)m_density;
float posZ = g_pBaseTerrain->GetPosY() + j + rand()%(int)m_density;
// 获得陆地上该点高度
float posY = g_pBaseTerrain->GetExactHeightAt(posX,posZ);
// 如果高度在允许海拔范围之间,则创建植被节点
if(posY >= m_minHeight && posY <= m_maxHeight)
{
D3DXVECTOR3 pos = D3DXVECTOR3(posX, posY, posZ);
POINT Size = GetPlantSize();
pos.y += Size.y/2;
m_pPlantNodeList->push_back(CPlantBoard(pos,Size.x,Size.y));
}
}
}
}
void CPlantCollect::CreateVertices()
{
// 获得植被节点数目
int NodeNum = m_pPlantNodeList->size();
// 计算得顶点总数
m_vertexNum = NodeNum * 12;
// 计算得索引总数
m_indexNum = NodeNum * 18;
// 创建顶点缓冲
g_pD3DDevice->CreateVertexBuffer(
m_vertexNum * sizeof(VertexPositionTex),
D3DUSAGE_WRITEONLY,
VertexPositionTex::FVF,
D3DPOOL_MANAGED,
&m_pVB,
0);
VertexPositionTex* pVertices;
m_pVB->Lock(0,0,(void**)&pVertices,0);
// 序列化全部植被节点顶点
int vindex = 0;
for(list<CPlantBoard>::iterator ptr = m_pPlantNodeList->begin(); ptr != m_pPlantNodeList->end(); ++ptr)
{
ptr->FlushVertexBuffer(pVertices,vindex);
}
m_pVB->Unlock();
// 创建索引缓冲
g_pD3DDevice->CreateIndexBuffer(
m_indexNum * sizeof(DWORD),
D3DUSAGE_WRITEONLY,
D3DFMT_INDEX32,
D3DPOOL_MANAGED,
&m_pIB,
0);
DWORD* pIndices;
m_pIB->Lock(0,0,(void**)&pIndices,0);
// 序列化全部植被节点索引
int index = 0;
for(list<CPlantBoard>::iterator ptr = m_pPlantNodeList->begin(); ptr != m_pPlantNodeList->end(); ++ptr)
{
ptr->FlushIndexBuffer(pIndices,index);
}
m_pIB->Unlock();
}
void CPlantCollect::Draw(float gameTick)
{
// 禁用背面剔除
g_pD3DDevice->SetRenderState(D3DRS_CULLMODE, D3DCULL_NONE);
// 启用Alpha通道
g_pD3DDevice->SetRenderState(D3DRS_ALPHABLENDENABLE, TRUE);
g_pD3DDevice->SetRenderState(D3DRS_SRCBLEND, D3DBLEND_SRCALPHA);
g_pD3DDevice->SetRenderState(D3DRS_DESTBLEND, D3DBLEND_INVSRCALPHA);
// 开启Alpha检测
g_pD3DDevice->SetRenderState(D3DRS_ALPHATESTENABLE, TRUE);
g_pD3DDevice->SetRenderState(D3DRS_ALPHAFUNC, D3DCMP_GREATEREQUAL);
g_pD3DDevice->SetRenderState(D3DRS_ALPHAREF, 150);
// 设置纹理、顶点缓冲区、索引缓冲区及顶点格式
g_pD3DDevice->SetTexture(0,m_pGrassTexture);
g_pD3DDevice->SetStreamSource(0, m_pVB, 0, sizeof(VertexPositionTex));
g_pD3DDevice->SetIndices(m_pIB);
g_pD3DDevice->SetFVF(VertexPositionTex::FVF);
// 绘制顶点
g_pD3DDevice->DrawIndexedPrimitive(D3DPT_TRIANGLELIST, 0, 0, m_vertexNum, 0, m_indexNum/3);
// 关闭Alpha检测
g_pD3DDevice->SetRenderState(D3DRS_ALPHATESTENABLE, FALSE);
// 禁用Alpha通道
g_pD3DDevice->SetRenderState(D3DRS_ALPHABLENDENABLE,FALSE);
// 重用背面剔除
g_pD3DDevice->SetRenderState(D3DRS_CULLMODE, D3DCULL_CCW);
}
POINT CPlantCollect::GetPlantSize()
{
// 获得植被尺寸
POINT Size;
Size.x = 16;
Size.y = 16;
return Size;
// 大家也可以在这里返回一个随机值,使得创建的植被大小各异 ^_^
}
CPlantCollect自身含有一个CPlantBoard列表以及独立的顶点及索引缓冲,按照特定的海拔和间距(当然你也可以定制属于你自己的标准)创建CPlantBoard节点,而后遍历列表调用每一个CPlantBoard对象的FlushVertexBuffer跟FlushIndexBuffer方法序列化自身缓冲到CPlantCollent总的缓冲区中。之后由CPlantCollect对象调用自身Draw方法一气呵成即可^ ^
剩下的主体代码就很简单了:
D3DGame.cpp
代码清单:D3DGame.cpp
来自:http://www.cnblogs.com/kenkao
-------------------------------------*/
#include "StdAfx.h"
#include "D3DGame.h"
#include "D3DCamera.h"
#include "D3DEffect.h"
#include "CoordCross.h"
#include "SimpleXMesh.h"
#include "Texture2D.h"
#include "D3DSprite.h"
#include "Skybox.h"
#include "SpriteBatch.h"
#include "BaseTerrain.h"
#include "Water.h"
#include "PlantCollect.h"
#include <stdio.h>
#include <time.h>
//---通用全局变量
HINSTANCE g_hInst;
HWND g_hWnd;
D3DXMATRIX g_matProjection;
D3DPRESENT_PARAMETERS g_D3DPP;
//---D3D全局变量
IDirect3D9 *g_pD3D = NULL;
IDirect3DDevice9 *g_pD3DDevice = NULL;
CMouseInput *g_pMouseInput = NULL;
CKeyboardInput *g_pKeyboardInput = NULL;
CD3DCamera *g_pD3DCamera = NULL;
CSkybox *g_pSkybox = NULL;
CBaseTerrain *g_pBaseTerrain = NULL;
CWater *g_pWater = NULL;
CPlantCollect *g_pPlant = NULL;
CSimpleXMesh *g_pMesh = NULL;
// 场景绘制
void DrawScene(bool isReflect,bool isRefract);
void Initialize(HINSTANCE hInst, HWND hWnd)
{
g_hInst = hInst;
g_hWnd = hWnd;
InitD3D(&g_pD3D, &g_pD3DDevice, g_D3DPP, g_matProjection, hWnd);
g_pMouseInput = new CMouseInput;
g_pMouseInput->Initialize(hInst,hWnd);
g_pKeyboardInput = new CKeyboardInput;
g_pKeyboardInput->Initialize(hInst,hWnd);
g_pD3DCamera = new CD3DCamera;
srand(time(0));
}
void LoadContent()
{
g_pD3DCamera->SetCameraPos(D3DXVECTOR3(600.0f,0.0f,600.0f));
g_pSkybox = new CSkybox;
g_pSkybox->Create("Skybox_0.JPG","Skybox_1.JPG","Skybox_2.JPG"
,"Skybox_3.JPG","Skybox_4.JPG","Skybox_5.JPG");
g_pBaseTerrain = new CBaseTerrain;
g_pBaseTerrain->Create(128,128,10,"HeightData_128x128.raw","Grass.dds");
g_pWater = new CWater;
g_pWater->Create(1280,1280,0.0f,0.0f,40.0f);
g_pPlant = new CPlantCollect;
g_pPlant->Create(60,90,15);
g_pMesh = new CSimpleXMesh;
g_pMesh->LoadXMesh("WindMill.x");
}
void Update(float gameTick)
{
g_pMouseInput->GetState();
g_pKeyboardInput->GetState();
// 更新摄影机高度
D3DXVECTOR3 CameraPos = g_pD3DCamera->GetCameraPos();
float roleHeight = 25.0f;
float Ty = g_pBaseTerrain->GetExactHeightAt(CameraPos.x,CameraPos.z) + roleHeight;
g_pD3DCamera->SetCameraPos(D3DXVECTOR3(
CameraPos.x,
Ty,
CameraPos.z));
g_pD3DCamera->Update();
}
void Draw(float gameTick)
{
g_pD3DDevice->SetTransform(D3DTS_VIEW,&g_pD3DCamera->GetViewMatrix());
if(SUCCEEDED(g_pD3DDevice->BeginScene()))
{
g_pWater->BeginReflect();
DrawScene(true,false);
g_pWater->EndReflect();
g_pWater->BeginRefract();
DrawScene(false,true);
g_pWater->EndRefract();
g_pD3DDevice->Clear(0, NULL, D3DCLEAR_TARGET | D3DCLEAR_ZBUFFER, D3DCOLOR_RGBA(100,149,237,255), 1.0f, 0);
DrawScene(false,false);
g_pWater->Draw(gameTick);
g_pPlant->Draw(gameTick);
g_pD3DDevice->EndScene();
}
g_pD3DDevice->Present(NULL, NULL, NULL, NULL);
}
void DrawScene(bool isReflect,bool isRefract)
{
g_pSkybox->Draw(isReflect,isRefract);
g_pBaseTerrain->Draw();
D3DXMATRIX scalTrans;
D3DXMatrixScaling(&scalTrans,5.0f,5.0f,5.0f);
D3DXMATRIX movTrans;
D3DXMatrixTranslation(&movTrans,366,g_pBaseTerrain->GetExactHeightAt(366,190)-5.0f,190);
g_pMesh->DrawXMesh(scalTrans * movTrans);
}
void UnloadContent()
{
ReleaseCOM(g_pPlant);
ReleaseCOM(g_pWater);
ReleaseCOM(g_pBaseTerrain);
ReleaseCOM(g_pSkybox);
}
void Dispose()
{
ReleaseCOM(g_pD3DCamera);
ReleaseCOM(g_pKeyboardInput);
ReleaseCOM(g_pMouseInput);
ReleaseCOM(g_pD3DDevice);
ReleaseCOM(g_pD3D);
}
需要注意的是,植被属于场景中的细节部分,绘制又比较耗性能,不建议使其被水面反射而多次绘制。
如下效果图:

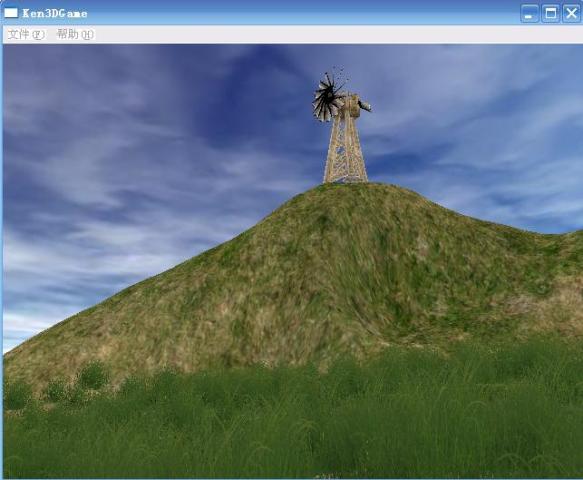
植被仅分布在地势较低的河流附近,不会出现在山顶之上~
以上,谢谢~