MyBatis 二级缓存
1 二级缓存是什么?
二级缓存是 MyBatis 中的一个重要的概念。
- 二级缓存是存储在 MappedStatement 中的成员变量 Cache
- 默认情况下,Cache 实例对象最底层是 PerpetualCache,但是底层之上还装饰了一层层的其他功能的 Cache。
package org.apache.ibatis.mapping;

public final class MappedStatement {
    private Cache cache;
}
Cache 接口很简洁,主要就是 put/get/remove/clear 这些方法
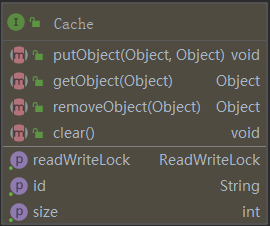
- 配置类 Configuration 中有一个 Map 管理 所有 MappedStatement 的二级缓存,主键是命名空间,即 包名+Mapper接口类名
package org.apache.ibatis.session;
public class Configuration {
    protected final Map<String, Cache> caches = new StrictMap<Cache>("Caches collection");
}
2 怎样设置打开/关闭 二级缓存:
如果你从来没有接触过 Mybatis , 建议你移步 传送门
2.1 全局关闭(针对应用关闭二级缓存)
第一种方式:通过 Java 代码设置
package org.apache.ibatis.session;
public class Configuration {
    // 是否开启二级缓存
    protected boolean cacheEnabled = true;
    public void setCacheEnabled(boolean cacheEnabled) {
        this.cacheEnabled = cacheEnabled;
    }
}
第二种方式:通过 xml 文件配置
<?xml version="1.0" encoding="UTF-8" ?>
<!DOCTYPE configuration
  PUBLIC "-//mybatis.org//DTD Config 3.0//EN"
 "http://mybatis.org/dtd/mybatis-3-config.dtd">
<configuration>
    <properties></properties>
    <!-- 该配置影响的所有映射器中配置的缓存的全局开关。默认true -->
    <!-- settings 需要放在 properties 后面, 不然会报错-->
    <settings>
        <setting name="cacheEnabled" value="false"/>
    </settings>
</configuration>
cacheEnabled 是如何生效的?
public Executor newExecutor(Transaction transaction, ExecutorType executorType) {
    executorType = executorType == null ? defaultExecutorType : executorType;
    executorType = executorType == null ? ExecutorType.SIMPLE : executorType;
    Executor executor;
    if (ExecutorType.BATCH == executorType) {
        executor = new BatchExecutor(this, transaction);
    } else if (ExecutorType.REUSE == executorType) {
        executor = new ReuseExecutor(this, transaction);
    } else {
        executor = new SimpleExecutor(this, transaction);
    }
    // 如果不开启二级缓存,就不会使用 CachingExecutor 这个类
    if (cacheEnabled) {
        executor = new CachingExecutor(executor);
    }
    executor = (Executor) interceptorChain.pluginAll(executor);
    return executor;
}

我们开篇就提过二级缓存其实就是使用 MappedStatement 的成员变量 Cache,如果我们都不创建 CacheExecutor 了,自然也就不会开启二级缓存了。
2.2 局部关闭(针对 mappedStatement 关闭缓存)
第一种方式:通过 Java 代码设置
@CacheNamespace
public interface UserMapper {
    @Select({" select * from users where id=#{1}"})
    @Options(useCache = true)
    User selectByid(Integer id);
}
第二种方式:通过 xml 文件配置
<mapper namespace="cn.skilled.peon.mybatis.UserMapper">

    <select id="selectByid2" useCache="true" resultType="cn.skilled.peon.mybatis.beans.User">
        select * from users where id=#{arg0}
    </select>
</mapper>
useCache 只是一个控制缓存的标记
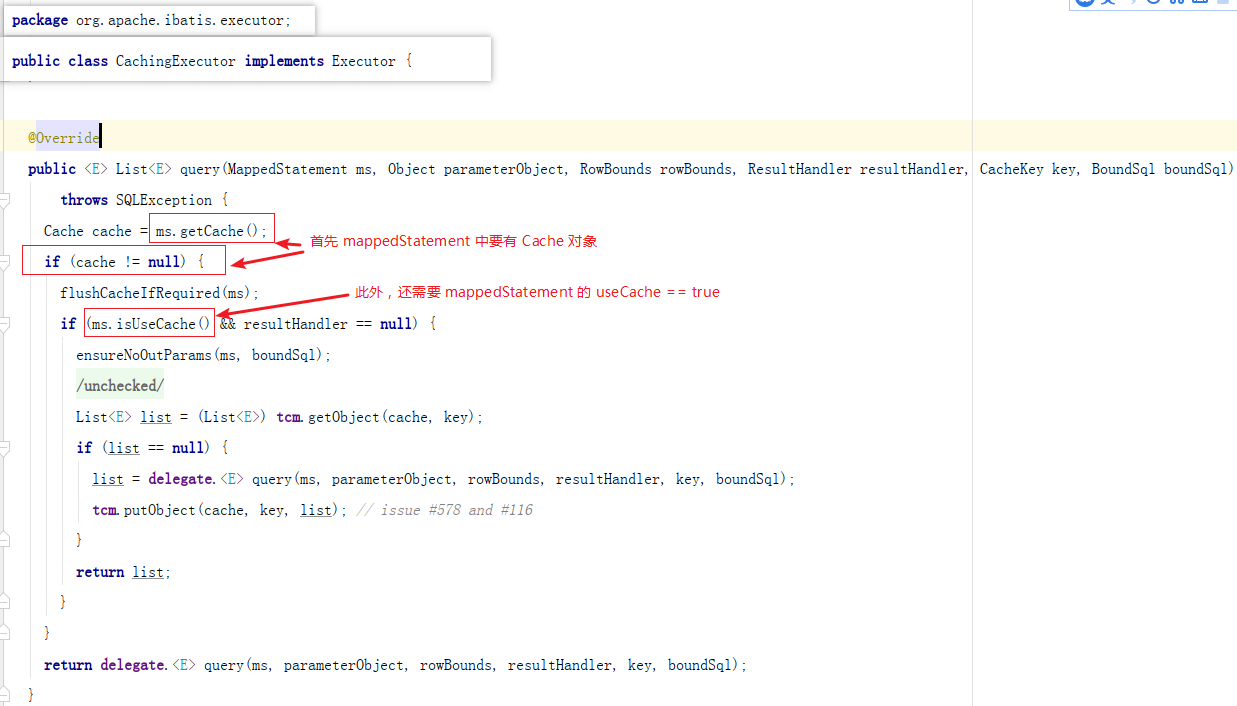
2.3 (cacheEnabled设为false) ≠ (cache == null)
你课不要天真的以为设置了 cacheEnabled=false,就不会创建 Cache 对象了!
也不要以为设置了 cacheEnabled=true,就会自动全局创建缓存了。
以下就是我开启了二级缓存,却在调用 configuration.getCache(UserMapper.class) 时发生的异常:

Caches collection does not contain value for cn.skilled.peon.mybatis.UserMapper
这个报错发生在 Configuration 的内部类 StrictMap 的 get() 方法中。
3. 给 mappedStatment 创建 Cache
3.1 第一种方式:使用 xml 配置:
<?xml version="1.0" encoding="UTF-8" ?>
<!DOCTYPE mapper
        PUBLIC "-//mybatis.org//DTD Mapper 3.0//EN"
        "http://mybatis.org/dtd/mybatis-3-mapper.dtd">
<mapper namespace="cn.skilled.peon.mybatis.UserMapper">
    <!--在此处增加 cache 标签创建二级缓存 -->
    <cache />
    ...
</mapper>
<cache/> 如何生效的
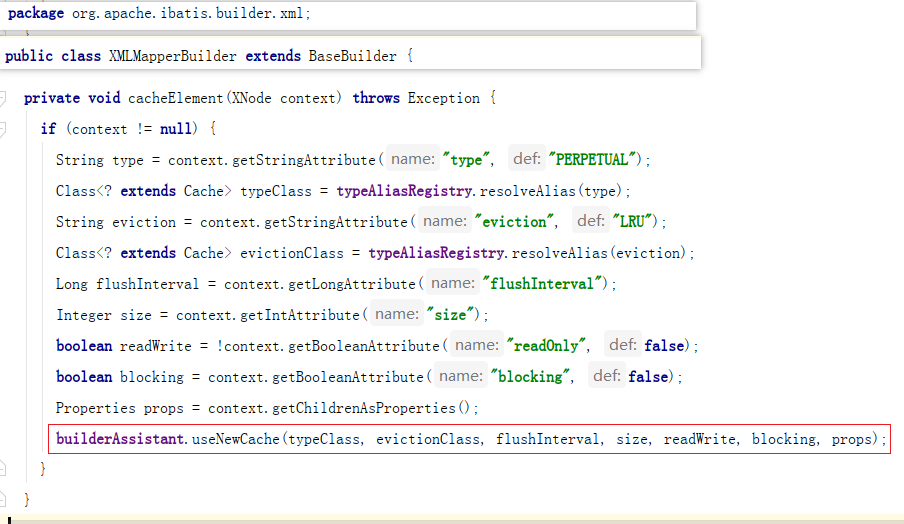
- 根据 mapper.xml 中 cache 标签内的属性 来创建 Cache。这里其实创建的是Cache责任链,这个稍后会讲。
-
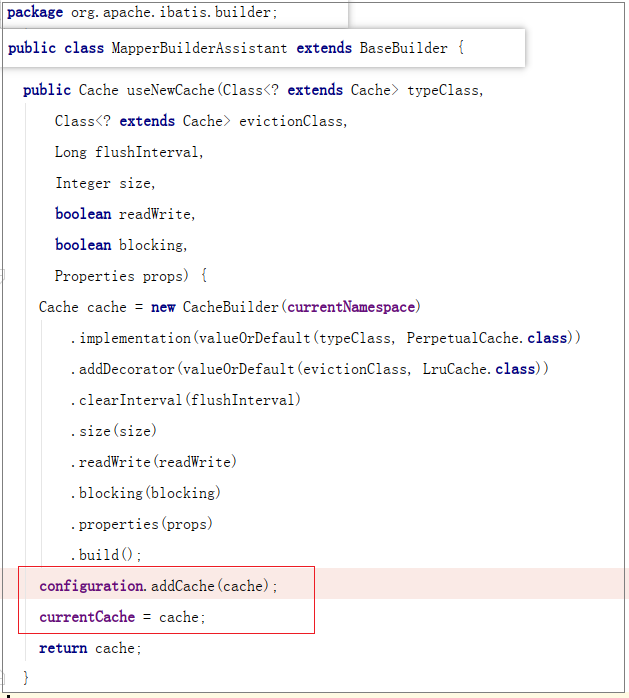
通过 CacheBuilder 创建 Cache 完成后,再通过 addCache 把二级缓存的引用交给 Configuration 管理。
-
currentCache 会在 Mapper 创建完成后,通过构造器模式 MappedStatement.Builder 设置到 MappedStatement 对象的 cache 中
3.2 第二种方式:使用 @CacheNamespace
@CacheNamespace
public interface UserMapper {}
@CacheNamespace 注解如何生效
-
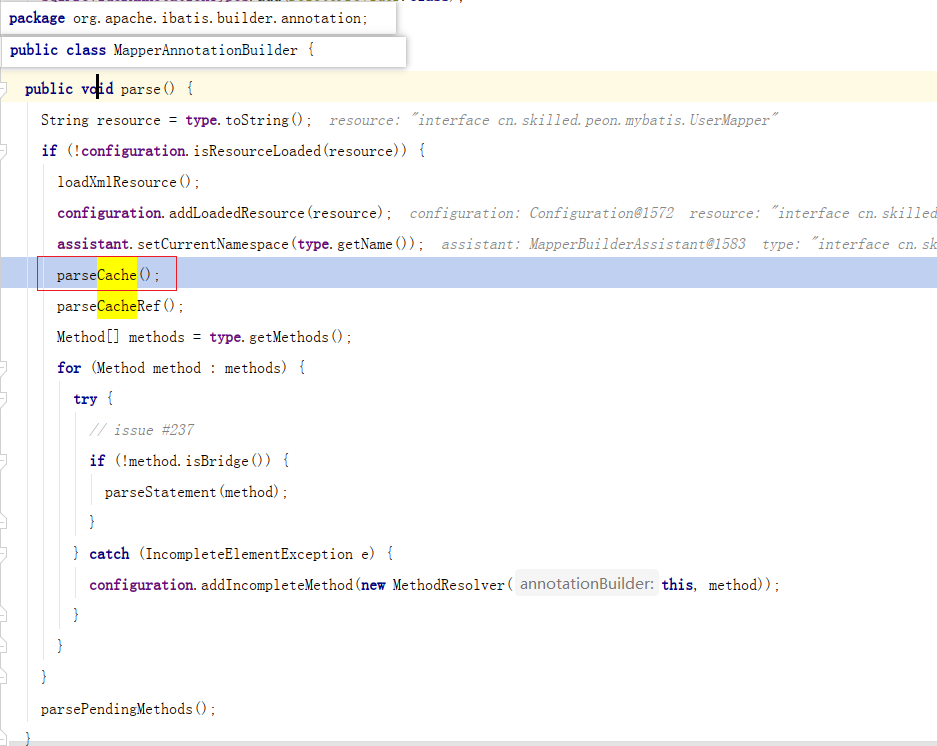
在 MapperAnnotationBuilder 中的 parseCache 方法解析缓存
-
殊途同归,最终也还是调用了 MapperBuilderAssistant 来创建 Cache

4.Cache责任链
- “俄罗斯套娃”
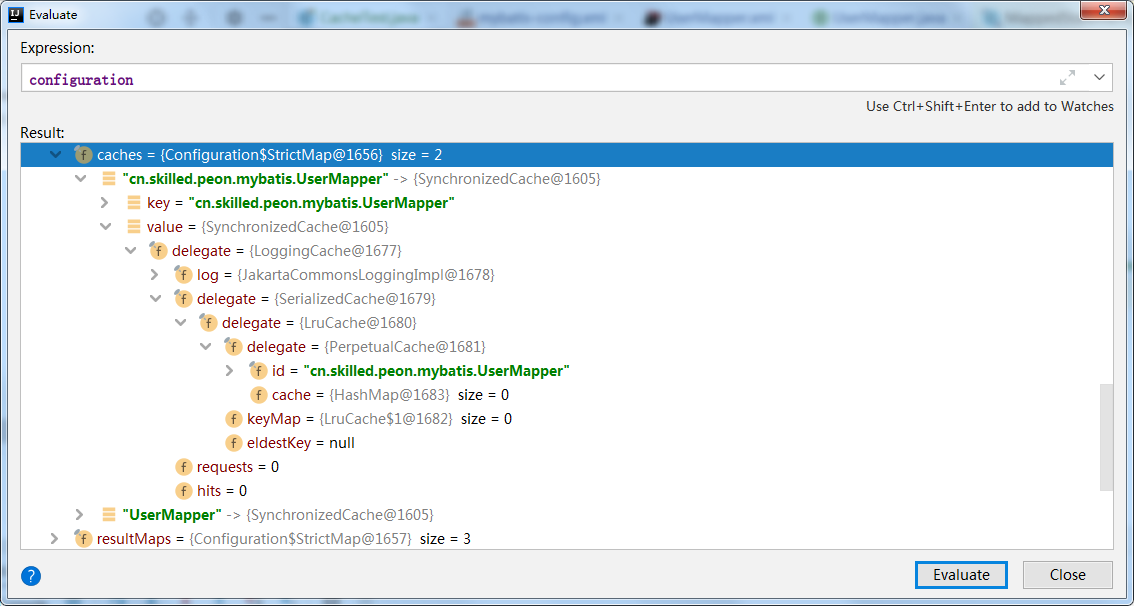
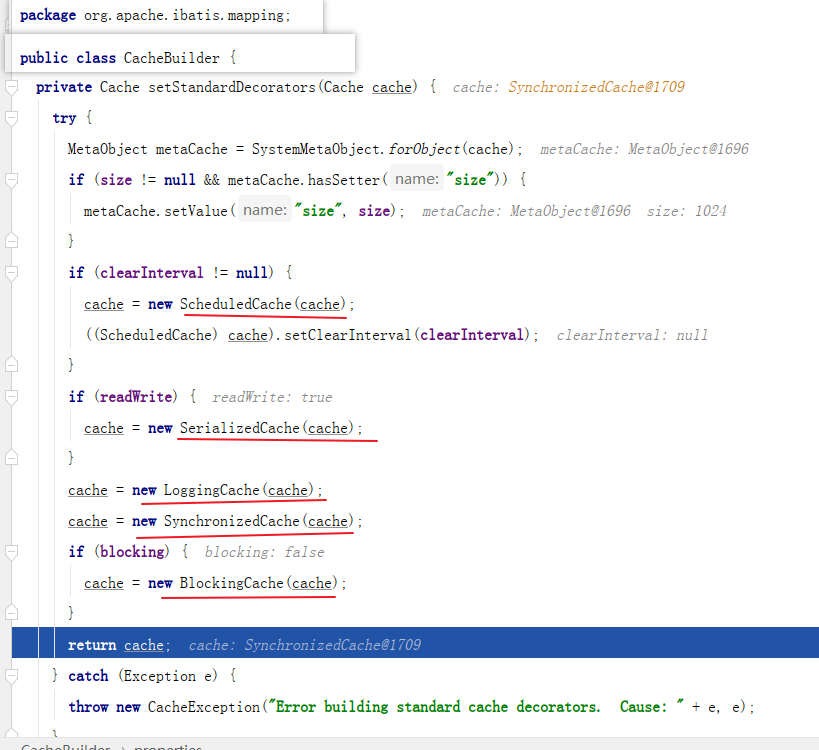
4.1 Cache 责任链是如何构成?--CacheBuilder
package org.apache.ibatis.mapping;

public class CacheBuilder {
    private final String id; // =命名空间=包名+接口类名
    private Class<? extends Cache> implementation;
    private final List<Class<? extends Cache>> decorators;
    private Integer size;
    private Long clearInterval;
    private boolean readWrite;
    private Properties properties;
    private boolean blocking;

    public Cache build() {
        setDefaultImplementations();
        // implementation 代表的是最底层的Cache
        // 可以用 磁盘,内存,或者第三方工具
        Cache cache = newBaseCacheInstance(implementation, id);
        setCacheProperties(cache);
        // issue #352, do not apply decorators to custom caches
        if (PerpetualCache.class.equals(cache.getClass())) {
            for (Class<? extends Cache> decorator : decorators) {
                cache = newCacheDecoratorInstance(decorator, cache);
                setCacheProperties(cache);
            }
            // 标准 装饰器+责任链模式
            cache = setStandardDecorators(cache);
        } else if (!LoggingCache.class.isAssignableFrom(cache.getClass())) {
            cache = new LoggingCache(cache);
        }
        return cache;
    }

    private void setDefaultImplementations() {
        if (implementation == null) {
            // 如果没有设置最底层的实现类,那就用 内存缓存 作为 二级缓存
            implementation = PerpetualCache.class;
            // 如果没有设置特别的淘汰策略,就默认使用 LRU 最近最少使用算法 来淘汰内存
            if (decorators.isEmpty()) {
                decorators.add(LruCache.class);
            }
        }
    }
}
4.2 责任链模式
- 责任链条上的每一个实例对象,分别负责一部分工作。且 MyBatis 二级缓存的责任链是顺序固定的。

5.二级缓存-事务
CachingExecutor 中还有一个重要的成员变量就是 TransactionalCacheManager
主要方法就是 rollback、commit
5.1 事务缓存管理器-TransactionalCacheManager
package org.apache.ibatis.cache;

public class TransactionalCacheManager {
    private final Map<Cache, TransactionalCache> transactionalCaches = new HashMap<Cache, TransactionalCache>();
    private TransactionalCache getTransactionalCache(Cache cache) {
        TransactionalCache txCache = transactionalCaches.get(cache);
        if (txCache == null) {
            txCache = new TransactionalCache(cache);
            transactionalCaches.put(cache, txCache);
        }
        return txCache;
    }
}
通过 事务管理器 tcm 调用
- 设置缓存putObject、
- 获取缓存getObject、
- 清除缓存 clear
都先会用 getTransactionalCache 方法,会在原来的 Cache 上面再装饰一层 TransactionalCache。
这样在事务提交 commit /回滚 rollback 时,再把所有的缓存执行一遍。
5.2 TransactionalCache
以 putObject 方法为例,所有操作会先作用在 TransactionalCache,当 commit 时才能真正生效!
package org.apache.ibatis.cache.decorators;
public class TransactionalCache implements Cache {
    private final Map<Object, Object> entriesToAddOnCommit;

    @Override
    public void putObject(Object key, Object object) {
        // 注意,新提交的缓存对象,会先保存在 事务暂存区(TransactionalCache 的 HashMap) 中
        entriesToAddOnCommit.put(key, object);
    }

    public void commit() {
        if (clearOnCommit) {
            delegate.clear();
        }
        // 延迟操作
        flushPendingEntries();
        reset();
    }
    private void flushPendingEntries() {
        // 在事务提交时才会延迟提交给真正的二级缓存
        for (Map.Entry<Object, Object> entry : entriesToAddOnCommit.entrySet()) {
            delegate.putObject(entry.getKey(), entry.getValue());
        }
        for (Object entry : entriesMissedInCache) {
            if (!entriesToAddOnCommit.containsKey(entry)) {
                delegate.putObject(entry, null);
            }
        }
    }
}
我知道光看这段代码还是不知道这个事务暂存区是干嘛的,接着往下看
5.3 事务暂存区
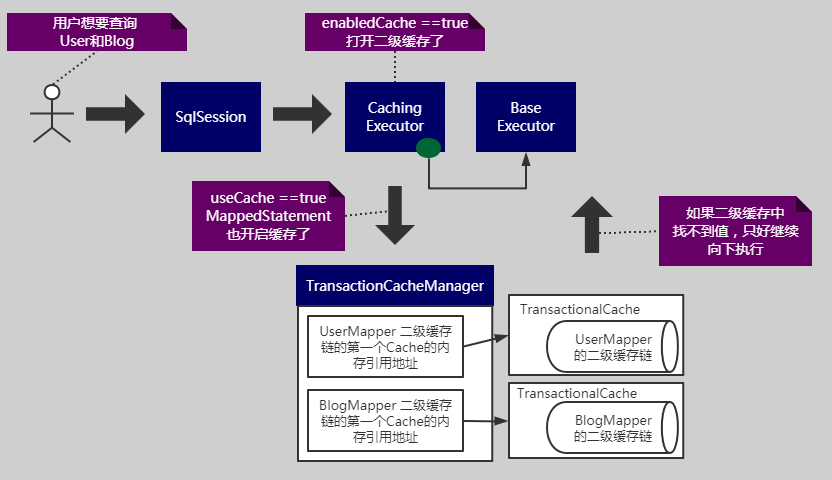
- 只要你用到选择开启了enableEnabled==true(默认关闭的),那你的代码就一定会走到 CachingExecutor 中,继而再传递给 BaseExecutor,默认情况是 ReuseExecutor
- 因为你创建了 CachingExecutor ,那么你也必然会拥有 TransactionCacheManager 实例,代码也必然会走到 TransactionCacheManager 的 查改方法中。
- useCache == true 将具体决定你在执行 query 方法时,能否使用二级缓存来快速返回结果,而不必查询数据库。默认就是 true。
5.4 延迟执行
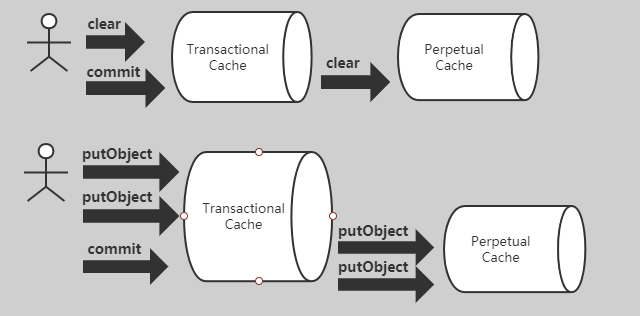
- clear 立刻修改 TransactionalCache 中的标志位 clearOnCommit = true,并且 清除原本要提交的对象集合 entriesToAddOnCommit。真正清除二级缓存的操作发生在 提交事务时。
- putObject 也只是先把对象放入 entriesToAddOnCommit,等到 提交事务时,才真正添加到二级缓存。
- 总结一下:在一个事务中,用户的所有操作,仅针对 TransactionalCache,只有 commit 之后,才会作用于 底层的 PerpetualCache