邮件发送
环境说明:
- 建立一个maven工程
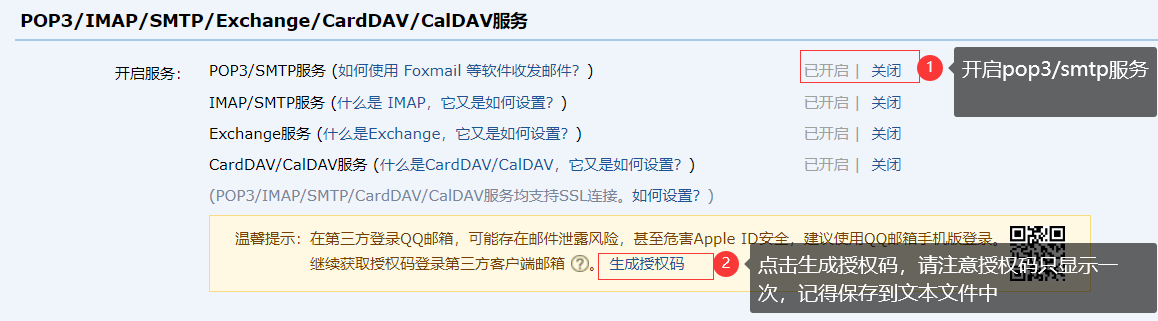
- qq邮箱开启pop3和smtp服务
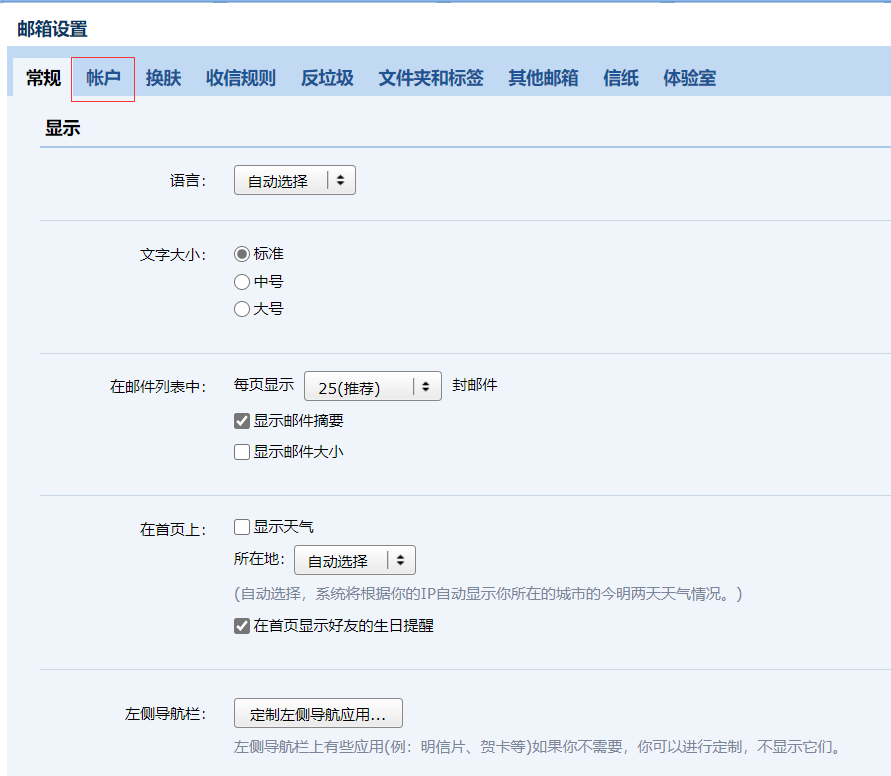
1. 获取邮箱授权码
打开qq邮箱设置按下图操作
2. 需要的依赖
<dependency>
    <groupId>javax.mail</groupId>
    <artifactId>mail</artifactId>
    <version>1.4.7</version>
</dependency>
3. 创建一个邮件工具类
package com.gxa.yonghu.util;

import com.sun.mail.util.MailSSLSocketFactory;

import javax.mail.*;
import javax.mail.internet.InternetAddress;
import javax.mail.internet.MimeMessage;
import java.util.Properties;

/**
 * @author 枫叶
 * @version 1.0
 * @date 2020/12/22
 */
public class MailUtil implements Runnable {
    //  发件人账号
    public final static String MAIL_NAME = "发件人账户";
    //  发件人授权码
    public final static String MAIL_CODE = "第一步中获取的授权码";
    // 登录的用户名
    private String username = null;
    // 收件人邮箱
    private String email = null;
    //邮件主题
    private String motif = null;
    //邮件内容
    private String contentText = null;

    public MailUtil(String username, String email, String motif, String content) {
        this.username = username;
        this.email = email;
        this.motif = motif;
        this.contentText = content;
    }

    @Override
    public void run() {
        // 指定发送邮件的主机smtp.qq.com(QQ)|smtp.163.com(网易)  这里需要继续扩展做判断分支处理
        String host = "smtp.qq.com";
        // 获取系统属性
        Properties properties = System.getProperties();
        // 设置邮件服务器
        properties.setProperty("mail.smtp.host", host);
        // 打开认证
        properties.setProperty("mail.smtp.auth", "true");

        try {
            //QQ邮箱需要下面这段代码,163邮箱不需要
            MailSSLSocketFactory sf = new MailSSLSocketFactory();
            sf.setTrustAllHosts(true);
            properties.put("mail.smtp.ssl.enable", "true");
            properties.put("mail.smtp.ssl.socketFactory", sf);

            // 1.获取默认session对象
            Session session = Session.getDefaultInstance(properties, new Authenticator() {
                @Override
                public PasswordAuthentication getPasswordAuthentication() {
                    // 发件人邮箱账号、授权码
                    return new PasswordAuthentication(MailUtil.MAIL_NAME, MailUtil.MAIL_CODE);
                }
            });

            // 2.创建邮件对象
            Message message = new MimeMessage(session);

            // 3.设置发件人
            message.setFrom(new InternetAddress(MailUtil.MAIL_NAME));

            // 4.设置收件人
            message.addRecipient(Message.RecipientType.TO, new InternetAddress(email));

            // 5.设置邮件主题
            message.setSubject(motif);

            // 6.设置邮件内容
            String content = "<html><head></head><body>" + contentText + "</body></html>";
            message.setContent(content, "text/html;charset=UTF-8");

            // 7.发送邮件
            // 阻塞方法
            Transport.send(message);
            System.out.println("邮件成功发送!");
        } catch (Exception e) {
            e.printStackTrace();
        }
    }
}
4. 发送邮件
这里用servlet做演示,接收一个包含邮箱信息的json
/**
 * @author 枫叶
 * @version 1.0
 * @date 2020/12/22
 */
@WebServlet(value = "/mail/send",name = "mail")
public class MailServlet extends HttpServlet {
    @Override
    protected void doGet(HttpServletRequest req, HttpServletResponse resp) throws ServletException, IOException {
        doPost(req,resp);
    }

    @Override
    protected void doPost(HttpServletRequest req, HttpServletResponse resp) throws ServletException, IOException {
        //这里使用了fastJson解析,若不想使用fastJSON可以自己使用自己喜欢的解析方式,fastJSON依赖如下
        /**
         *         <dependency>
         *             <groupId>com.alibaba</groupId>
         *             <artifactId>fastjson</artifactId>
         *             <version>1.2.72</version>
         *         </dependency>
         */
        JSONObject json = JSONObject.parseObject(req.getReader().readLine());
        //获取参数
        String email = json.getString("email");
        System.out.println(json);
        //参数验证
        if (email==null||"".equals(email)){
            resp.getWriter().println(DataResponse.error(400,"参数不足"));
            return;
        }

        //其它业务

        //创建html邮件内容,只需输入body中的代码
        String content = "<h1>邮件标题</h1>"
                +"邮件内容";
        MailUtil mail = new MailUtil("发件人", email,"邮件主题",content);
        //发送邮件
        new Thread(mail).start();
        resp.getWriter().println(DataResponse.ok());
    }
}
5. 上面用到的返回封装类DataResponse如下
public class DataResponse{
    private final Map<String,Object> result;

    @Override
    public String toString() {
            //这里也用到了fastJSON并且设置了日期的格式化格式
        JSON.DEFFAULT_DATE_FORMAT = "yyyy-MM-dd hh:mm:ss";
        return JSON.toJSONString(result,SerializerFeature.WriteDateUseDateFormat);
    }

    public DataResponse(Integer code,String msg,Object data){
        result = new HashMap<>();
        result.put("code",code);
        result.put("msg",msg);
        result.put("data",data);
    }

    public DataResponse(Integer code,String msg){
        this(code,msg,null);
    }

    public DataResponse() {
        result=new HashMap<>();
    }

    public DataResponse put(String key,Object value){
        result.put(key,value);
        return this;
    }

    public static DataResponse ok(){
        return new DataResponse(200,"成功!");
    }

    public static DataResponse ok(String msg){
        return new DataResponse(200,msg);
    }

    public static DataResponse ok(int code,String msg){
        return new DataResponse(code,msg);
    }
    public static DataResponse ok(String msg,Object data){
        return new DataResponse(200,msg,data);
    }
    public static DataResponse ok(int code,String msg,Object data){
        return new DataResponse(200,msg,data);
    }

    public static DataResponse error(){
        return new DataResponse(500,"服务器错误,操作失败!");
    }

    public static DataResponse error(String msg){
        return new DataResponse(500,msg);
    }

    public static DataResponse error(int code,String msg){
        return new DataResponse(code,msg);
    }

    public Object get(String key){
        return result.get(key);
    }

    public Object getData(){
        return result.get("data");
    }

    public void setCode(int code) {
        result.put("code",code);
    }

    public void setMsg(String msg) {
        result.put("msg",msg);
    }

    public void setData(Object data) {
        result.put("data",data);
    }

}
6. 启动服务发送邮件
略