转载自 https://www.jianshu.com/p/e488c8ee5b57
Netty中对零拷贝的封装
Netty的零拷贝
在操作系统层面上的零拷贝是指避免在用户态与内核态之间来回拷贝数据的技术。 Netty中的零拷贝与操作系统层面上的零拷贝不完全一样, Netty的零拷贝完全是在用户态(Java层面)的,更多是数据操作的优化。
Netty的零拷贝主要体现在五个方面
Netty的接收和发送ByteBuffer使用直接内存进行Socket读写,不需要进行字节缓冲区的二次拷贝。如果使用JVM的堆内存进行Socket读写,JVM会将堆内存Buffer拷贝一份到直接内存中,然后才写入Socket中。相比于使用直接内存,消息在发送过程中多了一次缓冲区的内存拷贝。
Netty的文件传输调用FileRegion包装的transferTo方法,可以直接将文件缓冲区的数据发送到目标Channel,避免通过循环write方式导致的内存拷贝问题。
Netty提供CompositeByteBuf类, 可以将多个ByteBuf合并为一个逻辑上的ByteBuf, 避免了各个ByteBuf之间的拷贝。
通过wrap操作, 我们可以将byte[]数组、ByteBuf、ByteBuffer等包装成一个Netty ByteBuf对象, 进而避免拷贝操作。
一 通过FileRegion实现零拷贝
基于上一篇博客的知识,理解Netty的零拷贝就很容易。
FileRegion底层调用NIO FileChannel的transferTo函数。 下面的代码节选自netty源码中example包的FileServerHandler.java。
@Override

public void channelRead0(ChannelHandlerContext ctx, String msg) throws Exception {

    RandomAccessFile raf = null;

    long length = -1;

    try {

        // 1. 通过 RandomAccessFile 打开一个文件.

        raf = new RandomAccessFile(msg, "r");

        length = raf.length();

    } catch (Exception e) {

        ctx.writeAndFlush("ERR: " + e.getClass().getSimpleName() + ": " + e.getMessage() + '
');

        return;

    } finally {

        if (length < 0 && raf != null) {

            raf.close();

        }

    }

    ctx.write("OK: " + raf.length() + '
');

    if (ctx.pipeline().get(SslHandler.class) == null) {

        // SSL not enabled - can use zero-copy file transfer.

        // 2. 调用 raf.getChannel() 获取一个 FileChannel.

        // 3. 将 FileChannel 封装成一个 DefaultFileRegion

        ctx.write(new DefaultFileRegion(raf.getChannel(), 0, length));

    } else {

        // SSL enabled - cannot use zero-copy file transfer.

        ctx.write(new ChunkedFile(raf));

    }

    ctx.writeAndFlush("
");

}
二 通过CompositeByteBuf实现零拷贝
CompositeByteBuf可以把需要合并的多个bytebuf组合起来,对外提供统一的readIndex和writerIndex。 但在CompositeByteBuf内部, 合并的多个ByteBuf都是单独存在的,CompositeByteBuf 只是逻辑上是一个整体。
CompositeByteBuf里面有个Component数组,聚合的bytebuf都放在Component数组里面,最小容量为16。
传统做法合并ByteBuf
假设有一份协议数据,它由头部和消息体组成,而头部和消息体是分别存放在两个ByteBuf中的, 为了方便后续处理,要将两个ByteBuf进行合并。
ByteBuf header = ...
ByteBuf body = ...
// 按照原本的做法 将header和body合并为一个ByteBuf
ByteBuf allBuf = Unpooled.buffer(header.readableBytes() + body.readableBytes());
allBuf.writeBytes(header);
allBuf.writeBytes(body);
上述过程将header和body都拷贝到了新的allBuf中,这增加了两次额外的数据拷贝操作了。
CompositeByteBuf实现合并bytebuf
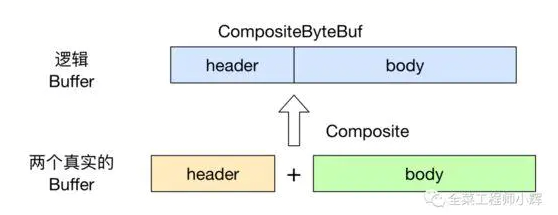
CompositeByteBuf合并ByteBuf,减少两次额外的数据拷贝操作。
ByteBuf header = ...
ByteBuf body = ...
// 新建CompositeByteBuf对象
CompositeByteBuf compositeByteBuf = Unpooled.compositeBuffer();
// 第一个参数是true, 表示当添加新的ByteBuf时, 自动递增 CompositeByteBuf 的 writeIndex。如果不传第一个参数或第一个参数为false,则合并后的compositeByteBuf的writeIndex不移动,即不能从compositeByteBuf中读取到新合并的数据。
compositeByteBuf.addComponents(true,header,body);
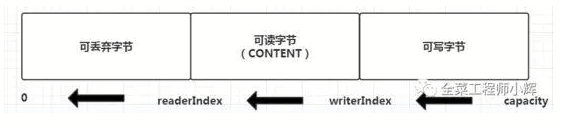
一张图清楚理解readIndex和writeIndex。
除了上面直接使用CompositeByteBuf类外, 还可以使用 Unpooled.wrappedBuffer方法。 Unpooled封装了CompositeByteBuf的操作,使用起来更加方便:
ByteBuf header = ...
ByteBuf body = ...
ByteBuf allByteBuf = Unpooled.wrappedBuffer(header, body);
三 通过wrap操作实现零拷贝
如果将一个byte数组转换为一个ByteBuf对象,以便于后续的操作,那么传统的做法是将此byte数组拷贝到ByteBuf中。
byte[] bytes = ...
ByteBuf byteBuf = Unpooled.buffer();
byteBuf.writeBytes(bytes);
显然这样的方式也是有一个额外的拷贝操作的, 我们可以使用Unpooled的相关方法, 包装这个byte数组, 生成一个新的ByteBuf实例, 而不需要进行拷贝操作. 上面的代码可以改为:
byte[] bytes = ...
ByteBuf byteBuf = Unpooled.wrappedBuffer(bytes);
通过Unpooled.wrappedBuffer方法将bytes包装为一个UnpooledHeapByteBuf对象, 而在包装的过程中, 不会有拷贝操作的,即生成的ByteBuf对象是和bytes数组共用了同一个存储空间,对bytes的修改也就是对ByteBuf对象的修改。
Unpooled类还提供了很多重载的wrappedBuffer方法,将一个或多个buffer包装为一个 ByteBuf对象,从而实现零拷贝。
public static ByteBuf wrappedBuffer(byte[] array)
public static ByteBuf wrappedBuffer(byte[] array, int offset, int length)
public static ByteBuf wrappedBuffer(ByteBuffer buffer)
public static ByteBuf wrappedBuffer(ByteBuf buffer)
public static ByteBuf wrappedBuffer(byte[]... arrays)
public static ByteBuf wrappedBuffer(ByteBuf... buffers)
public static ByteBuf wrappedBuffer(ByteBuffer... buffers)
public static ByteBuf wrappedBuffer(int maxNumComponents, byte[]... arrays)
public static ByteBuf wrappedBuffer(int maxNumComponents, ByteBuf... buffers)
public static ByteBuf wrappedBuffer(int maxNumComponents, ByteBuffer... buffers)
四 通过slice操作实现零拷贝
slice操作和wrap操作刚好相反, Unpooled.wrappedBuffer可以将多个ByteBuf 合并为一个, 而slice操作可以将一个ByteBuf切片为多个共享一个存储区域的 ByteBuf对象。

ByteBuf提供了两个slice操作方法:
public ByteBuf slice();
public ByteBuf slice(int index, int length);
前者等同于buf.slice(buf.readerIndex(), buf.readableBytes())调用,即返回buf中可读部分的切片。
后者相对就比较灵活,可以设置不同的参数获取buf不同区域的切片。
下面的例子展示了ByteBuf.slice方法的简单用法:
ByteBuf byteBuf = ...
ByteBuf header = byteBuf.slice(0, 5);
ByteBuf body = byteBuf.slice(5, 10);
用slice方法产生header和body的过程是没有拷贝操作的,header和body对象在内部其实是共享了byteBuf存储空间的不同部分而已 。