1、创建order分支
创建分支:
git checkout -b order
推送到远程:
git push -u origin order
2、通过路由渲染订单列表页面
新建order文件夹,Order.vue文件:
<template>
<div>
  <h3>订单列表</h3>
</div>
</template>

<script>
export default {

}
</script>

<style lang="less" scoped>

</style>
添加路由:
import Order from '../components/order/Order.vue'

const routes = [
  { path: '/', redirect: '/login' }, // 重定向
  { path: '/login', component: Login },
  {
    path: '/home',
    component: Home,
    redirect: '/welcome', // 重定向
    children: [ // 子路由
      { path: '/welcome', component: Welcome },
      { path: '/users', component: Users }, // 用户列表
      { path: '/rights', component: Rights }, // 权限列表
      { path: '/roles', component: Roles }, // 角色列表
      { path: '/categories', component: Cate }, // 商品分类
      { path: '/params', component: Params }, // 分类参数
      { path: '/goods', component: List }, // 商品列表
      { path: '/goods/add', component: Add }, // 添加商品
      { path: '/orders', component: Order } // 订单列表
    ]
  }
]
基础布局:
<template>
<div>
  <!--面包屑导航区域-->
  <el-breadcrumb separator-class="el-icon-arrow-right">
      <el-breadcrumb-item :to="{ path: '/home' }">首页</el-breadcrumb-item>
      <el-breadcrumb-item>订单管理</el-breadcrumb-item>
      <el-breadcrumb-item>订单列表</el-breadcrumb-item>
  </el-breadcrumb>
  <!--卡片视图区域-->
  <el-card>
    <el-row>
      <el-col :span="8">
        <!--搜索区域-->
        <el-input placeholder="请输入内容">
          <el-button slot="append" icon="el-icon-search"></el-button>
        </el-input>
      </el-col>
    </el-row>
  </el-card>
</div>
</template>

<script>
export default {

}
</script>

<style lang="less" scoped>

</style>
效果如图:

3、根据分页获取订单数据列表
调用api的订单数据列表接口,请求路径:orders,请求方法:get
请求参数:
query | 查询参数 | 可以为空 |
pagenum | 当前页码 | 不能为空 |
pagesize | 每页显示条数 | 不能为空 |
user_id | 用户 ID | 可以为空 |
pay_status | 支付状态 | 可以为空 |
is_send | 是否发货 | 可以为空 |
order_fapiao_title | ['个人','公司'] | 可以为空 |
order_fapiao_company | 公司名称 | 可以为空 |
order_fapiao_content | 发票内容 | 可以为空 |
consignee_addr | 发货地址 | 可以为空 |
添加代码:
<script>
export default {
  data() {
    return {
      // 获取订单列表的参数对象
      queryInfo: {
        query: '',
        pagenum: 1,
        pagesize: 10
      },
      orderList: [], // 订单列表
      total: 0 // 订单总数
    }
  },
  created() {
    this.getOrderList()
  },
  methods: {
    async getOrderList() {
      const { data: res } = await this.$http.get('orders', { params: this.queryInfo })
      if (res.meta.status !== 200) {
        return this.$message.error('获取订单列表失败')
      }
      // console.log(res)
      this.orderList = res.data.goods
      this.total = res.data.total
    }
  }
}
</script>
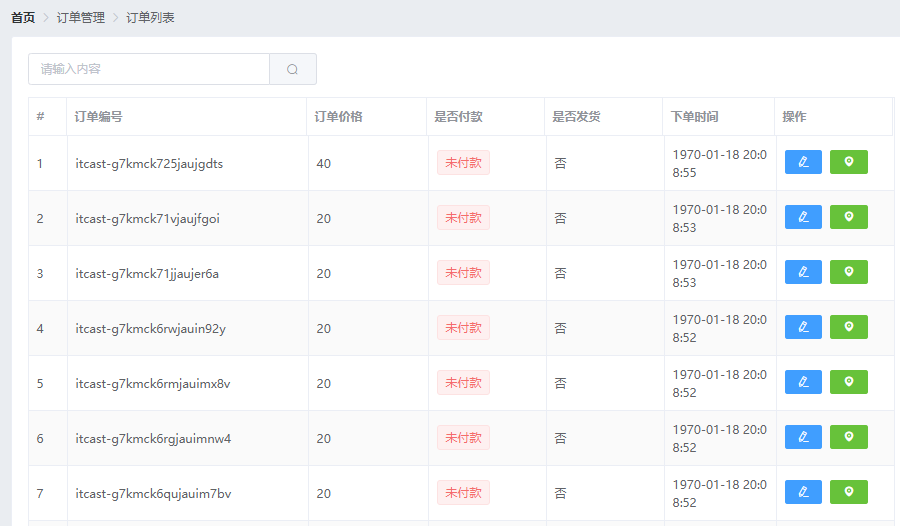
4、渲染订单table表格
添加表格代码:
<!--订单表格区域-->
<el-table :data="orderList" border stripe>
      <el-table-column type="index" label="#"></el-table-column>
      <el-table-column label="订单编号" prop="order_number" width="300px"></el-table-column>
      <el-table-column label="订单价格" prop="order_price"></el-table-column>
      <el-table-column label="是否付款" prop="pay_status">
        <template slot-scope="scope">
          <el-tag type="danger" v-if="scope.row.pay_status === '0'">未付款</el-tag>
          <el-tag type="success" v-else>已付款</el-tag>
        </template>
      </el-table-column>
      <el-table-column label="是否发货" prop="is_send"></el-table-column>
      <el-table-column label="下单时间" prop="create_time" width="140px">
        <template slot-scope="scope">
          <!--通过作用域插槽的形式 调用时间过滤器-->
          {{scope.row.create_time | dateFormat}}
        </template>
      </el-table-column>
      <el-table-column label="操作">
        <template slot-scope="scope">
          <!--修改按钮-->
          <el-button type="primary" size="mini" icon="el-icon-edit"></el-button>
          <!--地址按钮-->
          <el-button type="success" size="mini" icon="el-icon-location"></el-button>
        </template>
      </el-table-column>
</el-table>
此时效果图:
5、实现分页功能
添加分页代码:
<!--分页区域-->
    <el-pagination
      @size-change="handleSizeChange"
      @current-change="handleCurrentChange"
      :current-page="queryInfo.pagenum"
      :page-sizes="[5, 10, 20]"
      :page-size="queryInfo.pagesize"
      layout="total, sizes, prev, pager, next, jumper"
      :total="total" background
></el-pagination>
handleSizeChange 和 handleCurrentChange 函数:
// 监听 pageSize 改变的事件
handleSizeChange(newSize) {
      this.queryInfo.pagesize = newSize
      this.getOrderList()
},
// 监听 当前页码值 改变的事件
handleCurrentChange(newPage) {
      this.queryInfo.pagenum = newPage
      this.getOrderList()
}
效果图:

6、实现省市区县数据联动效果
导入citydata.js文件
<script>
import cityData from './citydata.js'

export default {
  data() {
    return {
      cityData: cityData // 可以简写为cityData
    }
  }
}
</script>
给修改地址按钮添加点击事件:
<!--修改地址按钮-->
<el-button type="primary" size="mini" icon="el-icon-edit"
              @click="showDialog"></el-button>

<script>
import cityData from './citydata.js'

export default {
  methods: {
    // 展示修改地址的对话框
    showDialog() {
      this.addressVisible = true
    }
  }
}
</script>
添加对话框代码:
<!--修改地址对话框-->
<el-dialog title="修改地址" :visible.sync="addressVisible"
    width="50%" @close="addressDialogClosed">
    <el-form :model="addressForm" :rules="addressFormRules" ref="addressFormRef" label-width="100px">
      <el-form-item label="省市区/县" prop="address1">
        <!--级联选择框 省市区县-->
        <!-- options用来指定数据源  props用来指定配置对象  value/v-model选中项绑定值-->
        <el-cascader :options="cityData" v-model="addressForm.address1"></el-cascader>
      </el-form-item>
      <el-form-item label="详细地址" prop="address2">
        <el-input v-model="addressForm.address2"></el-input>
      </el-form-item>
    </el-form>
    <span slot="footer" class="dialog-footer">
        <el-button @click="addressVisible = false">取 消</el-button>
        <el-button type="primary" @click="addressVisible = false">确 定</el-button>
    </span>
</el-dialog>

<script>
import cityData from './citydata.js'

export default {
  methods: {
    // 修改地址对话框的关闭事件
    addressDialogClosed() {
      this.$refs.addressFormRef.resetFields() // 清空表单
      this.addressForm.address1 = []
    }
  }
}
</script>
7、展示物流进度对话框并获取物流信息
给物流按钮添加点击事件:
<!--物流按钮-->
<el-button type="success" size="mini" icon="el-icon-location" @click="showProgress"></el-button>
showProgress函数:
// 展示物流进度的对话框
showProgress() {
      this.progressVisible = true
}
添加物流进度的对话框:
<!--物流进度对话框-->
<el-dialog title="物流进度" :visible.sync="progressVisible" width="50%">
    <span>这是一段信息</span>
</el-dialog>

<script>
import cityData from './citydata.js'

export default {
  data() {
    return {
      progressVisible: false // 控制物流进度对话框是否显示
    }
  }
}
</script>
然后要调用api的查看物流信息接口,请求路径:/kuaidi/:id,请求方法:get
供测试的物流单号:1106975712662
添加代码:
// 展示物流进度的对话框
async showProgress() {
      const { data: res } = await this.$http.get('/kuaidi/1106975712662')
      if (res.meta.status !== 200) {
        return this.$message.error('获取物流信息失败!')
      }
      console.log(res)
      this.progressInfo = res.data
      this.progressVisible = true
}
8、手动导入并使用Timeline组件
Timeline 时间线:可视化地呈现时间流信息。
Timeline 可拆分成多个按照时间戳正序或倒序排列的 activity,时间戳是其区分于其他控件的重要特征,使用时注意与 Steps 步骤条等区分。
我们发现 Timeline 组件是在element2.6.0版本才发布的,时间是:2019-03-01。
然后打开可视化工具--插件里的 vue-cli-plugin-element ,查看详情发现它的最近发布时间是:2019-01-09。
这就说明我们安装的插件 vue-cli-plugin-element 的发布时间,早于新版element增加 Timeline 功能的发布时间,所以需要手动导入。
把 timeline 和 timeline-item 文件夹复制粘贴到当前项目中的srcplugins目录下,然后打开element.js文件,添加代码:
import Timeline from './timeline/index.js'
import TimelineItem from './timeline-item/index.js'

Vue.use(Timeline)
Vue.use(TimelineItem)
添加代码:
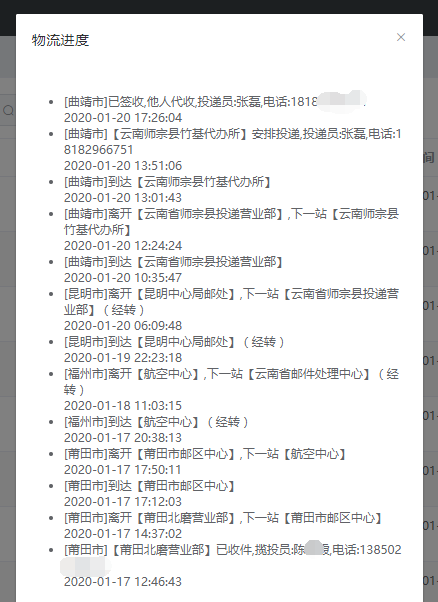
<!--timeline时间线-->
<el-timeline>
      <el-timeline-item
        v-for="(activity, index) in progressInfo"
        :key="index"
        :timestamp="activity.time">
        {{activity.context}}
      </el-timeline-item>
</el-timeline>

<script>
import cityData from './citydata.js'

export default {
  data() {
    return {
      progressInfo: [] // 物流信息列表
    }
  }
}
</script>
此时效果图:
导入 timeline 的样式:
<style lang="less" scoped>
@import '../../plugins/timeline/timeline.css';
@import '../../plugins/timeline-item/timeline-item.css';
.el-cascader{width: 100%}
</style>
刷新后效果图:

提交代码并合并分支:
git add .
git commit -m "完成订单功能的开发"
git push

git checkout master
git merge order
git push