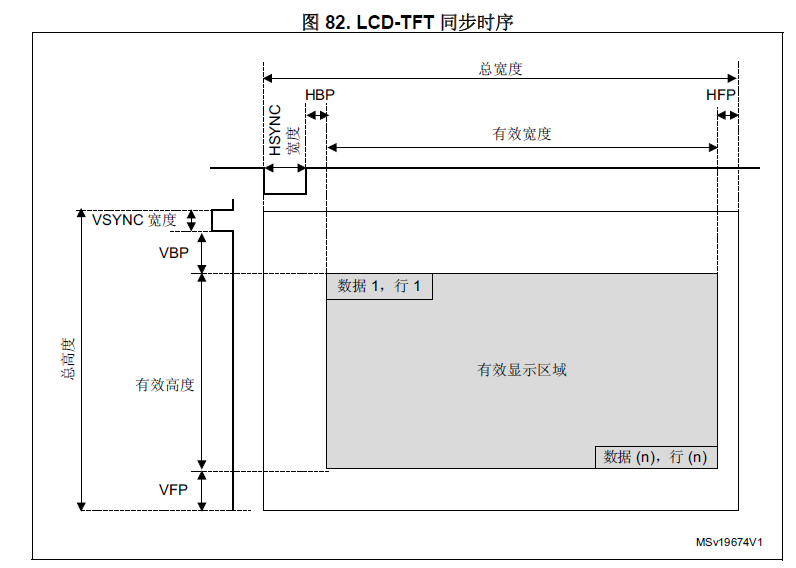
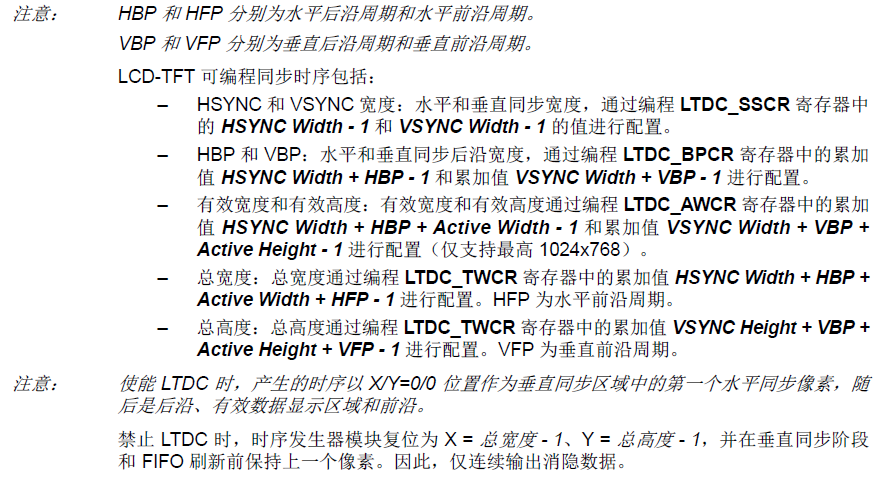
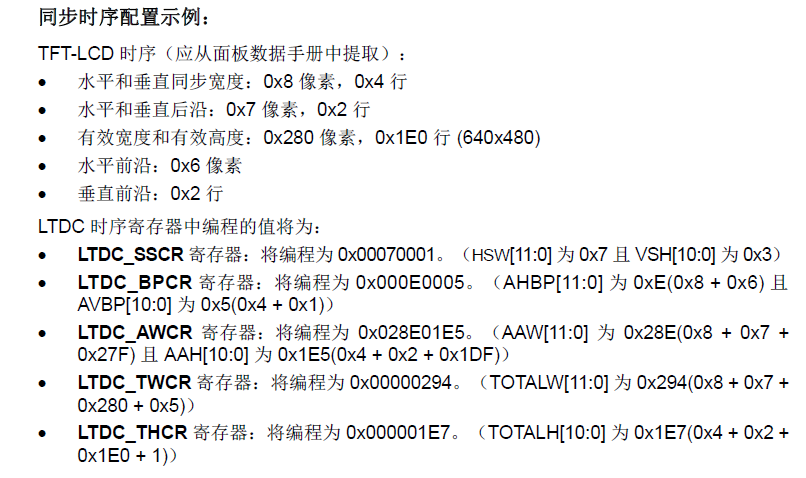
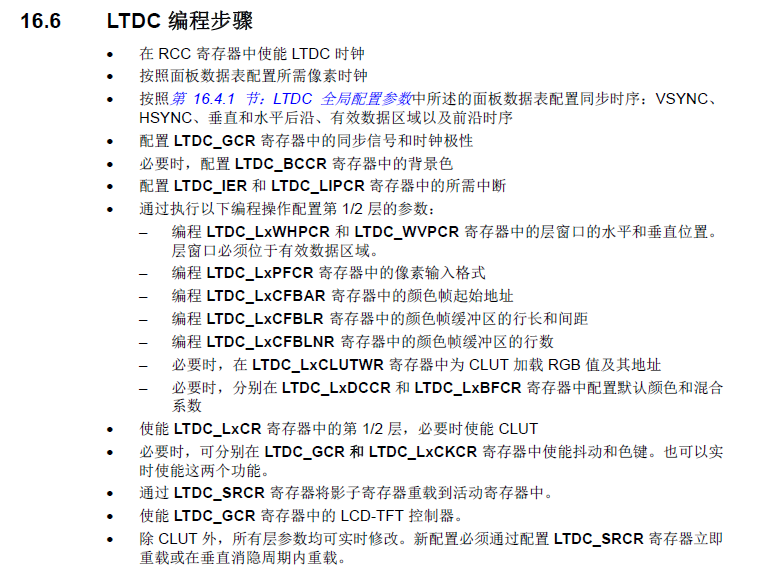
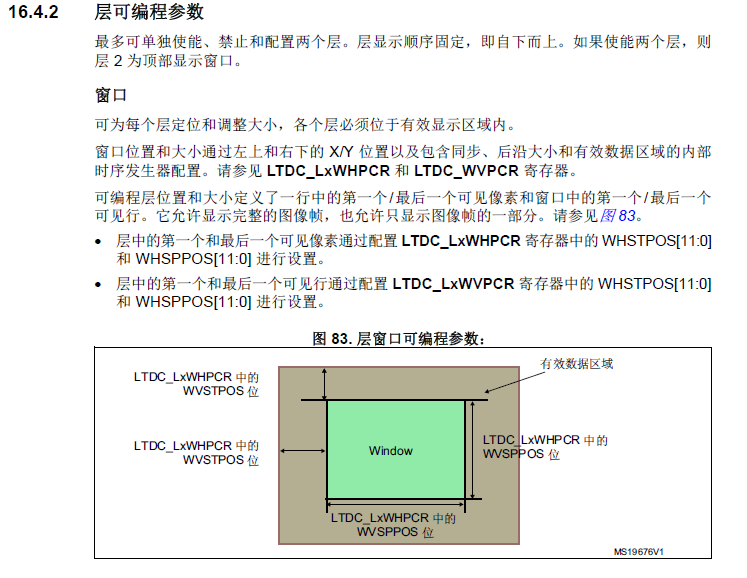
首先配置同步时序先看参考手册
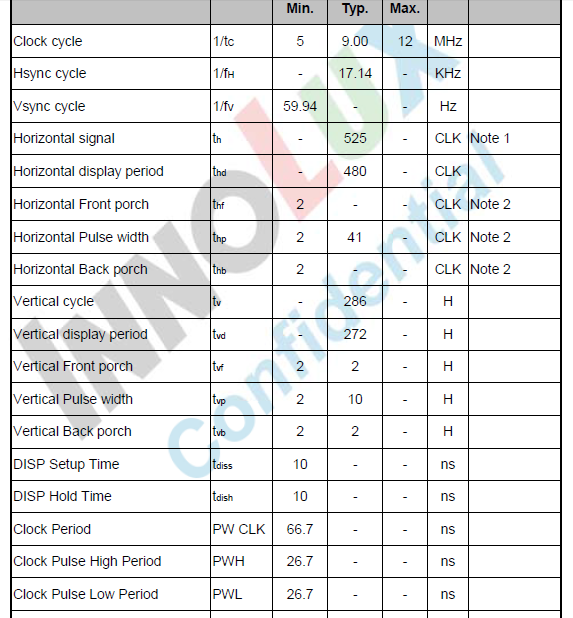
下面看一个实际例子,一块439的开发板
设置:
配置时序
LTDC_InitStruct.LTDC_HorizontalSync = 40; /* */ LTDC_InitStruct.LTDC_VerticalSync = 9; /* */ LTDC_InitStruct.LTDC_AccumulatedHBP = 42; /* */ LTDC_InitStruct.LTDC_AccumulatedVBP = 11; /* */ LTDC_InitStruct.LTDC_AccumulatedActiveW = 522; /* */ LTDC_InitStruct.LTDC_AccumulatedActiveH = 283; /* */ LTDC_InitStruct.LTDC_TotalWidth = 524; /* */ LTDC_InitStruct.LTDC_TotalHeigh = 285; LTDC_Init(<DC_InitStruct);
注意每个参数定义,之前是累加
看下完整的初始化代码
void LCD_Init(void) { LTDC_InitTypeDef LTDC_InitStruct; LTDC_Layer_InitTypeDef LTDC_Layer_InitStruct; LTDC_Layer_TypeDef LTDC_Layerx; /* IO¿Ú³õʼ»¯ */ LCD_GPIOInit(); LCD_DisplayOff(); /* ʹÄÜLCDʱÖÓ */ RCC_APB2PeriphClockCmd(RCC_APB2Periph_LTDC, ENABLE); /* ʹÄÜDMAʧ×Ù*/ RCC_AHB1PeriphClockCmd(RCC_AHB1Periph_DMA2D, ENABLE); /* ˮƽͬ²½ÐźÅ---µÍµçƽÓÐЧ */ LTDC_InitStruct.LTDC_HSPolarity = LTDC_HSPolarity_AL; /* ´¹Ö±Í¬²½ÐźÅ---µÍµçƽÓÐЧ */ LTDC_InitStruct.LTDC_VSPolarity = LTDC_VSPolarity_AL; /* Êý¾ÝʹÄÜÐźÅ---µÍµçƽÓÐЧ */ LTDC_InitStruct.LTDC_DEPolarity = LTDC_DEPolarity_AL; /* ÏñËØʱÖÓÅäÖÃ--- */ LTDC_InitStruct.LTDC_PCPolarity = LTDC_DEPolarity_AL; /* LCD±³¹âÉèÖà */ LTDC_InitStruct.LTDC_BackgroundRedValue = 0; LTDC_InitStruct.LTDC_BackgroundGreenValue = 0; LTDC_InitStruct.LTDC_BackgroundBlueValue = 0; /* **************************************************************************** *PLLSAI_VCO = HSE*PLLSAI_N / PLL_M = 8 * 192 / 8 = 192MHz *PLLLCDCLK = PLLSAI_VCO / PLLSAI_R = 192 / 3 = 64 Mhz *LTDC clock frequency = PLLLCDCLK / RCC_PLLSAIDivR = 64 / 8 = 8 Mhz **************************************************************************** */ RCC_PLLSAIConfig(192, 7, 3); RCC_LTDCCLKDivConfig(RCC_PLLSAIDivR_Div4); /* ʹÄÜPLLSAIʱÖÓ */ RCC_PLLSAICmd(ENABLE); /* µÈ´ýPLLSAIʱÖÓ */ while(RCC_GetFlagStatus(RCC_FLAG_PLLSAIRDY) == RESET){} /* */ LTDC_InitStruct.LTDC_HorizontalSync = 40; /* */ LTDC_InitStruct.LTDC_VerticalSync = 9; /* */ LTDC_InitStruct.LTDC_AccumulatedHBP = 42; /* */ LTDC_InitStruct.LTDC_AccumulatedVBP = 11; /* */ LTDC_InitStruct.LTDC_AccumulatedActiveW = 522; /* */ LTDC_InitStruct.LTDC_AccumulatedActiveH = 283; /* */ LTDC_InitStruct.LTDC_TotalWidth = 524; /* */ LTDC_InitStruct.LTDC_TotalHeigh = 285; LTDC_Init(<DC_InitStruct); LTDC_Layer_InitStruct.LTDC_HorizontalStart = 43; LTDC_Layer_InitStruct.LTDC_HorizontalStop = (480 + 43 - 1); LTDC_Layer_InitStruct.LTDC_VarticalStart = 12; LTDC_Layer_InitStruct.LTDC_VerticalStop = (272 + 12 - 1); /* Pixel Format configuration*/ LTDC_Layer_InitStruct.LTDC_PixelFormat = LTDC_Pixelformat_RGB565; /* Alpha constant (255 totally opaque) */ LTDC_Layer_InitStruct.LTDC_ConstantAlpha = 255; /* Default Color configuration (configure A,R,G,B component values) */ LTDC_Layer_InitStruct.LTDC_DefaultColorBlue = 0; LTDC_Layer_InitStruct.LTDC_DefaultColorGreen = 0; LTDC_Layer_InitStruct.LTDC_DefaultColorRed = 0; LTDC_Layer_InitStruct.LTDC_DefaultColorAlpha = 0; /* Configure blending factors */ LTDC_Layer_InitStruct.LTDC_BlendingFactor_1 = LTDC_BlendingFactor1_CA; LTDC_Layer_InitStruct.LTDC_BlendingFactor_2 = LTDC_BlendingFactor2_CA; /* the length of one line of pixels in bytes + 3 then : Line Lenth = Active high width x number of bytes per pixel + 3 Active high width = LCD_PIXEL_WIDTH number of bytes per pixel = 2 (pixel_format : RGB565) */ LTDC_Layer_InitStruct.LTDC_CFBLineLength = ((480 * 2) + 3); /* the pitch is the increment from the start of one line of pixels to the start of the next line in bytes, then : Pitch = Active high width x number of bytes per pixel */ LTDC_Layer_InitStruct.LTDC_CFBPitch = (480 * 2); /* configure the number of lines */ LTDC_Layer_InitStruct.LTDC_CFBLineNumber = 272; /* Input Address configuration */ LTDC_Layer_InitStruct.LTDC_CFBStartAdress = LCD_FRAME_BUFFER; LTDC_LayerInit(LTDC_Layer1, <DC_Layer_InitStruct); /* Configure Layer2 */ LTDC_Layer_InitStruct.LTDC_CFBStartAdress = LCD_FRAME_BUFFER + BUFFER_OFFSET; LTDC_Layer_InitStruct.LTDC_BlendingFactor_1 = LTDC_BlendingFactor1_PAxCA; LTDC_Layer_InitStruct.LTDC_BlendingFactor_2 = LTDC_BlendingFactor2_PAxCA; LTDC_LayerInit(LTDC_Layer2, <DC_Layer_InitStruct); LTDC_ReloadConfig(LTDC_IMReload); /* Enable foreground & background Layers */ LTDC_LayerCmd(LTDC_Layer1, ENABLE); // LTDC_LayerCmd(LTDC_Layer2, ENABLE); LTDC_ReloadConfig(LTDC_IMReload); LCD_DisplayOn(); } LCD_Init
LTDC_DefaultColorBlue就是背景色
每个Layer支持窗口(Window)操作,所谓Window,就是指该层的图像只有在Window区域内有效,而Window区域外则用该层的DefaultColor填充。如下图:
填色直接写内存
int main (void)
{
  uint32_t i, j;
  uint16_t *addr = (uint16_t *)LCD_FRAME_BUFFER;


  SDRAM_Init();
  LCD_Init();
    j = 0;
  while (1) {

    for (i = 0; i < 0x2000000;i++);
    for (i = 0; i < 480 * 272; i++)
    {
      addr[i] = 1 << j;
    }
    j++;
    if (j > 15)j = 0;
  }
}
