最近项目上要求增加视频直播功能,用户又不想多花钱购买专业的视频直播系统组件,客户是上帝没办法只能自己用Java实现一套推拉流中间件使用了。技术不算困难,开发思路也比较清晰,主要是通Nginx实现流媒体服务支撑,JavaCV实现客户端视频数据流通过RTMP协议向服务端推流操作。
主要技术
RTMP
RTMP是Real Time Messaging Protocol(实时消息传输协议)的首字母缩写。该协议基于TCP,是一个协议族,包括RTMP基本协议及RTMPT/RTMPS/RTMPE等多种变种。RTMP是一种设计用来进行实时数据通信的网络协议,主要用来在Flash/AIR平台和支持RTMP协议的流媒体/交互服务器之间进行音视频和数据通信。
Nginx
Nginx是一款自由的、开源的、高性能的HTTP服务器和反向代理服务器;同时也是一个IMAP、POP3、SMTP代理服务器;Nginx可以作为一个HTTP服务器进行网站的发布处理,另外Nginx可以作为反向代理进行负载均衡的实现。
JavaCV
JavaCV 是一款开源的视觉处理库,基于Apache License Version 2.0协议和GPLv2两种协议 ,对各种常用计算机视觉库封装后的一组jar包,封装了OpenCV、libdc1394、OpenKinect、videoInput和ARToolKitPlus等计算机视觉编程人员常用库的接口。
HLS
HTTP Live Streaming,也就是我们常说的HLS。HLS是苹果公司提出的基于HTTP的流媒体网络传输协议。类似于MPEG-DASH,但是HLS更加简洁,它的基本原理也是服务端把文件或媒体流按照不同的码率切分成一个个小片段进行传输,客户端在播放码流时,可以根据自身的带宽及性能限制,在同一视频内容的不同码率的备用源中,选择合适码率的码流进行下载播放。在传输会话开始时,客户端首先需要下载描述不同码流元数据的M3U8索引文件(类似于DASH中的MPD文件)。
服务端环境搭建
1. 安装nginx服务(下载地址https://github.com/arut/nginx-rtmp-module)
2. 配置nginx服务
worker_processes 1;
error_log logs/error.log debug;
events {
worker_connections 1024;
}
http {
include mime.types;
default_type application/octet-stream;
sendfile on;
keepalive_timeout 65;
server {
listen 6064;
location / {
root html;
}
location /stat {
rtmp_stat all;
rtmp_stat_stylesheet stat.xsl;
}
location /stat.xsl {
root html;
}
#HLS配置开始,这个配置为了`客户端`能够以http协议获取HLS的拉流
location /hls {
#server hls fragments
types{
application/vnd.apple.mpegurl m3u8;
video/mp2t ts;
}
alias temp/hls;
expires -1;
}
}
}
rtmp {
server {
listen 1935;
application live {
live on;
record off;
publish_notify on;
#on_publish http://localhost:8080/newsweb/api/v1/rtmp/on_publish;
#on_publish_done http://localhost:8080/newsweb/api/v1/rtmp/on_publish_done;
#on_play http://localhost:8080/newsweb/api/v1/rtmp/on_play;
#on_play_done http://localhost:8080/newsweb/api/v1/rtmp/on_play_done;
}
application hls {
live on;
hls on; #是否开启hls
hls_path temp/hls; #本地切片路径
hls_fragment 8s; #本地切片长度
publish_notify on;
#on_publish http://localhost:8080/newsweb/api/v1/rtmp/on_publish;
#on_publish_done http://localhost:8080/newsweb/api/v1/rtmp/on_publish_done;
#on_play http://localhost:8080/newsweb/api/v1/rtmp/on_play;
#on_play_done http://localhost:8080/newsweb/api/v1/rtmp/on_play_done;
}
}
}
3. 启动nginx服务程序

Nginx常用命令
1、启动nginx
nginx.exe 或者 start nginx
2、停止nginx
nginx -s stop或者nginx -s quit
3、重载nginx命令
nginx -s reload
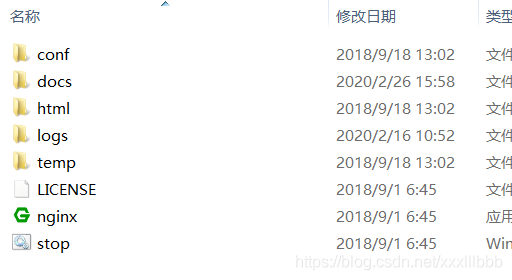
用浏览器访问地址:http://xxx.xxx.xxx.xxx:6064/ 可以看到如下页面说明ngxin启动成功。
客户端代码实现
创建BStreamer基础视频流类主要作为通用视频流的基类使用,在他的基础上可以扩展实现RTMP和RTSP的推流操作类。
/**
* 基础视频流
*/
public class BStreamer {
private int width = 640;
private int height = 480;
private String url;
public BStreamer(String url) {
this.url = url;
}
public BStreamer(String url, int w, int h) {
this.url = url;
if (w > 0 && h > 0) {
this.width = w;
this.height = h;
}
}
public int getWidth() {
return width;
}
public void setWidth(int width) {
this.width = width;
}
public int getHeight() {
return height;
}
public void setHeight(int height) {
this.height = height;
}
public String getUrl() {
return url;
}
public void setUrl(String url) {
this.url = url;
}
}
Pusher 类通过继承上面的BStreamer 类实现基于RTMP协议的视频流推送操作。
/**
* RTMP视频推流器
*/
public class Pusher extends BStreamer {
private Thread thread;
/**
* 视频采集器(摄像头)
*/
OpenCVFrameGrabber grabberCV;
///推流
FrameRecorder recorder;
private boolean exit = true;
public Pusher(String url) {
super(url);
}
public Pusher(String url, int w, int h) {
super(url, w, h);
}
public void close() throws Exception {
exit = false;
if(grabberCV!=null){
grabberCV.close();
}
if(recorder.isInterleaved()){
recorder.close();
recorder.setInterleaved(false);
}
this.thread.interrupt();
}
public void start() throws Exception {
exit = true;
if(grabberCV!=null){
grabberCV.start();
}
if(recorder.isInterleaved()){
recorder.start();
recorder.setInterleaved(true);
}
this.thread.start();
}
public void push(Consumer<Frame> consumer) throws Exception {
///采集摄像头
grabberCV = new OpenCVFrameGrabber(0);
grabberCV.setImageWidth(getWidth());
grabberCV.setImageHeight(getHeight());
///推流
// recorder = FrameRecorder.createDefault(getUrl(), getWidth(), getHeight());
recorder=new FFmpegFrameRecorder(getUrl(), getWidth(), getHeight());
recorder.setVideoCodec(avcodec.AV_CODEC_ID_H264); // 28
recorder.setFormat("flv"); // rtmp的类型
recorder.setFrameRate(30);
// recorder.setVideoBitrate(10 * 1024 * 1024);
this.thread = new Thread(() -> {
try {
while (exit) {
Frame f = grabberCV.grab();
if (f != null) {
if (recorder.isInterleaved()) {
ConsoleOut.println("push stream...");
recorder.record(f);
consumer.accept(f);
}
}
}
} catch (Exception e) {
e.printStackTrace();
recorder.setInterleaved(false);
}
});
}
}
TestRTMPPusher单元测试类,通过单元测试类完成代码效果验证。
public class TestRTMPPusher {
public static void main(String[] args) throws Exception {
//String url="rtsp://192.168.56.1:554/Sword";
String url="rtmp://127.0.0.1/live/stream";
Pusher pusher = new Pusher(url);
CanvasFrame cf = Windows.build("测试RTMP推流", w -> {
ConsoleOut.println("窗口已关闭!");
try {
pusher.close();
} catch (Exception e) {
e.printStackTrace();
}
});
pusher.push(f -> {
cf.showImage(f);
});
pusher.start();
}
}
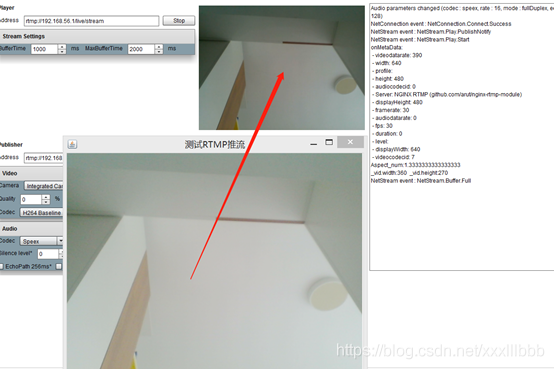
运行测试程序结果如下。

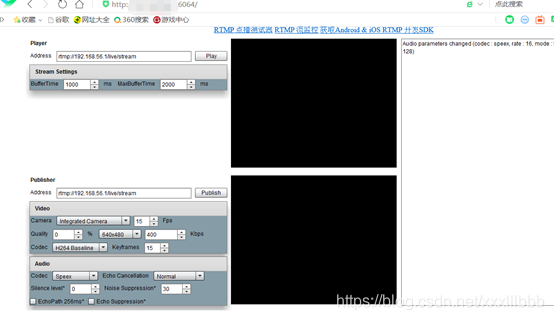
打开上面提到的nginx服务端程序界面,即可看到推流成功。
至此基于JavaCV实现的IPC推流功能就实现了,相关代码我已经上传到csdn资源,如有需要请自行下载学习。
————————————————
版权声明:本文为CSDN博主「黒木涯」的原创文章,遵循CC 4.0 BY-SA版权协议,转载请附上原文出处链接及本声明。
原文链接:https://blog.csdn.net/xxxlllbbb/article/details/104819683