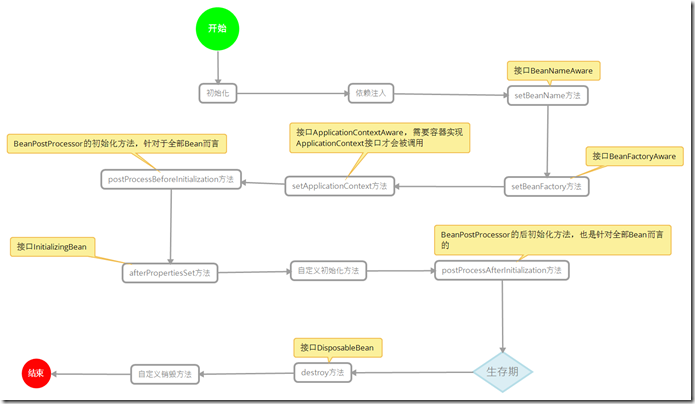
Spring Ioc容器初始化Bean的过程,Spring Ioc容器的本质目的就是为了管理Bean,对于Bean而言,在容器存在其生命周期,他的初始化和销毁也需要一个过程,在一些需要自定义的过程中,我们可以插入代码去改变他们的一些行为,以满足特定的需求,这就需要使用Spring Bean生命周期的知识了。
生命周期主要为了了解Spring Ioc容器初始化和销毁Bean的过程。下图展示了Spring Ioc容器初始化和销毁Bean的过程
介绍一下步骤:
1.如果Bean 实现了接口BeanNameAware的setBeanName方法,那么被Spring Ioc容器管理的Bean就会调用这个方法。
2.如果Bean实现了接口BeanFactoryBean的setBeanFactory方法,那么它就会调用这个方法。
3.如果Bean实现了接口ApplicationContextAware的setApplicationContext方法,且Spring Ioc容器也必须是一个ApplicationContext接口的实现类,那么就会调用这个方法,否则不会调用。
4.如果Bean实现了接口BeanPostProcessor的postProcessBeforeInitialization方法,那么它就会调用这个方法。
5.如果Bean实现了接口BeanFactoryPostProcessor的afterPropertiesSet方法,那么他就会调用这个方法。
6.如果Bean自定义了初始化的方法,那么它就会调用自定义的初始化方法。
7.如果Bean实现了接口BeanPostProcessor的postProcessAfterInitialzation方法,完成这些调用,这个时候Bean就完成了初始化,也存在了Spring Ioc容器当中,使用者可以从中获取Bean的服务。
当服务器关闭时或Spring ioc遇到情况关闭时,他就会对被调用的Bean进行销毁,步骤如下
8.如果Bean实现了接口DisposableBean的destroy方法,那么就会调用它。
9.如果自己定义了销毁方法,那么就会执行自定义的方法。
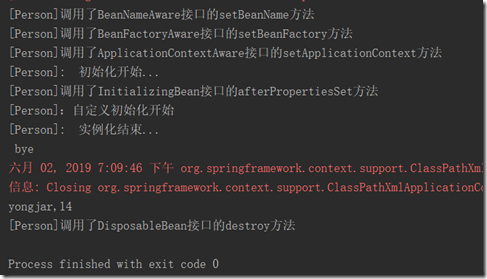
说了很多理论,那么我们就下面就实际操作证明一下吧
1,首先定义一个BeanPostProcessImpl 类,让Spring Ioc容器对其进行管理,这个时候我们需要实现BeanPostProcessor接口,证明4和7条。
package pro.jamal.blog.domain;

import org.springframework.beans.BeansException;
import org.springframework.beans.factory.config.BeanPostProcessor;

/**
 * @author: lyj
 * @Date: 2019/6/2
 */
public class BeanPostProcessImpl implements BeanPostProcessor {

    /**
     * 在初始化之前的方法
     */
    @Override
    public Object postProcessBeforeInitialization(Object bean, String s) throws BeansException {
        System.out.println("["+bean.getClass().getSimpleName()+"]:  初始化开始...");
        return bean;
    }

    /**
     * 初始化后的处理方法
     */
    @Override
    public Object postProcessAfterInitialization(Object bean, String s) throws BeansException {
        System.out.println("["+bean.getClass().getSimpleName()+"]:  实例化结束...
 bye");
        return bean;
    }
}
2,在定义一个类,实现1,2,3,5接口,再自定义一个初始化方法,证明第6条理论,简单的打印
package pro.jamal.blog.domain;

import org.springframework.beans.BeansException;
import org.springframework.beans.factory.*;
import org.springframework.context.ApplicationContext;
import org.springframework.context.ApplicationContextAware;

/**
 * @author: lyj
 * @Date: 2019/6/2
 */
public class Person implements BeanNameAware, BeanFactoryAware, ApplicationContextAware, InitializingBean, DisposableBean {
    private String name;
    private  Integer age;

    @Override
    public void setBeanFactory(BeanFactory beanFactory) throws BeansException {

        System.out.println("["+this.getClass().getSimpleName()+"]"+ "调用了BeanFactoryAware接口的setBeanFactory方法");
    }

    @Override
    public void setBeanName(String s) {
        System.out.println("["+this.getClass().getSimpleName()+"]"+ "调用了BeanNameAware接口的setBeanName方法");
    }

    @Override
    public void destroy() throws Exception {
        System.out.println("["+this.getClass().getSimpleName()+"]"+ "调用了DisposableBean接口的destroy方法");

    }

    @Override
    public void afterPropertiesSet() throws Exception {
        System.out.println("["+this.getClass().getSimpleName()+"]"+ "调用了InitializingBean接口的afterPropertiesSet方法");

    }

    @Override
    public void setApplicationContext(ApplicationContext applicationContext) throws BeansException {

        System.out.println("["+this.getClass().getSimpleName()+"]"+ "调用了ApplicationContextAware接口的setApplicationContext方法");
    }


    public void diyInit(){
        System.out.println("["+this.getClass().getSimpleName()+"]:"+"自定义初始化开始");
    }


    public String getName() {
        return name;
    }

    public void setName(String name) {
        this.name = name;
    }

    public Integer getAge() {
        return age;
    }

    public void setAge(Integer age) {
        this.age = age;
    }


}
3、xml配置
<?xml version="1.0" encoding="UTF-8"?>
<beans xmlns="http://www.springframework.org/schema/beans"
       xmlns:xsi="http://www.w3.org/2001/XMLSchema-instance"
       xsi:schemaLocation="http://www.springframework.org/schema/beans
                        http://www.springframework.org/schema/beans/spring-beans.xsd">

    <bean class="pro.jamal.blog.domain.BeanPostProcessImpl"/>
    <bean class="pro.jamal.blog.domain.Person" init-method="diyInit">
        <property name="name" value="yongjar"/>
        <property name="age" value="14"/>
    </bean>

</beans>
4.测试
public class BeanCycleTest {
    public static void main(String[] args) {
        ClassPathXmlApplicationContext context =
                new ClassPathXmlApplicationContext("bean.xml");
         Person bean = context.getBean(Person.class);
        System.out.println(bean.getName() +"," + bean.getAge());
        context.close();
    }
}
打印结果

