ROS入门(五)——Gazebo加载模型与ROS控制
iwehdio的博客园:https://www.cnblogs.com/iwehdio/
参考教程:Gazebo官方教程
- Using roslaunch to start Gazebo, world files and URDF models:http://gazebosim.org/tutorials?tut=ros_roslaunch
- Using a URDF in Gazebo:http://gazebosim.org/tutorials/?tut=ros_urdf
- Using Gazebo plugins with ROS:http://gazebosim.org/tutorials?tut=ros_gzplugins
- ROS Control:http://gazebosim.org/tutorials/?tut=ros_control
1、将机器人添加到Gazebo环境中
-
创建自己的Gazebo ROS包。在ROS工作空间下,所用与机器人模型和说明有关的都应放在
/MYROBOT_description包中,所有与Gazebo有关的启动文件和世界文件都应放在/MYROBOT_gazebo中。~/catkin_ws/src /MYROBOT_description /urdf MYROBOT.urdf /meshes mesh1.dae ... /materials /cad /MYROBOT_gazebo /launch MYROBOT.launch /worlds MYROBOT.world /models world_object1.dae /materials /plugins -
创建自定义的世界文件和启动世界文件的launch文件,在 smallcar_gazebo功能包下。station.launch文件放在launch文件夹下,station.world文件放在worlds文件夹下。
station.launch文件 <launch> <!-- We resume the logic in empty_world.launch, changing only the name of the world to be launched --> <include file="$(find gazebo_ros)/launch/empty_world.launch"> <arg name="world_name" value="$(find smallcar_gazebo)/worlds/station.world"/> <!-- more default parameters can be changed here --> </include> </launch> station.world文件 <?xml version="1.0" ?> <sdf version="1.4"> <world name="default"> <include> <uri>model://ground_plane</uri> </include> <include> <uri>model://sun</uri> </include> <include> <uri>model://gas_station</uri> <name>gas_station</name> <pose>-2.0 7.0 0 0 0 0</pose> </include> </world> </sdf> -
添加
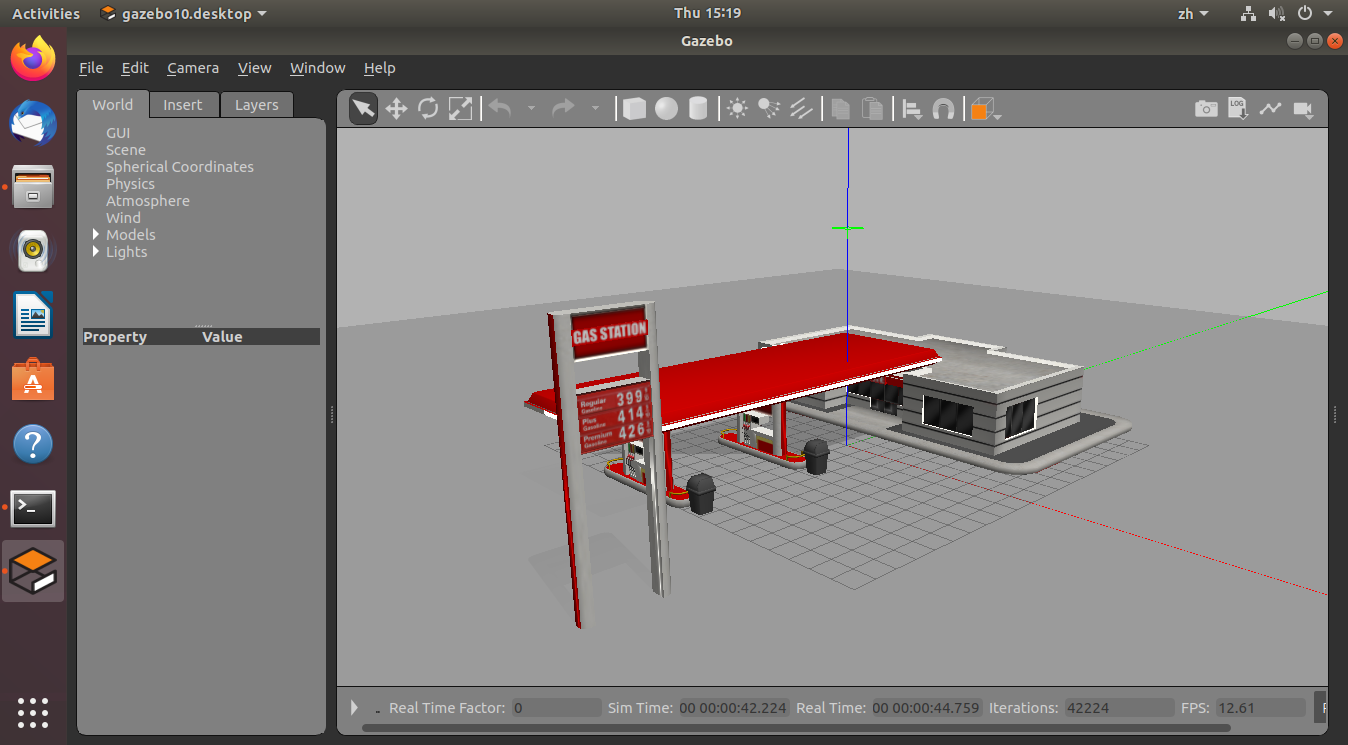
find smallcar_gazebo到环境变量后,使用指令:$ roslaunch smallcar_gazebo station.launch即可启动加油站世界文件(如果启动不了查看 .gazebo/.models下是否有 gas_station模型):
-
使用 roslaunch 启动 URDF描述的机器人。
-
可以使用ROS服务调用的方法。该方法使用 python 脚本
spawn_model想gazebo_rosROS节点(在rostopic命名空间中简称为“ gazebo”)发出服务调用请求,以将自定义URDF添加到Gazebo中。主要考虑使用 URDF 的情况,使用XACRO 或模型数据库方法可参考http://gazebosim.org/tutorials?tut=ros_roslaunch。 -
运行脚本和查看所有可用参数的方法:
$ rosrun gazebo_ros spawn_model -file `rospack find MYROBOT_description`/urdf/MYROBOT.urdf -urdf -x 0 -y 0 -z 1 -model MYROBOT $ rosrun gazebo_ros spawn_model -h -
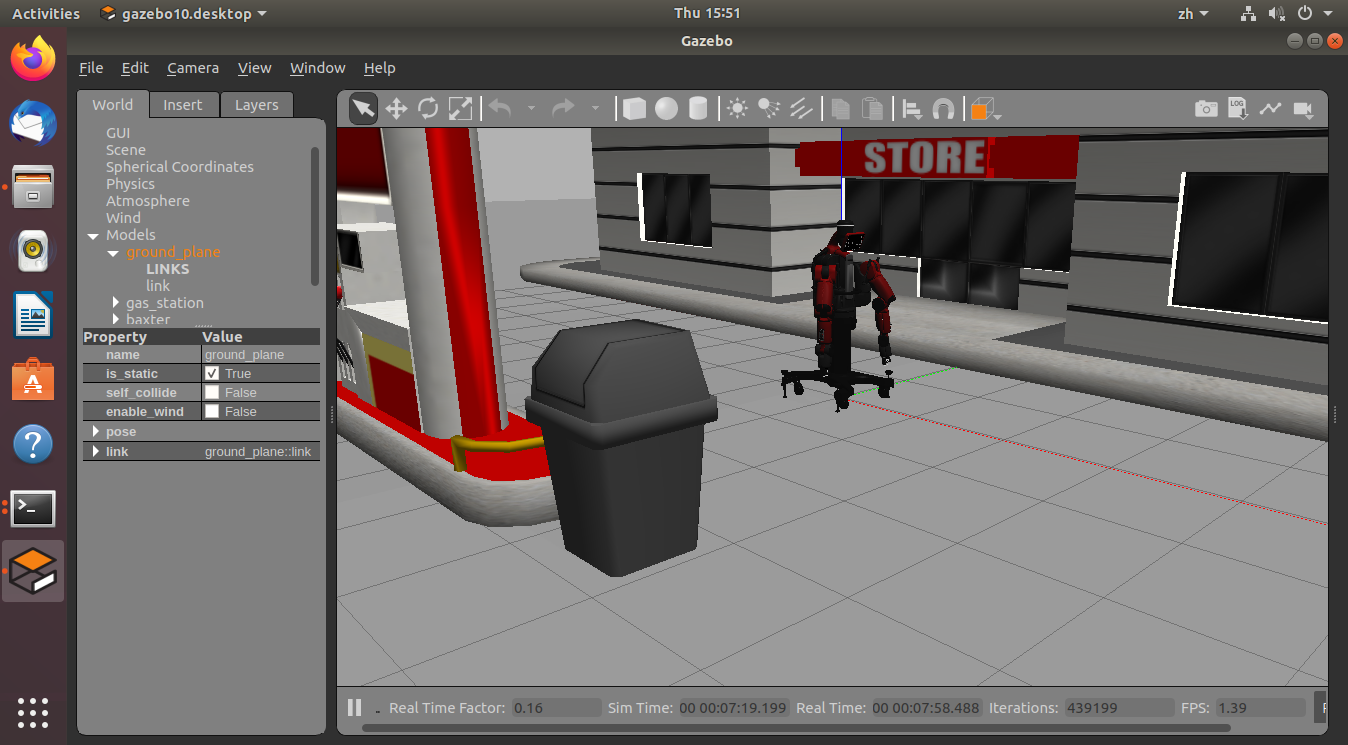
如果没有 URDF 实例,可以使用 baxter 实例。
$ git clone https://github.com/RethinkRobotics/baxter_common.git
$ rosrun gazebo_ros spawn_model -file `rospack find baxter_description`/urdf/baxter.urdf -urdf -z 1 -model baxter
不想配置环境变量可以进入baxter_description/urdf输入:
$ rosrun gazebo_ros spawn_model -file baxter.urdf -urdf -z 1 -model baxter
结果为将机器人添加到了环境中:
-
将这个机器人集成到launch文件中,将以下的内容添加到launch文件中。效果与上相同
<!-- Spawn a robot into Gazebo -->
<node name="spawn_urdf" pkg="gazebo_ros" type="spawn_model" args="-file $(find baxter_description)/urdf/baxter.urdf -urdf -z 1 -model baxter" />
-
2、URDF 文件的使用。
-
通用机器人描述格式(URDF)是ROS用于描述机器人的所有元素的XML文件格式。在后台,gazebo将自动将URDF转换为SDF。
-
URDF 文件的总体要求:每个
<link>标签中都必须有一个<inertial>标签;每个<link>、<joint>、<robot>标签中都可以有一个<gazebo>标签;如果想让某组件固定到世界则指定<link name="world">。 -
<gazebo>元素是URDF的扩展,用于指定在gazebo中进行仿真所需的其他属性。它允许您指定以SDF格式找到的未包含在URDF格式中的属性。三种不同的<gazebo>元素分别<link>、<joint>、<robot>标签。 -
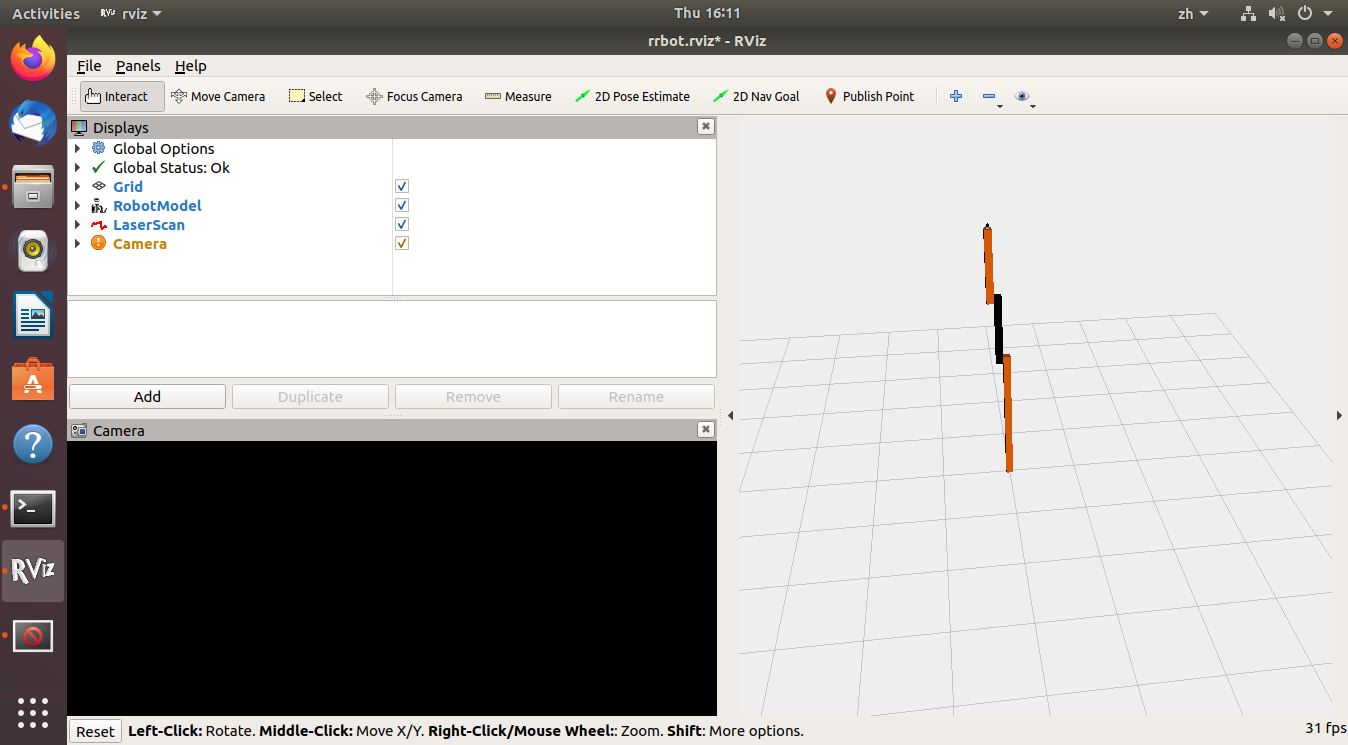
获取实例机器人RPBot,编译并在Rviz中查看。
$ git clone https://github.com/ros-simulation/gazebo_ros_demos.git
$ roslaunch rrbot_description rrbot_rviz.launch
结果为:(还能够使用“关节状态发布者”窗口中的滑块来移动两个关节)
在这里可能会报错,解决方法见https://www.cnblogs.com/vtas-Yao/p/12376939.html。命令行里没有警告了,但是 Camera 里还是有警告。
-
在gazebo中查看:
$ roslaunch rrbot_gazebo rrbot_world.launch -
<gazebo>元素标签没有属性,适用于整个机器人模型。<robot>中如果有该标签则说明模型是不可移动的。更多该标签的功能见http://gazebosim.org/tutorials/?tut=ros_urdf。 -
刚性固定模型到世界。
-
如果希望将URDF模型永久地附加到世界框架(地平面),则必须创建一个“世界”链接和一个将其固定到模型基础的关节。RRBot通过以下步骤实现了这一目标:
  <!-- Used for fixing robot to Gazebo 'base_link' -->
  <link name="world"/>

  <joint name="fixed" type="fixed">
    <parent link="world"/>
    <child link="link1"/>
  </joint>
-
-
链接(link)在RRBot中的示例:
<!-- Base Link --> <link name="link1"> <collision> <origin xyz="0 0 ${height1/2}" rpy="0 0 0"/> <geometry> <box size="${width} ${width} ${height1}"/> </geometry> </collision> <visual> <origin xyz="0 0 ${height1/2}" rpy="0 0 0"/> <geometry> <box size="${width} ${width} ${height1}"/> </geometry> <material name="orange"/> </visual> <inertial> <origin xyz="0 0 1" rpy="0 0 0"/> <mass value="1"/> <inertia ixx="1.0" ixy="0.0" ixz="0.0" iyy="1.0" iyz="0.0" izz="1.0"/> </inertial> </link>-
gazebo中指定的单位为米和千克。
-
<collision>标签中指定的是物理的碰撞模型,<visual>中指定的是可见的视觉模型。二者必须同时指定。 -
开源工具Blender可以简化碰撞模型,提高性能。
-
标准 URDF 指定颜色:
<material name="orange"/> 或 <material name="orange"> <color rgba="${255/255} ${108/255} ${10/255} 1.0"/> </material>-
上述方法在gazebo中无效,gazebo中必须为每个链接指定材料标签。
<gazebo reference="link1">
    <material>Gazebo/Orange</material>
</gazebo>
-
-
<inertial>在gazebo中为了使链接不被忽略,质量必须大于零。此外,在任何有限扭矩应用下,零主惯性矩(ixx,iyy,izz)的链接都可能导致无限加速。<inertial> <origin xyz="0 0 ${height1/2}" rpy="0 0 0"/> <mass value="1"/> <inertia ixx="1.0" ixy="0.0" ixz="0.0" iyy="1.0" iyz="0.0" izz="1.0"/> </inertial><origin>标签表示此链接的质心。通过将质心设置为RRBot矩形链接高度的一半,我们将质心居中。 -
在RRBot中,指定了两个非固定链接的摩擦系数,以便在发生碰撞时模拟更精确的接触相互作用。
<gazebo reference="link2">
    <mu1>0.2</mu1>
    <mu2>0.2</mu2>
    <material>Gazebo/Black</material>
  </gazebo>
-
-
关节(joint)在RRBot中的示例:
<joint name="joint2" type="continuous"> <parent link="link2"/> <child link="link3"/> <origin xyz="0 ${width} ${height2 - axel_offset*2}" rpy="0 0 0"/> <axis xyz="0 1 0"/> <dynamics damping="0.7"/> </joint><origin>、<parent>、<child>标签是必须的。<limit>标签中的所有属性都是可选的。
-
通过 gazebo 将 URDF 转换为 SDF:
$ gz sdf -p MODEL.urdf
3、Gazebo插件与ROS
-
Gazebo主要支持三种插件:ModelPlugins 提供对物理模型的 API 访问;SensorPlugins 提供对传感器的 API 的访问;VisualPlugins 提供对视觉的 API 的访问。
-
添加一个 ModelPlugins 。将ModelPlugins charity到
<robot>标签内部,且被<gazebo>标签包裹着。<robot> ... robot description ... <gazebo> <plugin name="differential_drive_controller" filename="libdiffdrive_plugin.so"> ... plugin parameters ... </plugin> </gazebo> ... robot description ... </robot>在Gazebo内加载机器人模型后,
diffdrive_plugin代码将获得对模型本身的引用,从而可以对其进行操作。同样,它将为自身的SDF元素供参考,以读取传递给它的插件参数。 -
添加一个 SensorPlugins 。指定传感器插件略有不同,Gazebo中的传感器应连接到链接,因此
<gazebo>必须为描述该传感器的元素提供对该链接的引用。<robot> ... robot description ... <link name="sensor_link"> ... link description ... </link> <gazebo reference="sensor_link"> <sensor type="camera" name="camera1"> ... sensor parameters ... <plugin name="camera_controller" filename="libgazebo_ros_camera.so"> ... plugin parameters .. </plugin> </sensor> </gazebo> </robot>在Gazebo内加载机器人模型后,
camera_controller将为代码提供对传感器的引用,从而可以访问其API。同样,它将为自身的SDF元素提供参考,以读取传递给它的插件参数。 -
gazebo_plugins中可用的插件:
-
Camera:提供ROS接口,用于通过发布CameraInfo和Image ROS消息来模拟wge100 摄像机之类的摄像机。
-
以一个安装在RRBot摆臂末端的简单RGB相机为示例,在 rrbot.xacro 文件中。
<xacro:property name="camera_link" value="0.05" /> <!-- Size of square 'camera' box --> <joint name="camera_joint" type="fixed"> <axis xyz="0 1 0" /> <origin xyz="${camera_link} 0 ${height3 - axel_offset*2}" rpy="0 0 0"/> <parent link="link3"/> <child link="camera_link"/> </joint> <!-- Camera --> <link name="camera_link"> <collision> <origin xyz="0 0 0" rpy="0 0 0"/> <geometry> <box size="${camera_link} ${camera_link} ${camera_link}"/> </geometry> </collision> <visual> <origin xyz="0 0 0" rpy="0 0 0"/> <geometry> <box size="${camera_link} ${camera_link} ${camera_link}"/> </geometry> <material name="red"/> </visual> <inertial> <mass value="1e-5" /> <origin xyz="0 0 0" rpy="0 0 0"/> <inertia ixx="1e-6" ixy="0" ixz="0" iyy="1e-6" iyz="0" izz="1e-6" /> </inertial> </link> -
该插件为我们提供了摄像头功能,并将图像发布到ROS消息中。如前所示,在 rrbot.gazebo 文件中用
<gazebo>标签的引用指向链接。<!-- camera --> <gazebo reference="camera_link"> <sensor type="camera" name="camera1"> <update_rate>30.0</update_rate> <camera name="head"> <horizontal_fov>1.3962634</horizontal_fov> <image> <width>800</width> <height>800</height> <format>R8G8B8</format> </image> <clip> <near>0.02</near> <far>300</far> </clip> <noise> <type>gaussian</type> <!-- Noise is sampled independently per pixel on each frame. That pixel's noise value is added to each of its color channels, which at that point lie in the range [0,1]. --> <mean>0.0</mean> <stddev>0.007</stddev> </noise> </camera> <plugin name="camera_controller" filename="libgazebo_ros_camera.so"> <alwaysOn>true</alwaysOn> <updateRate>0.0</updateRate> <cameraName>rrbot/camera1</cameraName> <imageTopicName>image_raw</imageTopicName> <cameraInfoTopicName>camera_info</cameraInfoTopicName> <frameName>camera_link</frameName> <hackBaseline>0.07</hackBaseline> <distortionK1>0.0</distortionK1> <distortionK2>0.0</distortionK2> <distortionK3>0.0</distortionK3> <distortionT1>0.0</distortionT1> <distortionT2>0.0</distortionT2> </plugin> </sensor> </gazebo>其中:
-
<gazebo reference="camera_link">:链接名称“ camera_link”必须与我们添加到 URDF 的链接的名称匹配。 -
<sensor type="camera" name="camera1">:传感器名称“ camera1”必须与所有其他传感器名称唯一。 -
<update_rate>30.0</update_rate>:刷新率,Gazebo内每秒拍摄一次新相机图像的次数。这是传感器在仿真过程中将尝试的最大更新速率,但是如果物理仿真的运行速度快于传感器生成的速度,则它可能会落后于该目标速率。 -
填写以下这些值以匹配物理相机硬件上制造商的规格。假定为正方形。近片段和远片段是特定于仿真的参数,为摄像机可以看到仿真对象的距离提供了上限和下限。在相机的验光框中指定。
<horizontal_fov>1.3962634</horizontal_fov> <image> <width>800</width> <height>800</height> <format>R8G8B8</format> </image> <clip> <near>0.02</near> <far>300</far> </clip> -
<plugin name="camera_controller" filename="libgazebo_ros_camera.so">:这是与实际文件(gazebo_ros/gazebo_ros_camera.cpp) 链接。 -
为图像主题和照相机信息主题定义了照相机将发布到的rostopic。
<cameraName>rrbot/camera1</cameraName>
<imageTopicName>image_raw</imageTopicName>
<cameraInfoTopicName>camera_info</cameraInfoTopicName>
应当订阅:/rrbot/camera1/image_raw 和 /rrbot/camera1/camera_info。
-
<frameName>camera_link</frameName>:图像在tf树中发布的坐标框架。
-
-
-
-
运行 RRBot 相机示例:同时启动gazebo和rviz。
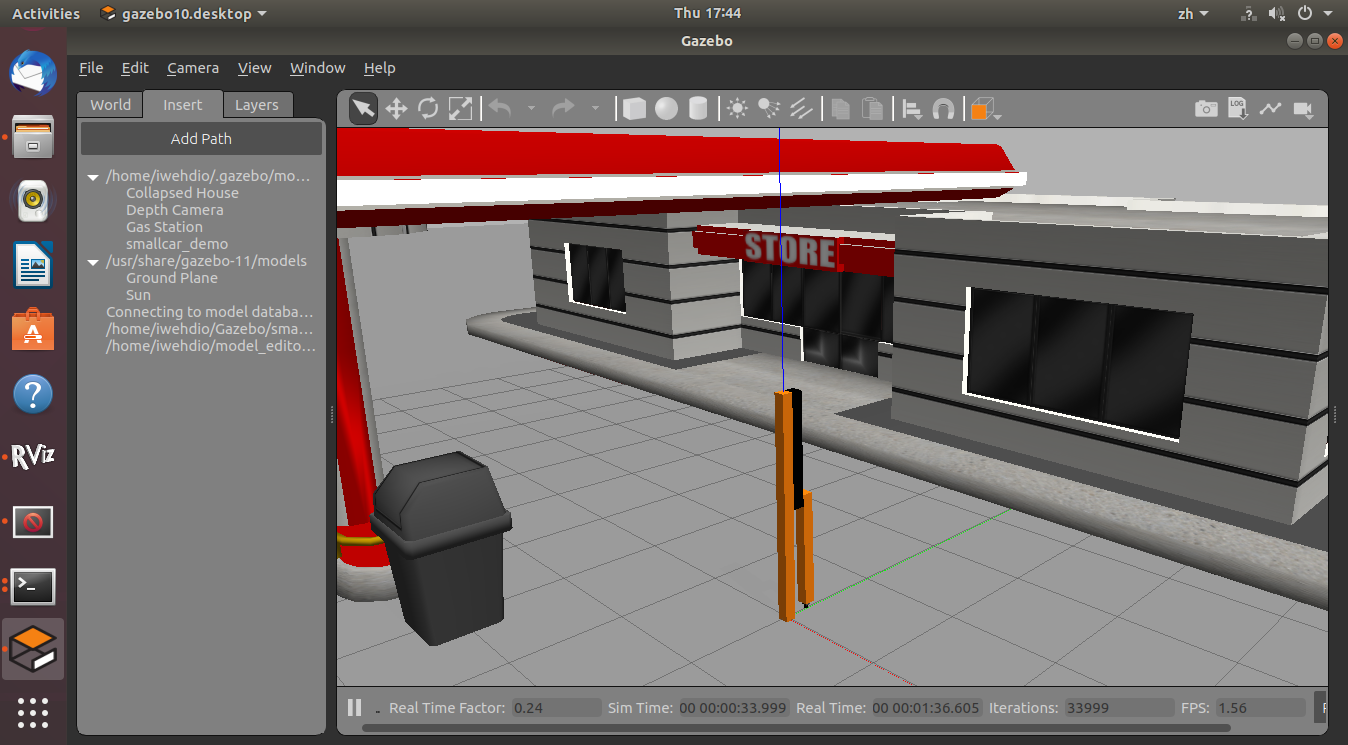
$ roslaunch rrbot_gazebo rrbot_world.launch
$ roslaunch rrbot_description rrbot_rviz.launch
在gazebo中在相机前放置之前的小车,在Rviz中可以看的相机的画面(/rrbot/camera1/image_raw话题)。
Gazebo中放置小车:
Rviz中的相机画面:

-
多机位相机(同步多个相机,仪器发布图像):
<gazebo reference="left_camera_frame"> <sensor type="multicamera" name="stereo_camera"> <update_rate>30.0</update_rate> <camera name="left"> <horizontal_fov>1.3962634</horizontal_fov> <image> <width>800</width> <height>800</height> <format>R8G8B8</format> </image> <clip> <near>0.02</near> <far>300</far> </clip> <noise> <type>gaussian</type> <mean>0.0</mean> <stddev>0.007</stddev> </noise> </camera> <camera name="right"> <pose>0 -0.07 0 0 0 0</pose> <horizontal_fov>1.3962634</horizontal_fov> <image> <width>800</width> <height>800</height> <format>R8G8B8</format> </image> <clip> <near>0.02</near> <far>300</far> </clip> <noise> <type>gaussian</type> <mean>0.0</mean> <stddev>0.007</stddev> </noise> </camera> <plugin name="stereo_camera_controller" filename="libgazebo_ros_multicamera.so"> <alwaysOn>true</alwaysOn> <updateRate>0.0</updateRate> <cameraName>multisense_sl/camera</cameraName> <imageTopicName>image_raw</imageTopicName> <cameraInfoTopicName>camera_info</cameraInfoTopicName> <frameName>left_camera_optical_frame</frameName> <!--<rightFrameName>right_camera_optical_frame</rightFrameName>--> <hackBaseline>0.07</hackBaseline> <distortionK1>0.0</distortionK1> <distortionK2>0.0</distortionK2> <distortionK3>0.0</distortionK3> <distortionT1>0.0</distortionT1> <distortionT2>0.0</distortionT2> </plugin> </sensor> </gazebo> -
深度相机:
<gazebo reference="${link_name}"> <sensor name="${link_name}_camera" type="depth"> <update_rate>20</update_rate> <camera> <horizontal_fov>1.047198</horizontal_fov> <image> <width>640</width> <height>480</height> <format>R8G8B8</format> </image> <clip> <near>0.05</near> <far>3</far> </clip> </camera> <plugin name="${link_name}_controller" filename="libgazebo_ros_openni_kinect.so"> <baseline>0.2</baseline> <alwaysOn>true</alwaysOn> <updateRate>1.0</updateRate> <cameraName>${camera_name}_ir</cameraName> <imageTopicName>/${camera_name}/color/image_raw</imageTopicName> <cameraInfoTopicName>/${camera_name}/color/camera_info</cameraInfoTopicName> <depthImageTopicName>/${camera_name}/depth/image_raw</depthImageTopicName> <depthImageInfoTopicName>/${camera_name}/depth/camera_info</depthImageInfoTopicName> <pointCloudTopicName>/${camera_name}/depth/points</pointCloudTopicName> <frameName>${frame_name}</frameName> <pointCloudCutoff>0.5</pointCloudCutoff> <pointCloudCutoffMax>3.0</pointCloudCutoffMax> <distortionK1>0.00000001</distortionK1> <distortionK2>0.00000001</distortionK2> <distortionK3>0.00000001</distortionK3> <distortionT1>0.00000001</distortionT1> <distortionT2>0.00000001</distortionT2> <CxPrime>0</CxPrime> <Cx>0</Cx> <Cy>0</Cy> <focalLength>0</focalLength> <hackBaseline>0</hackBaseline> </plugin> </sensor> </gazebo> -
激光雷达:
与之前一样,在 rrbot.xacro中指定链接和关节。
<joint name="hokuyo_joint" type="fixed">
    <axis xyz="0 1 0" />
    <origin xyz="0 0 ${height3 - axel_offset/2}" rpy="0 0 0"/>
    <parent link="link3"/>
    <child link="hokuyo_link"/>
</joint>

<!-- Hokuyo Laser -->
<link name="hokuyo_link">
    <collision>
        <origin xyz="0 0 0" rpy="0 0 0"/>
        <geometry>
            <box size="0.1 0.1 0.1"/>
        </geometry>
    </collision>

    <visual>
        <origin xyz="0 0 0" rpy="0 0 0"/>
        <geometry>
            <mesh filename="package://rrbot_description/meshes/hokuyo.dae"/>
        </geometry>
    </visual>

    <inertial>
        <mass value="1e-5" />
        <origin xyz="0 0 0" rpy="0 0 0"/>
        <inertia ixx="1e-6" ixy="0" ixz="0" iyy="1e-6" iyz="0" izz="1e-6" />
    </inertial>
</link>
与之前一样,在 rrbot.gazebo 文件中用
<gazebo>标签的引用指向链接。<!-- hokuyo --> <gazebo reference="hokuyo_link"> <sensor type="gpu_ray" name="head_hokuyo_sensor"> <pose>0 0 0 0 0 0</pose> <visualize>false</visualize> <update_rate>40</update_rate> <ray> <scan> <horizontal> <samples>720</samples> <resolution>1</resolution> <min_angle>-1.570796</min_angle> <max_angle>1.570796</max_angle> </horizontal> </scan> <range> <min>0.10</min> <max>30.0</max> <resolution>0.01</resolution> </range> <noise> <type>gaussian</type> <!-- Noise parameters based on published spec for Hokuyo laser achieving "+-30mm" accuracy at range < 10m. A mean of 0.0m and stddev of 0.01m will put 99.7% of samples within 0.03m of the true reading. --> <mean>0.0</mean> <stddev>0.01</stddev> </noise> </ray> <plugin name="gazebo_ros_head_hokuyo_controller" filename="libgazebo_ros_gpu_laser.so"> <topicName>/rrbot/laser/scan</topicName> <frameName>hokuyo_link</frameName> </plugin> </sensor> </gazebo>其中:
-
<visualize>false</visualize>:如果为true,则在gpu激光的扫描区域内可以看到半透明的激光射线。 -
设置为将激光扫描发布到的ROS主题名称,以及TF使用的转换框架
<topicName>/rrbot/laser/scan</topicName>
<frameName>hokuyo_link</frameName>
-
-
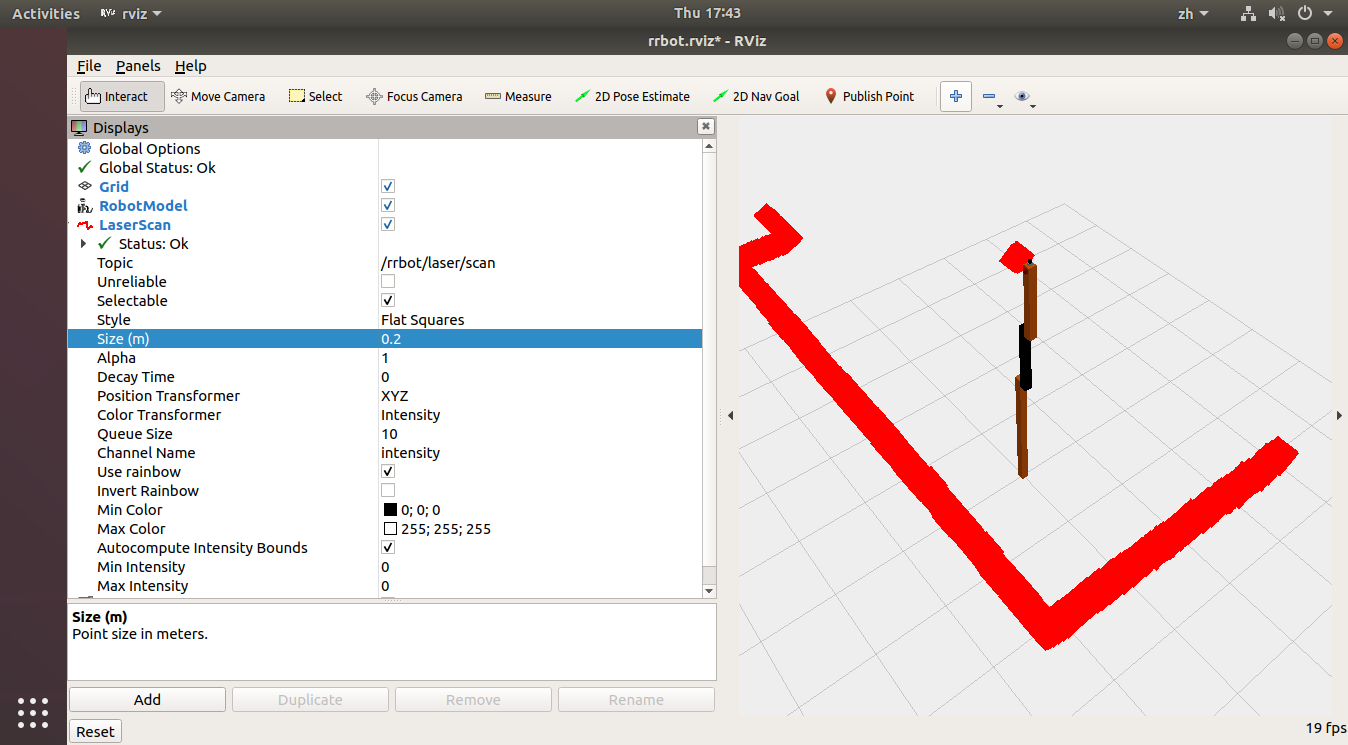
运行 RRBot 激光雷达实例:同时启动gazebo和rviz。
$ roslaunch rrbot_gazebo rrbot_world.launch $ roslaunch rrbot_description rrbot_rviz.launch-
在Rviz中,添加“ LaserScan”显示,并在“主题”下将其设置为 /rrbot/laser/scan 。
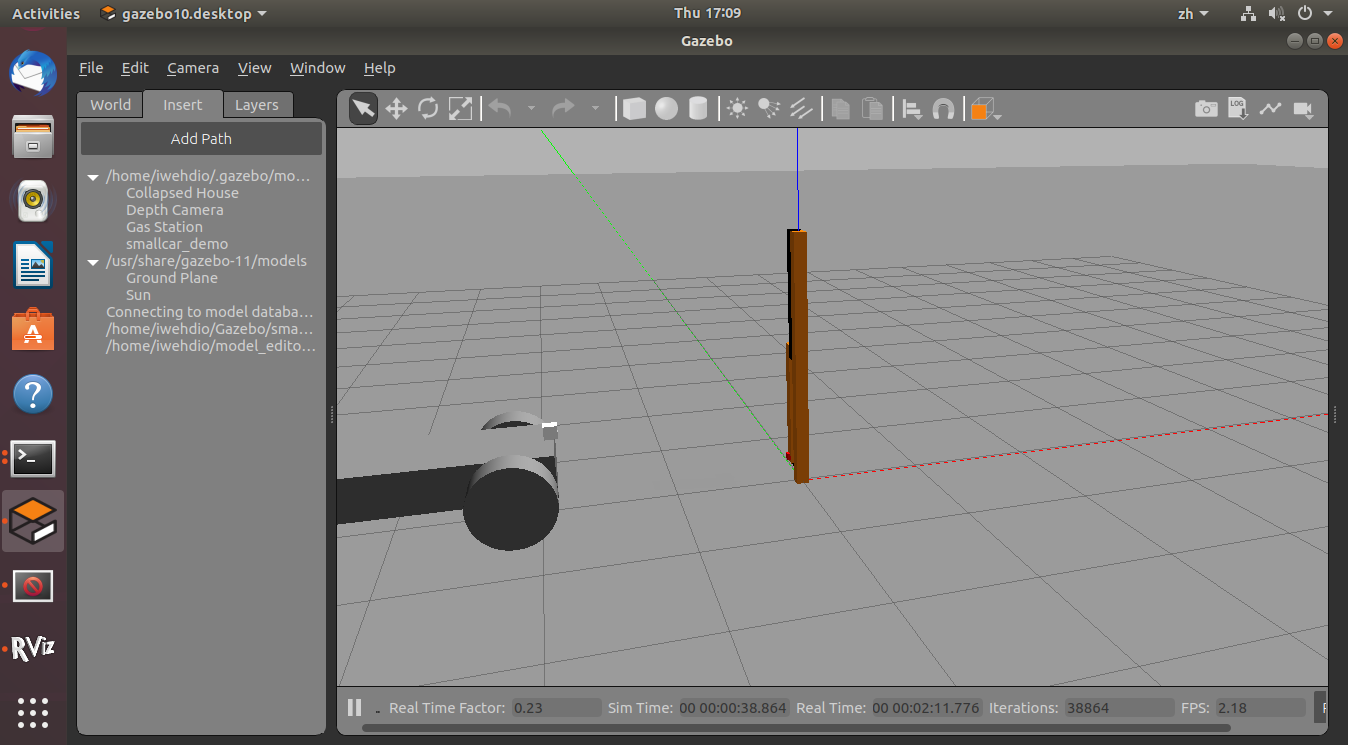
Gazebo中放置加油站:
 )
)Rviz中的激光雷达信息:
-
-
IMU 惯性运动传感器(GazeboRosImu),计算在ROS中完成:
<robot> : <gazebo> <plugin name="imu_plugin" filename="libgazebo_ros_imu.so"> <alwaysOn>true</alwaysOn> <bodyName>base_footprint</bodyName> <topicName>imu</topicName> <serviceName>imu_service</serviceName> <gaussianNoise>0.0</gaussianNoise> <updateRate>20.0</updateRate> </plugin> </gazebo> </robot> -
差动驱动:
<gazebo> <plugin name="differential_drive_controller" filename="libgazebo_ros_diff_drive.so"> <alwaysOn>true</alwaysOn> <updateRate>${update_rate}</updateRate> <leftJoint>base_link_right_wheel_joint</leftJoint> <rightJoint>base_link_left_wheel_joint</rightJoint> <wheelSeparation>0.5380</wheelSeparation> <wheelDiameter>0.2410</wheelDiameter> <torque>20</torque> <commandTopic>cmd_vel</commandTopic> <odometryTopic>odom</odometryTopic> <odometryFrame>odom</odometryFrame> <robotBaseFrame>base_footprint</robotBaseFrame> </plugin> </gazebo> -
防滑转向驱动:
<gazebo> <plugin name="skid_steer_drive_controller" filename="libgazebo_ros_skid_steer_drive.so"> <updateRate>100.0</updateRate> <robotNamespace>/</robotNamespace> <leftFrontJoint>front_left_wheel_joint</leftFrontJoint> <rightFrontJoint>front_right_wheel_joint</rightFrontJoint> <leftRearJoint>back_left_wheel_joint</leftRearJoint> <rightRearJoint>back_right_wheel_joint</rightRearJoint> <wheelSeparation>0.4</wheelSeparation> <wheelDiameter>0.215</wheelDiameter> <robotBaseFrame>base_link</robotBaseFrame> <torque>20</torque> <topicName>cmd_vel</topicName> <broadcastTF>false</broadcastTF> </plugin> </gazebo> -
平面移动:
<robot name="test_model"> <!-- root link, on the ground just below the model origin --> <link name="base_footprint"> <visual> <origin xyz="0 0 0" rpy="0 0 0" /> <geometry> <box size="0.001 0.001 0.001" /> </geometry> </visual> </link> <joint name="base_link_joint" type="fixed"> <origin xyz="0.0 0 1.25" rpy="0 0 0" /> <parent link="base_footprint"/> <child link="base_link" /> </joint> <!-- the model --> <link name="base_link"> <inertial> <mass value="50" /> <origin xyz="0 0 -1.25" /> <inertia ixx="50.0" ixy="0.0" ixz="0.0" iyy="50.0" iyz="0.0" izz="50.0" /> </inertial> <visual> <geometry> <box size="0.5 0.5 1.0" /> <!-- does not need to match collision --> </geometry> </visual> <collision> <origin xyz="0 0 -1.0" /> <geometry> <cylinder length="0.5" radius="0.25" /> </geometry> </collision> </link> <gazebo> <plugin name="object_controller" filename="libgazebo_ros_planar_move.so"> <commandTopic>cmd_vel</commandTopic> <odometryTopic>odom</odometryTopic> <odometryFrame>odom</odometryFrame> <odometryRate>20.0</odometryRate> <robotBaseFrame>base_footprint</robotBaseFrame> </plugin> </gazebo> </robot> -
此外还包括:激光测距仪、地面力反馈、地面位置、关节姿态、Prosilica相机、投影仪、缓冲、视频插件等,见http://gazebosim.org/tutorials?tut=ros_gzplugins。
4、用ROS控制Gazebo
-
可以使用ros_control和简单的Gazebo插件适配器在Gazebo中模拟机器人的控制。
-
要将ros_control与机器人一起使用,需要向URDF添加一些其他元素。
transmission>元素用于将执行器链接到关节。其中包括:<joint name="">:URDF中关节的名字。<type>:执行器的类型。<hardwareInterface>:在<actuator>和<joint>标签中,用于告诉插件硬件层的位置、速度等参数。
-
还需要将一个Gazebo插件添加到您的URDF中,该插件实际上会解析传输标签并加载适当的硬件接口和控制器管理器。
<gazebo> <plugin name="gazebo_ros_control" filename="libgazebo_ros_control.so"> <robotNamespace>/MYROBOT</robotNamespace> </plugin> </gazebo><plugin>标签还具有以下可选的子元素:<robotNamespace>:用于此插件实例的ROS名称空间,在URDF / SDF中默认为机器人名称。<controlPeriod>:控制器的更新周期(以秒为单位),默认为gazebo的周期。<controlPeriod>:robot_description(URDF)在参数服务器上的位置,默认为'/ robot_description'。<robotSimType>:要使用的自定义机器人sim接口的pluginlib名称,默认为'DefaultRobotHWSim'。
- gazebo_ros_control 默认行为提供的接口:
- JointStateInterface。
- EffortJointInterface。
- VelocityJointInterface。
-
RRBot 中的示例:
rrbot.xacro 中添加的
<transmission>标签。<transmission name="tran1"> <type>transmission_interface/SimpleTransmission</type> <joint name="joint1"> <hardwareInterface>EffortJointInterface</hardwareInterface> </joint> <actuator name="motor1"> <hardwareInterface>EffortJointInterface</hardwareInterface> <mechanicalReduction>1</mechanicalReduction> </actuator> </transmission> <transmission name="tran2"> <type>transmission_interface/SimpleTransmission</type> <joint name="joint2"> <hardwareInterface>EffortJointInterface</hardwareInterface> </joint> <actuator name="motor2"> <hardwareInterface>EffortJointInterface</hardwareInterface> <mechanicalReduction>1</mechanicalReduction> </actuator> </transmission><hardwareInterface>必须在<joint>和<actuator>标签中都包含。
rrbot.gazebo 中加载插件:
<gazebo> <plugin name="gazebo_ros_control" filename="libgazebo_ros_control.so"> <robotNamespace>/rrbot</robotNamespace> </plugin> </gazebo> -
创建一个 ros_controls 包。
-
创建功能包。
$ mkdir ~/catkin_ws $ cd ~/catkin_ws $ catkin_create_pkg smallcar_control controller_manager joint_state_controller robot_state_publisher_gui $ cd smallcar_control $ mkdir config $ mkdir launch -
创建一个 .yaml 配置文件,放置在 config 文件夹中。
PID增益和控制器设置必须保存在yaml文件中,该文件通过roslaunch文件加载到参数服务器中。
rrbot: # Publish all joint states ----------------------------------- joint_state_controller: type: joint_state_controller/JointStateController publish_rate: 50 # Position Controllers --------------------------------------- joint1_position_controller: type: effort_controllers/JointPositionController joint: joint1 pid: {p: 100.0, i: 0.01, d: 10.0} joint2_position_controller: type: effort_controllers/JointPositionController joint: joint2 pid: {p: 100.0, i: 0.01, d: 10.0} -
创建一个 roslaunch 文件。
创建用于启动ros_control控制器的roslaunch文件。
<launch>

  <!-- Load joint controller configurations from YAML file to parameter server -->
  <rosparam file="$(find rrbot_control)/config/rrbot_control.yaml" command="load"/>

  <!-- load the controllers -->
  <node name="controller_spawner" pkg="controller_manager" type="spawner" respawn="false"
    output="screen" ns="/rrbot" args="joint1_position_controller joint2_position_controller joint_state_controller"/>

  <!-- convert joint states to TF transforms for rviz, etc -->
  <node name="robot_state_publisher_gui" pkg="robot_state_publisherr_gui" type="robot_state_publisherr_gui
    respawn="false" output="screen">
    <remap from="/joint_states" to="/rrbot/joint_states" />
  </node>

</launch>
其中:
- 第一行:“ rosparam”通过加载 yaml 配置文件将控制器设置加载到参数服务器。
- 第二行:controller_spawner 节点通过运行 python 脚本启动 RRBot 的两个关节位置控制器,该脚本对ros_control控制器管理器进行服务调用。服务调用告诉控制器管理器您想要哪个控制器。它还加载了第三个控制器,该控制器使用 hardware_interfaces 发布所有关节的关节状态,并在 / oint_states上发布话题。生成器只是用于roslaunch的帮助程序脚本。
- 最后一行开始一个 robot_state_publisher_gui 节点,该节点仅侦听来自 joint_state_controller 的 /joint_states消息,然后将转换发布到 /tf。这使您可以在Rviz中查看模拟的机器人以及执行其他任务。
-
-
使用 roslaunch 启动控制器:
$ roslaunch rrbot_gazebo rrbot_world.launch
$ roslaunch rrbot_control rrbot_control.launch
在此之前需要先安装控制器插件:
$ sudo apt-get install ros-melodic-effort-controllers-
也可以手动通过服务请求控制:
# 加载控制器:
$ rosservice call /rrbot/controller_manager/load_controller "name: 'joint1_position_controller'"
$ rosservice call /rrbot/controller_manager/load_controller "name: 'joint2_position_controller'"
# 启动控制器:
$ rosservice call /rrbot/controller_manager/switch_controller "{start_controllers: ['joint1_position_controller','joint2_position_controller'], stop_controllers: [], strictness: 2}"
# 停止控制器:
$ rosservice call /rrbot/controller_manager/switch_controller "{start_controllers: [], stop_controllers: ['joint1_position_controller','joint2_position_controller'], strictness: 2}"
-
-
手动发送命令:
$ rostopic pub -1 /rrbot/joint1_position_controller/command std_msgs/Float64 "data: 1.5" $ rostopic pub -1 /rrbot/joint2_position_controller/command std_msgs/Float64 "data: 1.0" -
使用 RQT 发送命令:
启动RQT:
$ rosrun rqt_gui rqt_gui在RQT的“插件”菜单上,添加“主题->消息发布者”插件,添加命令发布者控制器
/rrbot/joint1_position_controller/command。调节话题发布速率和目标值。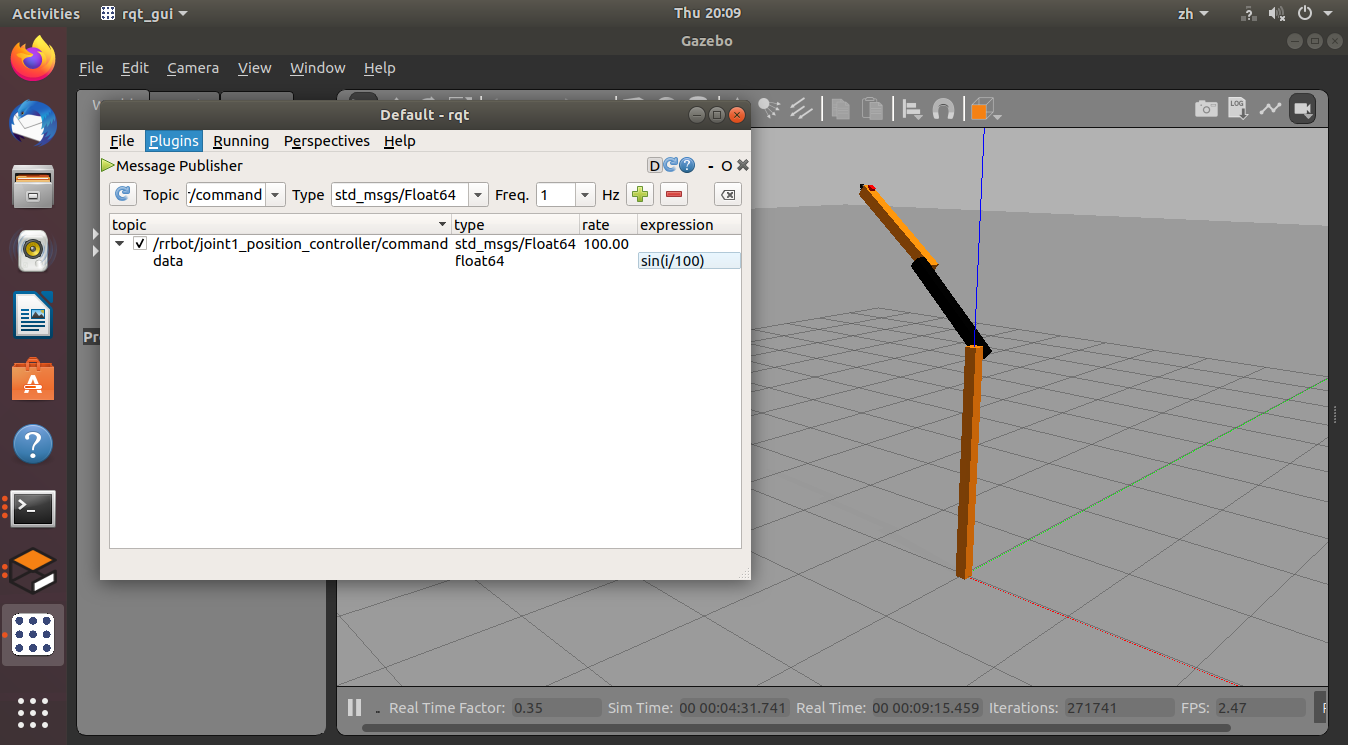
-
可视化控制器性能:将Plot插件添加到RQT,并添加与您在上面为主题发布者选择的主题相同的主题:
/rrbot/joint1_position_controller/command/data。 -
向Plot插件添加另一个主题,该主题可跟踪被控制执行器的实际位置。您将需要通过调整PID增益来减少这两个值之间的误差,如下一步所示。对于RRBot:
/rrbot/joint1_position_controller/state/process_value。 -
调节PID增益:将“动态重新配置”插件添加到RQT,然后单击“全部扩展”以查看子选项。假设您的控制器使用PID,则应使用“ pid”选项。

-
使用roslaunch 保存 rqt 配置。
$ roslaunch rrbot_control rrbot_rqt.launch
-
iwehdio的博客园:https://www.cnblogs.com/iwehdio/