使用树莓派搭建视频监控平台去年就简单的实现了,只不过功能比较简陋,最近抽时间重构了原来的平台。
其他关于JavaCV的文章,可以通过下面的链接查看:
JavaCV-开发系列文章汇总篇(https://www.cnblogs.com/itqn/p/14696221.html)
环境搭建
环境部分,参考旧版的安装及配置:
框架选型
之前的平台是采用JFinal和JavaCV开发的, 这次重构,调整为Springboot + JavaCV实现,主要用到的框架有:
- spring-webmvc
- spring-websocket
- spring-jdbc
- oshi
- javacv
- vue
- iview
- flv.js
功能完善
这次重构完善了很多功能,引入了服务器监控、采用VUE+IVIEW对页面重新开发,另外还支持了在线回访录制视频,目前已实现的功能有:
- 摄像头监控画面实时预览
- 自动录制
- 分段录制
- 磁盘保护
- 树莓派运行参数监控
- 录制管理(支持录制回放)
- 登录鉴权
除了上面功能外,此次重构还大大降低了延迟,以及增加多种拉流类型,在无buffer拉流的情况下,FLV、RTMP流延迟在1秒以内(600ms左右),拉流端支持FLV、RTMP、HLS。
界面预览
由于浏览器已经不再支持Flash,所以本次监控画面实时预览采用FLV,播放器采用flv.js,实时预览延迟1秒内。
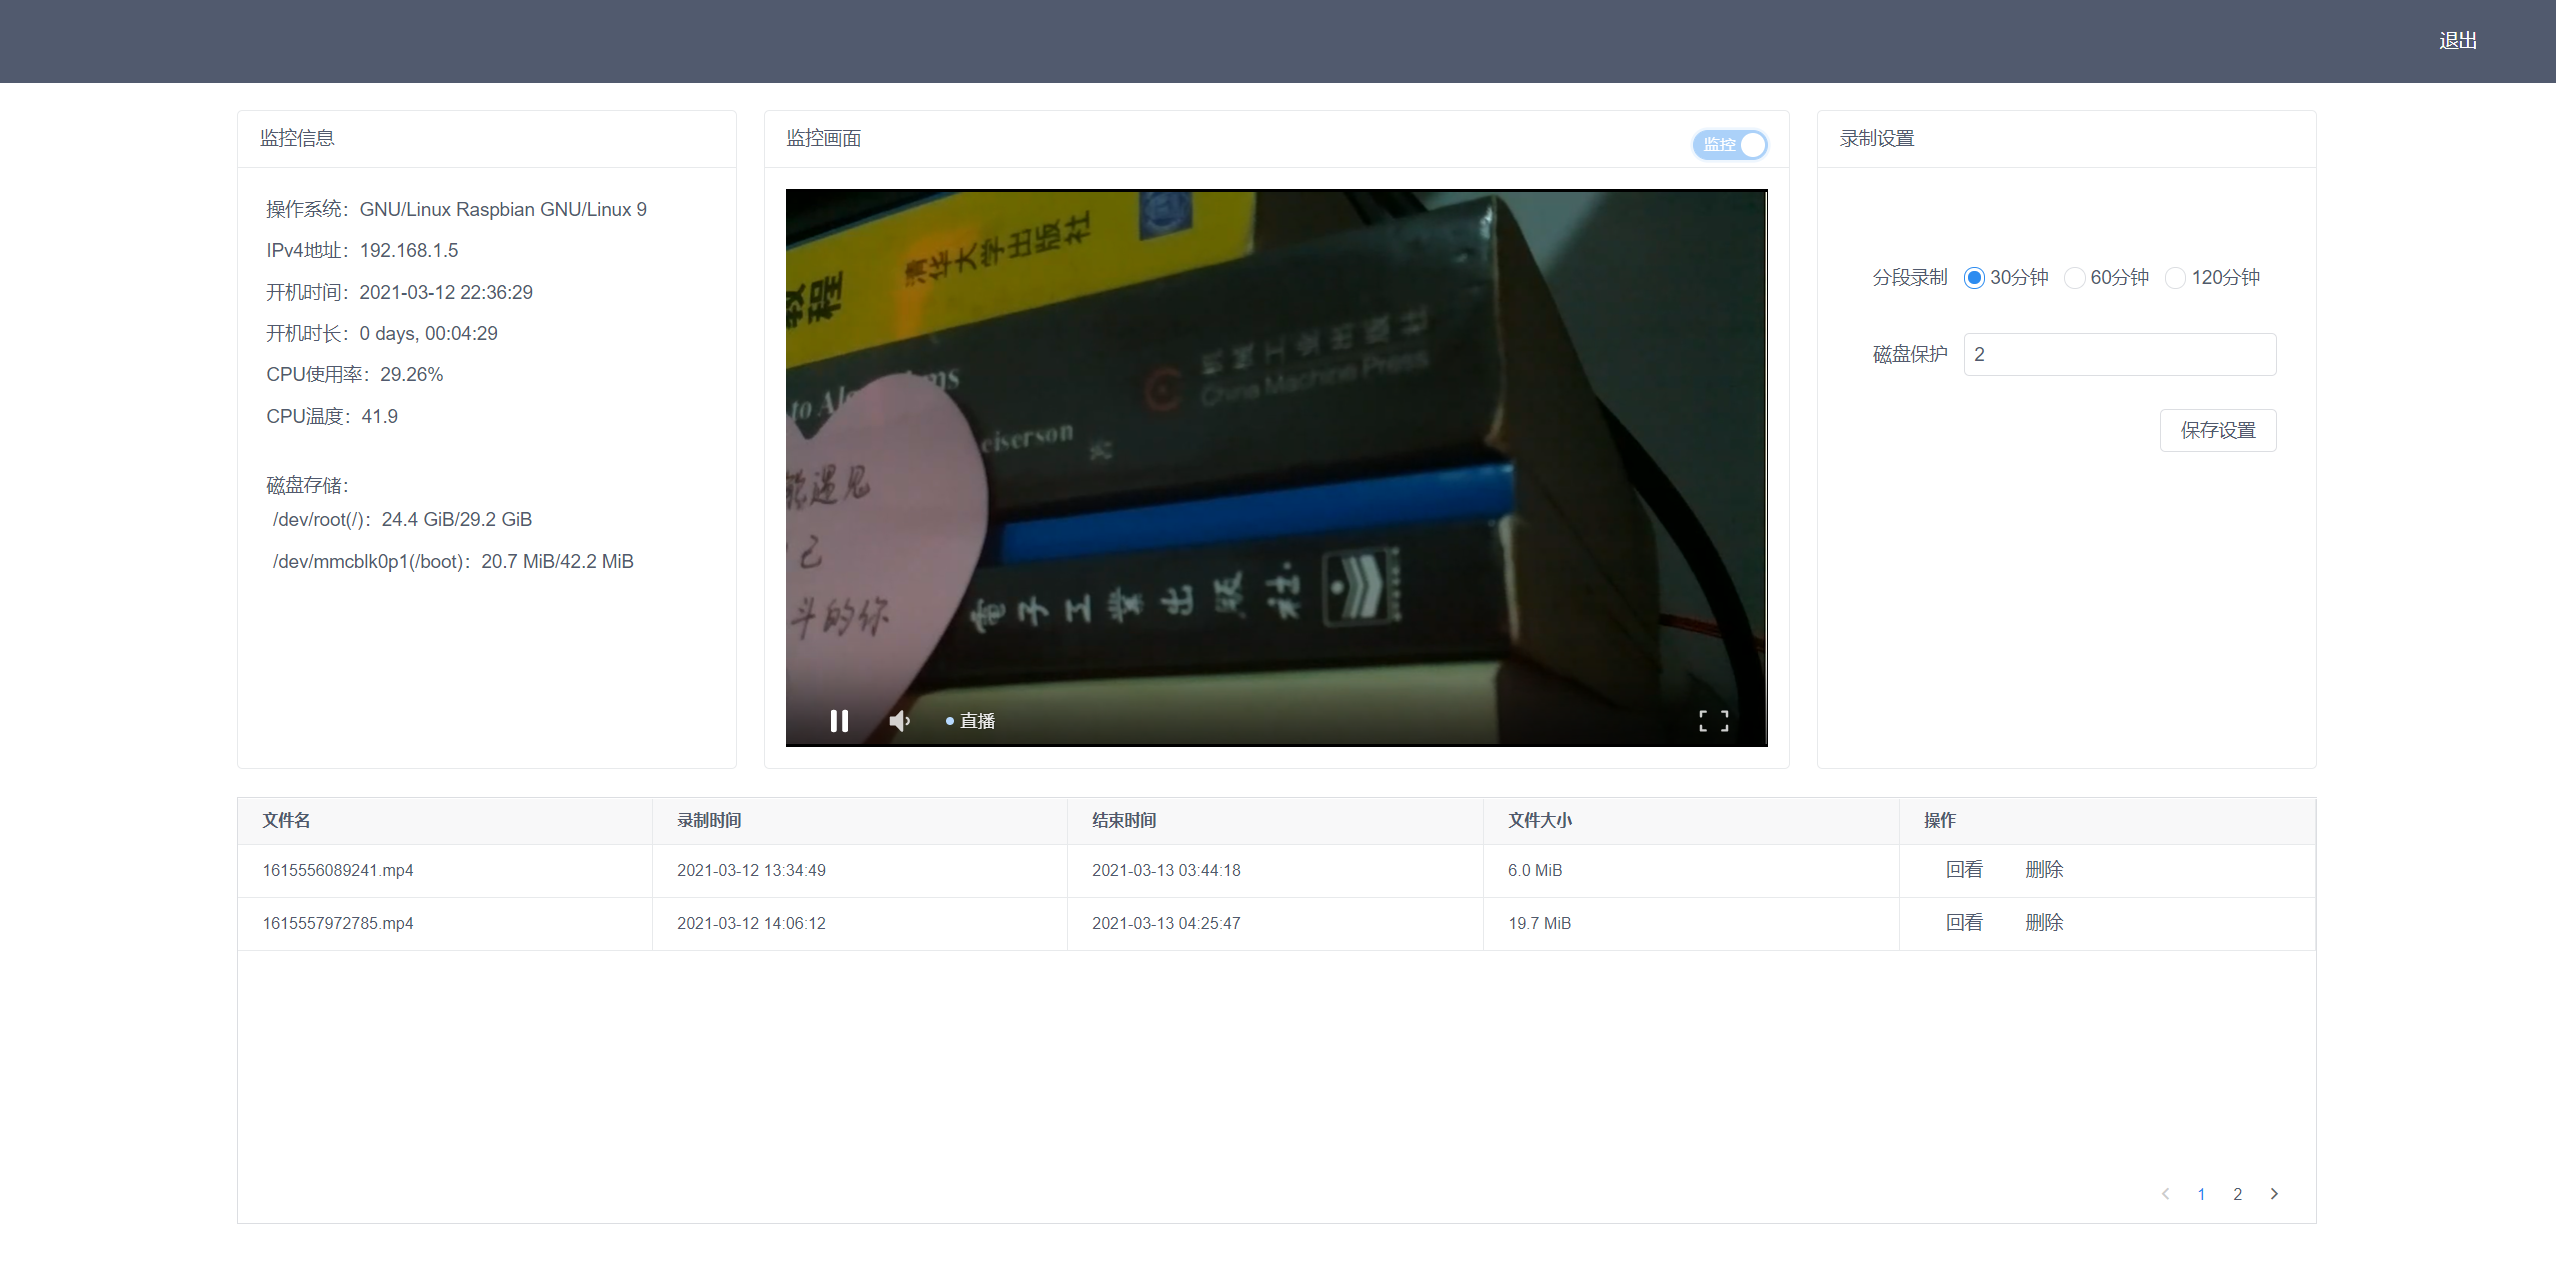
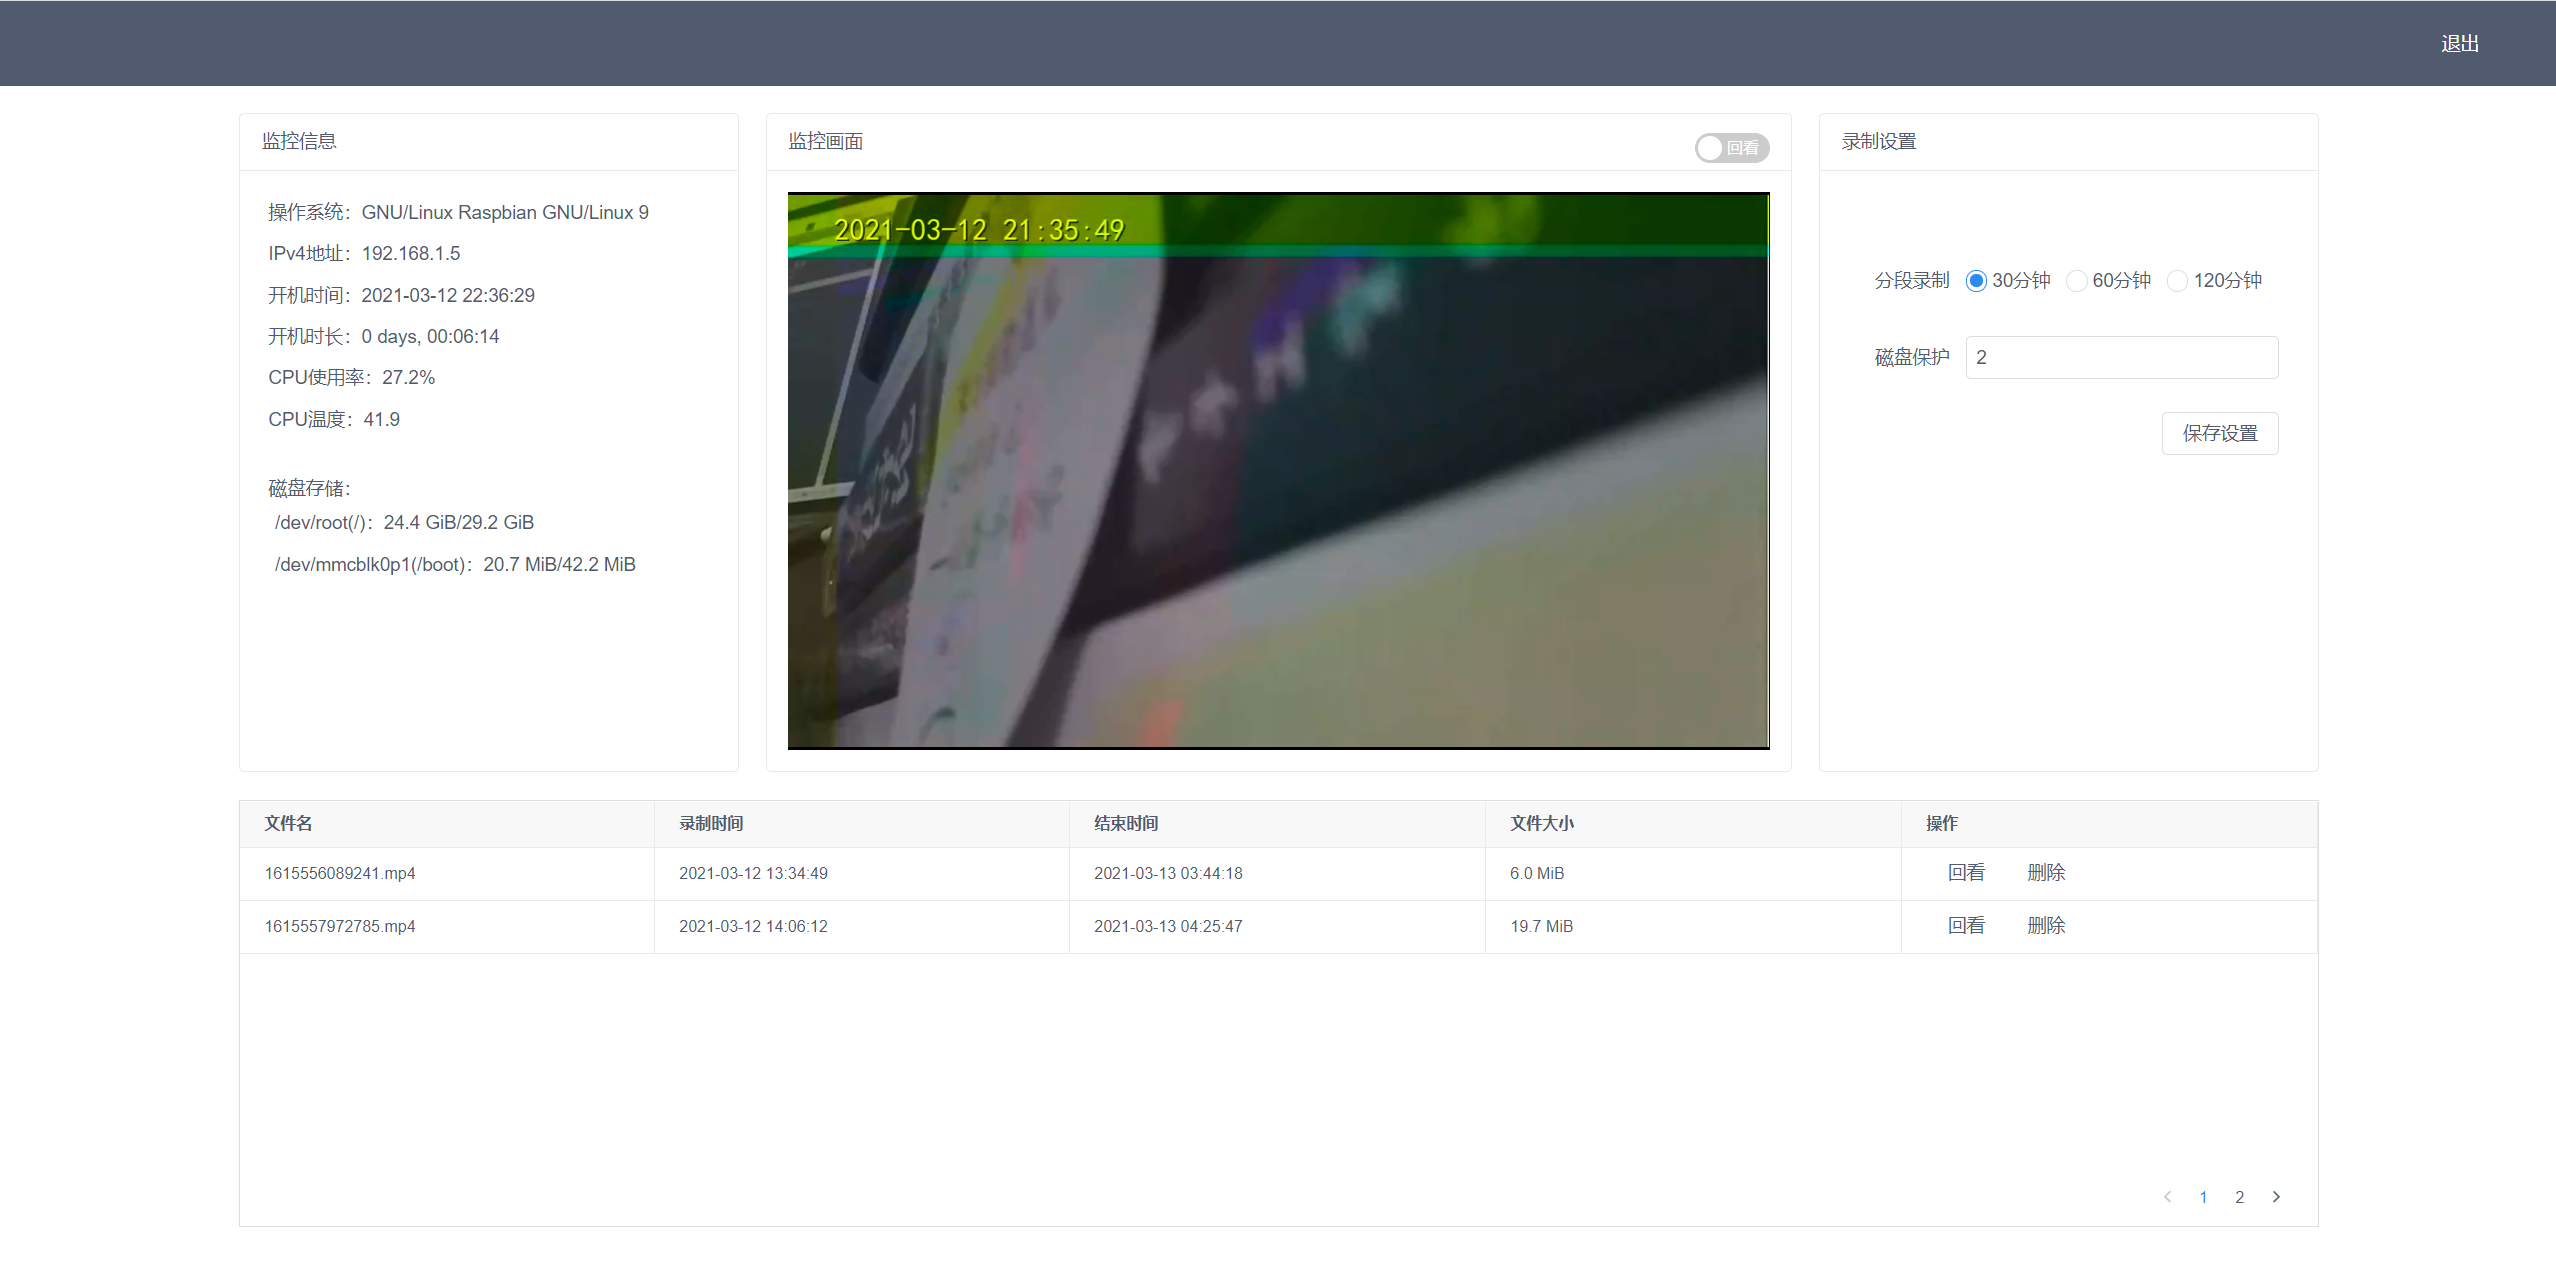
监控录制由原来的FLV,调整为mp4,支持H5原生播放器观看监控回放,这里由于我在画面上加了时间戳滤镜,导致录制效果不是很好,后期需要排查优化一下。
功能实现
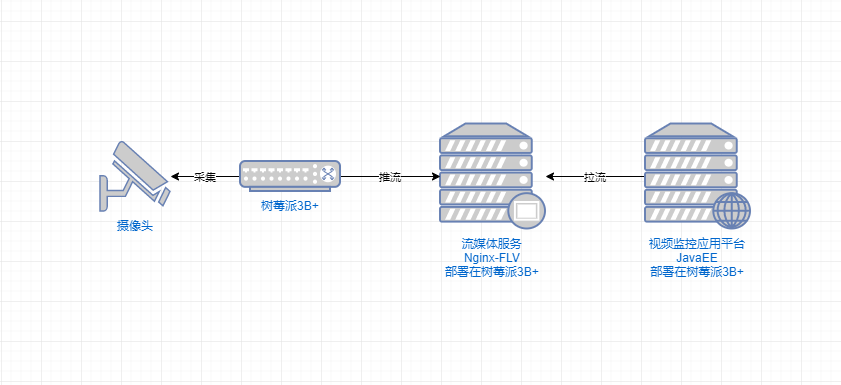
- 画面采集,FFmpeg推流
在旧版的实现中,采用的是JavaCV采集画面,并实现推流,在实际使用情况中,这种效果并不理想,延迟太高。所以在新版重构时,选择raspivid + ffmpeg来替代JavaCV实现。
画面采集采用raspivid:
raspivid -n -t 0 -w 1920 -h 1080 -fps 25 -b 600000 -o -
推流采用FFmpeg:
ffmpeg -i - -vcodec copy -an -f flv rtmp://192.168.1.5:1935/hls/stream0
- 拉流,录制
拉流还是采用JavaCV,这里分为两部分,拉流及流加工录制,如果不需要对流进行处理的话,直接录制流即可。
拉流:
grabber = new FFmpegFrameGrabber(streamUri);
Frame f = grabber.grab();
if (f != null && f.image != null) {
  if (f != null && f.image != null) {
    Iterator <StreamListener> it = listeners.iterator();
    while (it.hasNext()) {
      StreamListener sl = it.next();
      final Frame ff = f.clone();
      sl.onVideo(ff);
    }
  }
}
录制:
public void onVideo(Frame frame) {
  // 分段录制
  if (timeLimit > 0 && System.currentTimeMillis() - startTime > timeLimit) {
    try {
      RecordINF inf = stop();
      if (timeoutCB != null) {
        timeoutCB.accept(inf);
      }
      startTime = System.currentTimeMillis();
      timestamp = 0;
      videoFile = new File(videoDir, startTime + ".mp4");
      start();
    } catch (Exception e) {
      LOG.error(e.getMessage(), e);
    }
  }

  try {
    if (timestamp == 0) {
      timestamp = System.currentTimeMillis();
    }
    videoTS = 1000 * (System.currentTimeMillis() - timestamp);
    if (videoTS > recorder.getTimestamp()) {
      recorder.setTimestamp(videoTS);
    }
    recorder.record(frame);
  } catch (org.bytedeco.javacv.FrameRecorder.Exception e) {
    LOG.error(e.getMessage(), e);
  }
}
- 磁盘保护
监控平台会不断录制视频,所有如果不对磁盘容量进行监控的话,可能会出现录制视频塞爆磁盘的情况,这里只针对录制文件存放的挂载盘进行监控。
@Scheduled(fixedRate = 30_000)
public void execute() {
  long byteG = settingService.setting().getStorageLimit() * G;
  List<OSFileStore> dsList = si.getOperatingSystem().getFileSystem().getFileStores();
  dsList.forEach(osf -> {
    if (appCfg.getMonitorMountDir().equals(osf.getMount()) && osf.getFreeSpace() < byteG) {
      clean();
    }
  });
}
- 树莓派运行参数监控
平台启动后定时采集运行参数信息,采用websocket的形式,定时推送到web端展示。
@Scheduled(fixedRate = 5000)
public void send() throws InterruptedException {
  OperatingSystem os = si.getOperatingSystem();
  CentralProcessor cpu = si.getHardware().getProcessor();

  info.setOs(os.getManufacturer() + " " + os.getFamily() + " " + os.getVersionInfo().getVersion());
  String ipV4Gateway = os.getNetworkParams().getIpv4DefaultGateway();
  ipV4Gateway = ipV4Gateway.substring(0, ipV4Gateway.lastIndexOf("."));
  info.setIp("");
  List < NetworkIF > nList = si.getHardware().getNetworkIFs();
  for (NetworkIF f : nList) {
    if (Arrays.toString(f.getIPv4addr()).replace("[", "").replace("]", "").startsWith(ipV4Gateway)) {
      info.setIp(Arrays.toString(f.getIPv4addr()).replace("[", "").replace("]", ""));
      break;
    }
  }

  long[] pts = cpu.getSystemCpuLoadTicks();
  TimeUnit.SECONDS.sleep(1);
  long[] cts = cpu.getSystemCpuLoadTicks();
  long t = 0;
  for (int i = 0; i < pts.length; i++) {
    t += cts[i];
  }
  info.setCpr(
    new DecimalFormat("#.##%").format(1.0 - (cts[CentralProcessor.TickType.IDLE.getIndex()] * 1.0 / t)));
  info.setCpt(String.valueOf(si.getHardware().getSensors().getCpuTemperature()));

  LocalDateTime btime = LocalDateTime.ofInstant(Instant.ofEpochSecond(os.getSystemBootTime()),
    ZoneId.systemDefault());
  info.setBtime(DateTimeFormatter.ofPattern("yyyy-MM-dd HH:mm:ss").format(btime));
  info.setUtime(FormatUtil.formatElapsedSecs(os.getSystemUptime()));

  List < OSFileStore > dsList = si.getOperatingSystem().getFileSystem().getFileStores();
  info.getFs().clear();
  dsList.forEach(ds -> info.addFs(ds.getName() + "(" + ds.getMount() + ")" + ":" //
    + FormatUtil.formatBytes(ds.getFreeSpace()) + "/"
    + FormatUtil.formatBytes(ds.getTotalSpace())));
  template.convertAndSend(AppWSConst.TOPIC_MONITOR, JSON.toJSONString(info));
}
- 实时监控画面预览
由于浏览器已经不再支持Flash,所以画面预览采用FLV流。
livePlay(url) {
  if (!!!url) return
  if (this.player) {
    this.player.destroy()
  }
  this.living = true
  this.buildPlayer({
    live: true, autoplay: true,
    video: {
      url: url,
      type: 'flv'
    },
    pluginOptions: {
      flv: {
        config: {
          enableStashBuffer: false
        }
      }
    }
  })
}
- 录制回放
录制的视频是mp4格式,采用flv.js直接播放即可。
videoPlay(url) {
  if (!!!url) return
  if (this.living || !this.player) {
    this.buildPlayer({
      autoplay: true, hotkey: true,
      video: {
        url: url,
        type: 'mp4'
      }
    })
  } else {
    this.player.switchVideo({ url: url, type: 'mp4' })
  }
  this.living = false
}
应用部署
在部署方面,所有服务均部署在树莓派3B+中,并设置开机自启,这样只要树莓派通电,所有功能就启动并运行。
关注公众号“HiIT青年”,了解更多关于树莓派及JavaCV开发的文章
=========================================================
关注 公众号 “HiIT青年” 发送 “javacv-raspi-iview” 获取树莓派开机推流设置方式。(如果没有收到回复,可能是你之前取消过关注。)

关注公众号,阅读更多文章。