基于SwinTransformer的目标检测训练模型学习总结
一、简要介绍
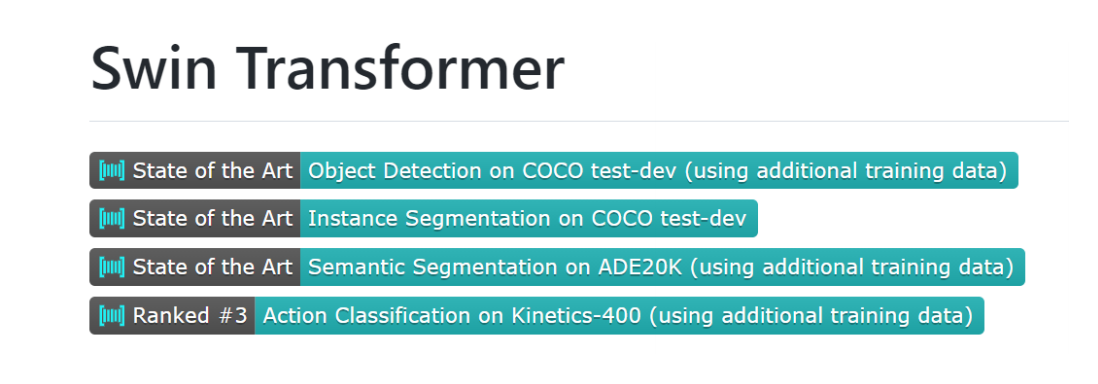
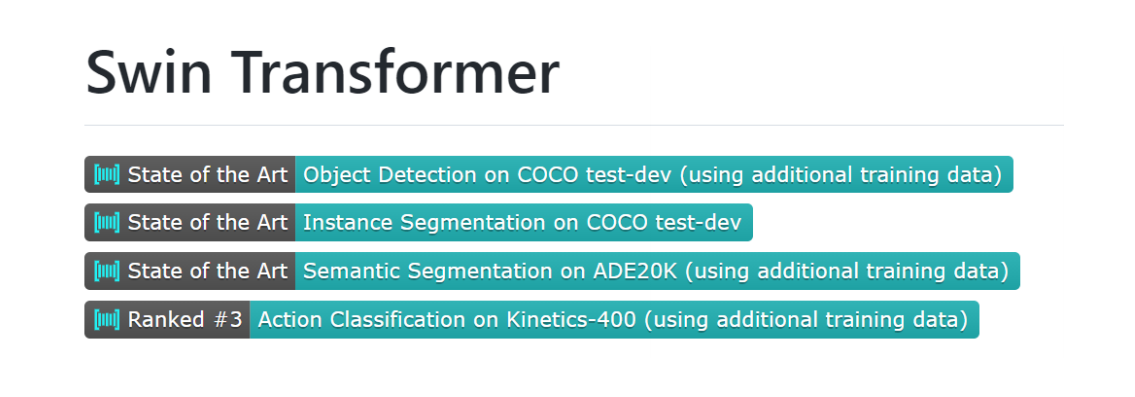
Swin Transformer是2021年提出的,是一种基于Transformer的一种深度学习网络结构,在目标检测、实例分割等计算机视觉任务上均取得了SOTA的性能。同时这篇论文也获得了ICCV2021年的Best Paper。
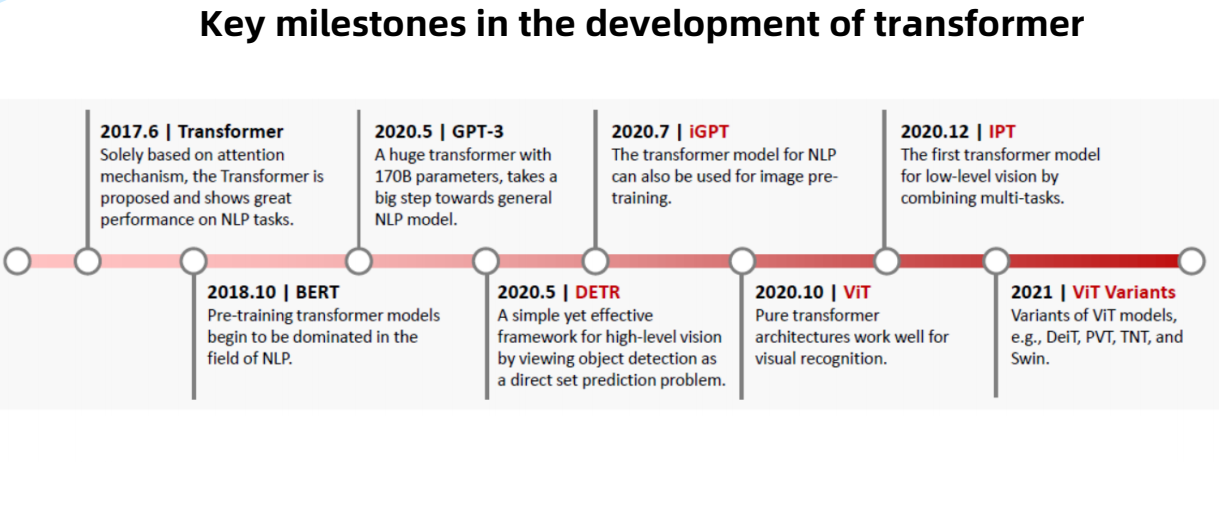
1.1 Transformer的关键里程碑
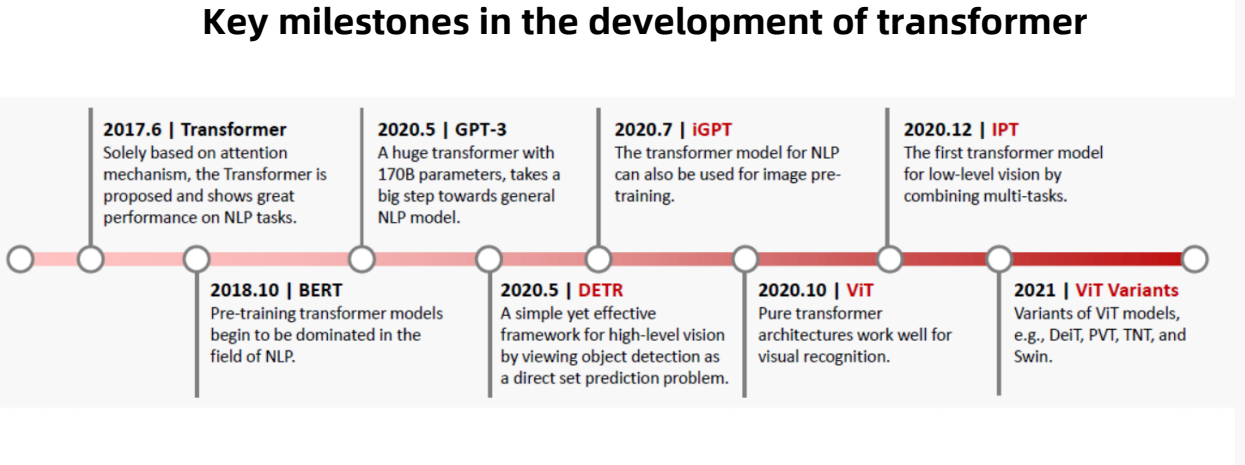
- Tranformer: 在2017年6月,仅基于注意力机制的Transformer首次由谷歌提出,应用于NLP自然语言处理的任务上表现出了良好的性能。
- BERT: 在2018年10月,预训练Transformer模型开始在NLP领域中占主导地位。
- GPT-3: 在2020年5月,提出一个带有170亿参数的大型Transformer,向通用NLP模型迈出了一大步。
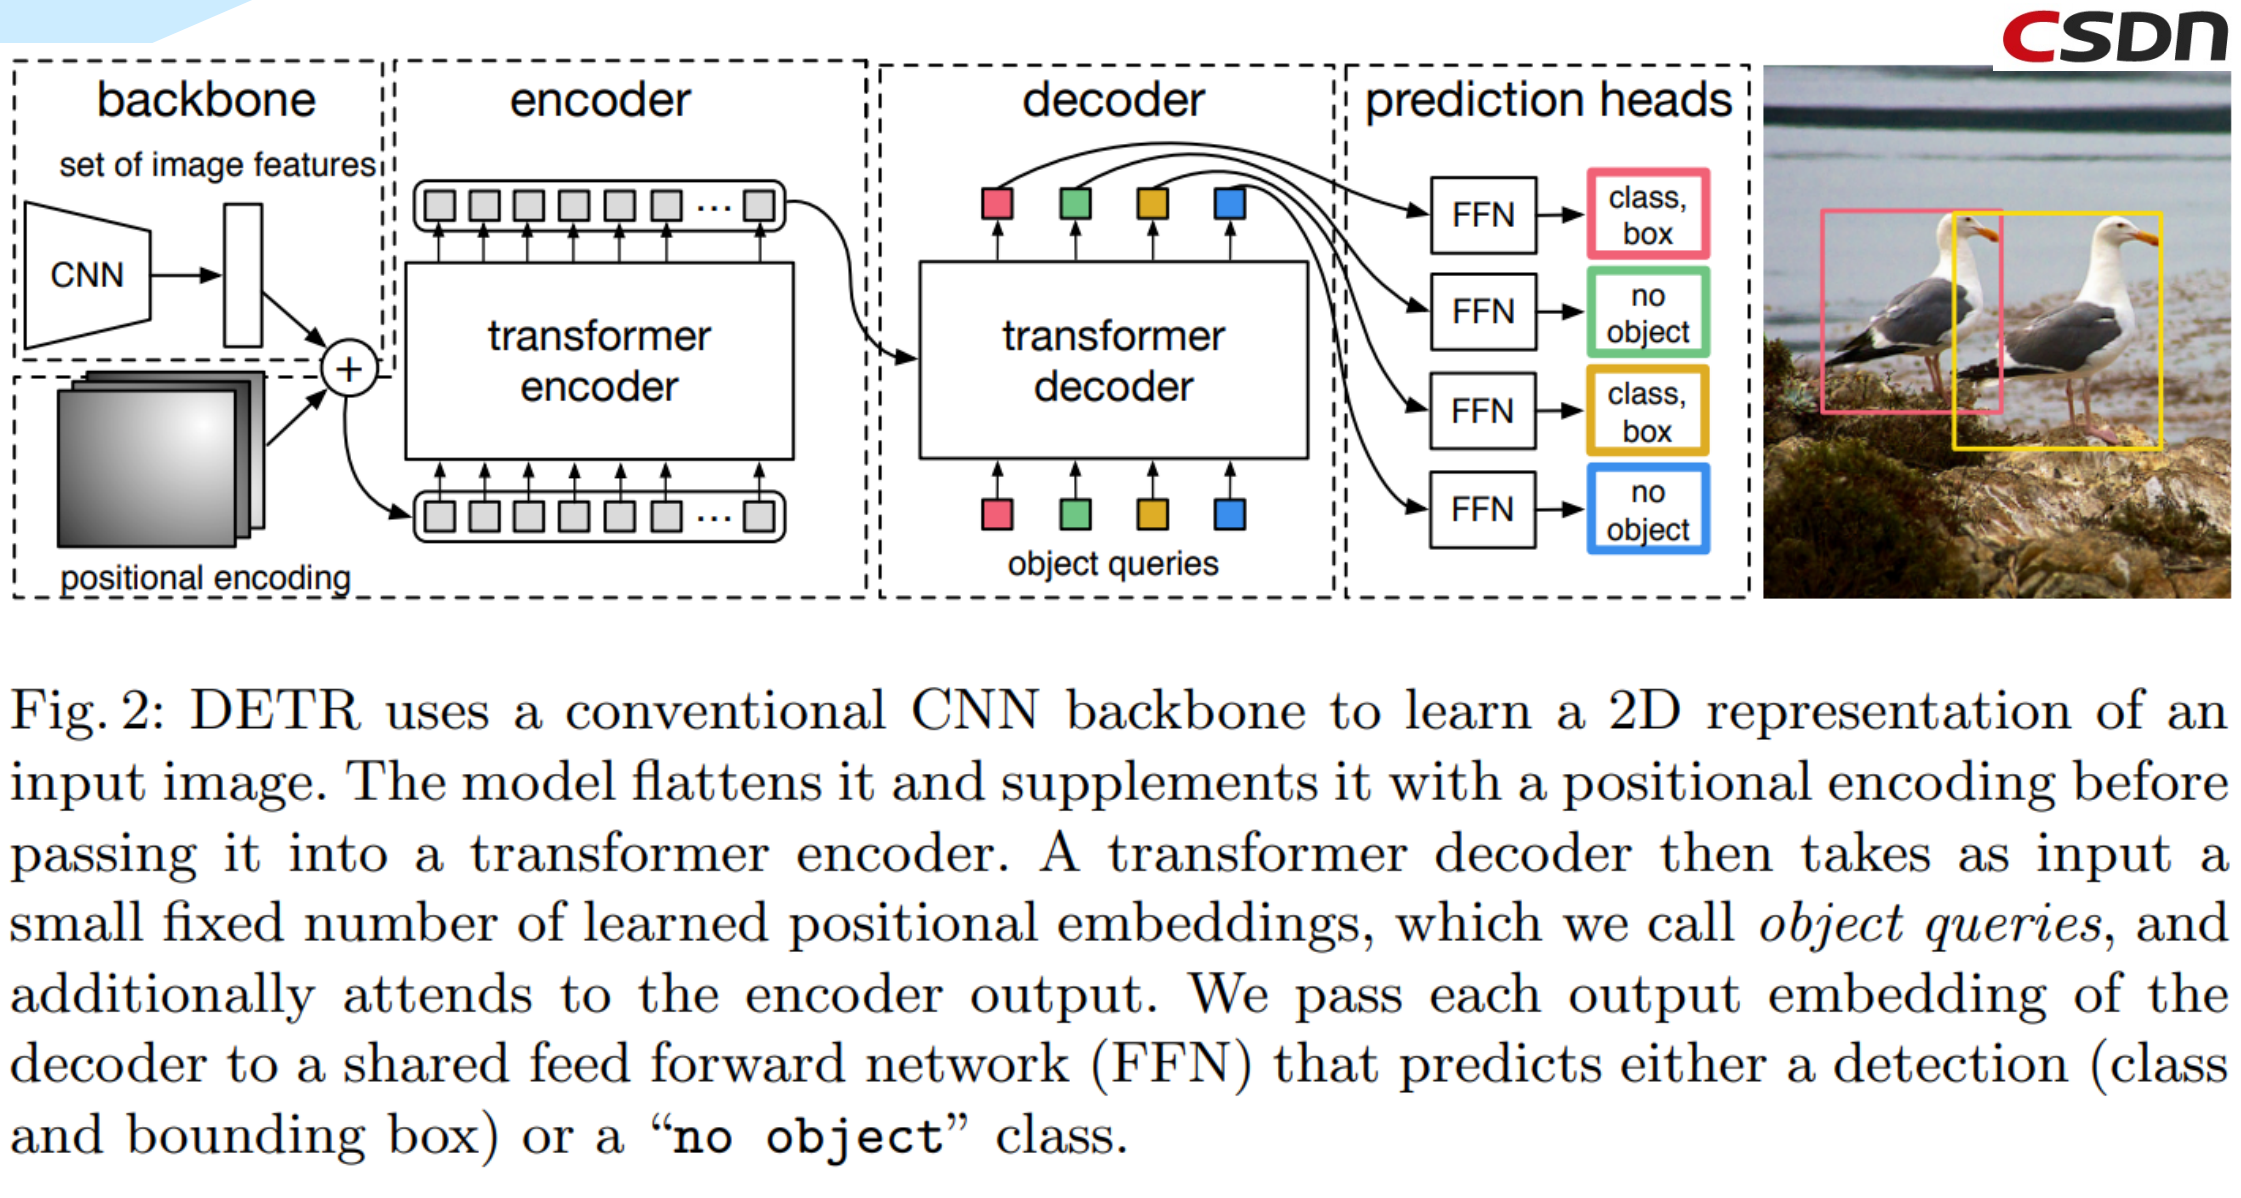
- DETR: 在2020年5月,提出一个简单而有效的高层视觉框架,将目标检测视为一个直接集预测问题。
- iGPT: 在2020年7月,针对NLP的模型也可以用于图像预训练。
- VIT: 在2020年10月,纯Transformer架构适用于可视化识别
- IPT: 在2020年12月,第一个结合多任务的低层视觉变换Transformer模型
- VIT Variants: 在2021年,提出基于VIT模型的几种变体,例如DeiT、PVT、TNT、Swin。
Swin Transformer是由微软亚洲研究院提出的一种Transformer结构模型,它取得了多个计算机视觉任务和数据集上的SOTA性能,这些任务包括目标检测、实例分割和语义分割,图像分类。它可以用作计算机视觉的通用backbone。在NLP和CV两个领域之间的差异,例如视觉实体尺度的巨大差异以及与文字中的单词相比,图像中像素的高分辨率,带来了使Transformer从语言适应视觉方面的挑战。
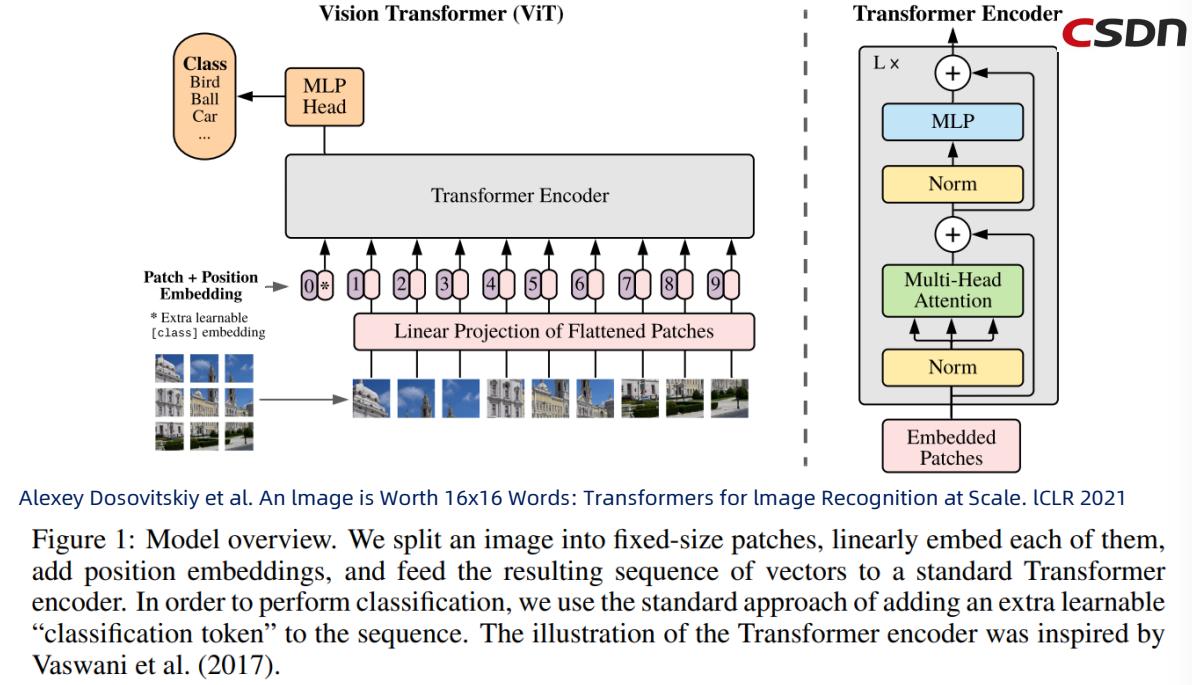
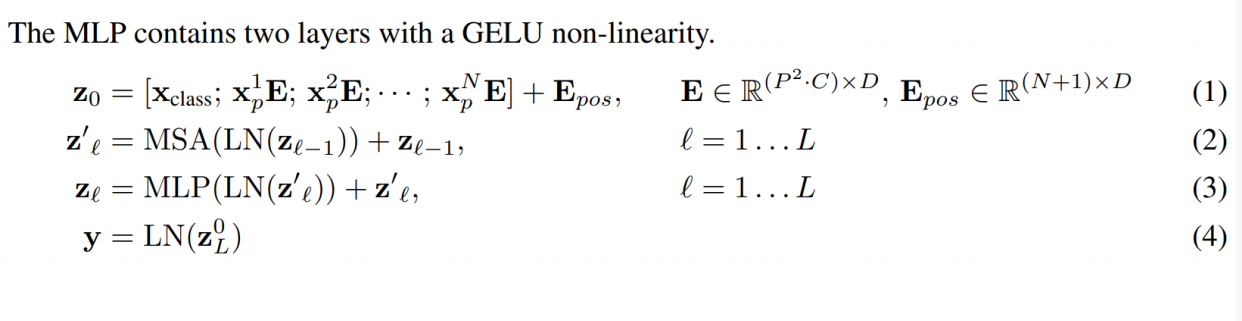
1.2 Transformer的网络结构
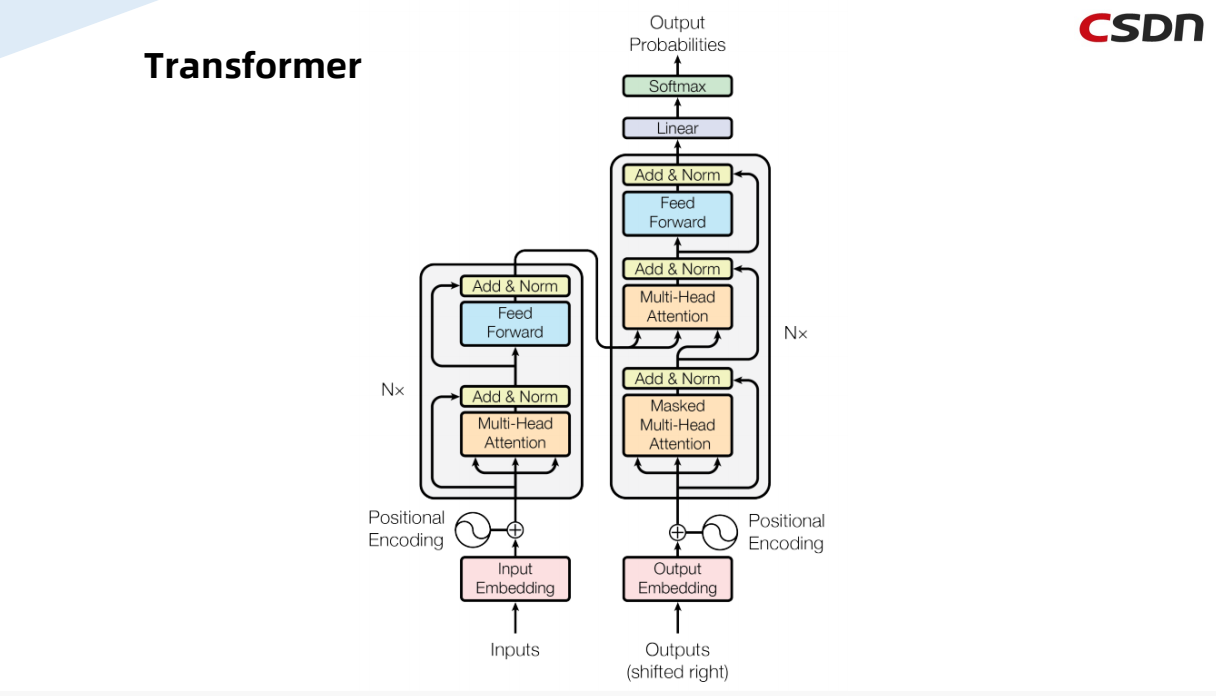
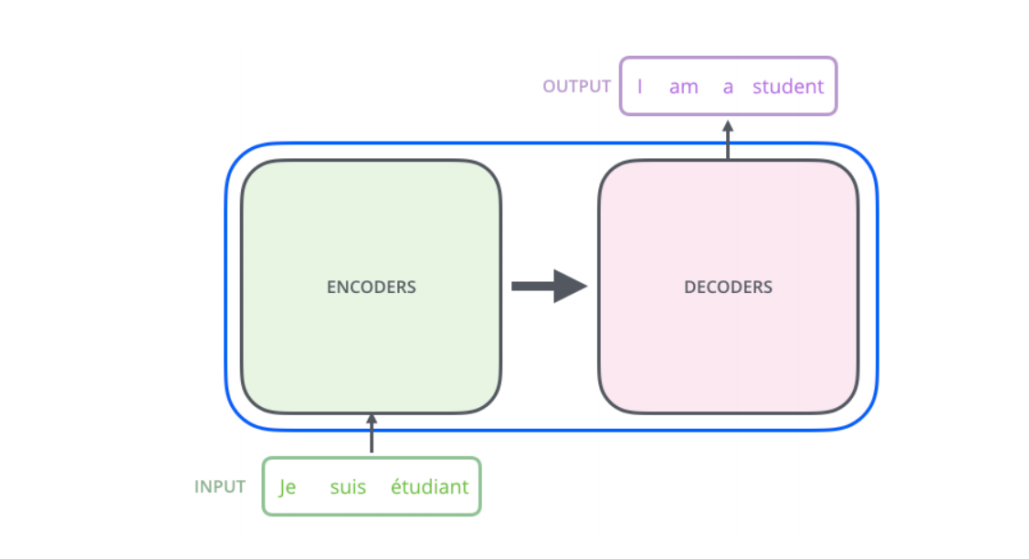
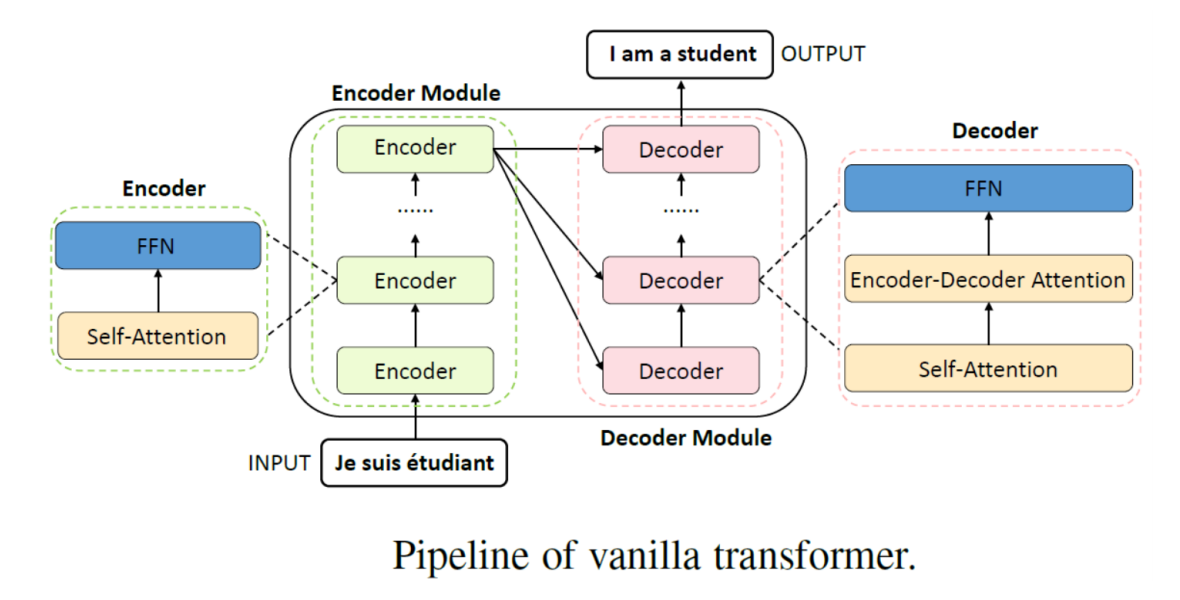
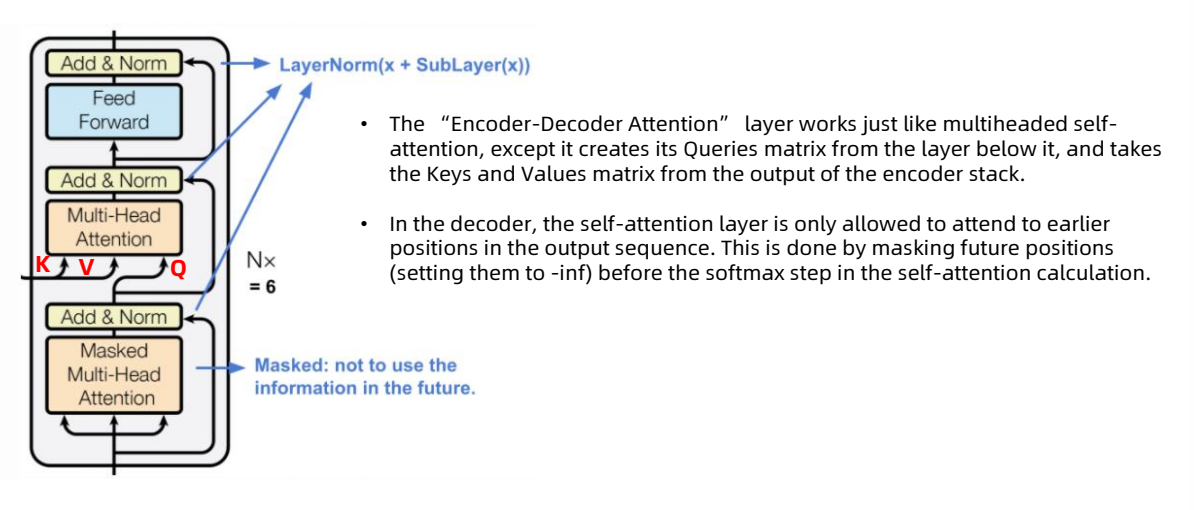
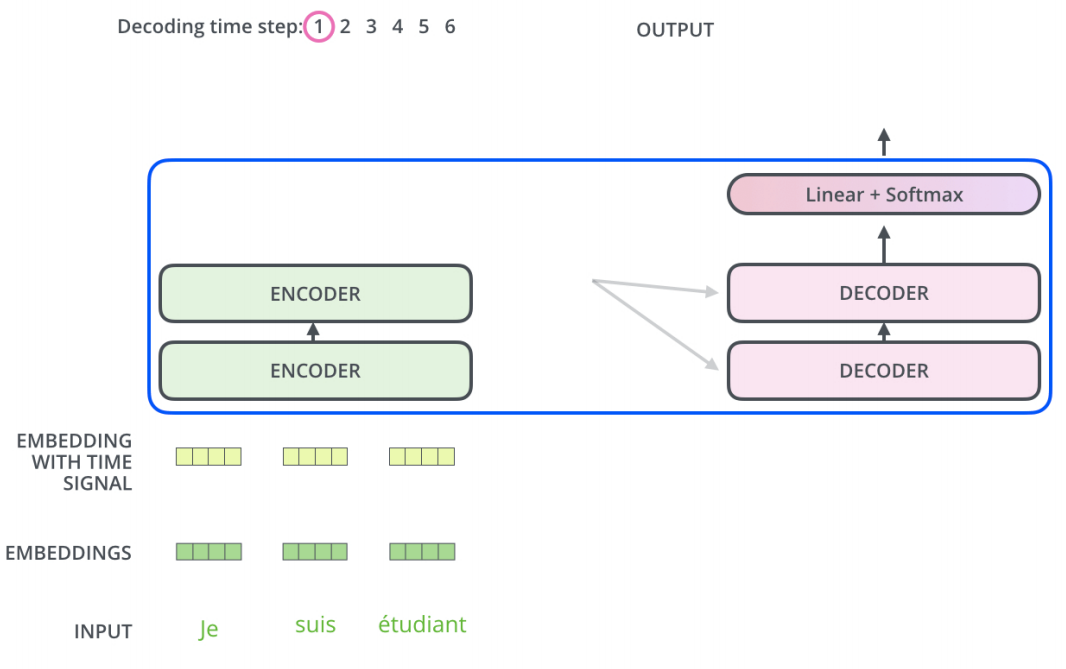
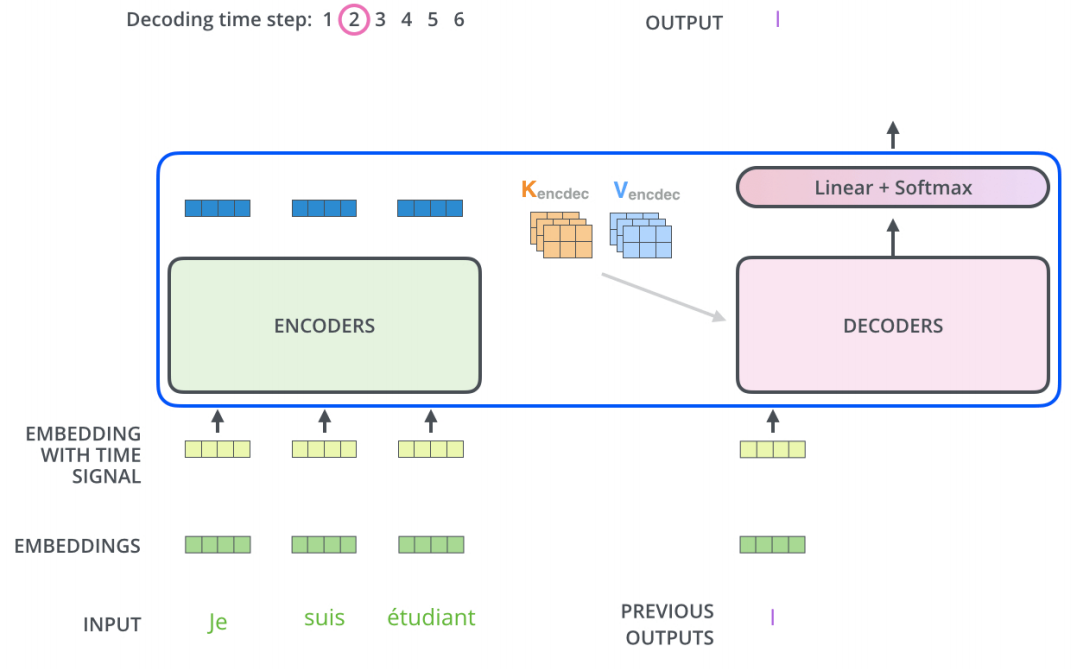
和大多数seq2seq模型一样,transformer的结构也是由encoder和decoder组成。
实际上,Transformer是基于Encoder和Decoder的网络架构。最初是被用来解决NLP自然语言处理来提出的,主要是用来的处理seq2seq的任务,例如语言的翻译。它的主要特点是采用了Multi-Head Attention的注意力机制以及Encoder和Decoder之间的Cross相互的注意力机制。
1.3 Swin Transformer的网络架构
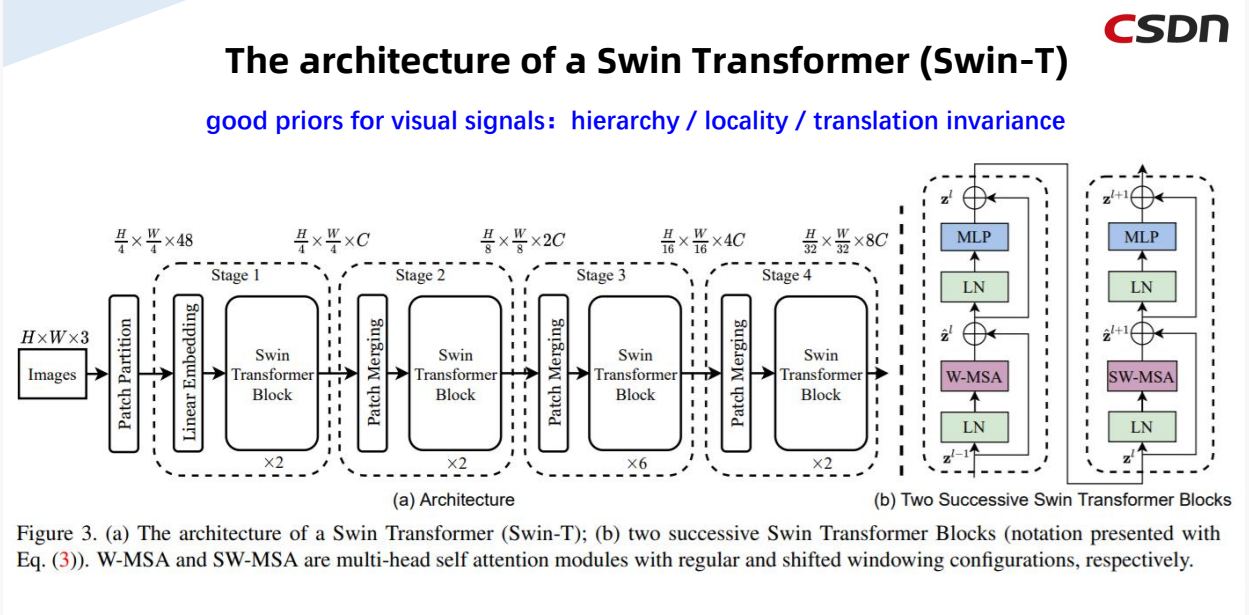
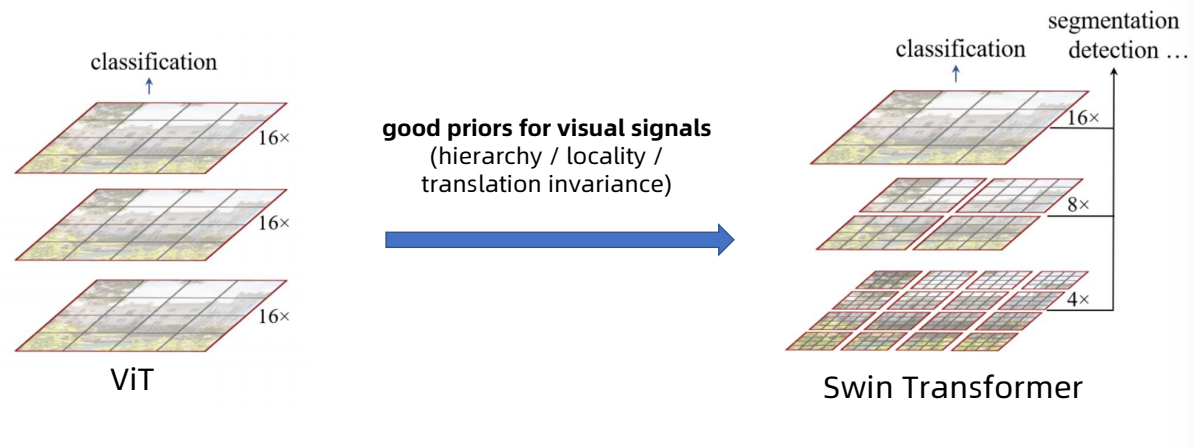
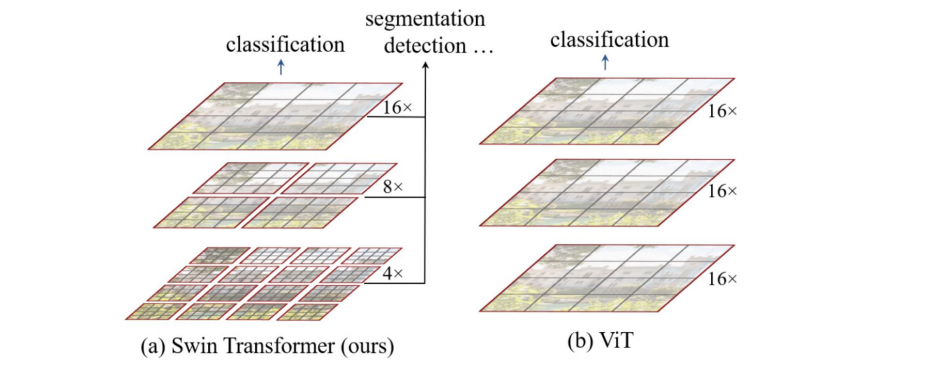
Swin Transformer的优势在于在ViT的基础上将hierarchy(层次性)、locality(局部性)、translation invariance(平移不变性)等先验引入Transformer网络结构设计从而能在视觉任务中取得更好的性能。
下面分别从几个特性来介绍:
-
层次性:从上图可以看到,Image经过Patch Partition传入,经过多个stage,其中每个stage中分别对其进行Patch Mergeing和Swin Transformer Block的处理,在此过程中Size的大小不断减少,同时通道数不断地增加,这就是该结构体现的层次性。
-
局部性:神经网络的前面几层应该只探索输入图像中的局部区域,而不过度在意图像中相隔较远区域的关系,这就是“局部性”原则。最终,可以聚合这些局部特征,以在整个图像级别进行预测。
-
平移不变性:不管检测对象出现在图像中的哪个位置,神经网络的前面几层应该对相同的图像区域具有相似的反应,即为“平移不变性”。卷积神经网络具有平移不变性,而图网络不具有该性质,因此不能直接做卷积操作。平移不变性是一个很有用的性质,尤其是当我们关心某个特征是否出现而不关心它出现的具体位置时。简单地说,卷积+最大池化约等于平移不变性。
1.4 核心创新点
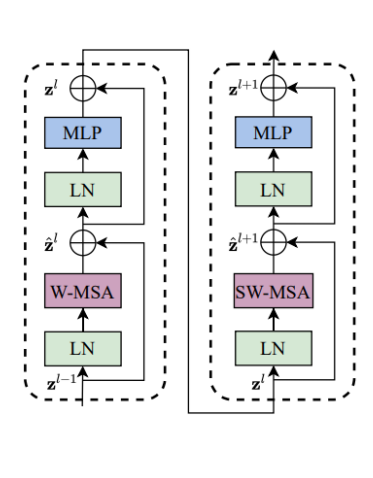
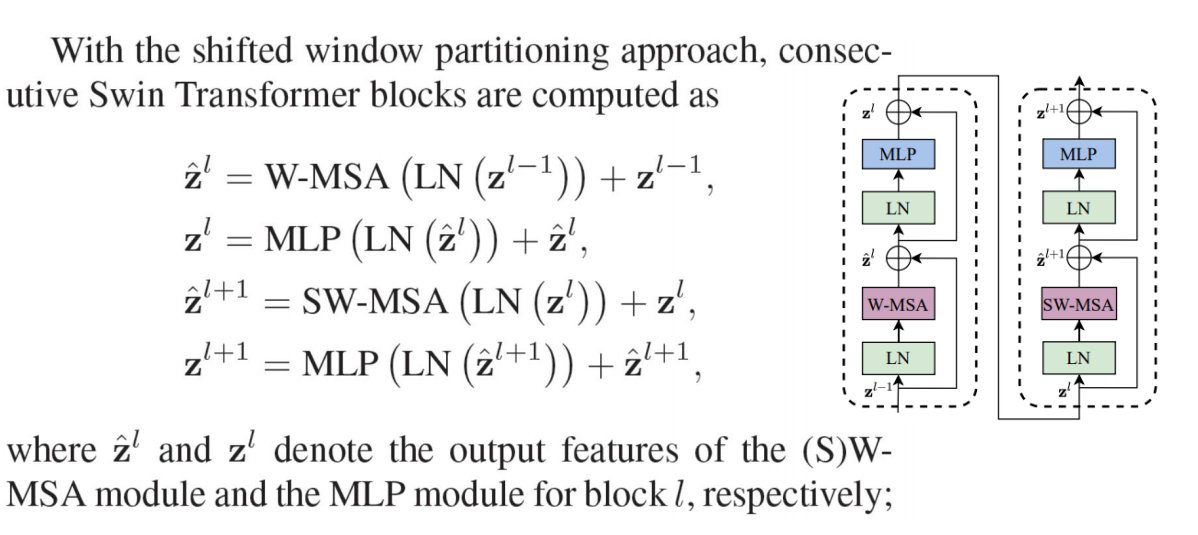
每个Swin Transformer模块都由两个Block组成。
(1)自注意力的计算在局部的非重叠窗口内进行。
(2)在前后两层的Transformer模块中,非重叠窗口的配置相比前一层做了半个窗口的移位,使得上一层中不同窗户的信息进行了交换。
二、目标检测相关基础
2.1 目标检测任务理解与总结
2.2 目标检测之常用数据集
2.3 目标检测之性能指标
三、Transformer的介绍及在CV领域内的应用
解码器与编码器
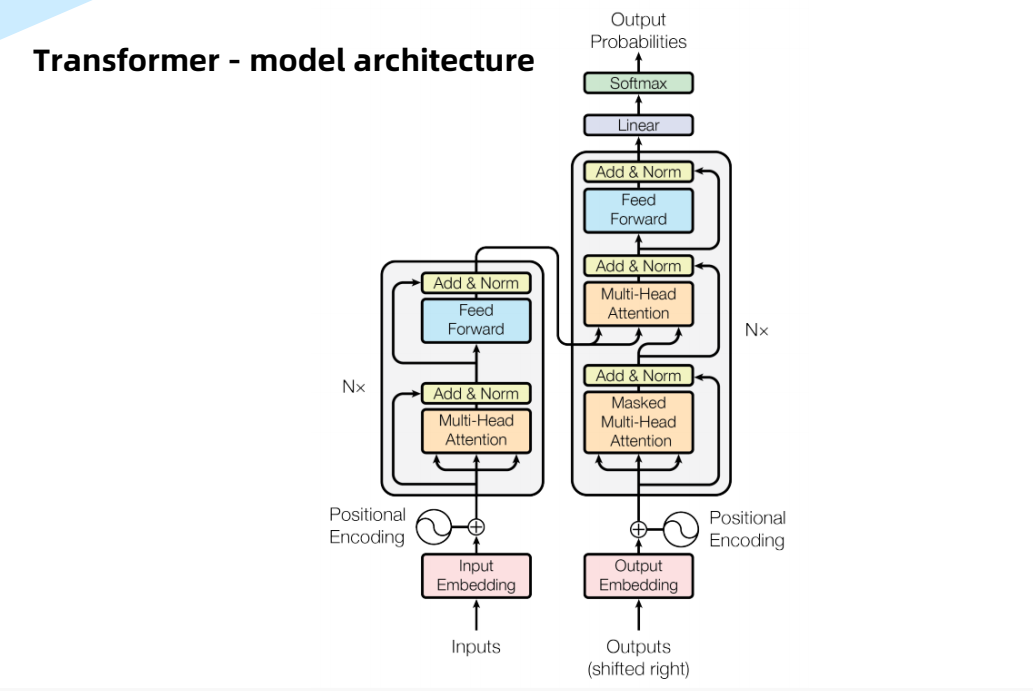

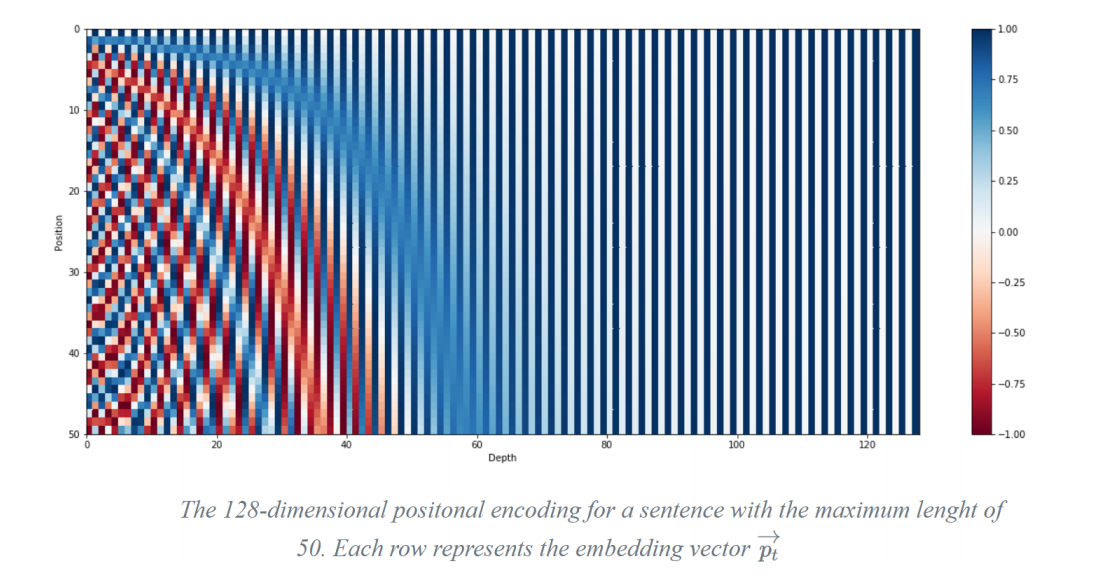
Positional Encoding
Decoder
DETR
End to End Object Detection with Transformers

四、Swin Transformer的原理
论文

Ze Liu Yutong Lin Yue Cao Han Hu Yixuan Wei Zheng Zhang Stephen Lin Baining Guo
Swin Transformer : Hierarchical Vision Transformer using Shifted Windows. ICCV 2021
https://arxiv.org/abs/2103.14030
SOTA
Problems of ViT
. Does not consider the difference between textual and visual signals
. Mainly for image classification
Key tech innovation : locality by Shifted windows
• Non-overlapped windows (faster real speed than sliding windows)
• Windows are shifted in the next layer
Hierarchical feature maps
• Windows Multi-Head Self-Attention (W-MSA)
• Shifted Windows Multi-Head Self-Attention (SW-MSA)
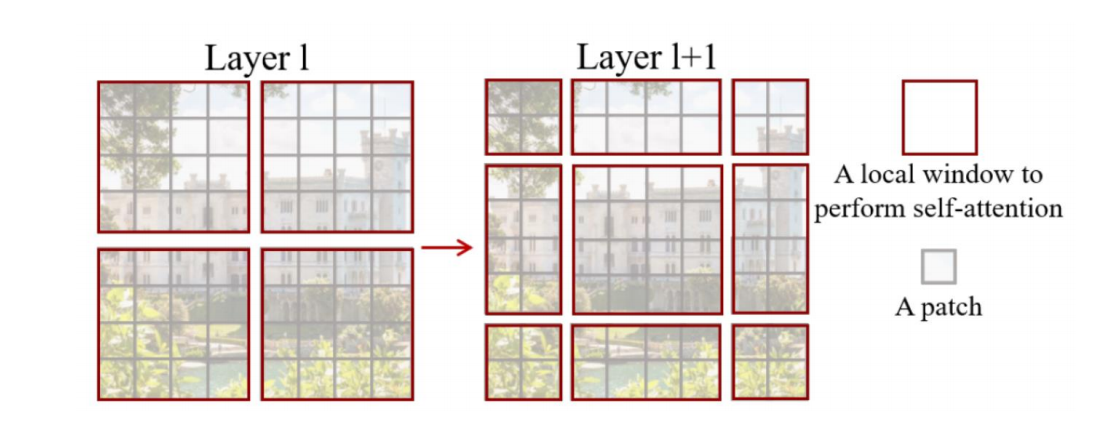
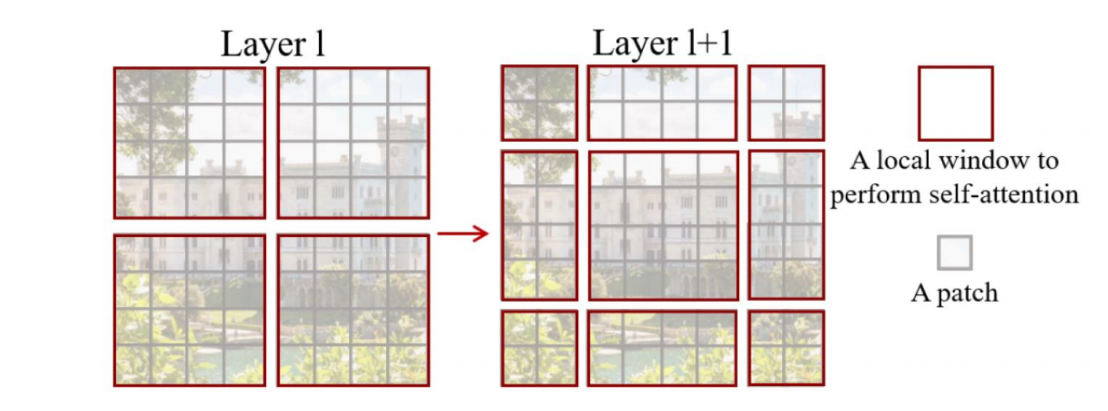
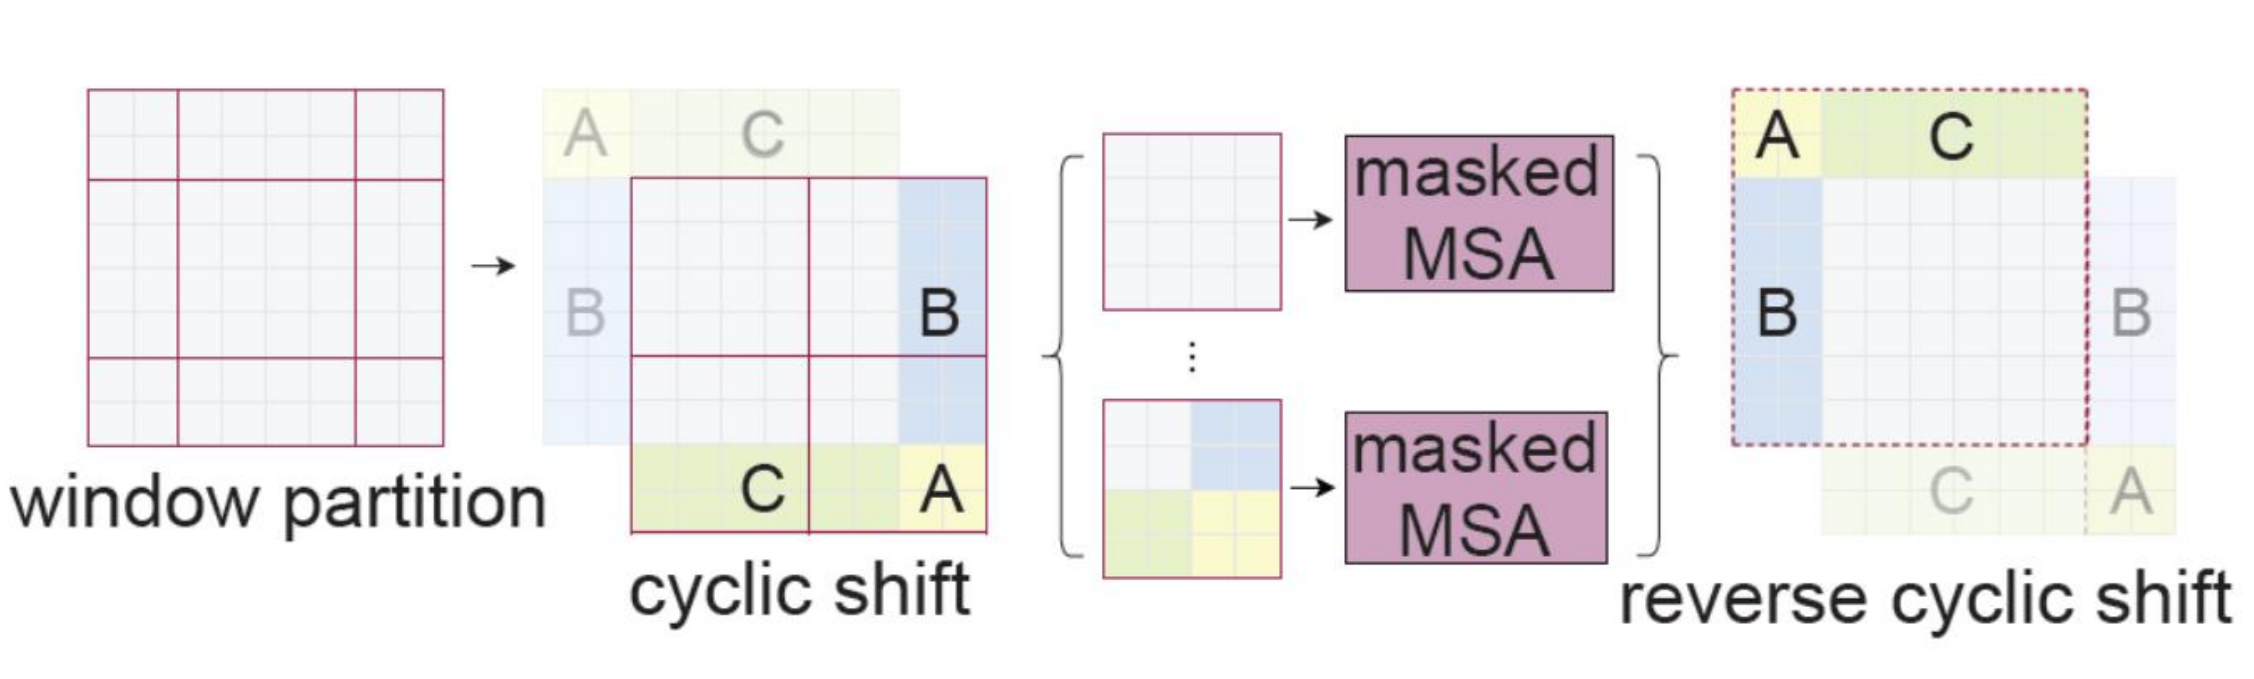
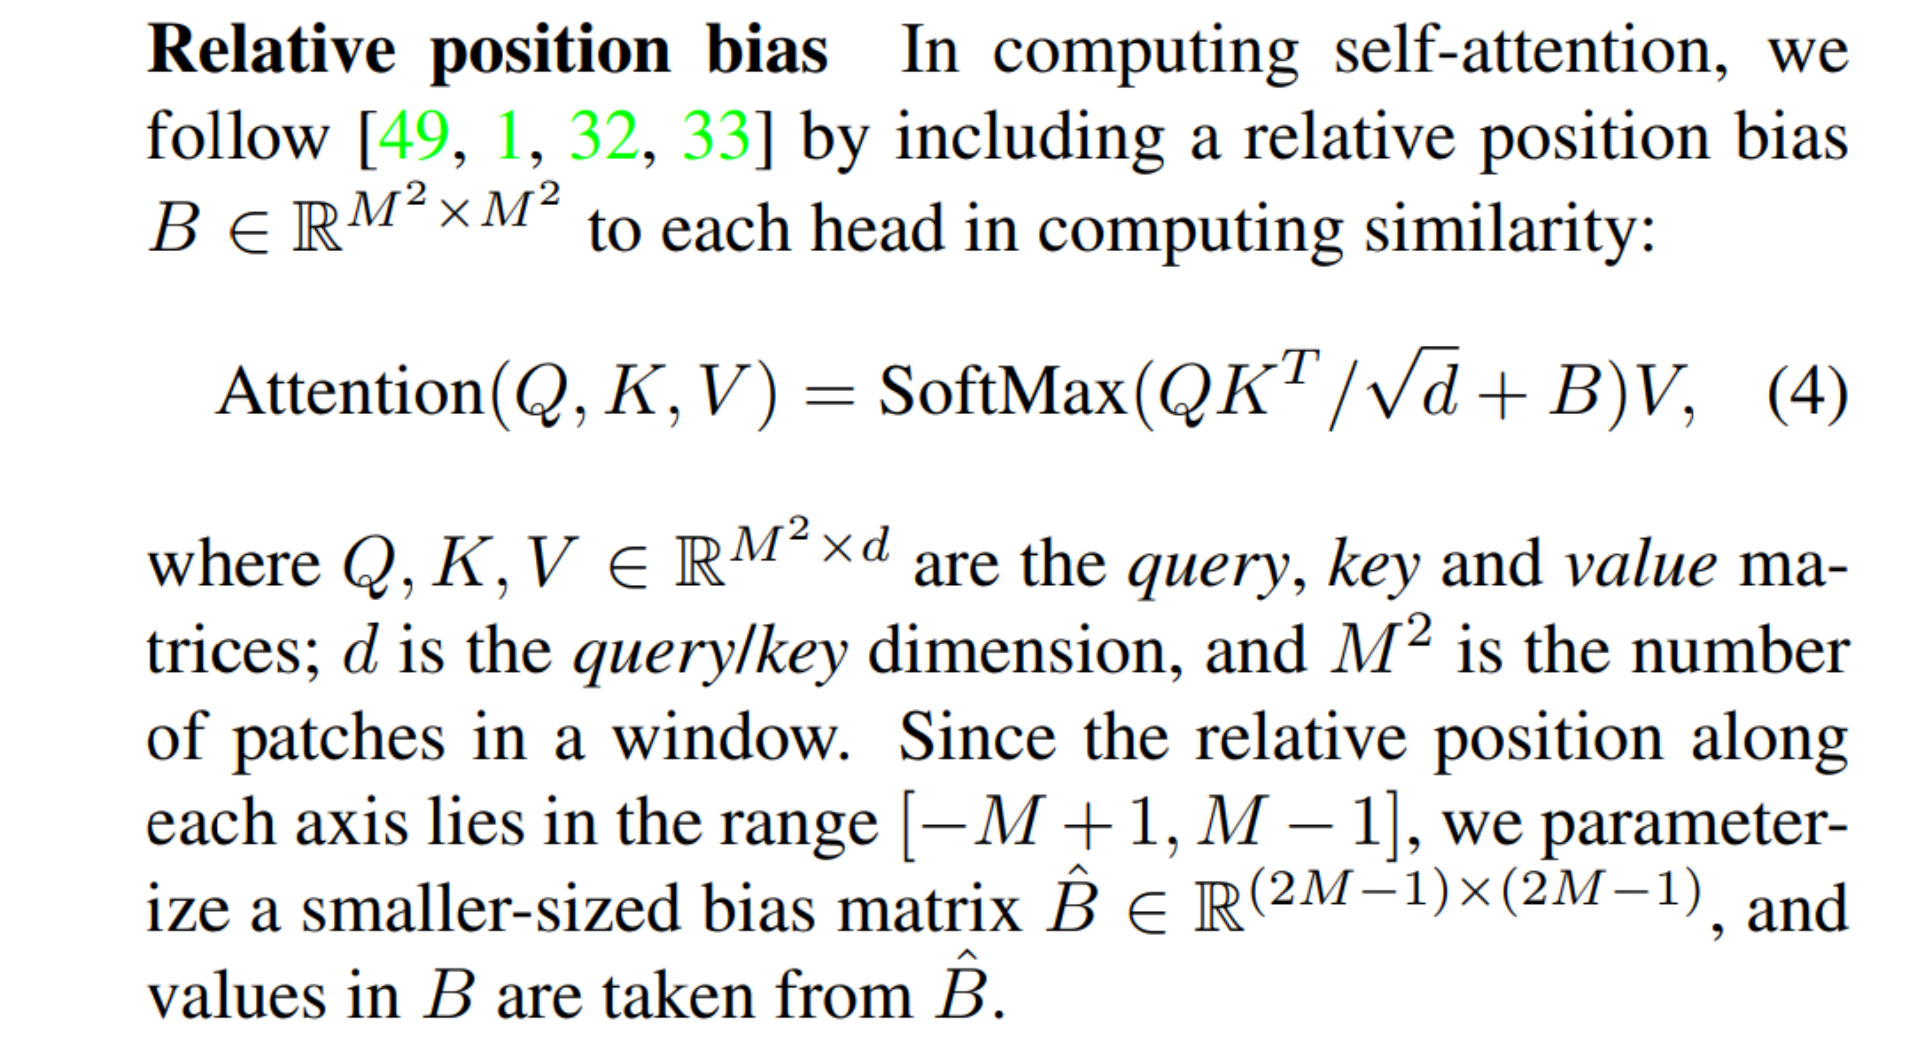
1)自注意的计算在局部的非重叠窗口内进行。不同query会共享同样的key集合,从而对硬件友好
2)在前后两层的Transformer模块中,非重叠窗口的配置相比前一层做了半个窗口的移位,使得上一层中不
同窗口的信息进行了交换。
Self-attention in non-overlapped windows
For efficient modeling, we propose to compute self attention within local windows.
The windows are arranged to evenly partition the image in a non-overlapping manner.
Supposing each window contains M × M patches, the computational complexity of a global
MSA module and a window based one on an image of h × w patches are :


The architecture of a Swin Transformer (Swin-T)
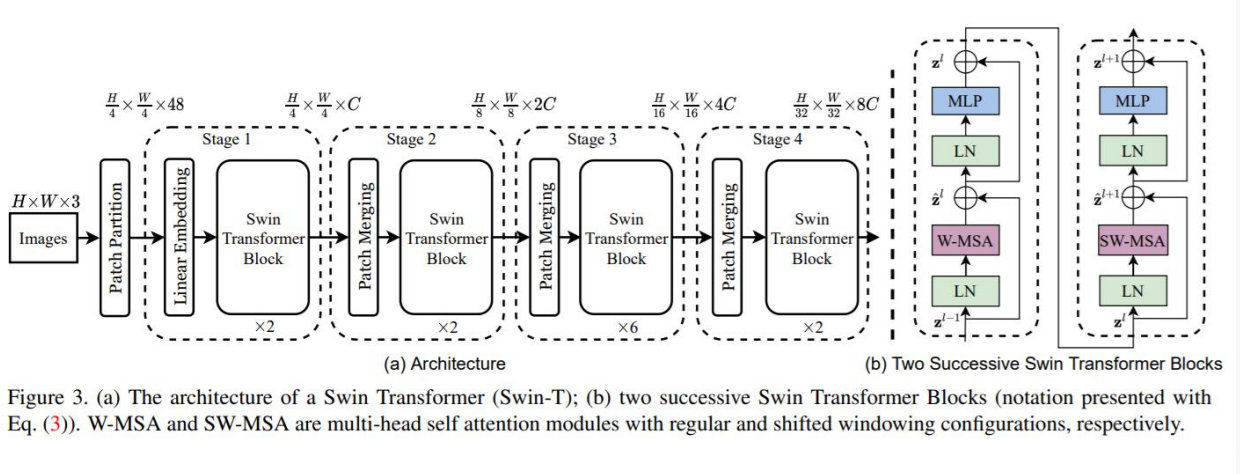
Patch Merging
经过Patch Merging后,feature map的高和宽会减半,深度会加倍

Swin Transformer block
Swin Transformer is built by replacing the standard multi-head
self attention (MSA) module in a Transformer block by a module
based on shifted windows, with other layers kept the same.
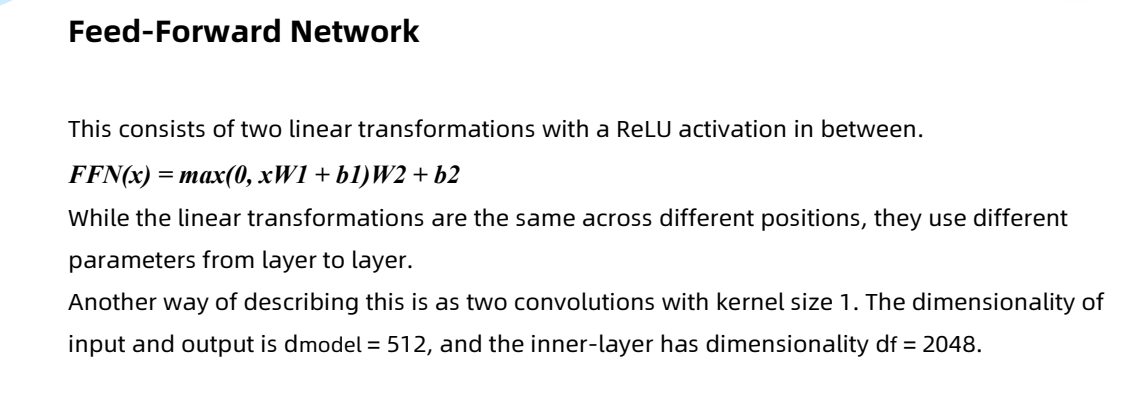
A Swin Transformer block consists of a shifted window based MSA
module, followed by a 2-layer MLP with GELU nonlinearity in
between.
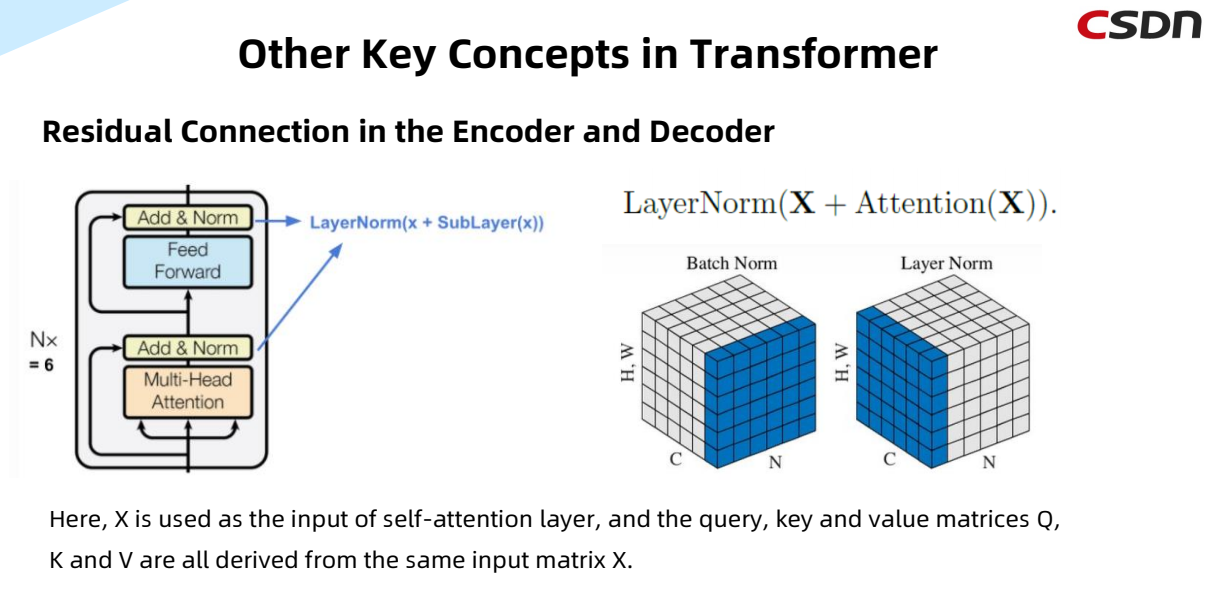
A LayerNorm (LN) layer is applied before each MSA module and
each MLP, and a residual connection is applied after each module.
Shifted window partitioning in successive blocks
Swin T(Tiny),S(Small),B(Base),L(Large)
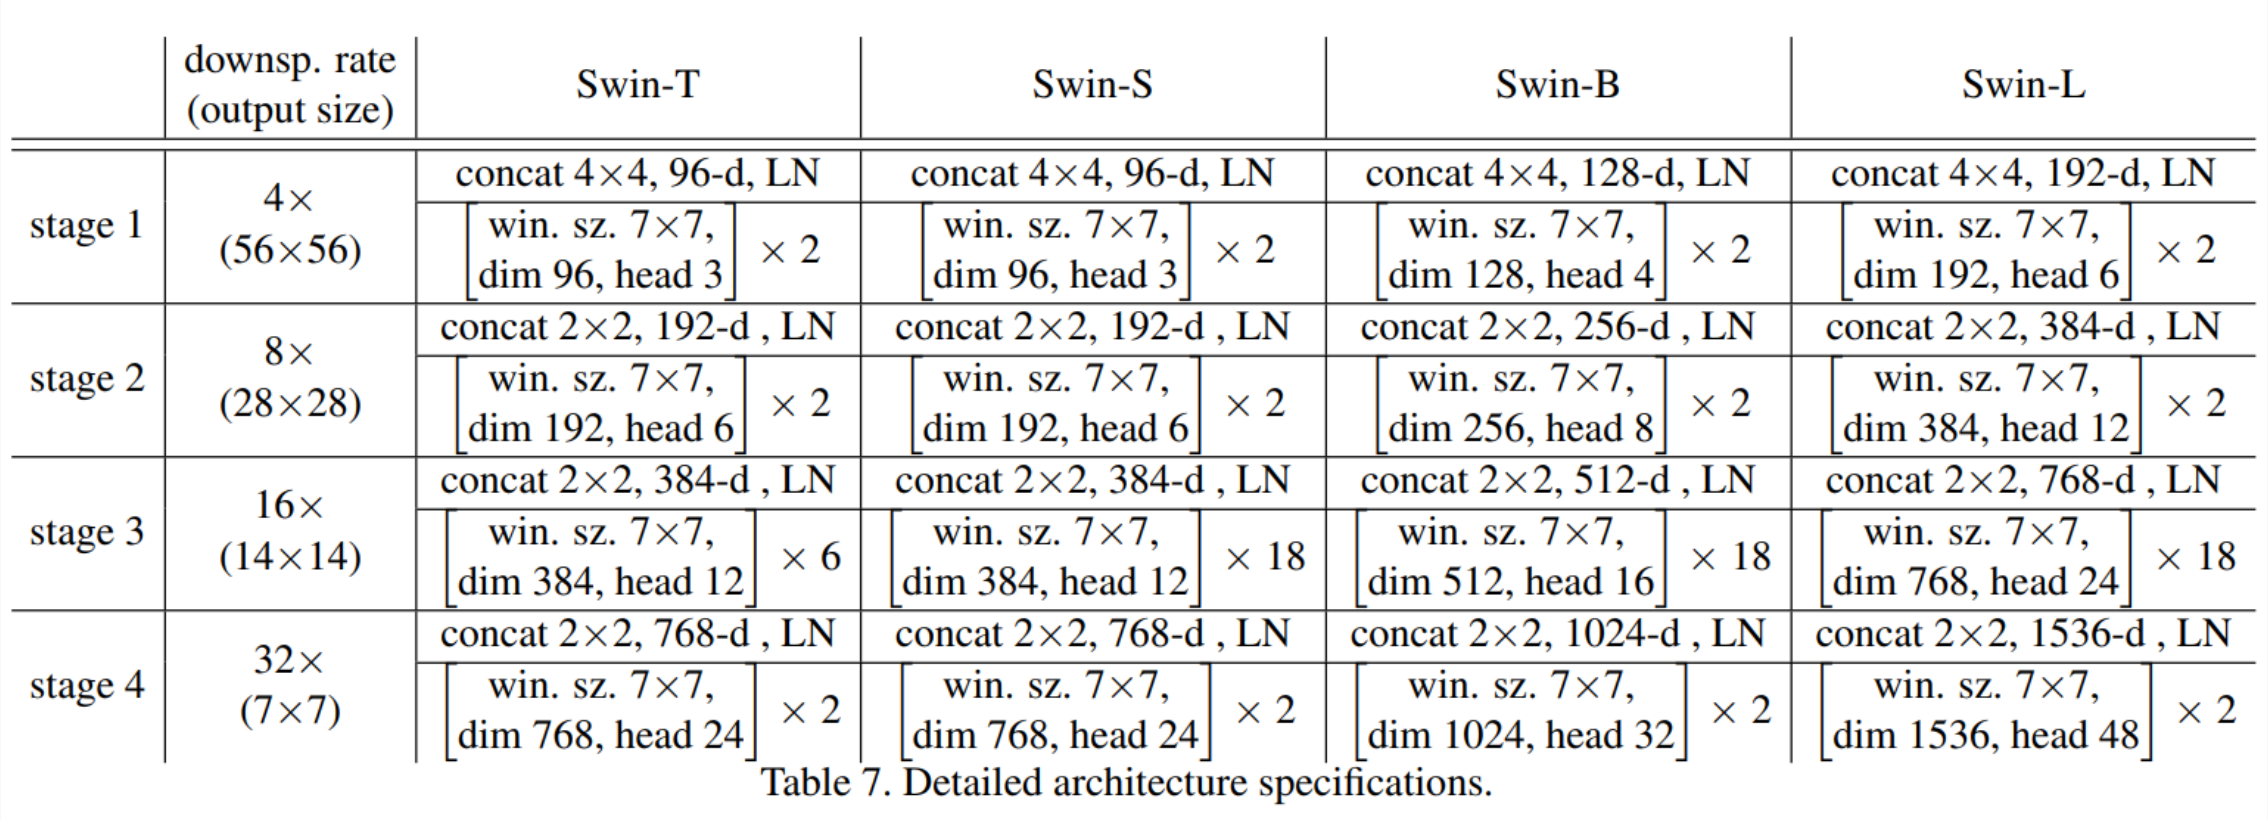
• win. sz. 7x7表示使用的窗口(Windows)的大小
• dim表示feature map的channel深度)
• head表示多头注意力模块中head的个数
Architecture Variants

where C is the channel number of the hidden layers in the first stage.
Architecture Variants
The window size is set to M = 7 by default. The query dimension of each
head is d = 32, and the expansion layer of each MLP is α = 4.
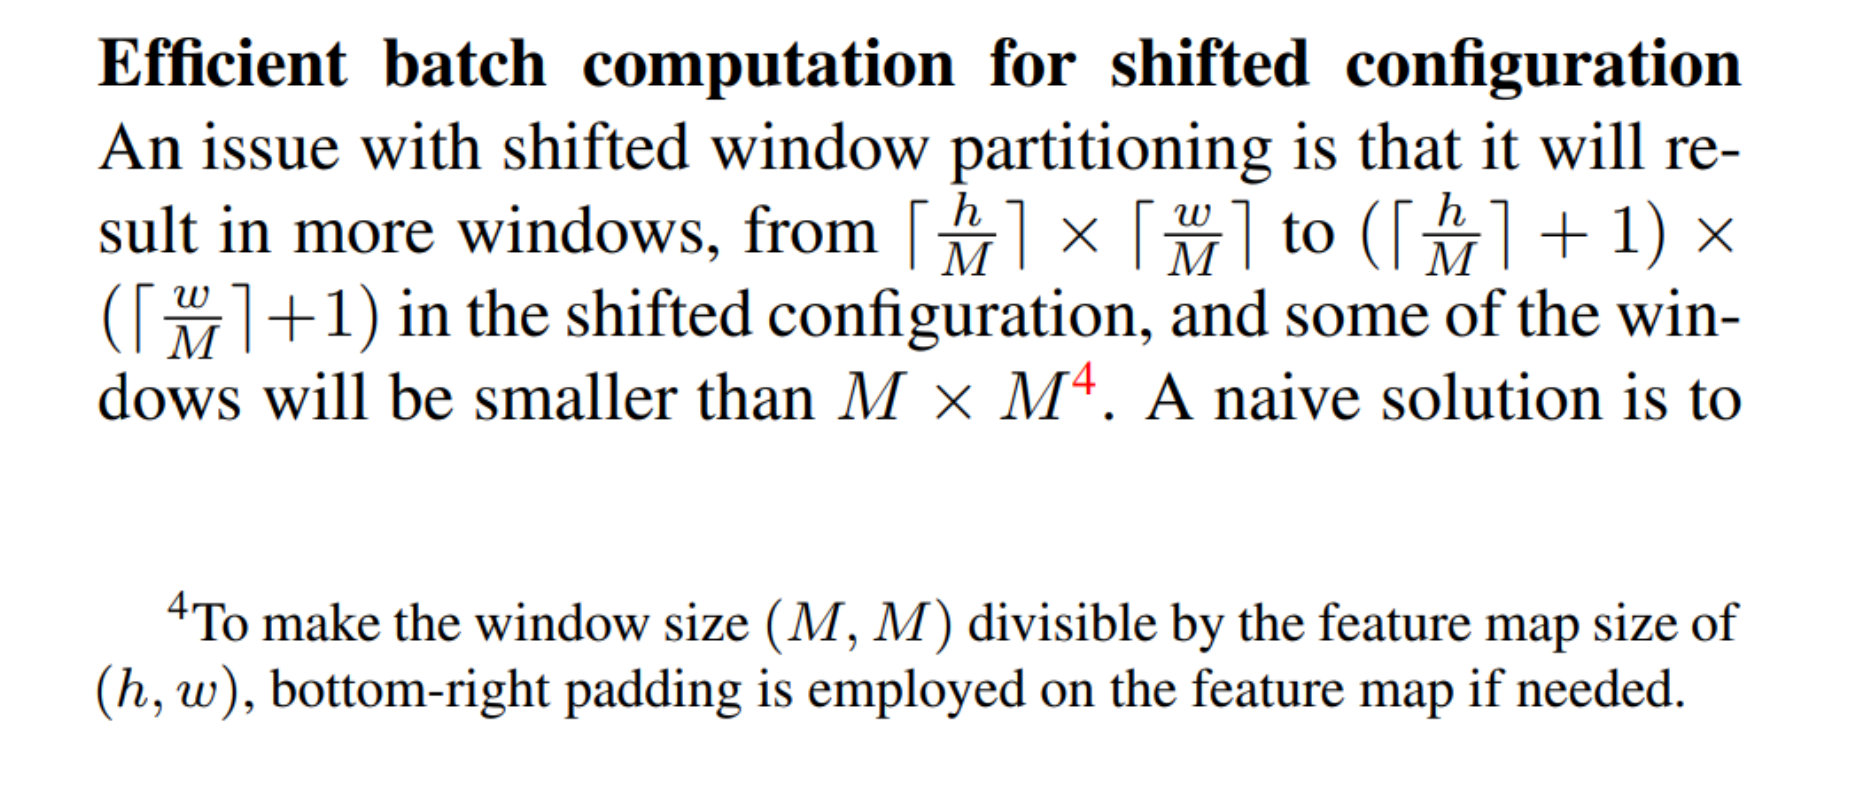
Illustration of an efficient batch computation approach for self-attention in shifted window partitioning
Experimental Designs
3 datasets to cover various recognition tasks of different granularities
• lmage-level lmageNet-1K classification (1.28M images; 1000 classes).
• Region-level coco object detection (115K images; 80 classes).
• Pixel-level ADE20K semantic segmentation (20K images; 150 classes)

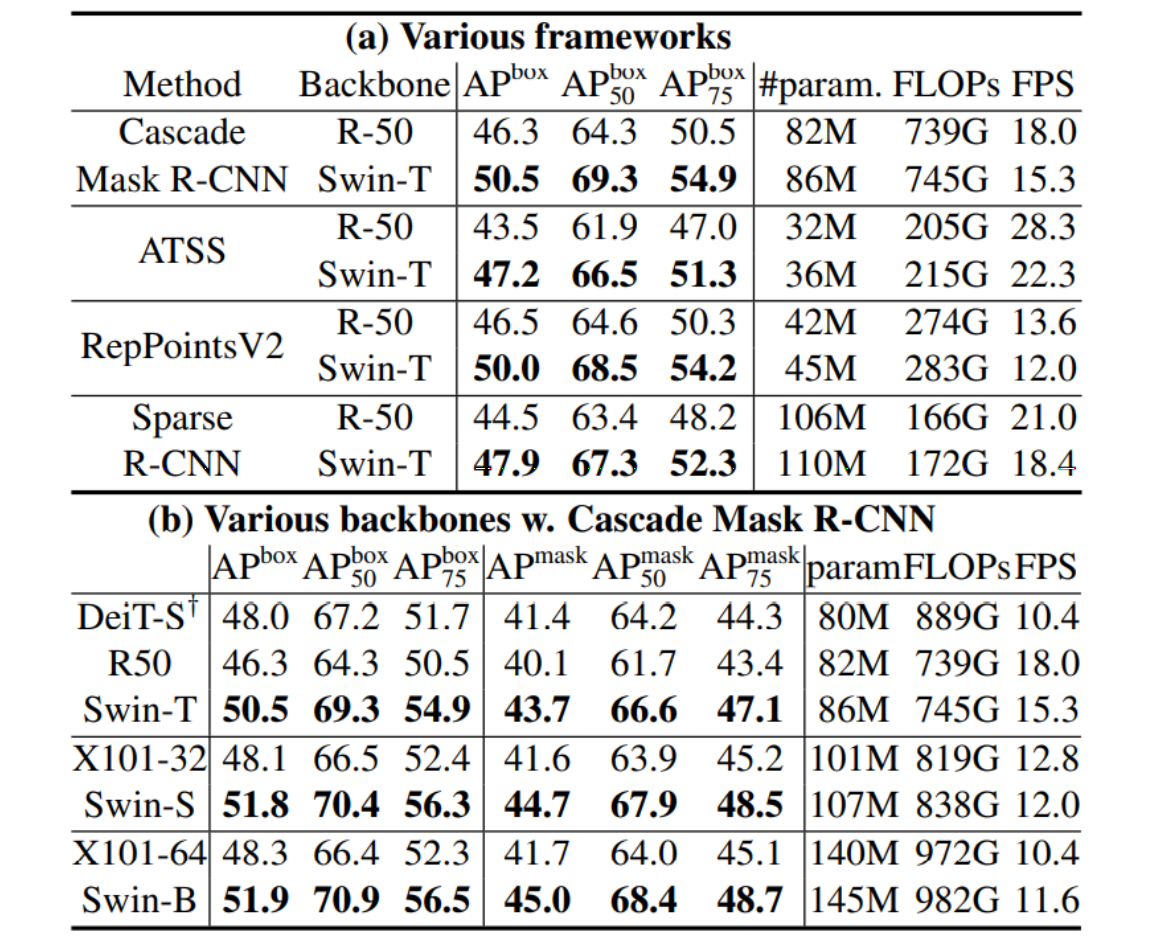
Results on COCO object detection and instance segmentation
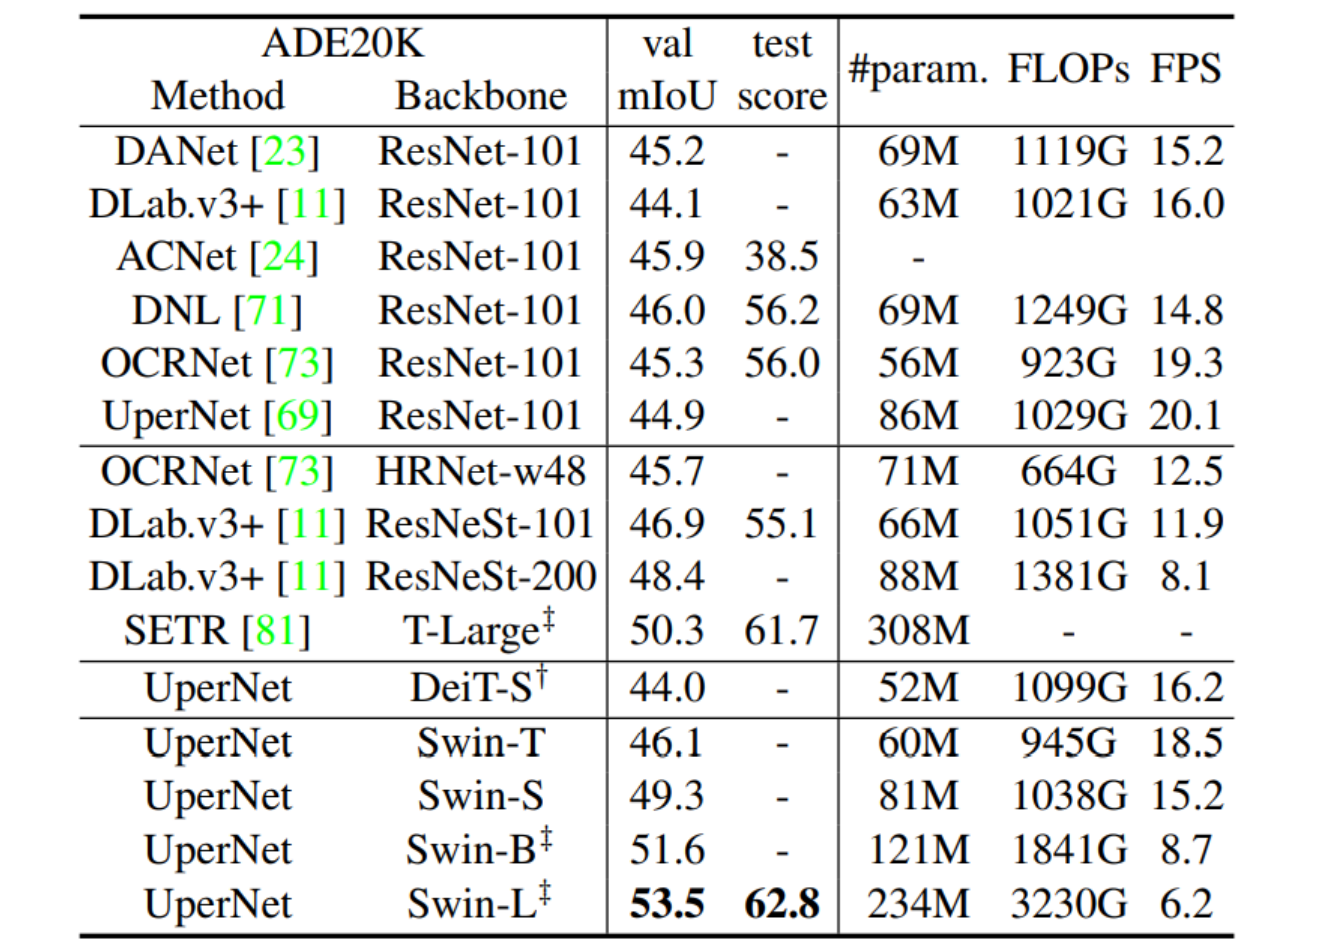
Results of semantic segmentation on the ADE20K val and test set
五、Swin Transformer的环境部署和训练相关
5.1 软件安装
1) 安装Anaconda
Anaconda 是一个用于科学计算的 Python 发行版,支持 Linux, Mac, Windows, 包含了众多流行的科学
计算、数据分析的 Python 包。
-
先去官方地址下载好对应的安装包
下载地址:https://www.anaconda.com/download/#linux -
然后安装anaconda
bash ~/Downloads/Anaconda3-2021.05-Linux-x86_64.sh
anaconda会自动将环境变量添加到PATH里面,如果后面你发现输入conda提示没有该命令,那么
你需要执行命令 source ~/.bashrc 更新环境变量,就可以正常使用了。
如果发现这样还是没用,那么需要添加环境变量。
编辑~/.bashrc 文件,在最后面加上
export PATH=/home/bai/anaconda3/bin:$PATH
注意:路径应改为自己机器上的路径
保存退出后执行: source ~/.bashrc
再次输入 conda list 测试看看,应该没有问题。
添加Aanaconda国内镜像配置
清华TUNA提供了 Anaconda 仓库的镜像,运行以下三个命令:
conda config --add channels
https://mirrors.tuna.tsinghua.edu.cn/anaconda/pkgs/free/
conda config --add channels
https://mirrors.tuna.tsinghua.edu.cn/anaconda/pkgs/main/
conda config --set show_channel_urls yes
2) 安装pytorch
首先创建一个anaconda虚拟环境,环境名字可自己确定,这里本人使用mypytorch作为环境名:
conda create -n mypytorch python=3.8
安装成功后激活mypytorch环境:
conda activate mypytorch
注意:10.2处应为cuda的安装版本号
编辑~/.bashrc 文件,设置使用mypytorch环境下的python3.8
alias python='/home/linxu/anaconda3/envs/mypytorch/bin/python3.8'
注意:python路径应改为自己机器上的路径
保存退出后执行: source ~/.bashrc
该命令将自动回到base环境,再执行 conda activate mypytorch 到pytorch环境。
5.2 Swin Transformer项目安装
1) 安装mmcv
克隆mmcv项目到本地
git clone -b v1.3.1 https://github.com/open-mmlab/mmcv.git
cd mmcv
MMCV_WITH_OPS=1 pip install -e .
检查
pip list
2) 安装mmdetection
参考:https://mmdetection.readthedocs.io/zh_CN/v2.19.1/get_started.html
git clone -b v2.11.0 https://github.com/open-mmlab/mmdetection.git
cd mmdetection
pip install -r requirements/build.txt
pip install -v -e . # or "python setup.py
- 安装apex
git clone https://github.com/NVIDIA/apex
cd apex
python setup.py install
注意:cuda的版本应和cudatoolkit一致
4)安装Swin-Transformer-Object-Detection
git clone https://github.com/SwinTransformer/Swin-Transformer-ObjectDetection.git
执行
cd Swin-Transformer-Object-Detection
python setup.py develop
下载预训练权重文件
下载mask_rcnn_swin_tiny_patch4_window7_1x.pth权重文件,并放置在Swin-Transformer-ObjectDetection文件夹下
百度网盘下载链接:
链接:https://pan.baidu.com/s/1cO3ln3fokP3cazveC-bjuw
提取码:uzzk
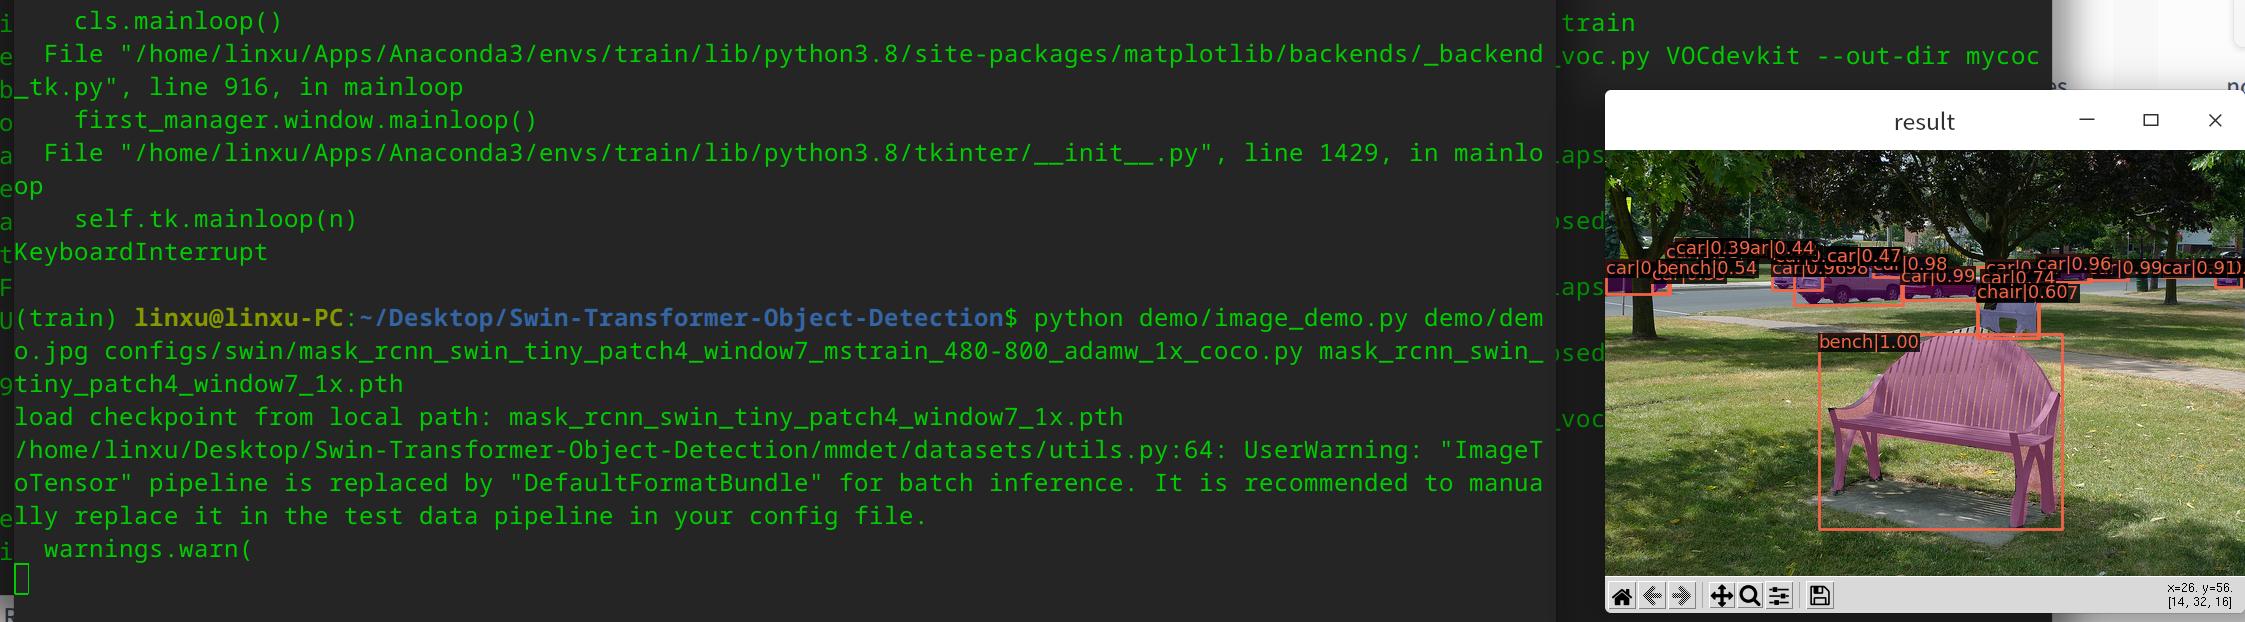
测试命令:
python demo/image_demo.py demo/demo.jpg
configs/swin/mask_rcnn_swin_tiny_patch4_window7_mstrain_480-800_adamw_1x_coco.py
mask_rcnn_swin_tiny_patch4_window7_1x.pth
5.3.标注自己的数据集
- 安装图像标注工具labelImg
克隆labelImg
git clone https://github.com/tzutalin/labelImg.git
使用Anaconda安装
到labelImg路径下执行命令
conda install pyqt=5
pip install lxml
pyrcc5 -o libs/resources.py resources.qrc
python labelImg.py
- 添加自定义类别
修改文件labelImg/data/predefined_classes.txt
ball
messi
trophy
3)使用labelImg进行图像标注
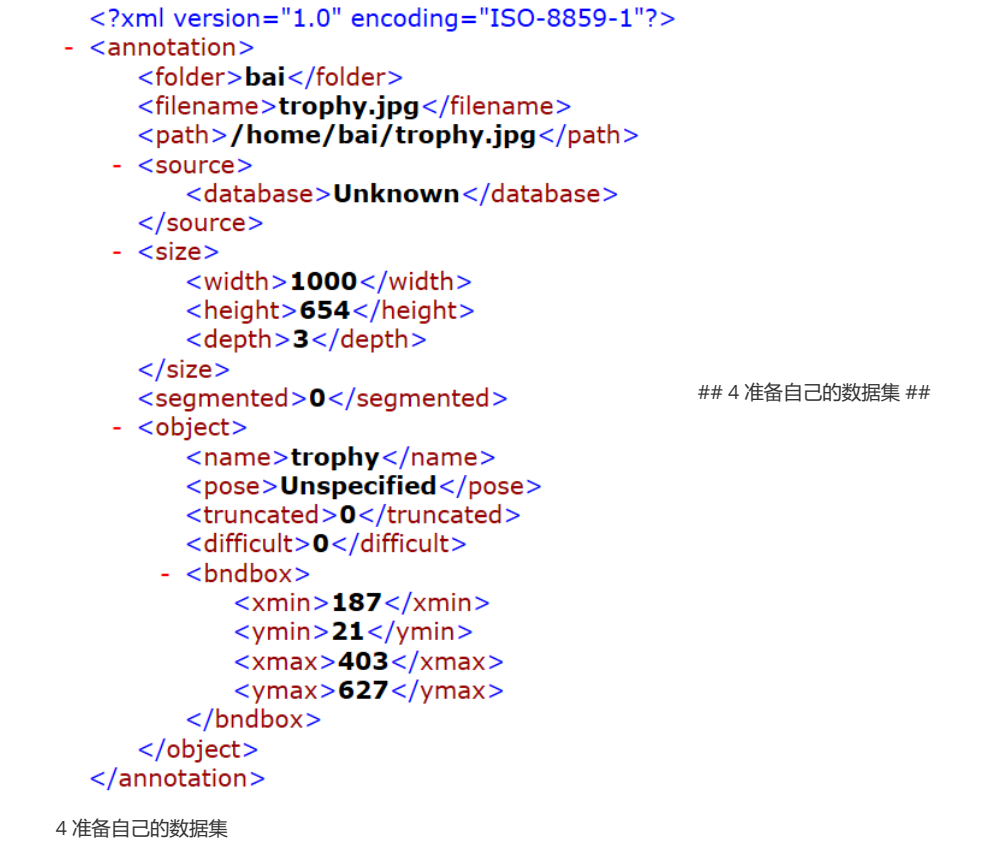
用labelImg标注生成PASCAL VOC格式的xml标记文件。例如:
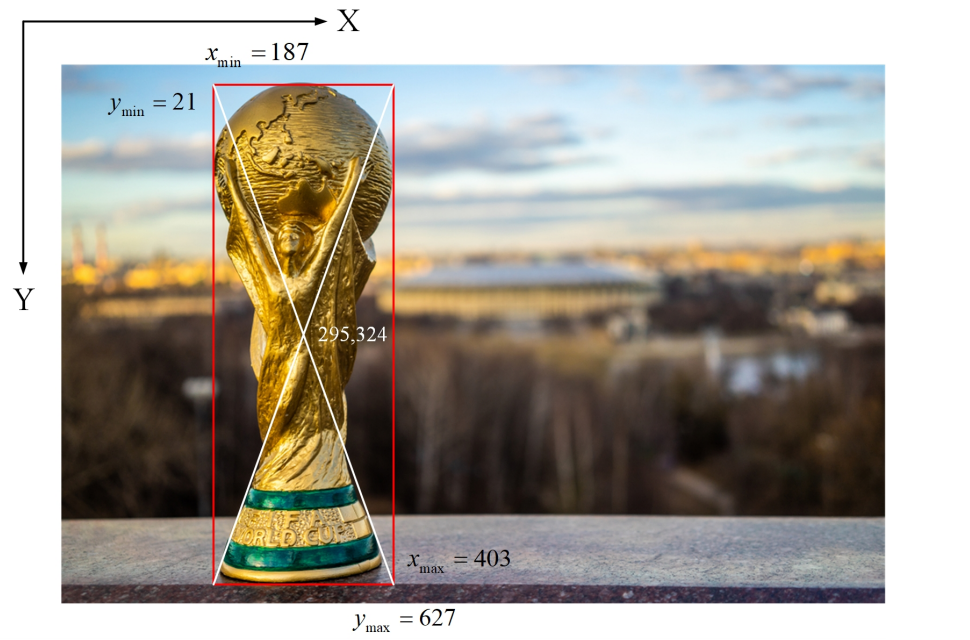
width =1000
height = 654
PASCAL VOC标记文件如下:
5.4 准备自己的数据集
- 下载项目文件
从百度网盘下载
VOCdevkit_bm.zip (下载到并解压)
prepare_mydata.py
pascal_voc.py
testfiles.zip (下载到Swin-Transformer-Object-Detection目录下并解压)
链接:https://pan.baidu.com/s/1cO3ln3fokP3cazveC-bjuw
提取码:uzzk
2)解压建立或自行建立数据集
使用PASCAL VOC数据集的目录结构:
建立文件夹层次为 VOCdevkit / VOC2007
VOC2007下面建立三个文件夹:Annotations,JPEGImages和ImageSets/Main
JPEGImages放所有的数据集图片;Annotations放所有的xml标记文件;ImageSets/Main下存放训练
集、验证集、测试集划分文件(目前为空)
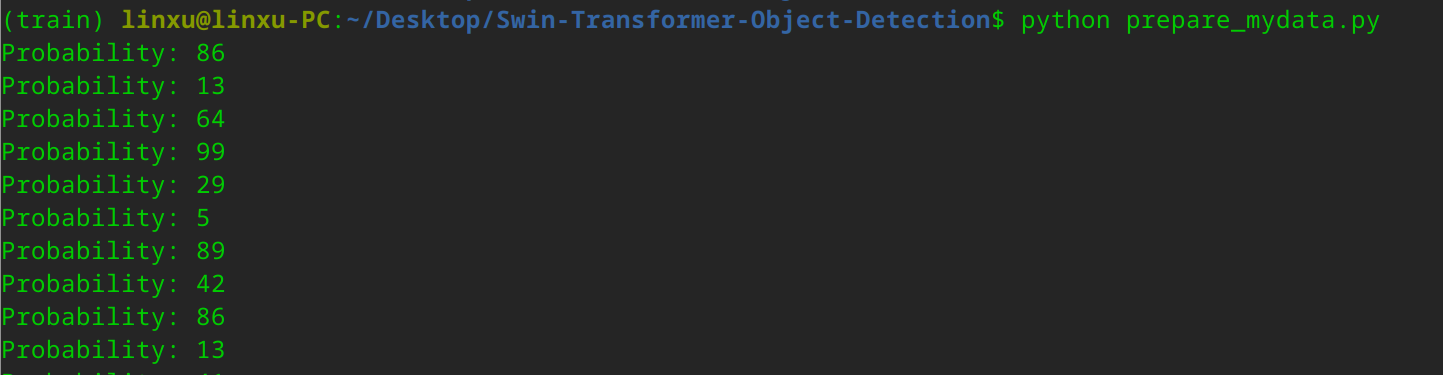
执行python脚本:
python prepare_mydata.py
注意根据自己的数据集修改其中的classes=["ball","messi"]
ImageSets/Main目录下可以看到生成四个文件
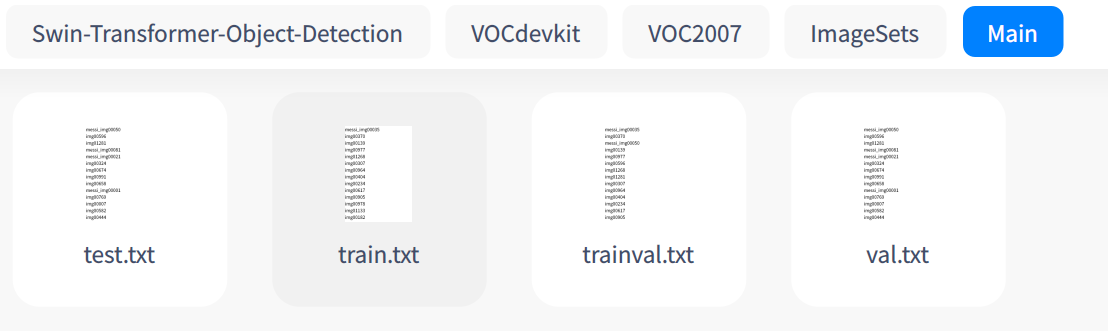
- train.txt给出了训练集图片文件的列表(不含文件名后缀)
- val.txt给出了验证集图片文件的列表
- test.txt给出了测试集图片文件的列表
- trainval.txt给出了训练集和验证集图片文件的列表
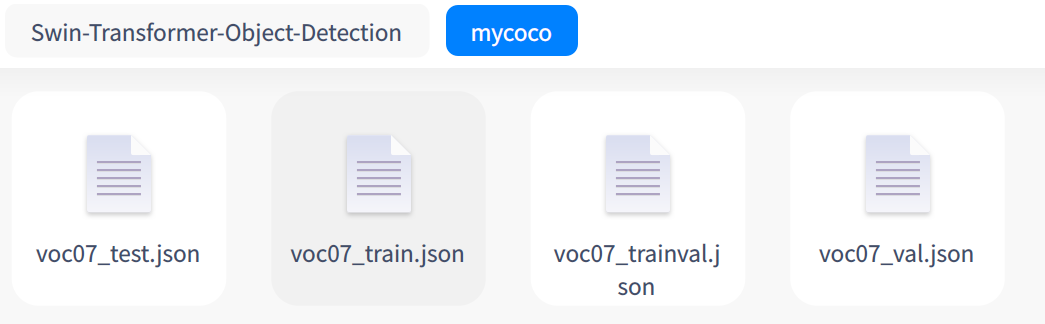
4)PASCAL VOC数据格式转换成COCO数据格式
执行python脚本
python pascal_voc.py VOCdevkit --out-dir mycoco --out-format coco
注意根据自己的数据集修改其中的voc_classes = ["ball", "messi"]
然后,把转成的COCO数据格式的数据的目录结构准备成COCO目录结构格式。

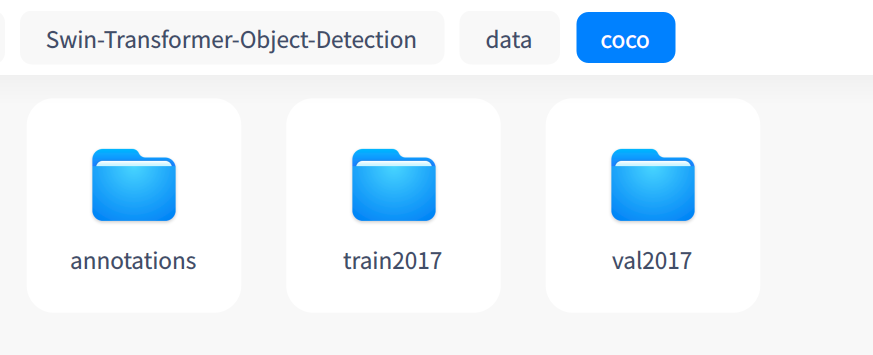
在Swin-Transformer-Object-Detection根目录下面,创建目录结构如下:
└── data
 ├── coco
 	├── annotations
 		├── instances_train2017.json
 		└── instances_val2017.json
 	├── train2017
 	└── val2017
其中:
train2017放置voc-images/train2017中的图片
val2017放置voc-images/val2017中的图片
voc07_train.json改名为instances_train2017.json
voc07_val.json改名为instances_val2017.json
5.5 修改配置文件
5.5.1 step1
1) 修改changemaskrcnn.py中num_class并执行该脚本, 产生新的权重文件
python changemaskrcnn.py

5.5.2 step2
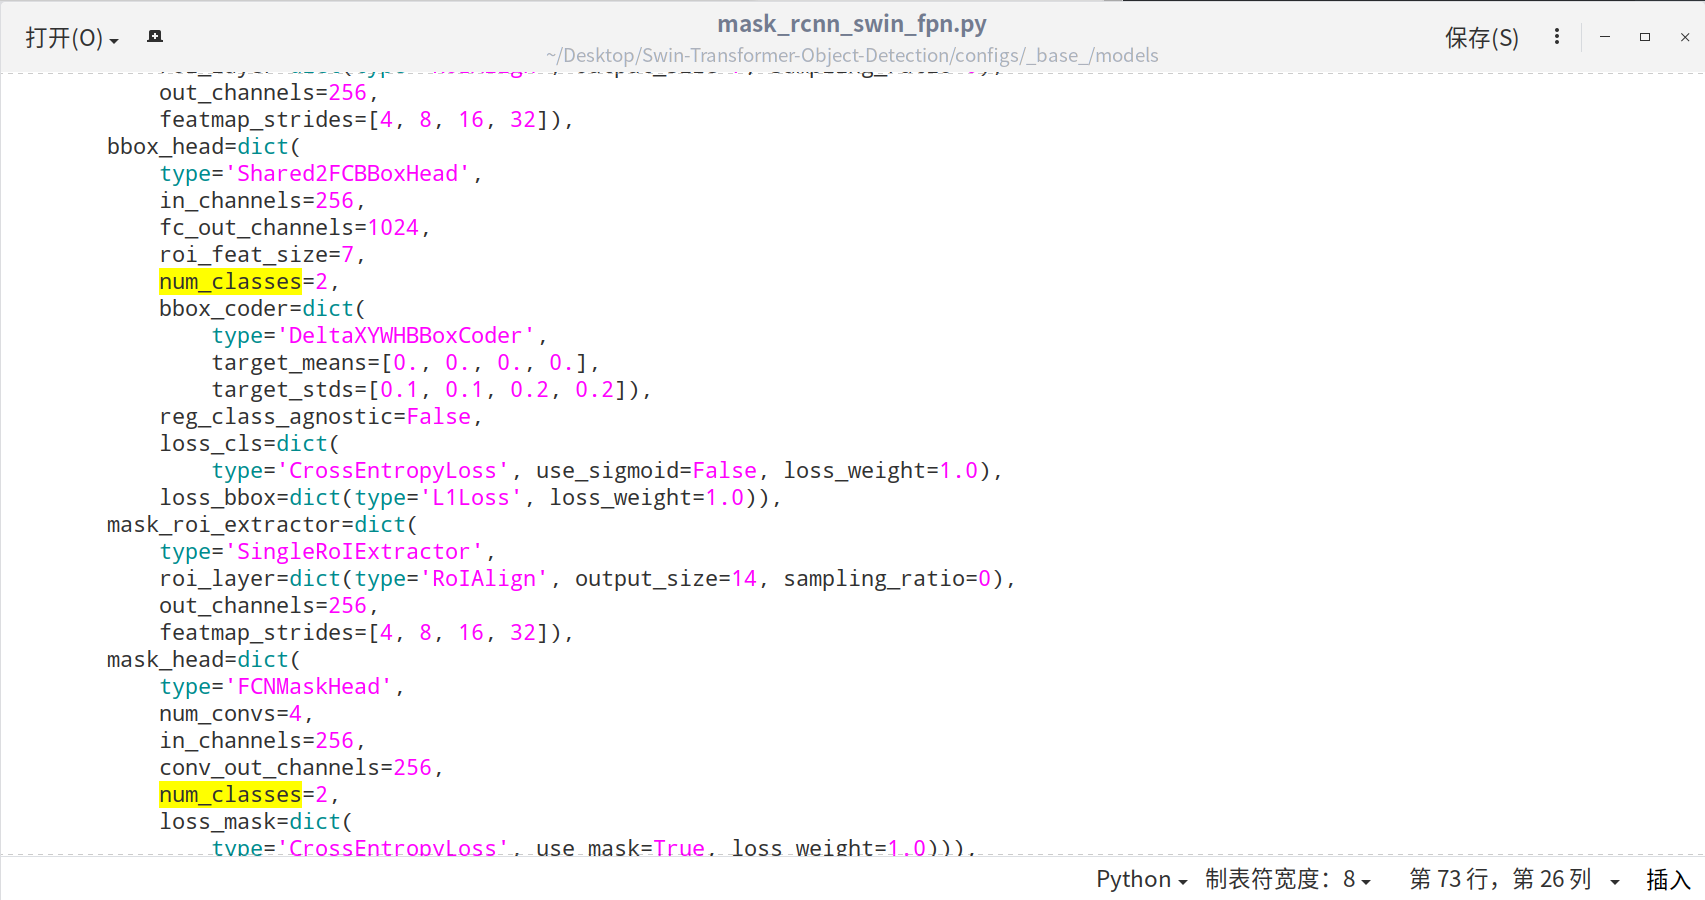
2)修改 configs/_base_/models/mask_rcnn_swin_fpn.py 中num_classes, 共两处
5.5.3 step3
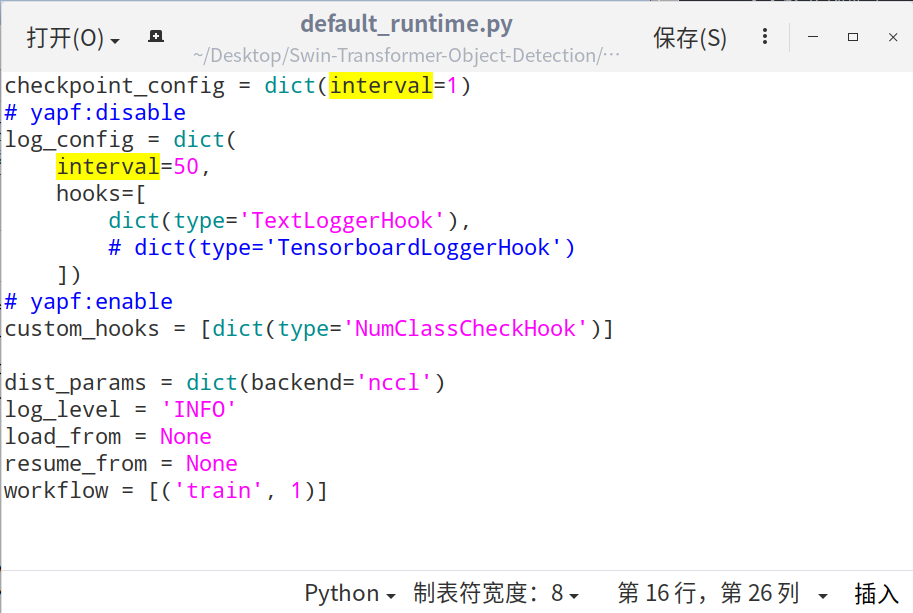
3)修改 configs/_base_/default_runtime.py 中interval, load_from
5.5.4 step4
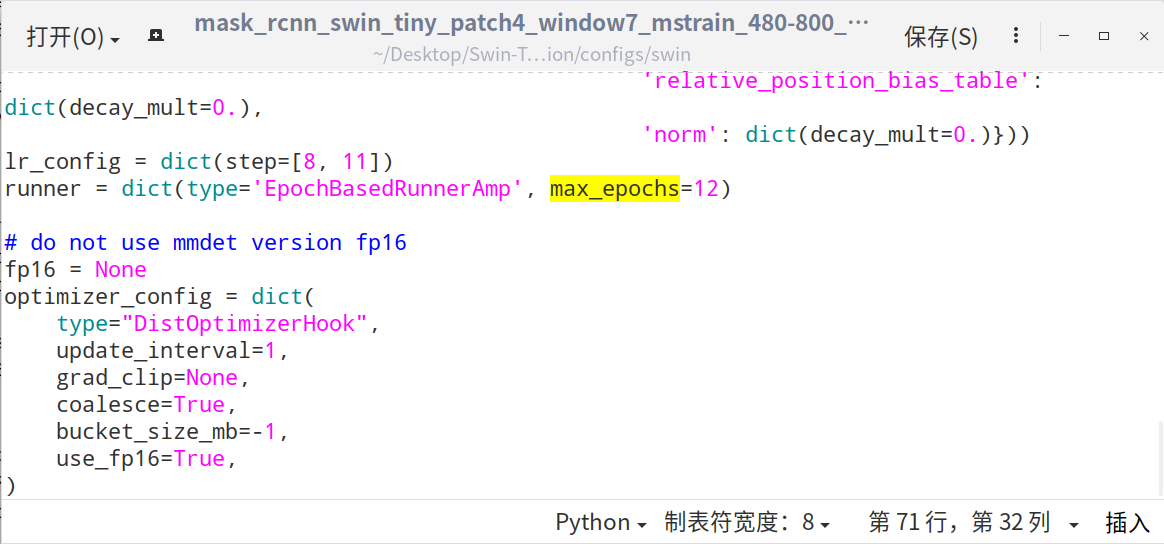
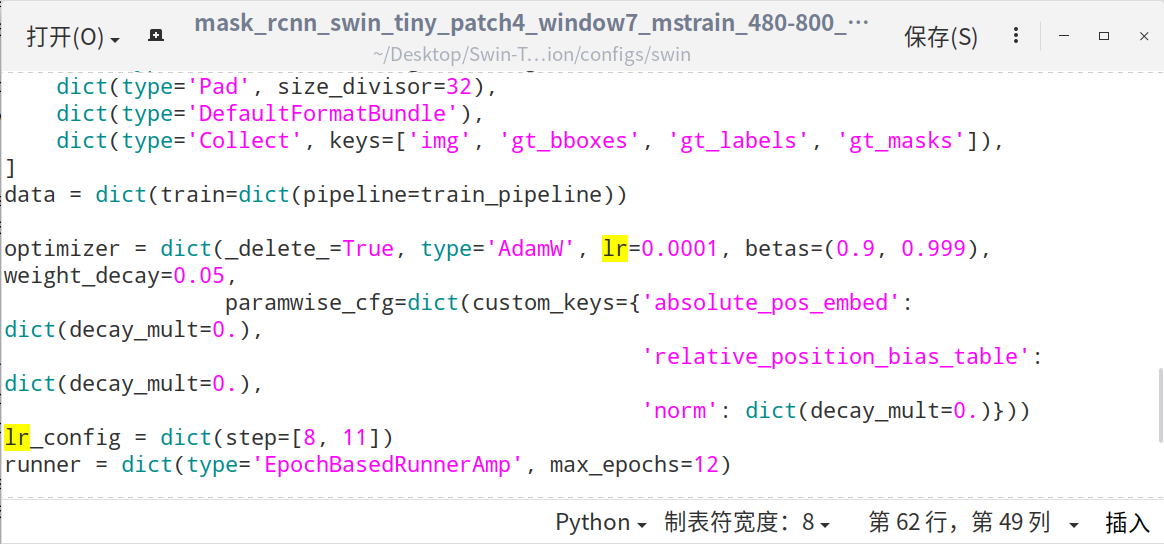
4)修改 configs/swin/mask_rcnn_swin_tiny_patch4_window7_mstrain_480-800_adamw_1x_coco.py 中的 _base_,max_epochs, lr

5.5.5 step5
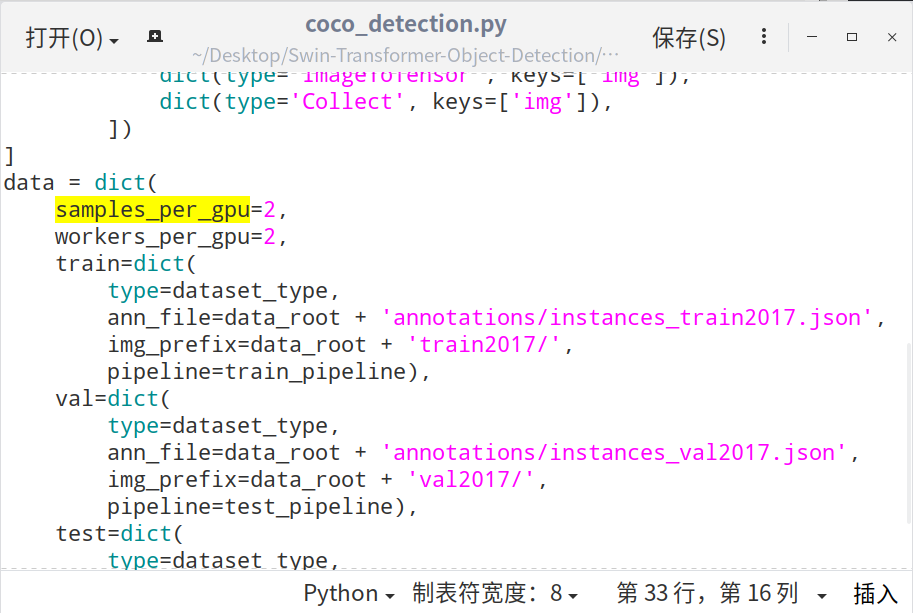
5) 修改 configs/_base_/datasets/coco_detection.py 中的
samples_per_gpu=2,
workers_per_gpu=2,
5.5.6 step6
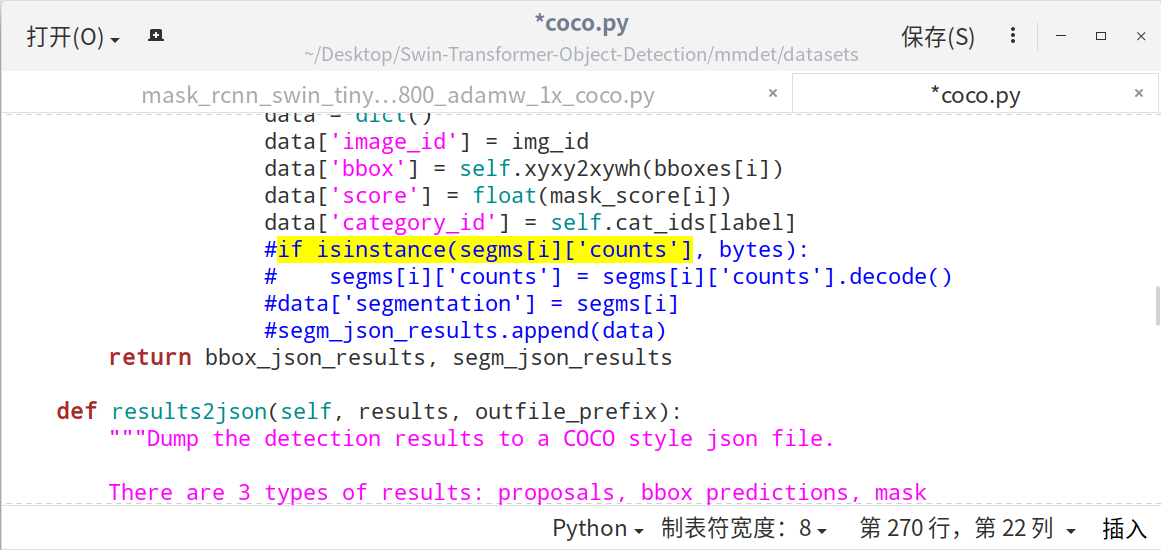
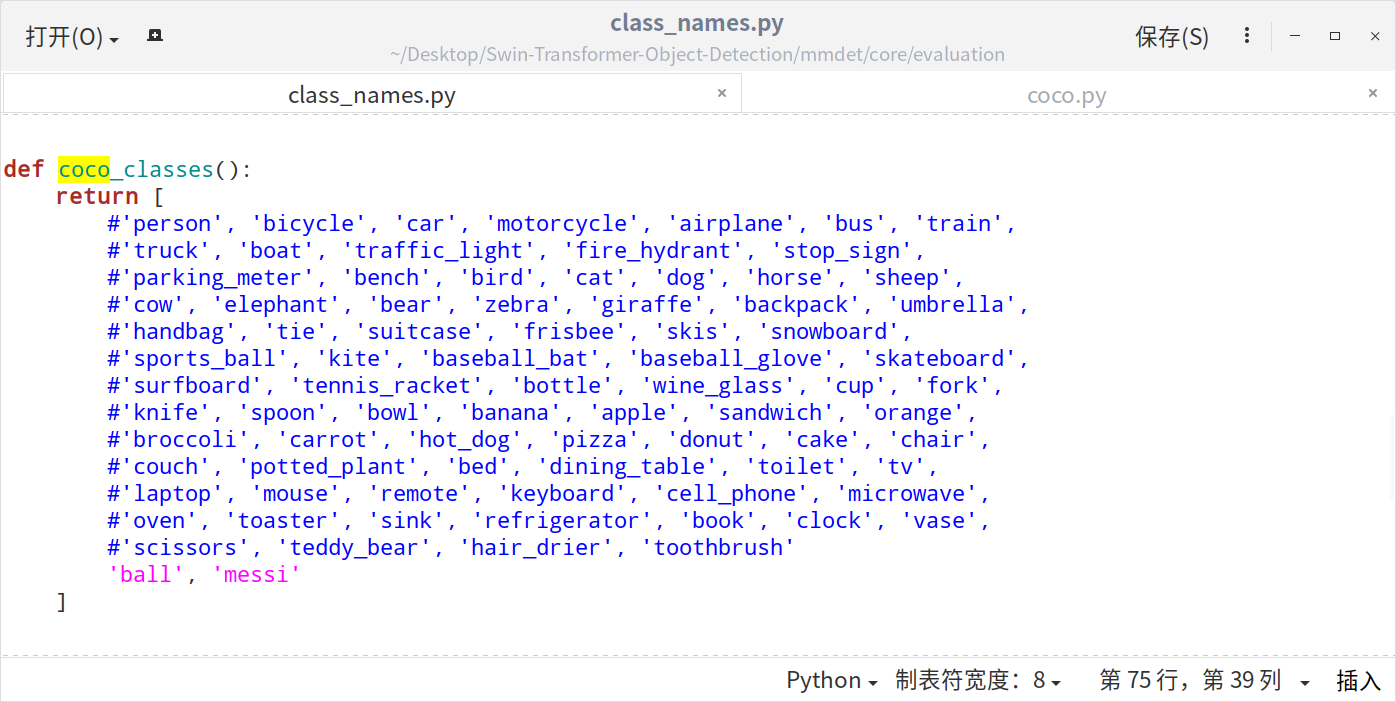
6)修改mmdet\datasets\coco.py中的CLASSES
另外,如果在训练时出现错误:IndexError: list index out of range
注释掉coco.py中_segm2json(self, results)函数中的以下语句 (268~271行)
#if isinstance(segms[i]['counts'], bytes):
#   segms[i]['counts'] = segms[i]['counts'].decode()
#	data['segmentation'] = segms[i]
#	segm_json_results.append(data)
5.5.7 step7
为了保持类别和类名一致,需要修改./mmdet/core/evaluation/class_names.py中的内容
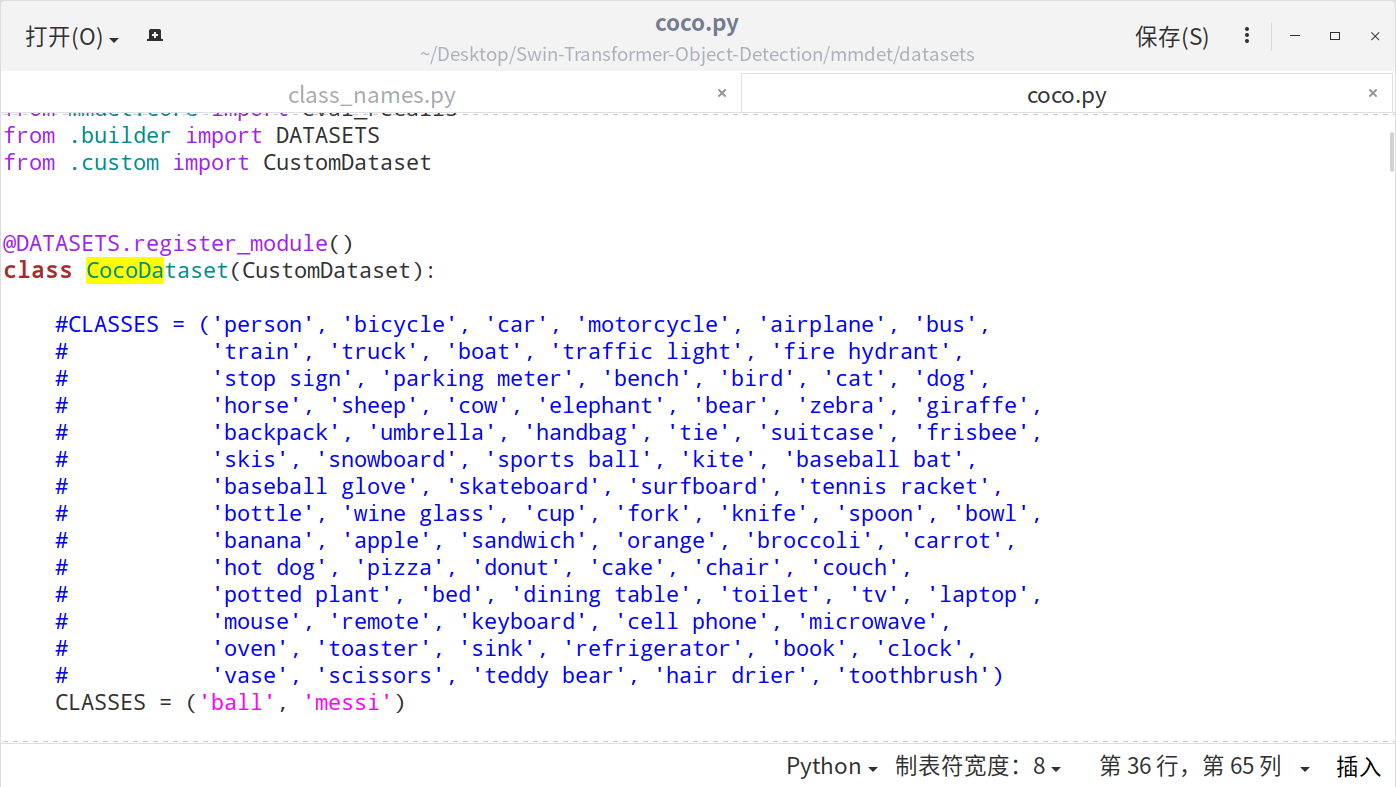
同时还需要修改.\mmdet\datasets\coco.py中的内容
最后为了避免第三方库受之前环境配置的影响,重新编译一遍源码。
python setup.py install
5.6 训练自己的数据集
- 训练命令
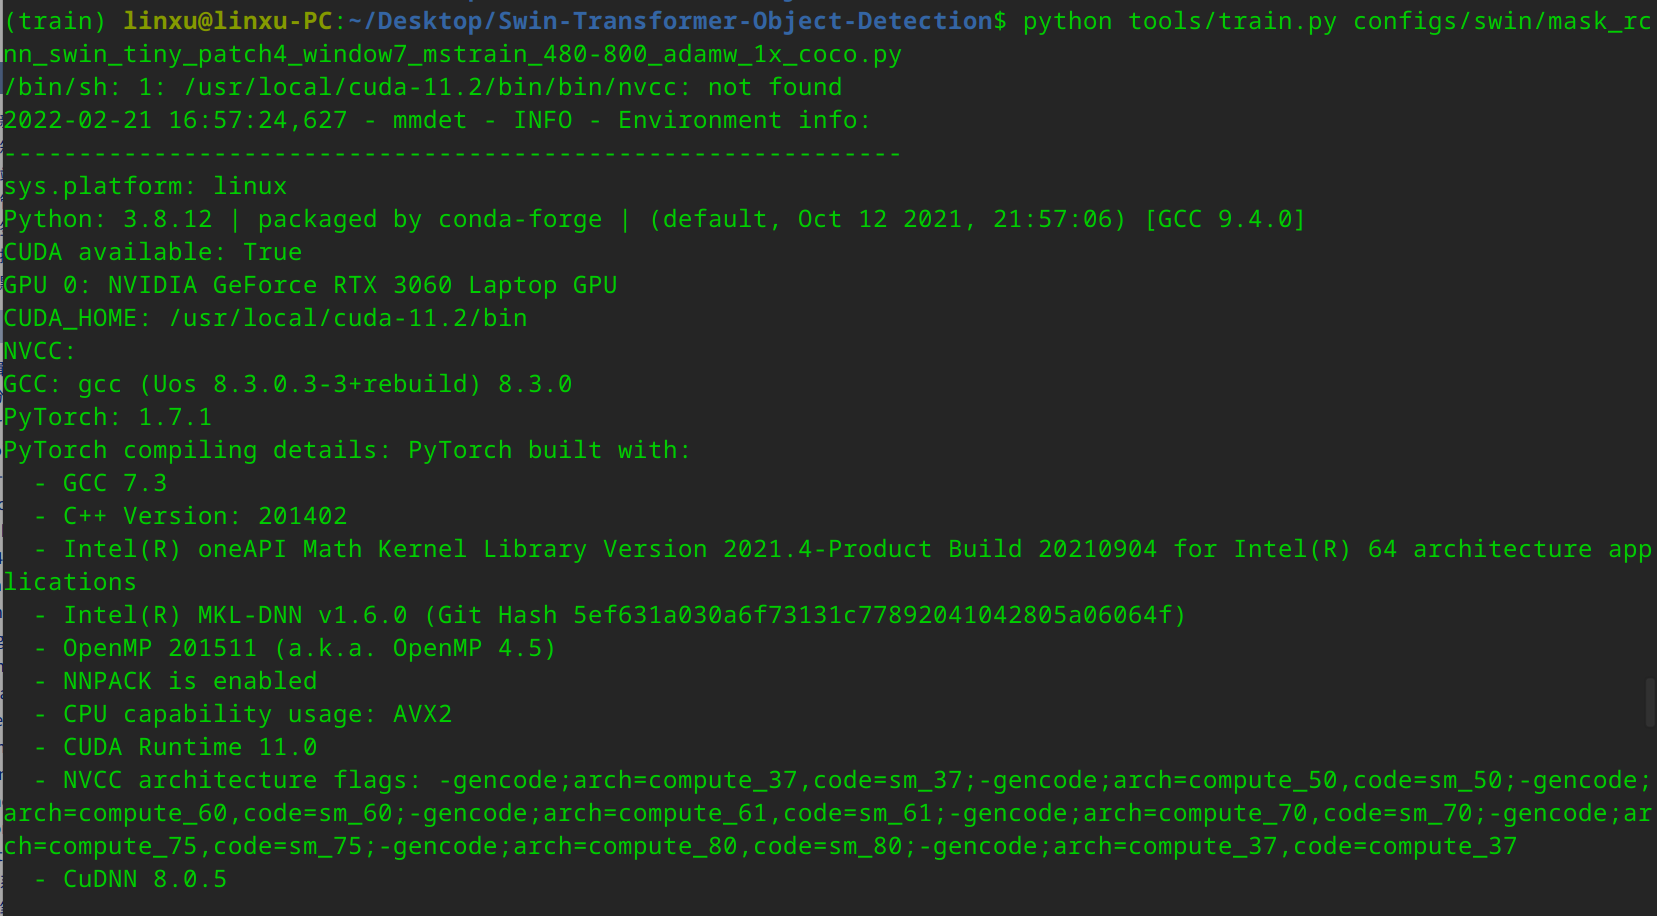
在Swin-Transformer-Object-Detection路径下执行:
python tools/train.py configs/swin/mask_rcnn_swin_tiny_patch4_window7_mstrain_480-800_adamw_1x_coco.py
- 训练结果的查看
查看Swin-Transformer-Object-Detection/work_dirs目录下的文件
5.7 测试训练出的网络模型
- 测试图片
python demo/image_demo.py testfiles/img1.jpg
configs/swin/mask_rcnn_swin_tiny_patch4_window7_mstrain_480-800_adamw_1x_coco.py
work_dirs/mask_rcnn_swin_tiny_patch4_window7_mstrain_480-
800_adamw_1x_coco/latest.pth --score-thr 0.5
2)测试视频
python demo/video_demo.py testfiles/messi.mp4 configs/swin/mask_rcnn_swin_tiny_patch4_window7_mstrain_480-800_adamw_1x_coco.py
work_dirs/mask_rcnn_swin_tiny_patch4_window7_mstrain_480-
800_adamw_1x_coco/latest.pth --score-thr 0.5 --show
3)性能统计
python tools/test.py configs/swin/mask_rcnn_swin_tiny_patch4_window7_mstrain_480-
800_adamw_1x_coco.py work_dirs/mask_rcnn_swin_tiny_patch4_window7_mstrain_480-
800_adamw_1x_coco/latest.pth --eval bbox
4)日志分析
python tools/analysis_tools/analyze_logs.py plot_curve
work_dirs/mask_rcnn_swin_tiny_patch4_window7_mstrain_480-
800_adamw_1x_coco/20211225_030436.log.json