办公网络里人一般系统用共享,尤其是财务, 他们喜欢直接点开编辑. 而不喜欢ftp
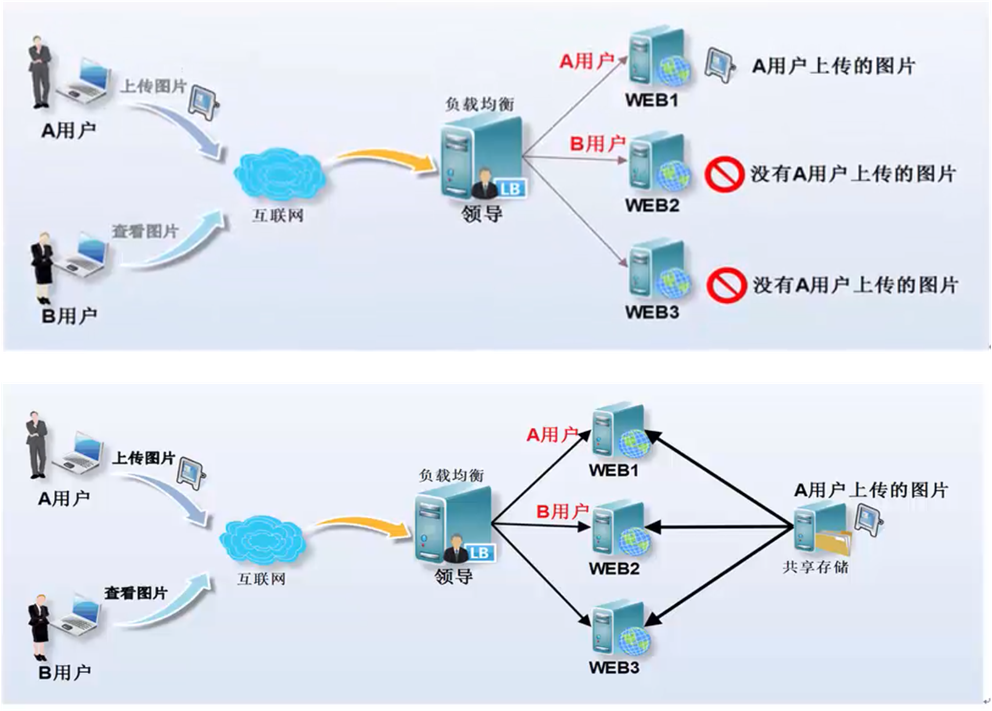
nfs在网站架构中的用途

注: 如果pv量少,则放在一台机器上速度更快,如果几千万pv,则存储分布式部署.
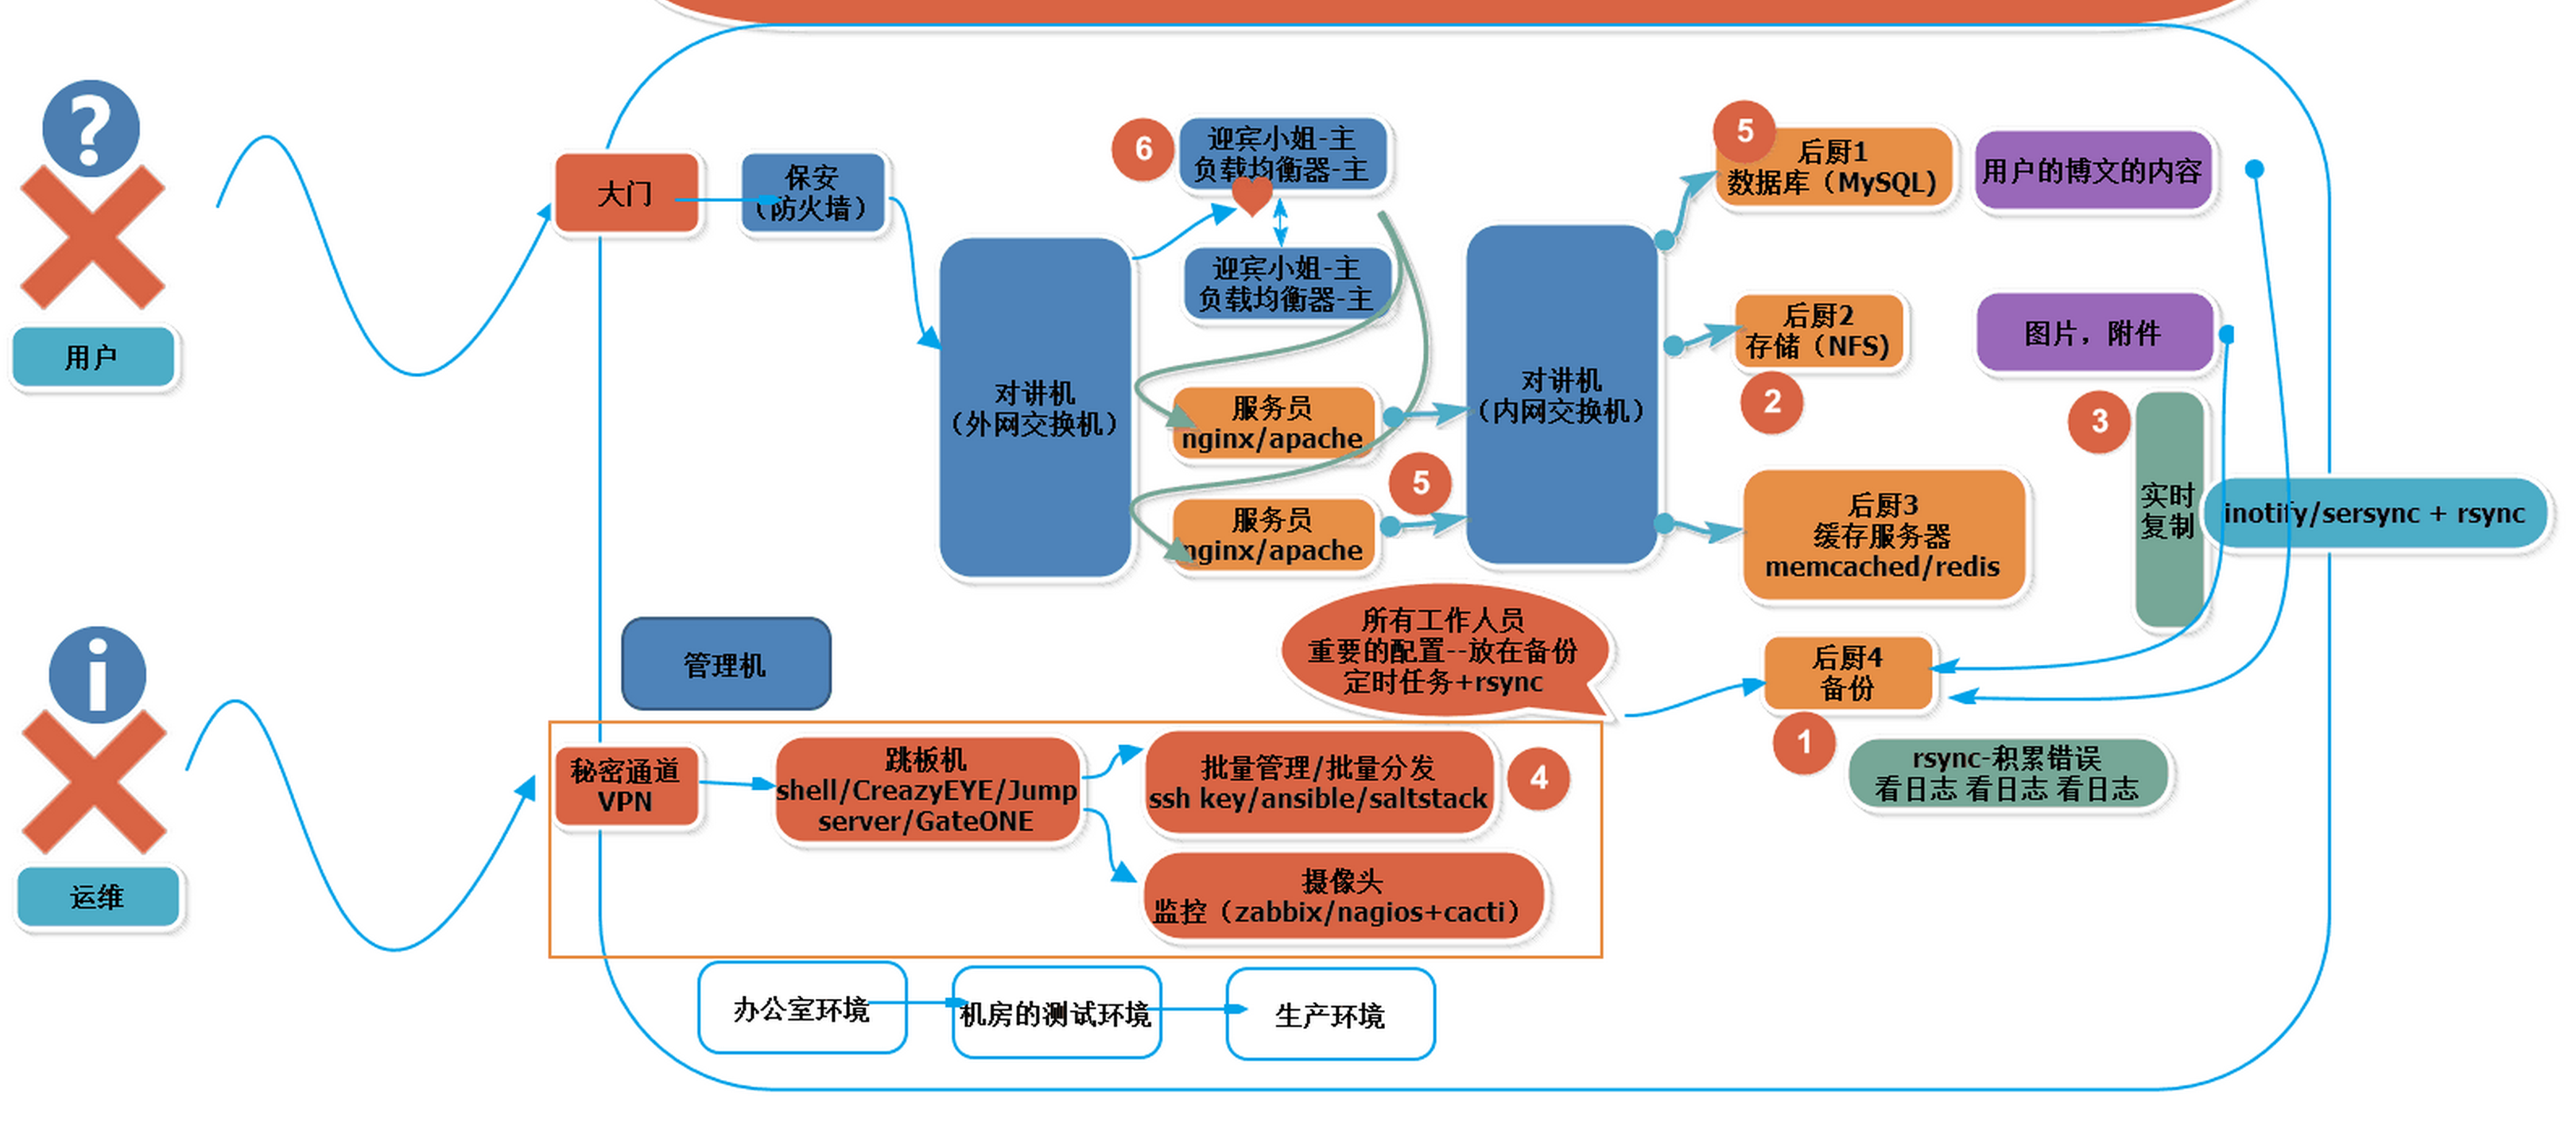
网站架构中各个组件的角色理解
| 角色 | 比喻 |
|---|---|
| 防火墙 | 保安 |
| 负载均衡 | 迎宾小姐 |
| 服务员 | nginx等 |
| 后厨 | nfs/mysql/memcache等 |
| 监控 | 大堂经理 |

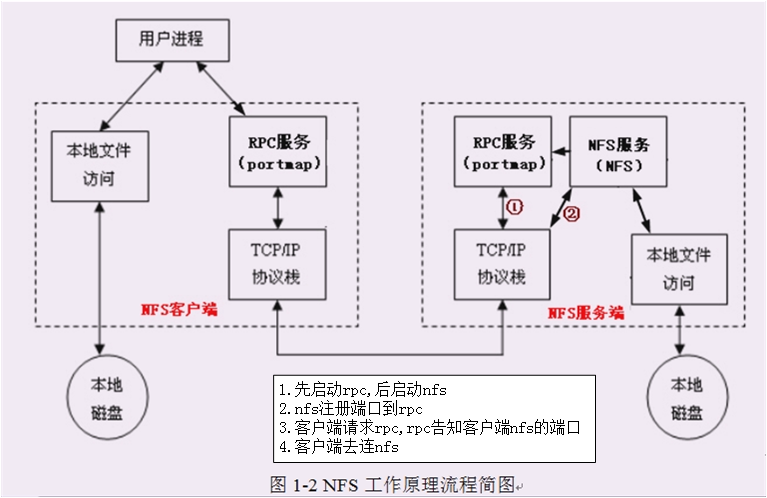
nfs-server为何有2个服务? rpcbind(portmap)+nfs
1.先启动rpc,后启动nfs
2.nfs主动注册自己端口到nfs
3.客户端请求rpc,rpc告知客户端nfs的端口
4.客户端用nfs的端口去连nfs


安装部署
- 服务端配置(14.12)
yum install rpcbind nfs-utils  -y
systemctl restart rpcbind
systemctl restart nfs
systemctl enable rpcbind
systemctl enable nfs

mkdir /data
echo "/data 192.168.14.0/24(rw,sync,no_root_squash)" >> /etc/exports
#注意: 这里一定要有ip限制,否则生产会有风险.

- 服务端内核优化
增大 接收 发送缓冲区的大小.

cat >> /etc/sysctl.conf<<EOF
net.core.wmem_default=8388608
net.core.rmem_default=8388608
net.core.rmem_max=16777216
net.core.wmem_max=16777216
EOF
sysctl –p


- 客户度配置(14.11)
yum install rpcbind nfs-utils  -y
systemctl start rpcbind
systemctl enable rpcbind

showmount -e 192.168.14.12
mount -t nfs 192.168.14.12:data /mnt

- 存档开机挂载
echo '/bin/mount -t nfs 192.168.14.12:data /mnt' >> /etc/rc.local
线上业务机nfs服务器想添加一个共享目录
- 添加目录
[root@n2 data]# cat /etc/exports
/data 192.168.14.0/24(rw,sync,no_root_squash)
/image 192.168.14.0/24(rw,sync,no_root_squash)

- 这里一定要注意: reload nfs即可
[root@n2 data]# systemctl reload nfs


- 客户端查看
[root@n1 mnt]# showmount -e 192.168.14.12
Export list for 192.168.14.12:
/image 192.168.14.0/24
/data  192.168.14.0/24

注: 这里有时候看不到,因为开了iptables, 手动挂一下试试
服务端状态查看
- 开启rpc后
[root@n2 ~]# systemctl start rpcbind
[root@n2 ~]# netstat -ntulp
...
tcp        0      0 0.0.0.0:111             0.0.0.0:*               LISTEN      1/systemd
...
udp        0      0 0.0.0.0:111             0.0.0.0:*                           14643/rpcbind
udp        0      0 0.0.0.0:822             0.0.0.0:*                           14643/rpcbind


- 开启nfs后
[root@n2 ~]# systemctl start nfs
[root@n2 ~]# netstat -ntulp
...
tcp        0      0 0.0.0.0:111             0.0.0.0:*               LISTEN      1/systemd
udp        0      0 127.0.0.1:1001          0.0.0.0:*                           14815/rpc.statd
udp        0      0 0.0.0.0:2049            0.0.0.0:*                           -
udp        0      0 0.0.0.0:20048           0.0.0.0:*                           14848/rpc.mountd
udp        0      0 0.0.0.0:111             0.0.0.0:*                           14643/rpcbind
udp        0      0 0.0.0.0:58131           0.0.0.0:*                           -
udp        0      0 0.0.0.0:822             0.0.0.0:*                           14643/rpcbind
udp        0      0 0.0.0.0:54613           0.0.0.0:*                           14815/rpc.statd

- 查看nfs注册的端口+rpc自己监听的端口(房源)
[root@n2 ~]# rpcinfo -p localhost
   program vers proto   port  service
    100000    4   tcp    111  portmapper ## rpc默认端口号
    100000    3   tcp    111  portmapper
    100000    2   tcp    111  portmapper
    100000    4   udp    111  portmapper
    100000    3   udp    111  portmapper
    100000    2   udp    111  portmapper


- 查看挂载
[root@n1 mnt]# df -h
Filesystem               Size  Used Avail Use% Mounted on
...
192.168.14.12:/data       37G  1.5G   36G   4% /mnt


- 服务端查看挂载参数
mount -t nfs -o 参数 ip:/data /mnt

方法1:
mount命令 或 cat /proc/mounts
...
192.168.14.12:/data on /mnt type nfs4 (rw,relatime,vers=4.1,rsize=131072,wsize=131072,namlen=255,hard,proto=tcp,port=0,timeo=600,retrans=2,sec=sys,clientaddr=192.168.14.11,local_lock=none,addr=192.168.14.12)

方法2: 服务端从文件查看
[root@n2 data]# cat /var/lib/nfs/etab
/image	192.168.14.0/24(rw,sync,wdelay,hide,nocrossmnt,secure,no_root_squash,no_all_squash,no_subtree_check,secure_locks,acl,no_pnfs,anonuid=65534,anongid=65534,sec=sys,secure,no_root_squash,no_all_squash)
/data
nfs exports参数实践
| 参数 | 说明 |
|---|---|
| rw | 可读写的权限 |
| ro | 只读的权限 |
| no_root_squash | 登入NFS主机,使用该共享目录时相当于该目录的拥有者,如果是root的话,那么对于这个共享的目录来说,他就具有root的权限,这个参数『极不安全』 |
| root_squash | 登入NFS主机,使用该共享目录时相当于该目录的拥有者。但是如果是以root身份使用这个共享目录的时候,那么这个使用者(root)的权限将被压缩成为匿名使用者,即通常他的UID与GID都会变成nobody那个身份 |
| all_squash | 不论登入NFS的使用者身份为何,他的身份都会被压缩成为匿名使用者,通常也就是nobody |
| anonuid | 可以自行设定这个UID的值,这个UID必需要存在于你的/etc/passwd当中 |
| anongid | 同anonuid,但是变成groupID就是了 |
| sync | 资料同步写入到内存与硬盘当中 |
| async | 资料会先暂存于内存当中,而非直接写入硬盘 |
| insecure | 允许从这台机器过来的非授权访问 |
nfs参数实践
(rw,sync) 读写+同步写盘
- 服务端创建/image
[root@n2 image]# mkdir /image

[root@n2 image]# cat /etc/exports
/image 192.168.14.0/24(rw,sync)                    #rw 读写; sync: 立即将数据刷入磁盘

- 服务端创建本地目录
[root@n2 image]# chown -R nfsnobody.nfsnobody /image/
[root@n2 image]# systemctl reload nfs

- 客户端创建挂载点/image,并挂载
[root@n1 mnt]# mkdir /image
[root@n1 mnt]# mount -t nfs 192.168.14.12:/image /image

- 客户端root touch是nfsnobody
[root@n1 image]# touch 1
[root@n1 image]# ll
total 0
-rw-r--r-- 1 nfsnobody nfsnobody 0 Mar 16 15:55 1

- 客户端test touch是显示没权限
[root@n1 ~]# sudo su - test
Last login: Fri Mar 16 15:49:08 CST 2018 on pts/1
[test@n1 ~]$ cd /image/
[test@n1 image]$ touch 2
touch: cannot touch ‘2’: Permission denied
不论登入NFS的使用者身份为何,他的身份都会被压缩成为匿名使用者,通常也就是nfsnobody
(rw,sync,all_squash) 读写+同步写盘
[root@n2 data]# mkdir /data

[root@n2 data]# cat /etc/exports
/image 192.168.14.0/24(rw,sync,all_squash)  #rw 读写; sync: 立即将数据刷入磁盘
[root@n2 data]# chown -R nfsnobody.nfsnobody /image/
[root@n2 data]# systemctl reload nfs


- 客户端创建/image,属主是root
[root@n1 mnt]# mkdir /image
[root@n1 ~]# ll -ld /image/
drwxr-xr-x 2 root root 6 Mar 16 15:30 /image/

- 客户端挂载: 发现/image的属主变成了nfsnobody
[root@n1 ~]# mount -t nfs 192.168.14.12:/image /image
[root@n1 ~]# ll -ld /image/
drwxr-xr-x 2 nfsnobody nfsnobody 24 Mar 16 15:50 /image/

- root创建文件: 属主是nfsnobody
[root@n1 image]# touch 1
[root@n1 image]# ll
total 0
-rw-r--r-- 1 nfsnobody nfsnobody 0 Mar 16 15:50 1

- test用户创建文件: 属主是nfsnobody
[test@n1 image]$ touch 2
[test@n1 image]$ ll
total 0
-rw-rw-r-- 1 nfsnobody nfsnobody 0 Mar 16 15:50 2
不论本地用户身份为何,他的身份都会被压缩成为匿名使用者,通常也就是nfsnobody
no_all_squash,root_squash 参数实践
- root创建的额是nfsnobody
[root@n1 image]# touch 1
[root@n1 image]# ll
total 0
-rw-r--r-- 1 nfsnobody nfsnobody 0 Mar 16 15:58 1

- test不允许创建
[test@n1 image]$ touch 2
touch: cannot touch ‘2’: Permission denied
no_all_squash: 是所有用户都不进行压缩,所以test用户对nfs的目录没有写入的权限(与nfs服务器的共享目录权限有关)。root用户进行压缩所以可以写入。
no_root_squash 参数实践(root用户不进行压缩映射)
- 服务端设置
[root@n2 ~]# ls -ld /data
drwxr-xr-x 2 root root 6 Mar 16 16:01 /data
[root@n2 ~]# cat /etc/exports
/data 192.168.14.0/24(rw,sync,no_root_squash)


- 客户端root可以创建
[root@n1 data]# touch 1
[root@n1 data]# ll
total 0
-rw-r--r-- 1 root root 0 Mar 16 16:02 1

- 客户端test不允许创建
[test@n1 data]$ touch 2
touch: cannot touch ‘2’: Permission denied
由于对root用户没有进行压缩,所以到达nfs服务器后依旧是root身份,root用户默认对所有的文件都有权限,所以可以写入。(很危险)
nfs的核心-exports参数小结
一定要清楚,客户端是以哪个用户来操作挂载点(涉及到能否写的问题)
| 参数 | 说明 |
|---|---|
| root_squash,no_all_squash | 默认情况(服务端: cat /var/lib/nfs/etab) |
| all_squash | 所有客户端都以nfsnobody身份操作挂载点 |
| no_root_squash(no_all_squash默认) | 所有用户都以各自身份操作挂载点 |
| all_squash,anonuid=3000,anongid=3000 | 所有用户都以id为3000的用户操作挂载点 |
nfs最佳实战
nfs最佳实战探究
- 服务端设置
[root@n2 ~]# mkdir /data
[root@n2 ~]# ls -ld /data
drwxr-xr-x 2 root root 6 Mar 16 16:13 /data

[root@n2 ~]# cat /etc/exports
/data 192.168.14.0/24(rw,sync)

[root@n2 ~]# systemctl reload nfs

- 客户端测试
[root@n1 ~]# mkdir /data
[root@n1 ~]# ls -ld /data
drwxr-xr-x 2 root root 6 Mar 16 16:15 /data

[root@n1 ~]# mount -t nfs 192.168.14.12:/data/ /data
[root@n1 ~]# ls -ld /data
drwxr-xr-x 2 root root 6 Mar 16 16:13 /data
- 客户端没权限写入. 为什么呢? 挂载后,查一下这个目录属于什么身份才可以写入
[root@n1 data]# touch 1
touch: cannot touch ‘1’: Permission denied

- 挂载后,查一下这个目录属于什么身份才可以写入
[root@n2 ~]#  cat /var/lib/nfs/etab
/data	192.168.14.0/24(rw,sync,wdelay,hide,nocrossmnt,secure,root_squash,no_all_squash,no_subtree_check,secure_locks,acl,no_pnfs,anonuid=65534,anongid=65534,sec=sys,secure,root_squash,no_all_squash)

- 居然是nfsnobody
[root@n2 ~]# id 65534
uid=65534(nfsnobody) gid=65534(nfsnobody) groups=65534(nfsnobody)

- 服务端如何解决呢?
方法1: 权限搞大.任何人都可以写入
chmod 777 /data/

方法2: 权限约束为nfsnobody #鉴于这个用户系统都有,为了安全我们往往创建陌生的用户
chown -R nfsnobody.nfsnobody /data
最佳实战安全,客户端以nfsuser的身份操作nfs挂载点
- 服务端和客户端都创建用户
[root@n2 ~]# useradd -s /sbin/nologin -M -u 3000 nfsuser

- 服务端配置
[root@n2 ~]# id nfsuser
uid=3000(nfsuser) gid=3000(nfsuser) groups=3000(nfsuser)

[root@n2 ~]# cat /etc/exports
/data 192.168.14.0/24(rw,all_squash,anonuid=3000,anongid=3000)

[root@n2 ~]# systemctl reload nfs

- 客户端重新挂载
[root@n1 ~]# mount -t nfs 192.168.14.12:/data/ /data
[root@n1 ~]# cd /data/
[root@n1 data]# touch 1
touch: cannot touch ‘1’: Read-only file system

- 服务端授权目录权限给nfsuser解决
[root@n2 ~]# chown nfsuser.nfsuser /data/
[root@n2 ~]# ls -ld /data/
drwxr-xr-x 2 nfsuser nfsuser 6 Mar 16 16:13 /data/

- 客户端重新挂载
[root@n1 ~]# cd /data/
[root@n1 data]# touch  1
[root@n1 data]# ll
total 0
-rw-r--r-- 1 nfsuser nfsuser 0 Mar 16 16:23 1
自此,没有nfsuser的用户就没办法访问了.确保了安全.
nfs报错处理
Linux NFS:could not open connection for tcp6
- 启动时候报错
[root@/etc ~]#/etc/init.d/nfs start
Shutting down NFS daemon:                                 [  OK  ]
Shutting down NFS mountd:                                  [  OK  ]
Shutting down NFS services:                                 [  OK  ]
Shutting down RPC idmapd:                                  [  OK  ]
Starting NFS services:                                           [  OK  ]
Starting NFS mountd: rpc.mountd: svc_tli_create: could not open connection for udp6
rpc.mountd: svc_tli_create: could not open connection for tcp6
rpc.mountd: svc_tli_create: could not open connection for udp6
rpc.mountd: svc_tli_create: could not open connection for tcp6
rpc.mountd: svc_tli_create: could not open connection for udp6
rpc.mountd: svc_tli_create: could not open connection for tcp6
                                                                          [  OK  ]
Starting NFS daemon: rpc.nfsd: address family inet6 not supported by protocol TCP
                                                                 [  OK  ]
Starting RPC idmapd:                                         [  OK  ]

- 解决:注释后重启
vim /etc/netconfig
#udp6       tpi_clts      v     inet6    udp     -       -
#tcp6       tpi_cots_ord  v     inet6    tcp     -       -
Stale file handle无法卸载
umount -lf /data #强制卸载