1.确定openvswitch模块加载
#lsmod |grep oepnvswitch
#/sbin/modprobe openvswitch
2.启动配置:
1)默认配置
rm -f /usr/local/etc/openvswitch/conf.db
ovsdb-tool create /usr/local/etc/openvswitch/conf.db /usr/local/share/openvswitch/vswitch.ovsschema
ovsdb-server -v --remote=punix:/usr/local/var/run/openvswitch/db.sock --remote=db:Open_vSwitch,Open_vSwitch,manager_options --private-key=db:Open_vSwitch,SSL,private_key --certificate=db:Open_vSwitch,SSL,certificate --bootstrap-ca-cert=db:Open_vSwitch,SSL,ca_cert --log-file --pidfile --detach
ovs-vswitchd --log-file --pidfile --detach
注:-vINFO”表示日志级别,共有emer、err、warn、info、dbg ;-v默认不带是dbg级别。
2)自定义路径
rm /etc/openvswitch/*.db
ovsdb-tool create /etc/openvswitch/ovs.db /usr/local/share/openvswitch/vswitch.ovsschema
ovsdb-tool create /etc/openvswitch/vtep.db /usr/local/share/openvswitch/vtep.ovsschema
ovsdb-server --pidfile --detach --log-file --remote punix:/usr/local/var/run/openvswitch/db.sock --remote=db:hardware_vtep,Global,managers --remote ptcp:9999 /etc/openvswitch/ovs.db /etc/openvswitch/vtep.db
ovs-vswitchd --log-file --detach --pidfile unix:/usr/local/var/run/openvswitch/db.sock
LOG: /usr/local/var/log/openvswitch/ovsdb-server.log
3.操作配置
ovs-vsctl add-br br0
ovs-vsctl set-controller br0 tcp:172.16.26.136:6653
通过ovs 创建一个br0, 端口tap0 ,tap1,tap2对应 值为100, 101,102;创建虚拟网络空间ns0,ns1,ns2,创建虚拟网卡veth0,veth1, veth2,对应ip地址为192.168.1.100,192.168.1.101,192.168.1.102;tap0-veth0,tap1-veth1,tap2-veth2桥接。
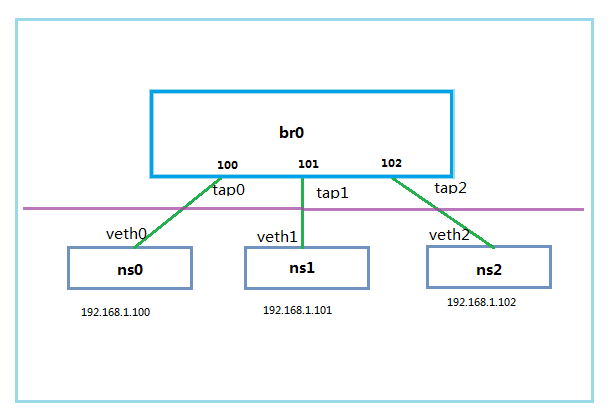
1.创建虚拟交换机
#ovs-vsctl add-br br0
2.创建网络空间ns0, 虚拟网卡veth0 和 peer tap0
#ip netns add ns0
#ip link add veth0 type veth peer name tap0
#ip link set veth0 netns ns0
#ip netns exec ns0 ip link set dev veth0 up
#ip netns exec ns0 ip addr add 192.168.1.100/24 dev veth0
#ip link set dev tap0 up
#ovs-vsctl add-port br0 tap0
#ovs-vsctl set Interface tap0 ofport_request=100
3.创建网络空间ns1 虚拟网卡veth1 和 peer tap1
ip netns add ns1
#ip link add veth1 type veth peer name tap1
#ip link set veth1 netns ns1
#ip netns exec ns1 ip link set dev veth1 up
#ip netns exec ns1 ip addr add 192.168.1.101/24 dev veth1
#ip link set dev tap1 up
#ovs-vsctl add-port br0 tap1
#ovs-vsctl set Interface tap1 ofport_request=101
4.创建网络空间ns2 虚拟网卡veth1 和 peer tap2
#ip netns add ns2
#ip link add veth2 type veth peer name tap2
#ip link set veth2 netns ns2
#ip netns exec ns2 ip link set dev veth2 up
#ip netns exec ns2 ip addr add 192.168.1.102/24 dev veth2
#ip link set dev tap2 up
#ovs-vsctl add-port br0 tap2
#ovs-vsctl set Interface tap2 ofport_request=102
5.查看流表
#root@ubuntu:~# ovs-ofctl dump-flows br0
NXST_FLOW reply (xid=0x4):
cookie=0x0, duration=3230.736s, table=0, n_packets=0, n_bytes=0, idle_age=3230, priority=3,dl_dst=00:00:00:00:00:00 actions=drop
cookie=0x9, duration=3230.696s, table=0, n_packets=0, n_bytes=0, idle_age=3230, priority=65535,ip,nw_proto=2 actions=CONTROLLER:65535
cookie=0x0, duration=3230.815s, table=0, n_packets=182, n_bytes=15421, idle_age=1659, priority=0 actions=drop
cookie=0x0, duration=3230.696s, table=0, n_packets=0, n_bytes=0, idle_age=3230, priority=3,dl_src=00:00:00:00:00:00 actions=drop
cookie=0x0, duration=3230.696s, table=0, n_packets=0, n_bytes=0, idle_age=3230, priority=3,dl_src=ff:ff:ff:ff:ff:ff actions=drop
cookie=0x0, duration=3230.777s, table=1, n_packets=181, n_bytes=15379, idle_age=1659, priority=0 actions=drop
cookie=0x0, duration=3230.776s, table=2, n_packets=181, n_bytes=15379, idle_age=1659, priority=0 actions=drop
cookie=0x0, duration=3230.776s, table=3, n_packets=27, n_bytes=1439, idle_age=1659, priority=0 actions=CONTROLLER:65535
6.测试连通性
终端1执行#ip netns exec ns0 ping 192.168.1.101
终端2执行# ip netns exec ns1 tcpdump –i veth1 终端2会显示 veth0 – veth2的icmp交互信息
7.添加流表,修改来自port100 的源地址为222.222.137.1
#ovs-ofctl add-flow br0 "priority=1 idle_timeout=0,in_port=100,actions=mod_nw_src:222.222.137.1,normal"
执行第6的测试 显示
root@ubuntu:~# ip netns exec ns1 tcpdump -i veth1 -v
tcpdump: listening on veth1, link-type EN10MB (Ethernet), capture size 65535 bytes
^C01:54:49.822143 IP6 (hlim 255, next-header ICMPv6 (58) payload length: 24) :: > ff02::1:ff6f:c5b8: [icmp6 sum ok] ICMP6, neighbor solicitation, length 24, who has fe80::ac78:4bff:fe6f:c5b8
01:54:49.994149 IP (tos 0x0, ttl 64, id 12026, offset 0, flags [DF], proto ICMP (1), length 84)
222.222.137.1 > 192.168.1.101: ICMP echo request, id 21405, seq 244, length 64
8.删除 port 100上所有流表
#ovs-ofctl del-flows ovs-switch "in_port=100"
9.测试IP匹配流表, 将192.168.1.100 ping 192.168.101的报文 转到port 102 (192.168.1.102)
#ovs-ofctl add-flow br0 "priority=111 idle_timeout=0,dl_type=0x0800,nw_src=192.168.1.100,nw_dst=192.168.1.101,actions=output:102"
root@ubuntu:/home/chulk/sdn/openmul# ip netns exec ns2 tcpdump -i veth2 icmp
tcpdump: verbose output suppressed, use -v or -vv for full protocol decode
listening on veth2, link-type EN10MB (Ethernet), capture size 65535 bytes
^C01:21:05.933940 IP 192.168.1.100 > 192.168.1.101: ICMP echo request, id 43886, seq 32, length 64
01:21:08.934038 IP 192.168.1.100 > 192.168.1.101: ICMP echo request, id 43886, seq 35, length 64
测试tcp 数据匹配
终端 1执行ip netns exec ns2 tcpdump -i veth2 icmp
终端2执行#ip netns exec ns1 nc -lp 1234 > test.log //服务端 192.168.1.101:1234
终端3执行#ip netns exec ns0 nc -w 1 192.168.1.101 1234 < test.log //veth0 tcp连接veth1
注:Test.log为测试文件,用来测试veth0 veth1直接文件传输,相当于远程拷贝,其他参考:http://blog.csdn.net/wang7dao/article/details/7684998;也可以用netperf测试。
终端1会显示TCP会话报文,只有SYN请求, 因为连接的报文本应该去101,但是被流表导向了102,所以导致没有ack响应报文。
root@ubuntu:~# ip netns exec ns2 tcpdump -i veth2
tcpdump: verbose output suppressed, use -v or -vv for full protocol decode
listening on veth2, link-type EN10MB (Ethernet), capture size 65535 bytes
01:42:43.809629 IP 192.168.1.100.38815 > 192.168.1.101.1234: Flags [S], seq 2964554190, win 29200, options [mss 1460,sackOK,TS val 65016423 ecr 0,nop,wscale 7], length 0
01:42:44.632833 IP 0.0.0.0.bootpc > 255.255.255.255.bootps: BOOTP/DHCP, Request from 3a:e4:96:ae:57:9f (oui Unknown), length 300
01:42:44.806696 IP 192.168.1.100.38815 > 192.168.1.101.1234: Flags [S], seq 2964554190, win 29200, options [mss 1460,sackOK,TS val 65016673 ecr 0,nop,wscale 7], length 0
10.IP+PORT流表
#ovs-ofctl add-flow br0 "priority=111 idle_timeout=0,dl_type=0x0800,nw_src=192.168.1.100,nw_dst=192.168.1.101,nw_proto=6,tp_dst=1234,actions=output:102" //按照9的测试,修改这个tp_dst=1234将不会获取到tcp的SYN报文(上面红色字体部分) 每次测试仅仅是当前流表,其他冲突流表已删