模型原理图
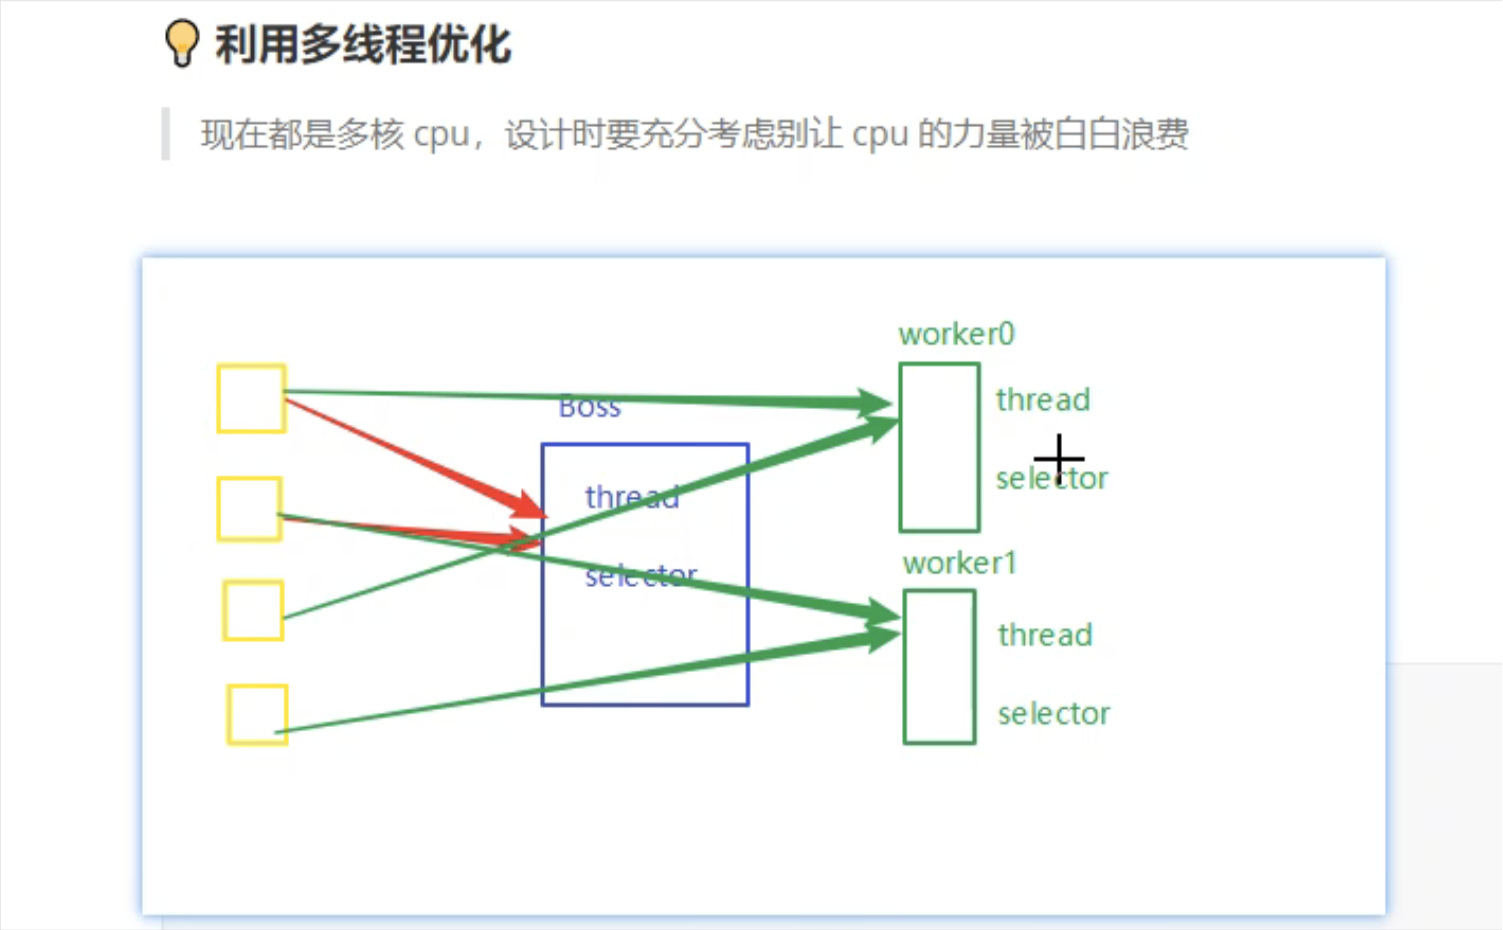
BOSS线程(ServerSocketChannel)专门负责建立链接,然后将accept到的SocketChannel分发给多个Worker线程。Worker线程有多个,可以分摊来自多个Client的SocketChannel。Worker线程专门负责read和write。
NIO多线程服务器实现
server端实现
package niomultithreadserver;


import java.io.IOException;
import java.net.InetSocketAddress;
import java.nio.ByteBuffer;
import java.nio.channels.*;
import java.nio.charset.Charset;
import java.util.Iterator;
import java.util.concurrent.ConcurrentLinkedDeque;
import java.util.concurrent.atomic.AtomicInteger;


public class MultiThreadServer {
    public static void main(String[] args) throws IOException {
        // 设置boss线程的名称为"boss"
        Thread.currentThread().setName("boss");
        // 创建ServerSocketChannel
        ServerSocketChannel ssc = ServerSocketChannel.open();
        /**
         * 1. ServerSocketChannel配置为非阻塞模式
         * 2. selector通常都是和非阻塞channel进行搭配
         * 非阻塞channel一旦感兴趣的事件,则可以通过selector.select()方法将事件追加到selector的selectedKeys中
         */
        ssc.configureBlocking(false);
        // 创建boss线程的selector,该selector专门监听accept事件
        Selector boss = Selector.open();
        // 将创建好的ServerSocketChannel和关注的accept事件注册到该selector
        SelectionKey bossKey = ssc.register(boss, 0, null);
        bossKey.interestOps(SelectionKey.OP_ACCEPT);
        // ServerSocketChannel和端口进行绑定
        ssc.bind(new InetSocketAddress(8088));
        // 创建一定数量的worker
        int cpuNum = Runtime.getRuntime().availableProcessors();
        System.out.println("cpuNum:" + cpuNum);
        Worker[] workers = new Worker[cpuNum];
        for (int i = 0; i < workers.length; i++) {
            workers[i] = new Worker("worker-" + i);
            workers[i].initWorker();
        }

        AtomicInteger count = new AtomicInteger();
        while (true) {
            /**
             * 轮训check查询的时候是否就绪,如果未就绪则select不会返回,只有监听的事件发生select()方法才返回
             * 每个selector中有两个集合:
             * 集合1: interested keys集合,存储的是当前selector感兴趣的channel + 事件类型(accept, connect, read, write)
             * 集合2:selected keys集合,存储的是selector.select()方法调用之后扫描到的新发生的事件
             * 注意每次select()方法调用时,可以理解为是往"selected keys集合"中追加本次select()新扫描的事件,上次select()并且加入的事件不会自动清除。
             * 因此后面迭代器迭代"selected keys集合"时需要及时remove掉,否则下次循环会重复消费处理
             */
            boss.select();
            Iterator<SelectionKey> bossSelectedKeysIter = boss.selectedKeys().iterator();
            while (bossSelectedKeysIter.hasNext()) {
                SelectionKey key = bossSelectedKeysIter.next();
                /**
                 * 注意及时remove掉已经监听到并且马上就要处理的事件
                 * 因为selector的selectedKeys集合不会自动将key清除掉,这会导致下次循环重复处理
                 */
                bossSelectedKeysIter.remove();
                if (key.isAcceptable()) {
                    SelectableChannel keyChannel = key.channel();
                    ServerSocketChannel sscFromSelector = (ServerSocketChannel) keyChannel;
                    System.out.println("sscFromSelector == ssc?" + (sscFromSelector == ssc));

                    SocketChannel sc = sscFromSelector.accept();
                    sc.configureBlocking(false);
                    // 建立链接打印日志
                    System.out.println("线程:" + Thread.currentThread().getName() + ":" + "connected --- " + sc.getRemoteAddress());
                    // 分配worker
                    System.out.println("线程:" + Thread.currentThread().getName() + ":" + "before register --- " + sc.getRemoteAddress());
                    workers[count.incrementAndGet() % workers.length].registerChannel(sc);
                    System.out.println("线程:" + Thread.currentThread().getName() + ":" + "after register --- " + sc.getRemoteAddress());
                }
            }
        }
    }

    static class Worker implements Runnable {
        private Thread thread;
        private Selector workerSelector;
        private String name;
        ConcurrentLinkedDeque<Runnable> queue = new ConcurrentLinkedDeque<>();

        public Worker(String name) {
            this.name = name;
        }

        public void initWorker() throws IOException {
            thread = new Thread(this, name);
            workerSelector = Selector.open();
            thread.start();
        }

        /**
         * 将一个SocketChannel分配给当前worker
         *
         * @param sc
         */
        public void registerChannel(SocketChannel sc) {
            queue.add(() -> {
                try {
                    sc.register(workerSelector, SelectionKey.OP_READ, null);
                } catch (ClosedChannelException e) {
                    e.printStackTrace();
                }
            });
            // 注册到任务队列之后唤醒一下
            workerSelector.wakeup();
        }

        @Override
        public void run() {
            while (true) {
                try {
                    workerSelector.select();
                    /**
                     * 注册分配的channel
                     */
                    Runnable scRegisterTask = queue.poll();
                    if (scRegisterTask != null) {
                        scRegisterTask.run();
                    }

                    Iterator<SelectionKey> workerSelectedKeysIter = workerSelector.selectedKeys().iterator();
                    while (workerSelectedKeysIter.hasNext()) {
                        SelectionKey key = workerSelectedKeysIter.next();
                        workerSelectedKeysIter.remove();
                        if (key.isReadable()) {
                            SocketChannel channel = (SocketChannel) key.channel();
                            ByteBuffer byteBuffer = ByteBuffer.allocate(16);
                            /**
                             * 将channel中的数据写入buffer
                             * 注意:两种情况需要做好处理:
                             * 1. 如果客户端正常关闭了socket,则read返回的是-1,这时需要将客户端对应的channel从boss selector中cancel
                             * 2. 如果客户端非正常关闭了socket,则需要捕获read方法,并将客户端对应的channel从boss selector中cancel
                             */
                            int readCnt = channel.read(byteBuffer);
                            if (readCnt == -1) {
                                System.out.println("线程:" + Thread.currentThread().getName() + ":" + "客户端关闭链接,取消channel监听...");
                                key.cancel();
                            }
                            System.out.println("线程:" + Thread.currentThread().getName() + ":" + "read data --- " + channel.getRemoteAddress());
                            // 切换buffer为读模式
                            byteBuffer.flip();
                            // 读取
                            System.out.println(Charset.forName("UTF-8").decode(byteBuffer));
                        }
                    }
                } catch (IOException e) {
                    e.printStackTrace();
                }
            }
        }
    }
}
client端实现
package niomultithreadserver;

import java.io.IOException;
import java.net.InetSocketAddress;
import java.nio.channels.SocketChannel;
import java.nio.charset.Charset;

public class Client {
    public static void main(String[] args) throws IOException {
        SocketChannel sc = SocketChannel.open();
        sc.connect(new InetSocketAddress("localhost", 8088));
        sc.write(Charset.forName("UTF-8").encode("123abc"));
        System.in.read();
    }
}