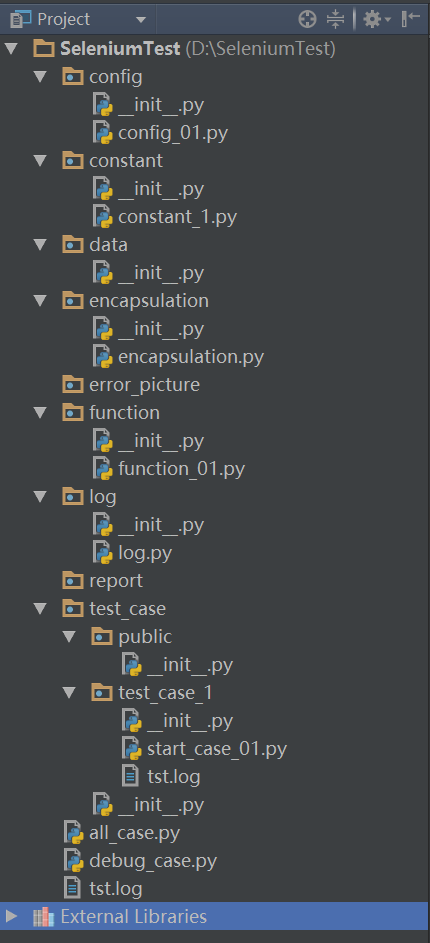
预期框架整理目标:
1.单个用例维护在单个.py文件中可单个执行,也可批量生成组件批量执行
2.对定位参数,定位方法,业务功能脚本,用例脚本,用例批量执行脚本,常用常量进行分层独立,各自维护在单独的.py文件中
3.加入日志,htlm报表,发送邮件功能
框架结构

结构说明:
config:配置部分,浏览器种类和定位信息维护在此处
constant:常量部分,固定不变的数据维护在此处
data:存放用于参数化的文本表格等文件
encapsulation:定位等selenium功能二次封装在此处
error_picture:存放错误截图
function:业务功能脚本维护在此处
log:存放log类
report:存放测试报告文件
test_case:存放用例文件
all_case.py:用来执行所有用例
debug_case.py:本人调试用的,可以忽略
tst.log:生成的日志
逐个介绍各个包下面的.py文件,并附上源码(说明见注释哈哈~):
 1 #!/usr/bin/env python
 2 # -*- coding: utf-8 -*-
 3 # @Time    : 2017-05-11 13:42
 4 # config/config_01.py
 5 from selenium import webdriver
 6 import time
 7 from selenium.webdriver.common.action_chains import *
 8
 9
10 # config配置部分
11
12 # 浏览器种类维护在此处
13 browser_config = {
14     'ie': webdriver.Ie,
15     'chrome': webdriver.Chrome
16 }
17
18 # 定位信息维护在此处,维护结构由外到内为:页面名称--页面下元素名称--元素的定位方式+参数
19 locat_config = {
20     '博客园首页': {
21         '找找看输入框': ['id', 'zzk_q'],
22         '找找看按钮': ['xpath', '//input[@value="找找看"]']
23     }
24 }
1 #!/usr/bin/env python
2 # -*- coding: utf-8 -*-
3 # @Time    : 2017-05-15 13:20
4 # constant/constant_1.py
5
6 # 常量部分(固定不变使用频繁的参数维护在此处)
7 LOGIN_URL = 'https://www.cnblogs.com/'
 1 #!/usr/bin/env python
 2 # -*- coding: utf-8 -*-
 3 # @Time    : 2017-05-15 13:20
 4 # encapsulation/encapsulation.py
 5
 6 # 封装部分维护在此
 7
 8 from config.config_01 import locat_config
 9 from log.log import Logger
10 from selenium.webdriver.support.wait import WebDriverWait
11
12 from selenium.webdriver.support import expected_conditions as EC
13
14 class UIHandle():
15     logger = Logger()
16
17     # 构造方法,用来接收selenium的driver对象
18     @classmethod
19     def __init__(cls, driver):
20         cls.driver = driver
21
22     # 输入地址
23     @classmethod
24     def get(cls, url):
25         cls.logger.loginfo(url)
26         cls.driver.get(url)
27
28     # 关闭浏览器驱动
29     @classmethod
30     def quit(cls):
31         cls.driver.quit()
32
33     # element对象(还可加入try,截图等。。。)
34     @classmethod
35     def element(cls, page, element):
36         # 加入日志
37         cls.logger.loginfo(page)
38         # 加入隐性等待
39         # 此处便可以传入config_o1中的dict定位参数
40         el = WebDriverWait(cls.driver, 10).until(EC.presence_of_element_located(locat_config[page][element]))
41         # 加入日志
42         cls.logger.loginfo(page+'OK')
43         return el
44     # element对象(还未完成。。。)
45     def elements(cls, page, element):
46         # 加入日志
47         cls.logger.loginfo(page)
48         # 加入隐性等待
49         WebDriverWait(cls.driver, 10)
50         els = cls.driver.find_elements(*locat_config[page][element])
51         # 注意返回的是list
52         return els
53
54     # send_keys方法
55     @classmethod
56     def Input(cls, page, element, msg):
57         el = cls.element(page, element)
58         el.send_keys(msg)
59
60     # click方法
61     @classmethod
62     def Click(cls, page, element):
63         el = cls.element(page, element)
64         el.click()
 1 #!/usr/bin/env python
 2 # -*- coding: utf-8 -*-
 3 # @Time    : 2017-05-15 13:22
 4 # function/function_01.py
 5 # 业务功能脚本(用例脚本可调用此处的功能脚本)
 6
 7 from encapsulation.encapsulation import UIHandle
 8 from constant.constant_1 import LOGIN_URL
 9 from config.config_01 import browser_config
10 from time import sleep
11
12 # 打开博客园首页,进行找找看搜索功能
13 def search(msg):
14     # 打开浏览器
15     driver = browser_config['chrome']()
16     # 传入driver对象
17     uihandle = UIHandle(driver)
18     #输入url地址
19     uihandle.get(LOGIN_URL)
20     # 调用二次封装后的方法,此处可见操作了哪个页面,哪个元素,msg是要插入的值,插入值得操作在另外一个用例文件中传入
21     uihandle.Input('博客园首页', '找找看输入框', msg)
22     uihandle.Click('博客园首页', '找找看按钮')
23     uihandle.quit()
 1 #!/usr/bin/env python
 2 # -*- coding: utf-8 -*-
 3 # @Time    : 2017-05-17 11:19
 4 # log/log.py
 5
 6 import logging
 7 import logging.handlers
 8
 9 # 日志类
10 class Logger():
11     LOG_FILE = 'tst.log'
12
13     handler = logging.handlers.RotatingFileHandler(LOG_FILE, maxBytes = 1024*1024, backupCount = 5) # 实例化handler
14     fmt = '%(asctime)s - %(filename)s:%(lineno)s - %(name)s - %(message)s'
15
16     formatter = logging.Formatter(fmt)   # 实例化formatter
17     handler.setFormatter(formatter)      # 为handler添加formatter
18
19     logger = logging.getLogger('tst')    # 获取名为tst的logger
20     logger.addHandler(handler)           # 为logger添加handler
21     logger.setLevel(logging.DEBUG)
22     def loginfo(self, message):
23         self.logger.info(message)
24
25     def logdebug(self, message):
26         self.logger.debug(message)
 1 #!/usr/bin/env python
 2 # -*- coding: utf-8 -*-
 3 # @Time    : 2017-05-15 15:30
 4 # test_case/test_case_1/start_case_01.py
 5
 6 import unittest
 7 from function.function_01 import *
 8 # 用例
 9 class Case_02(unittest.TestCase):
10     u'''哇塞好玩'''
11     def setUp(self):
12         pass
13
14     def test_zzk(self):
15         u'''输入哇塞好玩后点击找找看'''
16         search("哇塞好玩")
17         print('打印方法名:test_zzk')
18
19     def tearDown(self):
20         pass
21
22 if __name__ == "__main__":
23     unittest.main()
 1 #!/usr/bin/env python
 2 # -*- coding: utf-8 -*-
 3 # @Time    : 2017-05-10 16:34
 4 # all_case.py
 5
 6 import unittest
 7 import HTMLTestRunner
 8 import time,os,datetime
 9 import smtplib
10 from email.mime.text import MIMEText
11 from email.mime.multipart import MIMEMultipart
12 from email.mime.image import MIMEImage
13
14
15
16 # 取test_case文件夹下所有用例文件
17 def creatsuitel(lists):
18     testunit = unittest.TestSuite()
19     # discover 方法定义
20     discover = unittest.defaultTestLoader.discover(lists, pattern='start_*.py', top_level_dir=None)
21     #discover 方法筛选出来的用例,循环添加到测试套件中
22     for test_suite in discover:
23         for test_case in test_suite:
24             testunit.addTests(test_case)
25             print(testunit)
26     return testunit
27 list_1 = 'test_case\test_case_1'
28 alltestnames = creatsuitel(list_1)
29
30 #取前面时间加入到测试报告文件名中
31 now = time.strftime("%Y-%m-%M-%H_%M_%S", time.localtime(time.time()))
32 filename = "report\"+now+'result.html' #定义个报告存放路径,支持相对路径。
33 fp = open(filename, 'wb')
34 runner = HTMLTestRunner.HTMLTestRunner(stream=fp, title='Report_title', description='Report_description')
35
36 if __name__ == "__main__":
37     # 执行测试用例集并生成报告
38     runner = unittest.TextTestRunner()
感谢@大师兄+@我去热饭的指导与帮助。
为什么选择?
有的人喜欢创造世界,他们做了程序员
有的人喜欢拯救世界,他们做了测试员