1.index()方法
用于获取当前元素在其兄弟节点中的排序位置,从0开始。
语法:$("selector").index();
该方法一般不单独使用,而是配合对应使用。
2.对应
jQuery中的对应实际指的是“eq()”函数,用于获取集合中指定序号的元素节点,从 0 开始。
语法:$("selector").eq(index);
之所以eq()函数被称为对应,是因为其经常用于实现下面的效果:
// <!--  点击“box1”中某个“p”元素时,“box2”中【对应】的“p”元素变为红色。  -->
    $(".box1 p").click(function () {
        $(".box2 p").eq($(this).index()).css("backgroundColor","red");
    });
另外,index()与eq()配合使用,也经常用于选项卡效果的开发。
补充:
get()方法,也可以通过“index”获取选择器匹配条件中的元素,但是,与eq()方法不同的是:
eq(index),返回的是 jq对象,后续操作需要使用jQuery方法
get(index),返回的是 html元素,差异比较如下:
    console.log($contentDivs.eq(0));
    console.log($contentDivs.get(0));
    console.log(document.querySelector(".contentBox div"));

3.选项卡案例
<html lang="en">
<head>
    <meta charset="UTF-8">
    <title>选项卡案例</title>
    <script src="jQueryFiles/jquery-1.8.3.js"></script>
    <style>
        *{margin: 0;padding: 0;}
        .container{
             504px;height: 540px;margin: 50px auto;
            border: 1px solid #cccccc;
        }
        .optionBox{
             100%;height: 40px;box-shadow: 0 1px 4px gray;
        }
        .contentBox{
             100%;height: 500px;padding: 20px 10px;position: relative;
        }
        .optionBox ul li{
             100px;height:40px;line-height: 40px;text-align:center;
            background-color: darkorange;border-right: 1px dashed #f5f2f0;
            cursor:pointer;float: left;list-style: none;}
        .optionBox ul li:last-child{border-right: 0;}
        .contentBox div{
             100%;height: 100%;position: absolute;display: none;
        }
        .optionBox ul .selectLi{background-color: aquamarine;}
    </style>
</head>
<body>
    <div class="container">
        <div class="optionBox">
            <ul>
                <li class="selectLi">新闻</li>
                <li>娱乐</li>
                <li>科技</li>
                <li>军事</li>
                <li>体育</li>
            </ul>
        </div>
        <div class="contentBox">
            <div>特朗普批准TikTok与甲骨文的交易</div>
            <div>为什么在娱乐圈,学历与能力好像关系不大?</div>
            <div>那颗要用在 iPhone 12 上的 A14 芯片,很强吗?</div>
            <div>岛内接连2日清晨响起炮声?蔡英文高兴得早了!</div>
            <div>淘汰詹姆斯和哈登!字母哥拿下常规赛MVP</div>
        </div>
    </div>
<script>
    var $optionLis=$(".optionBox li");
    var $contentDivs=$(".contentBox div");
//  默认加载第一个div块的内容
    $contentDivs.eq(0).css("display","block");
//  定义鼠标进入事件
    $optionLis.mouseenter(function () {
        $(this).siblings().removeClass("selectLi");
        $(this).addClass("selectLi");
    //  通过“index()”和“eq()”函数获取选项标签li对应的内容div
        var $selectIndex=$(this).index();
        var $contentShow=$contentDivs.eq($selectIndex);
        if ($contentShow.siblings().is(":visible")){
            $contentShow.siblings().fadeOut();
        }
        $contentShow.fadeIn();
    });
</script>
</body>
</html>
4.each()方法
用于遍历每个节点,然后执行参数中的回调函数。
注意:
回调函数中如果存在“$(this)”,那么它指的是“当前正在遍历的这个节点”。
语法:$("selector").each(function(index, value){});
表示为每个匹配的元素规定要运行的函数,each()中的回调函数有两个参数:
第一个参数是选择器当前匹配元素的“索引位置index”,
第二个参数是当前匹配的元素(即函数中“this”指向的元素)。
两个参数都不是必须声明的,为可选参数。
示例:$("div").each(function(){
$(this).children().eq(1).css("backgroundColor","red");
});
还有另外一种写法:
$.each(arr || obj, function(index, value){});
each()方法可以针对任何具有Length属性的数组和类似数组的对象(例如函数的参数对象)进行迭代。
第一个参数为将要执行回调函数的数组或集合,
第二个参数为回调函数,回调函数中第一个参数是迭代对象的索引、第二个参数是迭代对象的值
each()方法示例:
<html lang="en">
<head>
<meta charset="UTF-8">
<title>each()方法</title>
<script src="jQueryFiles/jquery-1.8.3.js"></script>
<style>
div{
150px;height: 30px;margin: 80px 20px;
background-color: #eeeeee;float: left;
}
</style>
</head>
<body>
<div id="one"></div>
<div id="two"></div>
<div id="three"></div>
<div id="four"></div>
<div id="five"></div>
<script>
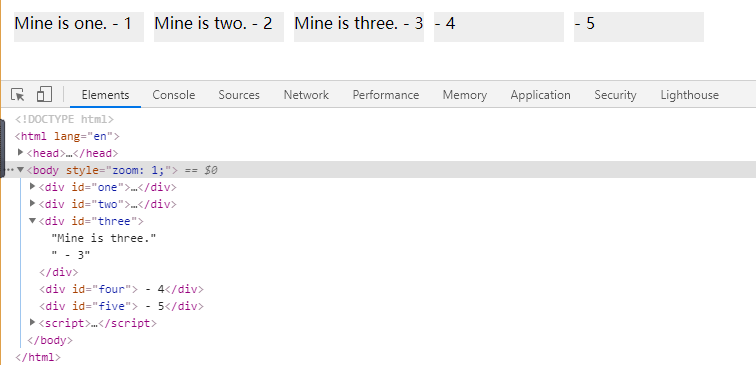
var arr = [ "one", "two", "three", "four", "five" ];
var obj = { one: 1, two: 2, three: 3, four: 4, five: 5 };
// 操作对象为数组
jQuery.each( arr, function( i, val ) {
// 通过 id选择器(id为arr中的val)进行匹配对象的遍历操作
$( "#" + val ).text( "Mine is " + val + "." );
// 第三个以后停止遍历
return ( val !== "three" );
});
// 操作对象为集合
jQuery.each( obj, function( i, val ) {
// 通过 id选择器(id为obj中的key)进行匹配对象的遍历操作
$( "#" + i ).append( document.createTextNode( " - " + val ) );
console.log(obj);
});
</script>
</body>
</html>
代码执行结果:
Table纵列操作示例:
<html lang="en">
<head>
    <meta charset="UTF-8">
    <title>Test</title>
    <script src="jQueryFiles/jquery-1.8.3.js"></script>
</head>
<body>
<table border="1" style="color: orangered;text-align: center" cellspacing="0">
    <tr><td>第一列</td><td>第二列</td><td>第三列</td><td>第四列</td><td>第五列</td><td>第六列</td><td>第七列</td></tr>
    <tr><td></td><td></td><td></td><td></td><td></td><td></td><td></td></tr>
    <tr><td></td><td></td><td></td><td></td><td></td><td></td><td></td></tr>
    <tr><td></td><td></td><td></td><td></td><td></td><td></td><td></td></tr>
    <tr><td></td><td></td><td></td><td></td><td></td><td></td><td></td></tr>
    <tr><td></td><td></td><td></td><td></td><td></td><td></td><td></td></tr>
    <tr><td></td><td></td><td></td><td></td><td></td><td></td><td></td></tr>
</table>

<script>
    $('tr').css('height','40px');
    $('tr:first td').css('width','100px');
    $("td").mouseenter(function () {
        var colIndex=$(this).index();
    //  鼠标当前经过的单元格,所对应的每一行的这一列,执行each()中的回调函数。
        $("tr").each(function () {
            $(this).children().eq(colIndex).css("background-color","lightblue");
        })
    }).mouseleave(function () {
        var colIndex=$(this).index();
        $("tr").each(function () {
            $(this).children().eq(colIndex).css("background-color","transparent");
        })
    });
</script>
</body>
</html>
5.delay()方法
改方法用于设置延迟执行时间,
语法示例:$("selector").delay(timeValue).animate();
参数为延迟的时间,通常配合“animate、fadeIn(fadeOut)、show(hidde)”等动画使用。
<html lang="en">
<head>
    <meta charset="UTF-8">
    <title>blink</title>
    <script src="jQueryFiles/jquery-1.8.3.js"></script>
    <style>
        *{ 0;padding: 0;}
        .container{
             100%;height: 750px;position: relative;
        }
        .container img{
             200px;height: 150px;position: absolute;
            display: none;
        }
        button{
             100px;height: 30px;font-size: 16px;font-weight: bold;
            margin: 6px;color: gold;cursor: pointer;
            background: linear-gradient(120deg,darkred,orangered);
        }
    </style>
</head>
<body>
    <div class="container">
        <button onclick="readyGo()">readyGo</button>
        <button onclick="stopBlink()">stopBlink</button>
        <img src="Images/Blink/bawanglong.jpg" alt="" title="霸王龙">
        <img src="Images/Blink/gesilalong.jpg" alt="" title="哥斯拉龙">
        <img src="Images/Blink/jialong.jpg" alt="" title="甲龙">
        <img src="Images/Blink/jianjiaolong.jpg" alt="" title="剑角龙">
        <img src="Images/Blink/kongshoulong.jpg" alt="" title="恐手龙">
        <img src="Images/Blink/qiyilong.jpg" alt="" title="奇艺龙">
        <img src="Images/Blink/sanjiaolong.jpg" alt="" title="三角龙">
        <img src="Images/Blink/shizuniao.jpg" alt="" title="始祖鸟">
    </div>
<script>
    var $container=$(".container");
    var $imgcolles=$(".container img")
    $imgcolles.eq(0).css({left:"310px",top:"10px"});
    $imgcolles.eq(1).css({left:"60px",top:"210px"});
    $imgcolles.eq(2).css({left:"350px",top:"450px"});
    $imgcolles.eq(3).css({left:"700px",top:"600px"});
    $imgcolles.eq(4).css({left:"580px",top:"240px"});
    $imgcolles.eq(5).css({left:"1100px",top:"470px"});
    $imgcolles.eq(6).css({left:"910px",top:"50px"});
    $imgcolles.eq(7).css({left:"1300px",top:"180px"});

    var timer=null;
    function readyGo() {
        timer=setInterval(function(){
            $imgcolles.each(function (i) {
        //  设置参数“i”,随着执行序号的增加,延迟时间增加,实现异步闪烁的效果。
                $(this).delay(i*600).fadeIn().fadeOut(300).fadeIn(300);
            })
        },5000);
    }
    function stopBlink() {
        clearInterval(timer);
        $imgcolles.each(function () {
            $(this).fadeIn();
        })
    }
</script>
</body>
</html>
6.内部插入
append(),
语法示例:A.append(B);
表示向“A节点内部现有内容之后”追加“B节点”
appendTo(),
语法示例:B.appendTo(A);
表示将“B节点”追加到“A节点内部现有内容之后”
prepend(),
语法示例:A.prepend(B);
表示向“A节点内部现有内容之前”追加“B节点”
prependTo(),
语法示例:B.prepend(A);
表示将“B节点”追加到“A节点内部现有内容之前”
7.外部插入
after(),
语法示例:A.after(B);
表示 在“A节点之后”添加“同级节点B”
before(),
语法示例:A.before(B);
表示 在“A节点之前”添加“同级节点B”
insertAfter(),
语法示例:A.insertAfter(B);
表示 把“A节点”添加到“节点B”之后
insertBefore(),
语法示例:A.insertBefore(B);
表示 把“A节点”添加到“节点B”之前
与前述内部插入方法相比,外部插入方法可以认为是给当前节点添加兄弟节点。
8.改变节点位置
在 jq中操作节点或节点组时,隐含的一个规律是:
通过“$()”方法搜索获得的节点,同一时间在页面中只能在一个位置存在。
也就是说,使用内部插入或外部插入等方法,在操作“$()”搜索的元素时,将改变元素的位置。
语法示例:
<body>
<div class="div1" style="200px;height:100px;border:1px solid">
    <span class="whoseChild">span标签</span>
</div>
<div class="div2" style="200px;height:100px;border:1px solid"></div>
<script>
// <!--  点击div2时,span标签将改变为div2的子元素
//       此时div1中不再有span标签!-->
    $(".div2").click(function () {
        $(this).append($(".whoseChild"));
    });
    $(".div1").click(function () {
        $(this).append($(".whoseChild"));
    });
</script>
</body>
9.wrap()方法
给指定元素增加一个父级元素。(开发过程中较少使用)
语法示例:A.wrap(B);
表示给“A”元素增加一个父级元素“B”,即 B包裹 A。
10.empty()和remove()
empty(),用于删除指定节点的内容;
remove(),用于删除指定节点自身。
语法:$("selector") .empty(); //等价于$("selector") .html("");
$("selector") .remove();
11.clone()
相当于 js中的 cloneNode(true)操作(深复制),即克隆的节点在页面中没有自己的位置,
需要通过 append()等操作才能够添加到页面中。
语法:$("selector") .append(B.clone());
<html lang="en">
<head>
    <meta charset="UTF-8">
    <title>Test</title>
    <script src="jQueryFiles/jquery-1.8.3.js"></script>
    <style>
        .leftBox,.rightBox{
             120px;height: 270px;margin: 10px;padding: 10px;
            float: left;border:1px solid gray;
        }
        .ulStyle{padding-left:30px;list-style: none;}
        .leftBox ul li{ margin: 5px 0px;}
        .btn{80px;height: 270px;line-height: 30px;
            margin-top:10px;padding:10px;float: left;}
        button{
             60px;letter-spacing: 5px;display:block;float: left;
        }
    </style>
</head>
<body>
    <div class="leftBox">
        <ul class="ulStyle">
            <li><input type="checkbox">西瓜</li>
            <li><input type="checkbox">葡萄</li>
            <li><input type="checkbox">苹果</li>
            <li><input type="checkbox">萝卜</li>
            <li><input type="checkbox">土豆</li>
            <li><input type="checkbox">白菜</li>
            <li><input type="checkbox">馒头</li>
            <li><input type="checkbox">米饭</li>
            <li><input type="checkbox">啤酒</li>
        </ul>
    </div>
    <div class="btn">
        <button class="copy">复制</button><br>
        <button class="move">移动</button><br>
        <button class="clear">清空</button>
    </div>
    <div class="rightBox"><ul></ul></div>
<script>
    $(".copy").click(function () {
//  判断“input”的“checked”属性,将已勾选内容【克隆】到rightBox中
        $(".rightBox ul").append($(".leftBox input:checked").parent().clone());
//  设置rightBox中生成的li的样式
        $(".rightBox ul").addClass("ulStyle");
        $(".rightBox ul li").css("margin","5px 0");
//  复制完成后“去除”复选框中的勾选标识,令“checked”属性值等于“false”
        $(".rightBox input").attr({"checked":false});
        $(".leftBox input").attr({"checked":false});
    });
    $(".move").click(function () {
//  判断“input”的“checked”属性,将已勾选内容【移动】到rightBox中
        $(".rightBox ul").append($(".leftBox input:checked").parent()).addClass("ulStyle");
        $(".rightBox ul li").css("margin","5px 0");
        $(".rightBox input").attr({"checked":false});
    });
    $(".clear").click(function () {
//  清空 rightBox中的内容
        $(".rightBox").empty();
    });
</script>
</body>
</html>
12.jQuery插件使用
① 引入 jQuery版本文件
② 引入插件的 js文件(以及相应的 css文件)
③ 添加加载的事件
④ 复制代码
素材资料,如 jQuery之家等网络资源
13.jQueryUI使用
① 引入jQuery版本文件
② 引入jQueryUI的样式文件
③ 引入jQueryUI的 js文件
④ 使用jQueryUI的功能(可能需要自己封装函数调用)
素材资料,如 jQuery官网“plugins”等网络资源