简单运动的封装
先从最简单的封装开始,慢慢的使其更丰富,更实用。
还是上一篇博文的代码,在此不作细说。
需求:点击按钮,让元素匀速运动。
<!DOCTYPE html>
<html lang="zh">
<head>
	<title></title>
	<style>
		#d1 {
			 100px;
			height: 100px;
			background-color: red;
			position: absolute;
			top:100px;
			left:200px;
		}
	</style>
</head>
<body>
	<button id="btn">点击移动</button>
	<div id="d1"></div>
</body>
</html>
对js中的运动函数进行简单的封装
<script>
        //获取标签
	let oBtn = document.getElementById("btn");
	let oDiv = document.getElementById("d1");
	// 声明一个变量用来储存计时器
	let iTimer = null;

    oBtn.onclick = function(){
		// 调用函数
		startMove();
	};
	    // 封装函数
		function startMove(){
			clearInterval(iTimer);
			iTimer = setInterval(function(){
				if(oDiv.offsetLeft ===500){
					clearInterval(iTimer);
				}else{
					oDiv.style.left = oDiv.offsetLeft + 10 + "px";
				}
			},30);
		}
封装函数其实就是讲多个函数中相同的部分提前出来,将其放在一个函数中,使用的时候可以之间调用。作用是增加代码的利用率,提高开发效率。
为了使封装的函数可以得到更广泛的使用,我们需要把一些运动过程中需要发生变化的部分通过传参的方式进行更改。
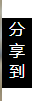
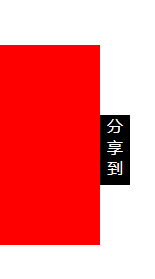
下面以网页中常见的 分享到 为例进行详细说明
默认状态:
鼠标悬浮在元素上:
<!DOCTYPE html>
<html>
    <head>
        <meta charset="utf-8">
        <title></title>
        <style>
            #div1 {
                 100px;
                height: 200px;
                background:red;
                position: absolute;
                left: -100px;
                top: 200px;
            }
            #div2 {
                 30px;
                height: 70px;
                background: black;
                position:absolute;
                right:-30px;
                top: 70px;;
                color:#fff;
                text-align: center;
            }
        </style>
    </head>
    <body>
        <div id="div1">
            <div id="div2">分享到</div>
        </div>
    </body>
    </html>
利用上面封装的函数,加以修改之后直接在本案例中使用
<script>
		// 将其复制成两个,分别用于鼠标悬浮时和鼠标移除时
			//悬浮时向右移动
			function startMove1(){
				clearInterval(iTimer);
				iTimer = setInterval(function(){
					if(oDiv1.offsetLeft ===0){
						clearInterval(iTimer);
					}else{
						oDiv1.style.left = oDiv1.offsetLeft + 10 + "px";
					}
				},30);
			}
			// 移除元素时恢复默认状态
			function startMove2(){
				clearInterval(iTimer);
				iTimer = setInterval(function(){
					if(oDiv1.offsetLeft ===-100){
						clearInterval(iTimer);
					}else{
						oDiv1.style.left = oDiv1.offsetLeft - 10 + "px";
					}
				},30);
			}

        //  首先获取两个元素
        let oDiv1 = document.getElementById('div1');
        let oDiv2 = document.getElementById('div2');
        let iTimer = null;
        // 给为父级的div绑定mouseover 和 mouseout事件
        oDiv1.onmouseover = function() {
			// 调用
            startMove1();
        };
        oDiv1.onmouseout = function() {
			// 调用
            startMove2() // 鼠标移出,让div隐藏
        };
    </script>
但是,上述案例中封装的函数使用起来并不方便,下面将其优化一下。
将共同点保留,不同点用形参代替,在调用时根据需求传入不同的值。整理后js代码如下:
/**参数的含义:
 * oDom:作用点(发生运动的元素)
 * iTarget:目标值(需要移动到达的位置)
 * iSpead:移动的速度(每一次移动量)
 */
function startMove(oDom,iTarget,iSpead){
	clearInterval(iTimer);
	iTimer = setInterval(function(){
		if(oDom.offsetLeft ===iTarget){
			clearInterval(iTimer);
		}else{
			oDom.style.left = oDom.offsetLeft + iSpead + "px";
		}
	},30);
}

let oDiv1 = document.getElementById('div1');
        let oDiv2 = document.getElementById('div2');
        let iTimer = null;
        oDiv1.onmouseover = function() {
            startMove(oDiv1,0,10);
        };
        oDiv1.onmouseout = function() {
            startMove(oDiv1,-100,-10) // 鼠标移出,让div隐藏
        };
上述代码中,将函数操作的元素提前出来,变成了函数的形参,这样就可以让此函数针对任意的元素。
但是注意,
目标值iTarget必须为速度iSpead的整数倍。否则停止条件无法满足,运动就会一直进行。