Nginx笔记
一、编译安装nginx
1.1、安装依赖
yum -y install gcc gcc-c++ autoconf automake make
yum -y install pcre-devel
yum -y install openssl openssl-devel
1.2、安装nginx步骤详解
1.下载源码包
[root@node1 ~]# wget -c https://nginx.org/download/nginx-1.12.0.tar.gz
2.解压缩源码
[root@node1 ~]# tar -zxvf nginx-1.12.0.tar.gz
3.配置,编译安装  开启nginx状态监测功能
[root@node1 ~]# cd nginx-1.12.0
[root@node1 nginx-1.12.0]# ./configure  --prefix=/app/nginx
成功之后的提示
Configuration summary
  + using system PCRE library
  + OpenSSL library is not used
  + using system zlib library

  nginx path prefix: "/app/nginx"
  nginx binary file: "/app/nginx/sbin/nginx"
  nginx modules path: "/app/nginx/modules"
  nginx configuration prefix: "/app/nginx/conf"
  nginx configuration file: "/app/nginx/conf/nginx.conf"
  nginx pid file: "/app/nginx/logs/nginx.pid"
  nginx error log file: "/app/nginx/logs/error.log"
  nginx http access log file: "/app/nginx/logs/access.log"
  nginx http client request body temporary files: "client_body_temp"
  nginx http proxy temporary files: "proxy_temp"
  nginx http fastcgi temporary files: "fastcgi_temp"
  nginx http uwsgi temporary files: "uwsgi_temp"
  nginx http scgi temporary files: "scgi_temp"
  #安装
  [root@node1 nginx-1.12.0]# make && make install

4.启动nginx,进入sbin目录,找到nginx启动命令
[root@node1 nginx-1.12.0]# cd /app/nginx/sbin/
#启动
[root@node1 sbin]# ./nginx
#关闭
[root@node1 sbin]# ./nginx -s stop
#重新加载
[root@node1 sbin]# ./nginx -s reload
二、nginx软件目录
[root@node1 nginx]# ls
client_body_temp  conf  fastcgi_temp  html  logs  proxy_temp  sbin  scgi_temp  uwsgi_temp
- conf 存放nginx所有配置文件的目录,主要nginx.conf
- html 存放nginx默认站点的目录,如index.html、error.html等
- logs 存放nginx默认日志的目录,如error.log access.log
- sbin 存放nginx主命令的目录,sbin/nginx
Nginx主配置文件/app/nginx/conf/nginx.conf是一个纯文本类型的文件,整个配置文件是以区块的形式组织的。一般,每个区块以一对大括号{}来表示开始与结束。
CoreModule核心模块
user www;                       #Nginx进程所使用的用户
worker_processes 1;             #Nginx运行的work进程数量(建议与CPU数量一致或auto)
error_log /log/nginx/error.log  #Nginx错误日志存放路径
pid /var/run/nginx.pid          #Nginx服务运行后产生的pid进程号
events事件模块
events {
    worker_connections  //每个worker进程支持的最大连接数
    use epool;          //事件驱动模型, epoll默认
}
http内核模块
//公共的配置定义在http{}
http {  //http层开始
...
    //使用Server配置网站, 每个Server{}代表一个网站(简称虚拟主机)
    'server' {
        listen       80;        //监听端口, 默认80
        server_name  localhost; //提供服务的域名或主机名
        access_log host.access.log  //访问日志
        //控制网站访问路径
        'location' / {
            root   /usr/share/nginx/html;   //存放网站代码路径
            index  index.html index.htm;    //服务器返回的默认页面文件
        }
        //指定错误代码, 统一定义错误页面, 错误代码重定向到新的Locaiton
        error_page   500 502 503 504  /50x.html;
    }
    ...
    //第二个虚拟主机配置
    'server' {
    ...
    }
    include /etc/nginx/conf.d/*.conf;  //包含/etc/nginx/conf.d/目录下所有以.conf结尾的文件
}   //http层结束
三、部署nginx站点
nginx默认站点是Nginx目录下的html文件夹,这里可以从nginx.conf中查到
 location / {
            root   html;
            index  index.html index.htm;
        }
如果要部署网站业务数据,只需要把开发好的程序全放到html目录下即可
[root@node1 html]# pwd
/app/nginx/html
[root@node1 html]# ls
50x.html  index.html  test.jpg
访问
http://192.168.1.129/test.jpg
四、Nginx多个虚拟主机
如果每台linux服务器只运行了一个小网站,那么人气低,流量小的草根站长需要承担高额的服务器租赁费,也造成了硬件资源浪费。
虚拟主机就是将一台服务器分割成多个“虚拟服务器”,每个站点使用各自的硬盘空间,由于省资源,省钱,众多网站都使用虚拟主机来部署网站。
虚拟主机的概念就是在web服务里的一个独立的网站站点,这个站点对应独立的域名(IP),具有独立的程序和资源目录,可以独立的对外提供服务。
这个独立的站点配置是在nginx.conf中使用server{}代码块标签来表示一个虚拟主机。
Nginx支持多个server{}标签,即支持多个虚拟主机站点。
虚拟主机类型
基于域名的虚拟主机
通过不同的域名区分不同的虚拟主机,是企业应用最广的虚拟主机。
基于端口的虚拟主机
通过不同的端口来区分不同的虚拟主机,一般用作企业内部网站,不对外直接提供服务的后台,例如www.pythonav.cn:9000
基于IP的虚拟主机
通过不同的IP区分不同的虚拟主机,此类比较少见,一般业务需要多IP的常见都会在负载均衡中绑定VIP
nginx可以自动识别用户请求的域名,根据不同的域名请求服务器传输不同的内容,只需要保证服务器上有一个可用的ip地址,配置好dns解析服务。
/etc/hosts是linux系统中本地dns解析的配置文件,同样可以达到域名访问效果
[root@node1 ~]# cat /etc/hosts
127.0.0.1   localhost localhost.localdomain localhost4 localhost4.localdomain4
::1         localhost localhost.localdomain localhost6 localhost6.localdomain6
192.168.1.129 www.tzh1.com
192.168.1.129 www.tzh2.com
准备好对应的站点文件
[root@node1 html]# pwd
/app/nginx/html
[root@node1 html]# tree
.
├── 50x.html
├── index.html
├── node1
│   └── index.html
├── node2
│   └── index.html
└── test.jpg

2 directories, 5 files
修改nginx.conf
[root@node1 conf]# egrep -v '#|^$' nginx.conf
worker_processes  1;
events {
    worker_connections  1024;
}
http {
    include       mime.types;
    default_type  application/octet-stream;
    sendfile        on;
    keepalive_timeout  65;
    server {
        listen       80;
        server_name  www.tzh1.com;
        location / {
            root   html/node1;
            index  index.html index.htm;
        }
        error_page   500 502 503 504  /50x.html;
        location = /50x.html {
            root   html;
        }
    }
     server {
        listen       80;
        server_name  www.tzh2.com;
        location / {
            root   html/node2;
            index  index.html index.htm;
        }
}
}
访问测试结果
[root@node1 ~]# curl www.tzh1.com
node1
[root@node1 ~]# curl www.tzh2.com
node2
五、Nginx访问日志功能
日志功能对每个用户访问网站的日志信息记录到指定的日志文件里,开发运维人员可以分析用户的浏览器行为,此功能由ngx_http_log_module模块负责
官网地址是:http://nginx.org/en/docs/http/ngx_http_log_module.html
控制日志的参数
log_format    记录日志的格式,可定义多种格式
accsss_log    指定日志文件的路径以及格式
#更改为
log_format main  '$remote_addr - $remote_user [$time_local] “"$request"'
                    ‘'$status $body_bytes_sent “"$http_referer"'
                    “'"$http_user_agent""$http_x_forwarded_for"';
对应参数解析
$remote_addr    记录客户端ip
$remote_user    远程用户,没有就是 “-”
$time_local    对应[14/Aug/2020:23:46:52 +0800]
$request     对应请求信息"GET /favicon.ico HTTP/1.1"
$status      状态码
$body_bytes_sent  571字节 请求体的大小
$http_referer  对应“-”  由于是直接输入浏览器就是 -
$http_user_agent  客户端身份信息
$http_x_forwarded_for  记录客户端的来源真实ip
日志效果如下
66.102.6.6 - - [14/Aug/2020:01:46:52 +0800] "GET /favicon.ico HTTP/1.1" 404 571 "-"
 "Mozilla/5.0 (X11; Linux x86_64) AppleWebKit/537.36 (KHTML, like Gecko) Chrome/49.0.2623.75 Safari/537.36 Google Favicon" "97.64.34.118"
nginx.conf默认配置
log_format  main  '$remote_addr - $remote_user [$time_local] "$request" '
                  '$status $body_bytes_sent "$http_referer" '
                  '"$http_user_agent" "$http_x_forwarded_for"';
access_log  logs/access.log  main;
日志格式配置定义
log_format是日志关键字参数,不能变
main是日志格式指定的标签,记录日志时通过main标签选择指定的格式。
六、Nginx反向代理
nginx实现负载均衡的组件
ngx_http_proxy_module proxy代理模块,用于把请求抛给服务器节点或者upstream服务器池
机器准备,两台服务器
master  192.168.1.129  主负载
slave   192.168.1.130   web1
反向代理配置文件nginx.conf
worker_processes  1;
events {
    worker_connections  1024;
}
http {
    include       mime.types;
    default_type  application/octet-stream;
    sendfile        on;
    keepalive_timeout  65;
    server {
        listen       80;
        server_name  192.168.1.129;
        location / {
        proxy_pass http://192.168.1.130:8080;
            root   html;
            index  index.html index.htm;
        }
        error_page   500 502 503 504  /50x.html;
        location = /50x.html {
            root   html;
        }
    }
此时访问master的服务器192.168.1.129:80地址,已经会将请求转发给192.168.1.130的8080端口
除了页面效果的展示以外,还可以通过log(access.log)查看代理效果
七、负载均衡介绍
Web服务器,直接面向用户,往往要承载大量并发请求,单台服务器难以负荷,我使用多台WEB服务器组成集群,前端使用Nginx负载均衡,将请求分散的打到我们的后端服务器集群中,
实现负载的分发。那么会大大提升系统的吞吐率、请求性能、高容灾

Nginx要实现负载均衡需要用到proxy_pass代理模块配置
Nginx负载均衡与Nginx代理不同地方在于
Nginx代理仅代理一台服务器,而Nginx负载均衡则是将客户端请求代理转发至一组upstream虚拟服务池
Nginx可以配置代理多台服务器,当一台服务器宕机之后,仍能保持系统可用。
7.1、upstream配置
在nginx.conf > http 区域中
在nginx.conf > http 区域 > server区域 > location配置中
upstream tzh {
       server 192.168.1.131:8000;
       server 192.168.1.130:9000;
}
添加proxy_pass
location / {
            root   html;
            index  index.html index.htm;
            proxy_pass http://tzh;
}
此时初步负载均衡已经完成,upstream默认按照轮训方式负载,每个请求按时间顺序逐一分配到后端节点。
7.2、upstream分配策略
调度算法      概述
轮询        按时间顺序逐一分配到不同的后端服务器(默认)
weight       加权轮询,weight值越大,分配到的访问几率越高
ip_hash      每个请求按访问IP的hash结果分配,这样来自同一IP的固定访问一个后端服务器
url_hash      按照访问URL的hash结果来分配请求,是每个URL定向到同一个后端服务器
least_conn    最少链接数,那个机器链接数少就分发
1.轮询(不做配置,默认轮询)
2.weight权重(优先级)
3.ip_hash配置,根据客户端ip哈希分配,不能和weight一起用weight 权重
upstream tzh {
       server 192.168.1.131:8000 weight=5;
       server 192.168.1.130:9000 weight=10;#这个节点访问比率是大于8000的
}
ip_hash
每个请求按访问ip的hash结果分配,这样每个访客固定访问一个后端服务器
upstream tzh {
    ip_hash;
       server 192.168.1.131:8000;
       server 192.168.1.130:9000;
}
backup
在非backup机器繁忙或者宕机时,请求backup机器,因此机器默认压力最小
upstream tzh {
       server 192.168.1.131:8000 weight=5;
       server 192.168.1.130:9000;
       server node.tzh.com:8080 backup;
}
八、Nginx实验负载均衡
角色           			    ip                        主机名
lb01(负载均衡器)          192.168.1.129:80   			 lb01
web01        			192.168.1.130:8080     	 	    web01
web02        			192.168.1.131:80        		web02
8.1、web02服务器配置tomcat
安装tomcat启动即可
8.2、web01服务器配置nginx,创建index.html
[root@node3 html]# mkdir node
[root@node3 html]# echo 'node131 is 我' > node/index.html
nginx配置文件
server {
        listen       80;
        server_name  192.168.1.131;
        location / {
            root   html/node;
            index  index.html index.htm;
        }
8.3、配置lb01服务器的nginx负载均衡
1.查看lb01的 nginx.conf
[root@node1 conf]# cat nginx.conf | grep -v "#"|grep -v "^$"
worker_processes  1;
events {
    worker_connections  1024;
}
http {
    include       mime.types;
    default_type  application/octet-stream;
    sendfile        on;
    keepalive_timeout  65;
    upstream tzh.com {
       server 192.168.1.130:8080;
       server 192.168.1.131:80;
}

    server {
        listen       80;
        server_name  192.168.1.129;
        location / {
            proxy_pass http://tzh.com;
        }
        error_page   500 502 503 504  /50x.html;
        location = /50x.html {
            root   html;
        }
    }
}
2.手动创建proxy_params文件,文件中存放代理的请求头相关参数
[root@node1 ~]# vim /app/nginx/conf/proxy_params
proxy_set_header Host $http_host;
proxy_set_header X-Real-IP $remote_addr;
proxy_set_header X-Forwarded-For $proxy_add_x_forwarded_for;
proxy_connect_timeout 30;
proxy_send_timeout 60;
proxy_read_timeout 60;
proxy_buffering on;
proxy_buffer_size 32k;
proxy_buffers 4 128k;
3.启动lb01节点nginx后测试
访问页面192.168.1.129
轮询切换130和131页面
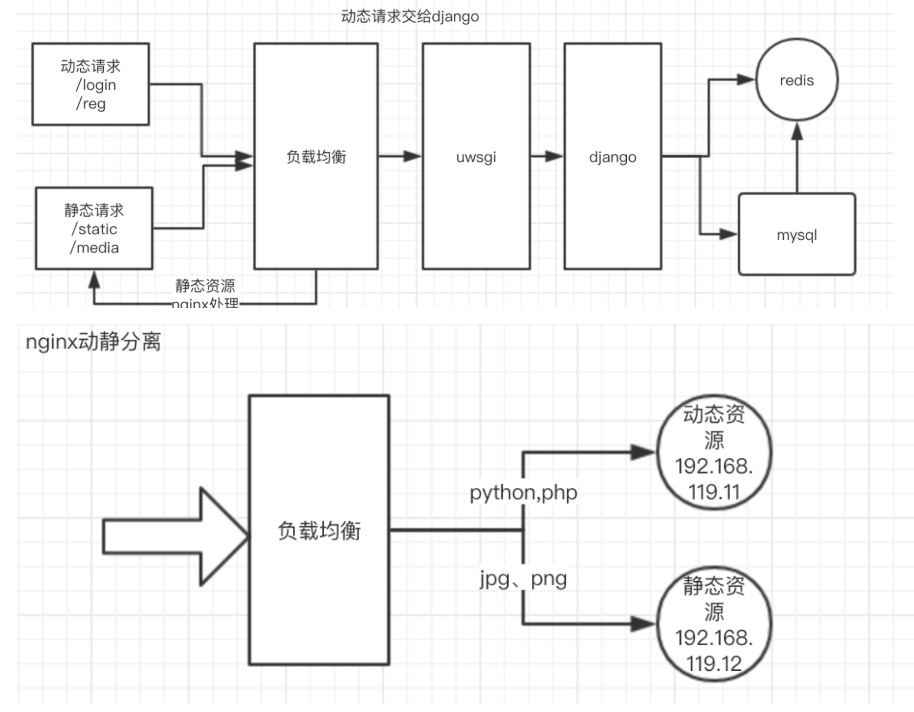
九、nginx动静分离
9.1 、动态页面与静态页面区别
- 静态资源: 当用户多次访问这个资源,资源的源代码永远不会改变的资源。
- 动态资源:当用户多次访问这个资源,资源的源代码可能会发送改变。
9.2、什么是动静分离
- 动静分离是让动态网站里的动态网页根据一定规则把不变的资源和经常变的资源区分开来,动静资源做好了拆分以后,我们就可以根据静态资源的特点将其做缓存操作,这就是网站静态化处理的核心思路
- 动静分离简单的概括是:动态文件与静态文件的分离。
- 伪静态:网站如果想被搜索引擎搜素到,动态页面静态技术freemarker等模版引擎技术
9.3 为什么要用动静分离
- 在我们的软件开发中,有些请求是需要后台处理的(如:.jsp,.do等等),有些请求是不需要经过后台处理的(如:css、html、jpg、js等等文件),这些不需要经过后台处理的文件称为静态文件,否则动态文件。因此我们后台处理忽略静态文件。这会有人又说那我后台忽略静态文件不就完了吗。当然这是可以的,但是这样后台的请求次数就明显增多了。在我们对资源的响应速度有要求的时候,我们应该使用这种动静分离的策略去解决。
- 动静分离将网站静态资源(HTML,JavaScript,CSS,img等文件)与后台应用分开部署,提高用户访问静态代码的速度,降低对后台应用访问。这里我们将静态资源放到nginx中,动态资源转发到tomcat服务器中。
- 因此,动态资源转发到tomcat服务器我们就使用到了前面讲到的反向代理了。
十、Nginx实现动静分离

10.1、nginx配置文件
- 动静分离的原理很简单,通过location对请求url进行匹配即可
- 环境
- 代理服务器 (nginx)192.168.1.129
- 静态服务器(nginx)192.168.1.130
- 动态服务器 (tomcat) 192.168.1.131(也可以对动态资源做个负载均衡)
[root@node1 nginx]# cat conf/nginx.conf | grep -v "#" |grep  -v "^$"
worker_processes  1;
events {
    worker_connections  1024;
}
http {
    include       mime.types;
    default_type  application/octet-stream;
    sendfile        on;
    keepalive_timeout  65;
    upstream tzh.com {
       server 192.168.1.130:8080 weight=10;
       server 192.168.1.130:8081 weight=20;
    }
    server {
        listen       80;
        server_name  192.168.1.129;
        location / {
           # 把动态资源反向代理到负载均衡池
           proxy_pass http://tzh.com;
        }
        location ~.*\.(jpg|png|js|css|html) {
           # 静态资源则访问以下目录 /html/statics(不是nginx里面奥,目录自己自选)
           # 此处nginx走的是本地资源
           root /html/statics;
        }
        error_page   500 502 503 504  /50x.html;
        location = /50x.html {
            root   html;
        }
    }
}
本次实验是简单的配置而已,没结合项目配置。
10.2、动静分离与前后分离区别
- 动静分离动态资源与静态资源分离,不会部署在同一台服务器上。
- 前后分离:网站架构模式,微服务开发基于
SOA面向于服务器开发,后台和前端都采用调用接口方式。将一个项目拆分成一个控制Web(前端)和接口(后端),最终使用rpc远程调用技术。视图层和业务逻辑层拆分,中间采用RPC远程调用技术
10.3、一些问题
- 为什么互联网公司项目中,静态资源url后面会加上一个时间戳?他的作用:控制缓存
- 目的:最终的目的是为了控制项目上线的时候,薪静态资源与老的浏览器缓存静态资源避免冲突问题。
- 解决办法:加上时间戳规范t = 项目上线
- 304走本地缓存状态码原理:
- 默认浏览器图片缓存是7天。
- 第一次下载资源的时候,客户端保存修改资源时间
- 第二次下载资源的时候,服务端判断客户端上一次修改的时间是否需返回200还是304
- 第二次下载资源的时候,服务端判断当前资源文件与客户端上一次修改的时间是否需返回200还是304客户端第二次下载资源最后修改时间 2018/6/28 下午11:07:11
- 服务端最后一次修改时间大于客户端最后一次修改的时间200重 新加载资源
- 服务器端最后一次修改的时间小于客户端最后修改的时间返回304走本地缓存
生产环境中js css最后一次的修改时间与客户端缓存的最后一次修改的时间可能会产生
冲突。服务器在2018年5月22日上线,用户在2018年6月01日访问,用户上线新js文件在2018年06月5日最后一次修改时间还是保留上次上线时间。所以一般来说在服务器上线的时候,都会在静态资源上加上时间戳 强制最新的资源