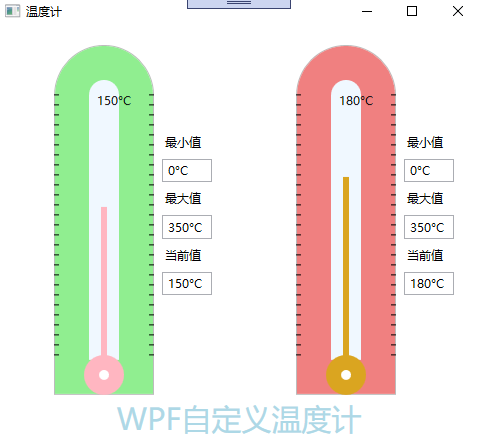
WPF中的控件不再具有固定的形象,仅仅是算法内容或数据内容的载体,你可以把控件看成为一组操作穿上了一套衣服,换一个控件就相当于换另外一套衣服。本文主要用WPF的控件模板自定义一个温度计,简述WPF的控件模板的用法,仅供学习分享使用,如有不足之处,还请指正。
模板分类
WPF引入模板,将数据和算法的内容与形式解耦,模板主要分为两大类:
- 控件模板:是算法内容的体现形式,一个控件怎样组织内部结构才能更符合业务逻辑,让用户操作起来更舒服,控件模板决定了控件“长成什么样子”。
- 数据模板:是数据内容的表现形式,一条数据显示成什么样子,是简单的文本,还是直观的图表,由数据模板决定。
示例截图
本例主要用过ProgressBar控件,设计成温度计的样式,如下所示:

示例步骤
- 创建控件模板副本,生成样式资源
- 修改默认资源样式,添加对应内容。
- 绑定数据到文本框
关于如何创建模板副本,可参考前面相关文章。
示例源码
1. 窗口布局
本例使用了两个进度条,分别展示不同样式的温度计,UI代码如下所示:
 1    <Grid>
 2         <Grid.RowDefinitions>
 3             <RowDefinition Height="*"></RowDefinition>
 4             <RowDefinition Height="Auto"></RowDefinition>
 5         </Grid.RowDefinitions>
 6         <Grid.ColumnDefinitions>
 7             <ColumnDefinition Width="*"></ColumnDefinition>
 8             <ColumnDefinition Width="Auto" MinWidth="80"></ColumnDefinition>
 9             <ColumnDefinition Width="*"></ColumnDefinition>
10             <ColumnDefinition Width="Auto" MinWidth="80"></ColumnDefinition>
11         </Grid.ColumnDefinitions>
12         <ProgressBar x:Name="temp" HorizontalAlignment="Right" Grid.Column="0"  IsIndeterminate="False" Orientation="Vertical" Background="LightGreen" Foreground="LightPink"  Margin="5" VerticalAlignment="Bottom" Maximum="350" Minimum="0" Value="150" Width="100" Height="350" Style="{DynamicResource ProgressBarStyle1}" />
13         <StackPanel Grid.Column="1" Orientation="Vertical" HorizontalAlignment="Left" VerticalAlignment="Center">
14             <TextBlock Text="最小值" Margin="3" Padding="3"></TextBlock>
15             <TextBox Text="{Binding ElementName=temp ,Path= Minimum,StringFormat={}{0}°C}" Width="50"  Margin="3" Padding="3"></TextBox>
16             <TextBlock Text="最大值"  Margin="3" Padding="3"></TextBlock>
17             <TextBox Text="{Binding ElementName=temp ,Path= Maximum,StringFormat={}{0}°C}" Width="50"  Margin="3" Padding="3"></TextBox>
18             <TextBlock Text="当前值" Margin="3" Padding="3"></TextBlock>
19             <TextBox Text="{Binding ElementName=temp ,Path= Value,StringFormat={}{0}°C}" Width="50"  Margin="3" Padding="3"></TextBox>
20         </StackPanel>
21
22         <ProgressBar Grid.Row="0" Grid.Column="2"  x:Name="temp1" HorizontalAlignment="Right"  IsIndeterminate="False" Orientation="Vertical" Background="LightCoral" Foreground="Goldenrod"  Margin="5" VerticalAlignment="Bottom" Maximum="350" Minimum="0" Value="180" Width="100" Height="350" Style="{DynamicResource ProgressBarStyle1}" />
23         <StackPanel Grid.Row="0" Grid.Column="3" Orientation="Vertical" HorizontalAlignment="Left" VerticalAlignment="Center">
24             <TextBlock Text="最小值" Margin="3" Padding="3"></TextBlock>
25             <TextBox Text="{Binding ElementName=temp1 ,Path= Minimum,StringFormat={}{0}°C}" Width="50"  Margin="3" Padding="3"></TextBox>
26             <TextBlock Text="最大值"  Margin="3" Padding="3"></TextBlock>
27             <TextBox Text="{Binding ElementName=temp1 ,Path= Maximum,StringFormat={}{0}°C}" Width="50"  Margin="3" Padding="3"></TextBox>
28             <TextBlock Text="当前值" Margin="3" Padding="3"></TextBlock>
29             <TextBox Text="{Binding ElementName=temp1 ,Path= Value,StringFormat={}{0}°C}" Width="50"  Margin="3" Padding="3"></TextBox>
30         </StackPanel>
31         <TextBlock Grid.Row="1" Grid.Column="0" Grid.ColumnSpan="4" Text="WPF自定义温度计" HorizontalAlignment="Center" FontSize="30" Foreground="LightBlue"></TextBlock>
32     </Grid>
注意:默认情况下,进度条是水平方向的,本例为了模拟温度计,需要设置成垂直方向。
2. 模板样式
ControlTemplate,主要用于设置模板,其中默认生成模板中定义x:Name的内容不可以删除,否则会报错【如:x:Name="TemplateRoot",x:Name="PART_Indicator"等】。具体如下所示:
 1     <Window.Resources>
 2         <local:WidthToMarginConvert x:Key="WidthToMargin" rate="3"/>
 3         <local:TempToStringConvert x:Key="tempformat"></local:TempToStringConvert>
 4         <SolidColorBrush x:Key="ProgressBar.Progress" Color="#FF06B025"/>
 5         <SolidColorBrush x:Key="ProgressBar.Background" Color="#FFE6E6E6"/>
 6         <SolidColorBrush x:Key="ProgressBar.Border" Color="#FFBCBCBC"/>
 7         <Style x:Key="ProgressBarStyle1" TargetType="{x:Type ProgressBar}">
 8             <Setter Property="Foreground" Value="{StaticResource ProgressBar.Progress}"/>
 9             <Setter Property="Background" Value="{StaticResource ProgressBar.Background}"/>
10             <Setter Property="BorderBrush" Value="{StaticResource ProgressBar.Border}"/>
11             <Setter Property="BorderThickness" Value="1"/>
12             <Setter Property="Template">
13                 <Setter.Value>
14                     <ControlTemplate TargetType="{x:Type ProgressBar}">
15                         <Grid x:Name="TemplateRoot">
16
17                             <VisualStateManager.VisualStateGroups>
18                                 <VisualStateGroup x:Name="CommonStates">
19                                     <VisualState x:Name="Determinate"/>
20                                     <VisualState x:Name="Indeterminate">
21                                         <Storyboard RepeatBehavior="Forever">
22                                             <DoubleAnimationUsingKeyFrames Storyboard.TargetProperty="(UIElement.RenderTransform).(TransformGroup.Children)[0].(ScaleTransform.ScaleX)" Storyboard.TargetName="Animation">
23                                                 <EasingDoubleKeyFrame KeyTime="0" Value="0.25"/>
24                                                 <EasingDoubleKeyFrame KeyTime="0:0:1" Value="0.25"/>
25                                                 <EasingDoubleKeyFrame KeyTime="0:0:2" Value="0.25"/>
26                                             </DoubleAnimationUsingKeyFrames>
27                                             <PointAnimationUsingKeyFrames Storyboard.TargetProperty="(UIElement.RenderTransformOrigin)" Storyboard.TargetName="Animation">
28                                                 <EasingPointKeyFrame KeyTime="0" Value="-0.5,0.5"/>
29                                                 <EasingPointKeyFrame KeyTime="0:0:1" Value="0.5,0.5"/>
30                                                 <EasingPointKeyFrame KeyTime="0:0:2" Value="1.5,0.5"/>
31                                             </PointAnimationUsingKeyFrames>
32                                         </Storyboard>
33                                     </VisualState>
34                                 </VisualStateGroup>
35                             </VisualStateManager.VisualStateGroups>
36                             <Border BorderBrush="{TemplateBinding BorderBrush}" BorderThickness="{TemplateBinding BorderThickness}" Background="{TemplateBinding Background}" CornerRadius="0 50 50 0"/>
37                             <Border Background="AliceBlue" Width="280" Height="30" CornerRadius="0 15 15 0"></Border>
38                             <Rectangle x:Name="PART_Track"/>
39                             <Grid x:Name="PART_Indicator" ClipToBounds="true" HorizontalAlignment="Left" Margin="38 0 0 0" Height="6">
40
41                                 <Rectangle x:Name="Indicator" Fill="Black" Opacity="0.8" />
42                                 <Rectangle x:Name="Animation" Fill="{TemplateBinding Foreground}" RenderTransformOrigin="0.5,0.5">
43                                     <Rectangle.RenderTransform>
44                                         <TransformGroup>
45                                             <ScaleTransform/>
46                                             <SkewTransform/>
47                                             <RotateTransform/>
48                                             <TranslateTransform/>
49                                         </TransformGroup>
50                                     </Rectangle.RenderTransform>
51                                 </Rectangle>
52
53                             </Grid>
54
55
56                             <Ellipse Width="40" HorizontalAlignment="Left" Margin="0 0 0 0" Height="40"  Fill="{TemplateBinding Foreground}" ></Ellipse>
57                             <Ellipse Width="10" HorizontalAlignment="Left" Margin="15 0 0 0" Height="10"  Fill="White" ></Ellipse>
58                             <TextBlock Text="{TemplateBinding Value, Converter={StaticResource tempformat}}" Foreground="Black"  Width="40" Height="20" Padding="3"  Margin="{TemplateBinding Value, Converter={StaticResource WidthToMargin}}" >
59
60                                 <TextBlock.RenderTransform>
61                                     <RotateTransform Angle="90"></RotateTransform>
62                                 </TextBlock.RenderTransform>
63                             </TextBlock>
64                             <Canvas x:Name="tick" >
65                                 <Path Canvas.Left="0" Canvas.Top="0" Stroke="Black" Data="M40 0 L40 5 M50 0 L50 5 M60 0 L60 5 M70 0 L70 5  M80 0 L80 5 M90 0 L90 5 M100 0 L100 5"></Path>
66                                 <Path Canvas.Left="0" Canvas.Top="0" Stroke="Black" Data="M110 0 L110 5 M120 0 L120 5 M130 0 L130 5 M140 0 L140 5 M150 0 L150 5 M160 0 L160 5 M170 0 L170 5 M180 0 L180 5  M190 0 L190 5 M200 0 L200 5"></Path>
67                                 <Path Canvas.Left="0" Canvas.Top="0" Stroke="Black" Data="M210 0 L210 5 M220 0 L220 5 M230 0 L230 5 M240 0 L240 5 M250 0 L250 5 M260 0 L260 5 M270 0 L270 5 M280 0 L280 5 M290 0 L290 5 M300 0 L300 5 "></Path>
68
69
70                                 <Path Canvas.Left="0" Canvas.Bottom="0" Stroke="Black" Data="M40 0 L40 5 M50 0 L50 5 M60 0 L60 5 M70 0 L70 5  M80 0 L80 5 M90 0 L90 5 M100 0 L100 5"></Path>
71                                 <Path Canvas.Left="0" Canvas.Bottom="0" Stroke="Black" Data="M110 0 L110 5 M120 0 L120 5 M130 0 L130 5 M140 0 L140 5 M150 0 L150 5 M160 0 L160 5 M170 0 L170 5 M180 0 L180 5  M190 0 L190 5 M200 0 L200 5"></Path>
72                                 <Path Canvas.Left="0" Canvas.Bottom="0" Stroke="Black" Data="M210 0 L210 5 M220 0 L220 5 M230 0 L230 5 M240 0 L240 5 M250 0 L250 5 M260 0 L260 5 M270 0 L270 5 M280 0 L280 5 M290 0 L290 5 M300 0 L300 5 "></Path>
73
74
75                             </Canvas>
76                         </Grid>
77                         <ControlTemplate.Triggers>
78                             <Trigger Property="Orientation" Value="Vertical">
79                                 <Setter Property="LayoutTransform" TargetName="TemplateRoot">
80                                     <Setter.Value>
81                                         <RotateTransform Angle="-90"/>
82                                     </Setter.Value>
83                                 </Setter>
84                             </Trigger>
85                             <Trigger Property="IsIndeterminate" Value="true">
86                                 <Setter Property="Visibility" TargetName="Indicator" Value="Collapsed"/>
87                             </Trigger>
88                         </ControlTemplate.Triggers>
89                     </ControlTemplate>
90                 </Setter.Value>
91             </Setter>
92         </Style>
93     </Window.Resources>
3. 数据转换
在模板数据绑定的过程中,有些数据需要进行格式化【如:数字转换成带单位的字符串,数值转换成Margin类型等】,所以需要定义数据转换类,如下所示:
 1     public class WidthToMarginConvert : IValueConverter
 2     {
 3         public Double rate { get; set; }
 4
 5         public object Convert(object value, Type targetType, object parameter, System.Globalization.CultureInfo culture)
 6         {
 7             Double width = (Double)value;
 8             Double pwidth = width * rate;
 9             pwidth = pwidth < 300 ? pwidth : 300;
10             return new Thickness(pwidth, 0, 0, 0);
11         }
12
13         //没有用到
14         public object ConvertBack(object value, Type targetType, object parameter, System.Globalization.CultureInfo culture)
15         {
16             throw new NotImplementedException();
17         }
18     }
19
20     public class TempToStringConvert : IValueConverter
21     {
22
23         public object Convert(object value, Type targetType, object parameter, System.Globalization.CultureInfo culture)
24         {
25             return string.Format("{0}°C", value.ToString());
26         }
27
28         //没有用到
29         public object ConvertBack(object value, Type targetType, object parameter, System.Globalization.CultureInfo culture)
30         {
31             throw new NotImplementedException();
32         }
33     }
备注
以上就是自定义温度计的全部内容,旨在抛砖引玉,共同学习,一起进步。

