QML动态标注线
1,目的
有些情况对某个位置进行标注,但是背景过于复杂, 需要将标注点和标注内容进行分离,这时就需要用到标注线。我们即明确知道了标注的的信息也让界面更加均衡。
效果图:
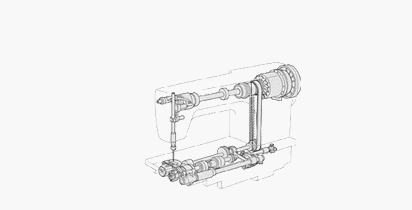
图1

图2
2,设计分析
如果单纯将标识点连线到标注区,这样在标注内容较多时是会给人杂乱不堪的感觉。这里我们先使用30度倾角拉出斜线,再使用水平画线延伸到目标点。后期在逻辑上控制斜线尽量不发生交叉,那么给人的感觉就较为整齐。
基本原理:我们已知信息是起始点、结束点坐标,首先通过起始点向结束的点的水平面画倾角30度的斜线,与结束点水平面重叠时转为画水平线直至结束坐标。
3,设计内容
首先在主qml中创建tagLine.qml组件,添加组件属性和基本元素。代码如下:
import QtQuick 2.0

Item {
    id: tagLine

    property point startPoint: Qt.point(0, 0)
    property point endPoint: Qt.point(0, 0)
    property var lineColor: "70ffe42f"
    property var lineWidth: 1

    //斜线长度
    property var oblLineLength: 0
    //水平线长度
    property var horLineLength: 0

    Rectangle{
        id: oblLine

        antialiasing: true
        height: lineWidth
        color: lineColor
        transformOrigin: Item.TopLeft
    }

    Rectangle{
        id: horLine

        antialiasing: true
        height: lineWidth
        color: lineColor
        transformOrigin: Item.TopLeft
    }
}
从代码中可知 我们是使用rectangle作为线条进行绘制。现在基本元素已经齐全,下一步就是计算线条长度,和添加画线动画。
我们先实现线条长度计算函数。
首先我们需要了解界面的坐标系,水平方向右是x轴正向,垂直向下是y轴正向。
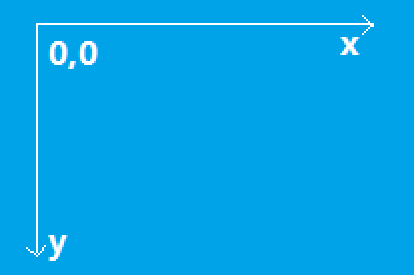
图3
在这个坐标系中,结束点可能会出现在起始点的如下4个区域中,我们先实现区域1中的计数,其他区域只需要在这个基础上稍微调整角度即可。
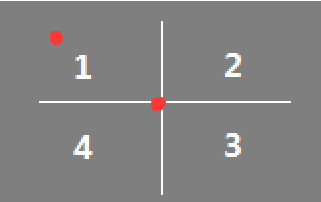
图4
下图5所示,我们最终需要的是a,c这两条线长。利用三角函数,已知b、f先算a=b/cos30°,d=b*tan30° 。下图是收藏的常用三角函数值表图6
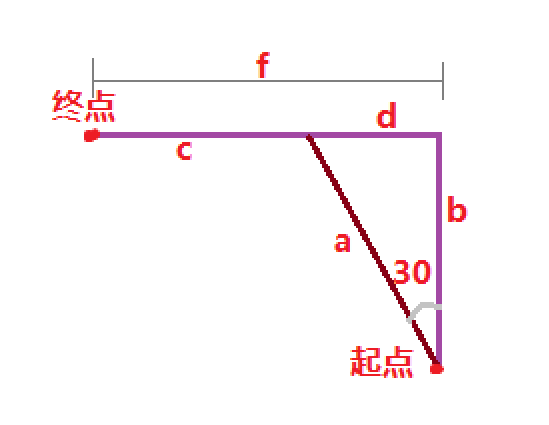
图5
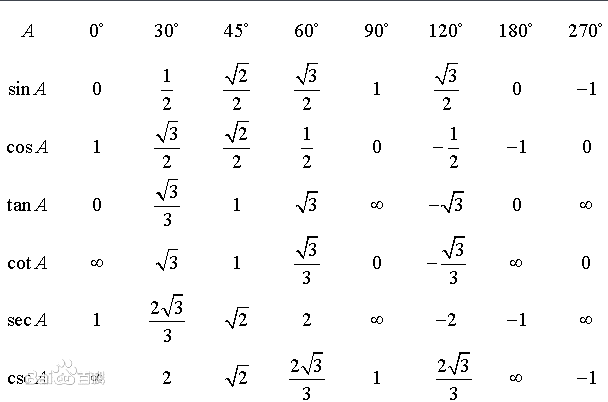
图6
这里还有一种情况就是d大于f的情况,这时我们就不能使用30度斜边改用垂线。实现代码如下
function drawCala() {
    //相对角度
    var angle= 0

    //实际角度值
    var realAngle = 0;

    var newOblLeng = 0;
    var newHorLeng = 0;

    var tmpx = Math.abs(startPoint.x - endPoint.x);
    var tmpy = Math.abs(startPoint.y - endPoint.y);

    //情况1 30°夹角
    if (tmpx >= Math.floor((Math.sqrt(3) / 3) * tmpy))
    {
        newOblLeng = Math.floor(tmpy / (Math.sqrt(3) / 2));
        newHorLeng = tmpx - Math.floor((Math.floor((Math.sqrt(3) / 3) * tmpy)));
        angle = 60;
    }
    //情况2 垂线和直线配合
    else
    {
        newOblLeng = tmpy;
        newHorLeng = tmpx;
        angle = 90;
    }

    oblLine.width = newOblLeng;
    horLine.width = newHorLeng;
}
到此我们已经计算出了这两根线的线长。还需要继续处理如下内容才算完成。
1,计算出c/a交汇的位置坐标,作为水平线c的起始点;
2,根据终点在起点的4个不同区域内,计算出线段a的倾角;
3,根据终点在起点的4个不同区域内,计算出水平线c的延伸方向;
4,添加动画,在a从起点开始延伸到达计算值后,水平线开始延伸,最终到达终点。
这里就不多说了,直接看代码吧,效果如下

图7
最终实现的代码:
tagLine.qml
import QtQuick 2.0

Item {
    property point startPoint: Qt.point(0, 0)
    property point endPoint: Qt.point(0, 0)
    property var lineColor: "#70ffe42f"
    property var lineWidth: 1

    //斜线长度
    property var oblLineLength: 0
    //水平线长度
    property var horLineLength: 0

    onStartPointChanged: {
        drawCala();
    }
    onEndPointChanged: {
        drawCala();
    }

    function drawCala() {
        //相对角度
        var angle= 0

        //实际角度值
        var realAngle = 0;

        var newOblLeng = 0;
        var newHorLeng = 0;

        var tmpx = Math.abs(startPoint.x - endPoint.x);
        var tmpy = Math.abs(startPoint.y - endPoint.y);

        //情况1 30°夹角
        if (tmpx >= Math.floor((Math.sqrt(3) / 3) * tmpy))
        {
            newOblLeng = Math.floor(tmpy / (Math.sqrt(3) / 2));
            newHorLeng = tmpx - Math.floor((Math.floor((Math.sqrt(3) / 3) * tmpy)));
            angle = 60;
        }
        //情况2 垂线和直线配合
        else
        {
            newOblLeng = tmpy;
            newHorLeng = tmpx;
            angle = 90;
        }

        //水平线的Y坐标 和结束点Y坐标相同
        horLine.y = endPoint.y;

        //结束的点在起始点的左上方
        if ((startPoint.x >= endPoint.x) && (startPoint.y >= endPoint.y))
        {
            realAngle = 180 + angle;
            horLine.x = endPoint.x + newHorLeng;
            horLine.rotation = 180;
        }
        //结束的点在起始点的右上方
        else if ((startPoint.x <= endPoint.x) && (startPoint.y >= endPoint.y))
        {
            realAngle = -angle;
            horLine.x = endPoint.x - newHorLeng;
            horLine.rotation = 0;
        }
        //结束的点在起始点的右下方
        else if ((startPoint.x <= endPoint.x) && (startPoint.y <= endPoint.y))
        {
            realAngle = angle;
            horLine.x = endPoint.x - newHorLeng;
            horLine.rotation = 0;
        }
        //结束的点在起始点的左下方
        else if ((startPoint.x >= endPoint.x) && (startPoint.y <= endPoint.y))
        {
            realAngle = 180 - angle;
            horLine.x = endPoint.x + newHorLeng;
            horLine.rotation = 180;
        }

        oblLine.x = startPoint.x;
        oblLine.y = startPoint.y;
        oblLine.rotation = realAngle
        oblLineLength = newOblLeng;
        horLineLength = newHorLeng;

        if (oblLineLength > 0)
        {
            oblAnimation.restart();
        }
        else
        {
            //当使用垂线时斜线长度清零
            oblLine.width = oblLineLength;
            //直接进行水平延伸
            horLine.visible = true;
            horAnimation.restart();
        }
    }

    Rectangle{
        id: oblLine

        antialiasing: true
        height: lineWidth
        color: lineColor
        transformOrigin: Item.TopLeft
    }

    Rectangle{
        id: horLine

        antialiasing: true
        height: lineWidth
        color: lineColor
        transformOrigin: Item.TopLeft
    }

    PropertyAnimation {
        id: oblAnimation
        target: oblLine
        property: "width"
        duration: 500
        from: 0
        to: oblLineLength
        onStopped: {
            if (horLineLength > 0)
            {
                horLine.visible = true
                horAnimation.restart()
            }
        }
        onStarted: {
            horLine.visible = false
        }
    }

    PropertyAnimation {
        id: horAnimation
        target: horLine
        property: "width"
        duration: 600
        from: 0
        to: horLineLength
    }
}
使用标注线main.qml
import QtQuick 2.5
import QtQuick.Window 2.2

Window {
    visible: true
     480
    height: 240

    color: "#1f1f1f"

    TagLine {
        id: myTagLine
    }

    MouseArea {
        anchors.fill: parent
        onClicked: {
            myTagLine.startPoint = Qt.point(parent.width / 2, parent.height / 2)
            myTagLine.endPoint = Qt.point(50, 50)
        }
    }
}
4,总结
利用Rectangle组件进行画线,然后再进行动画拼接,最终实现线条延伸效果,此组件比较适合应用在标识内容较多的场合。后续还可以配合标识框的组合动画让效果更佳。对以上代码稍作调整可实现如图1,2的效果。
下来大家发现有什么问题或需要讨论交流,可以在简书、博客园、或邮箱将问题进行留言,我会及时回复和更新。
邮箱: whqcxz@163.com
原创:https://www.simbahiker.com/news/0220200524001.html