好文:https://blog.csdn.net/javazejian/article/details/56267036
通过一个实例来理解
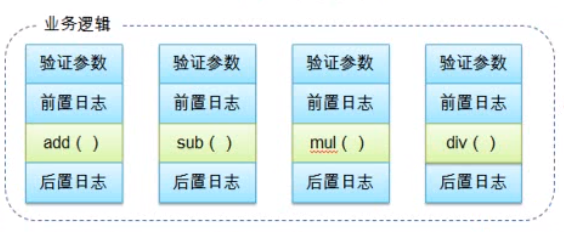
1. 需求:实现算术计算器,可以加减乘除,同时记录日志

2. 实现方式:
① 高度耦合(直接pass)
② 自己实现动态代理
③ 利用Spring AOP框架
二. 自己实现动态代理
1. 定义接口及实现类:
-- 接口:ArithmeticCalculator
public interface ArithmeticCalculator {

    int add(int i, int j);
    int sub(int i, int j);
    int mul(int i, int j);
    int div(int i, int j);

}
-- 接口的实现类
public class ArithmeticCalculatorImpl implements ArithmeticCalculator{

    public int add(int i, int j) {
        int result = i + j;
        System.out.println("[add] " + i + " + " + j + " = " + result);
        return result;
    }

    public int sub(int i, int j) {
        int result = i - j;
        System.out.println("[sub] " + i + " - " + j + " = " + result);
        return result;
    }

    public int mul(int i, int j) {
        int result = i * j;
        System.out.println("[mul] " + i + " * " + j + " = " + result);
        return result;
    }

    public int div(int i, int j) {
        int result = i / j;
        System.out.println("[div] " + i + " / " + j + " = " + result);
        return result;
    }
}
-- 返回动态代理类
关键代码已经标红,利用JDK的Proxy类,加入参数,返回代理类
try-catch-finally分别对应四种通知
public class ArithmeticCalculatorLoggingProxy {

    private ArithmeticCalculator target;

    public ArithmeticCalculatorLoggingProxy(ArithmeticCalculator target) {
        this.target = target;
    }

    public ArithmeticCalculator getLoggingProxy() {
        ArithmeticCalculator proxy = null;

        //代理对象由哪一个类加载器加载
        ClassLoader loader = target.getClass().getClassLoader();

        //代理对象的类型
        Class[] interfaces = new Class[] {ArithmeticCalculator.class};

        //调用代理对象的目标方法,并执行的代理方法
        InvocationHandler h = new InvocationHandler() {

            //proxy: 一般不用proxy中的方法,容易死循环
            //method: 目标类中的方法
            //args: 目标类方法的参数
            public Object invoke(Object proxy, Method method, Object[] args) {
                Object result = null;
                try {
                    System.out.println("这是前置通知...");
                    result = method.invoke(target, args);
                    System.out.println("这是返回通知,方法正常执行时执行...");
                } catch(Exception e) {
                    System.out.println("这是异常通知,方法异常时执行...");
                    e.printStackTrace();
                } finally {
                    System.out.println("这是后置通知,不论是否异常,都会执行");
                }
                return result;
            }

        };

        proxy = (ArithmeticCalculator) Proxy.newProxyInstance(loader, interfaces, h);

        return proxy;
    }
}
-- 调用
public class App
{
    public static void main( String[] args )
    {
        ArithmeticCalculator target = new ArithmeticCalculatorImpl();
        ArithmeticCalculator proxy = new ArithmeticCalculatorLoggingProxy(target).getLoggingProxy();
        proxy.add(1, 3);
        System.out.println();
        proxy.div(4, 2);
    }
}
-- 结果(后置通知的执行顺序好像和spring aop不太一样)

三 通过Spring AOP + AspectJ注解方式
-- 配置文件(利用context和aop命名空间)
    <!-- 配置bean自动扫描 -->
    <context:component-scan base-package="com.atguigu.spring_1.aop"></context:component-scan>

    <!-- 配置aspectj起作用 -->
    <aop:aspectj-autoproxy></aop:aspectj-autoproxy>
-- 接口,实现类同前,需要注意,实现类要加到spring容器中

-- 日志切面类
需要注意,用@Component 加入到Spring IOC容器中, 用 @Aspect 让AspectJ自动扫描
@Component
@Aspect
public class LogginAspect {

    /**
     * 定义一个方法,用于声明切入点表达式,一般的,方法中不需要其他代码
     */
    @Pointcut("execution(* com.atguigu.spring_1.aop.ArithmeticCalculator.*(..))")
    public void declareJointPointExpression() {};

    /**
     * 前置通知
     */
    @Before("declareJointPointExpression()")
    public void beforeMethod(JoinPoint joinPoint) {
        // JoinPoint:链接点可以访问到方法的具体信息
        String methodName = joinPoint.getSignature().getName();
        List<Object> args = Arrays.asList(joinPoint.getArgs());
        System.out.println("前置通知: method " + methodName + " begin with arguments:" + args +"");
    }

    /**
     * 后置通知: 不论是否有异常,都会如期执行
     * 但是无法访问到方法的返回值
     */
    @After("declareJointPointExpression()")
    public void afterMethod(JoinPoint joinPoint) {
        String methodName = joinPoint.getSignature().getName();
        System.out.println("后置通知: method " + methodName + " end");
    }

    /**
     * 返回通知:只有正常执行时,才可以执行
     * 能够访问到方法的返回值
     */
    @AfterReturning(value="declareJointPointExpression()",
            returning="result")
    public void afterReturningMethod(JoinPoint joinPoint, Object result) {
        String methodName = joinPoint.getSignature().getName();
        System.out.println("返回通知: method " + methodName + " end with result: " + result +"");
    }

    /**
     * 异常通知:抛出异常时执行
     */
    @AfterThrowing(value="declareJointPointExpression()",
            throwing="ex")
    public void afterThrowingMethod(JoinPoint joinPoint, Exception ex) {
        String methodName = joinPoint.getSignature().getName();
        System.out.println("异常通知: method " + methodName + " throw an exception " + ex +"");
    }
}
-- 调用
public class App
{
    public static void main( String[] args )
    {
        ApplicationContext ctx = new ClassPathXmlApplicationContext("aop.xml");
        ArithmeticCalculator target = ctx.getBean(ArithmeticCalculator.class);
        target.add(1, 3);
        System.out.println();
        target.div(4, 2);
    }
}
-- 结果

四)四种通知的执行顺序
没有异常:前置通知->目标方法->后置通知->返回通知
有异常: 前置通知->目标方法->后置通知->异常通知
五)后置通知和返回通知的区别
-- 后置通知(@After)不能访问到目标方法的结果,而返回通知(@AfterReturning)则可以
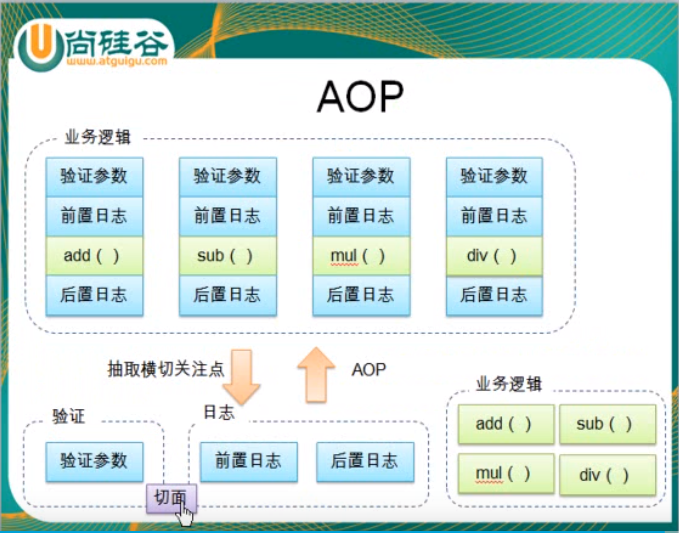
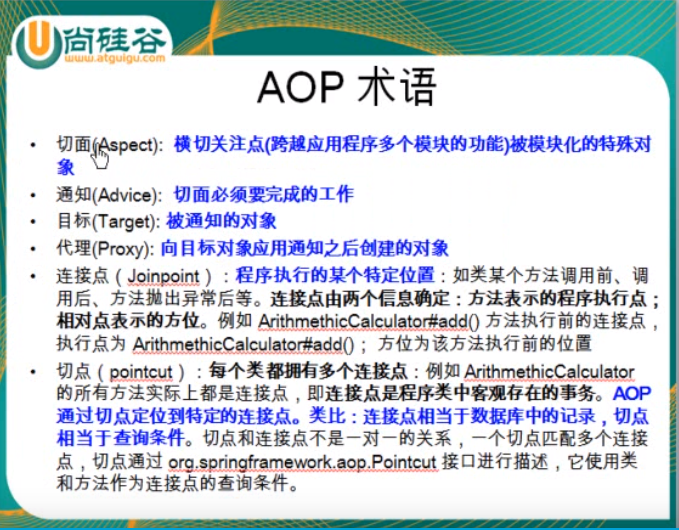
六)切面等基本概念的理解

