因为倾向于纯代码编码,所以不太喜欢可视化编程,不过也略有研究,所以项目里面的所有界面效果,全部都是纯代码编写!
终于到了重中之重的tableview的学习了,自我学习ios编程以来,工作中用得最多的就她了,所以不管是以前学习和现在学习,我都把对tableview的学习放在重点!
闲话少叙,代码如下:
一、先谈自定义cell,以及自定义cell上控件的自定义
cell是直接用xib拖拽的,很方便有木有
import UIKit

class MyCell: UITableViewCell {

    override func awakeFromNib() {
        super.awakeFromNib()
        // Initialization code
    }
    @IBOutlet weak var headerImg: UIImageView!
    @IBOutlet weak var fileLab: UILabel!

    override func setSelected(_ selected: Bool, animated: Bool) {
        super.setSelected(selected, animated: animated)

        // Configure the view for the selected state
    }

}
二、在控制器里面的调用
1)声明及初始化
class SeventViewController: UIViewController,UITableViewDelegate,UITableViewDataSource

    var myTableView:UITableView?
    var imgAry = [String]()

    var fileAry = [String]()
func creatTableView() {
        self.myTableView = UITableView(frame:self.view.frame,style:.plain)
        self.myTableView?.delegate = self
        self.myTableView?.dataSource = self
        self.myTableView?.tableFooterView = UIView()
        self.myTableView?.register(UINib.init(nibName: "MyCell", bundle: nil), forCellReuseIdentifier: "MyCell")
        self.myTableView?.rowHeight = 50
        self.view.addSubview(self.myTableView!)
    }
2)添加了一个表头,具体如下
//创建一个表头标签
        let headerLab = UILabel()
        headerLab.frame = CGRectMake(0, 0, SCREEN_WIDTH, 20)
        headerLab.backgroundColor = UIColor.orangeColor()
        headerLab.textColor = UIColor.whiteColor()
        headerLab.numberOfLines = 0
        headerLab.lineBreakMode = NSLineBreakMode.ByWordWrapping //换行方式
        headerLab.text = "常见 UIKIT 控件"
        headerLab.font = UIFont.systemFontOfSize(20)
        self.tableView.tableHeaderView = headerLab
3)创建内容数组
self.imgAry = ["1.jpeg","1.jpeg","1.jpeg","1.jpeg","1.jpeg","1.jpeg",]
4)代理方法的实现
有2个代理方法是必须实现的
(1)返回行数
func tableView(_ tableView: UITableView, numberOfRowsInSection section: Int) -> Int {
        return self.imgAry.count
    }
(2)cell的初始化
func tableView(_ tableView: UITableView, cellForRowAt indexPath: IndexPath) -> UITableViewCell {

        let cell:MyCell = tableView.dequeueReusableCell(withIdentifier: "MyCell") as! MyCell
        cell.headerImg.image = UIImage(named:self.imgAry[indexPath.row])
        cell.fileLab.text = "(indexPath.row)"

        return cell
    }
(3)cell的点击方法
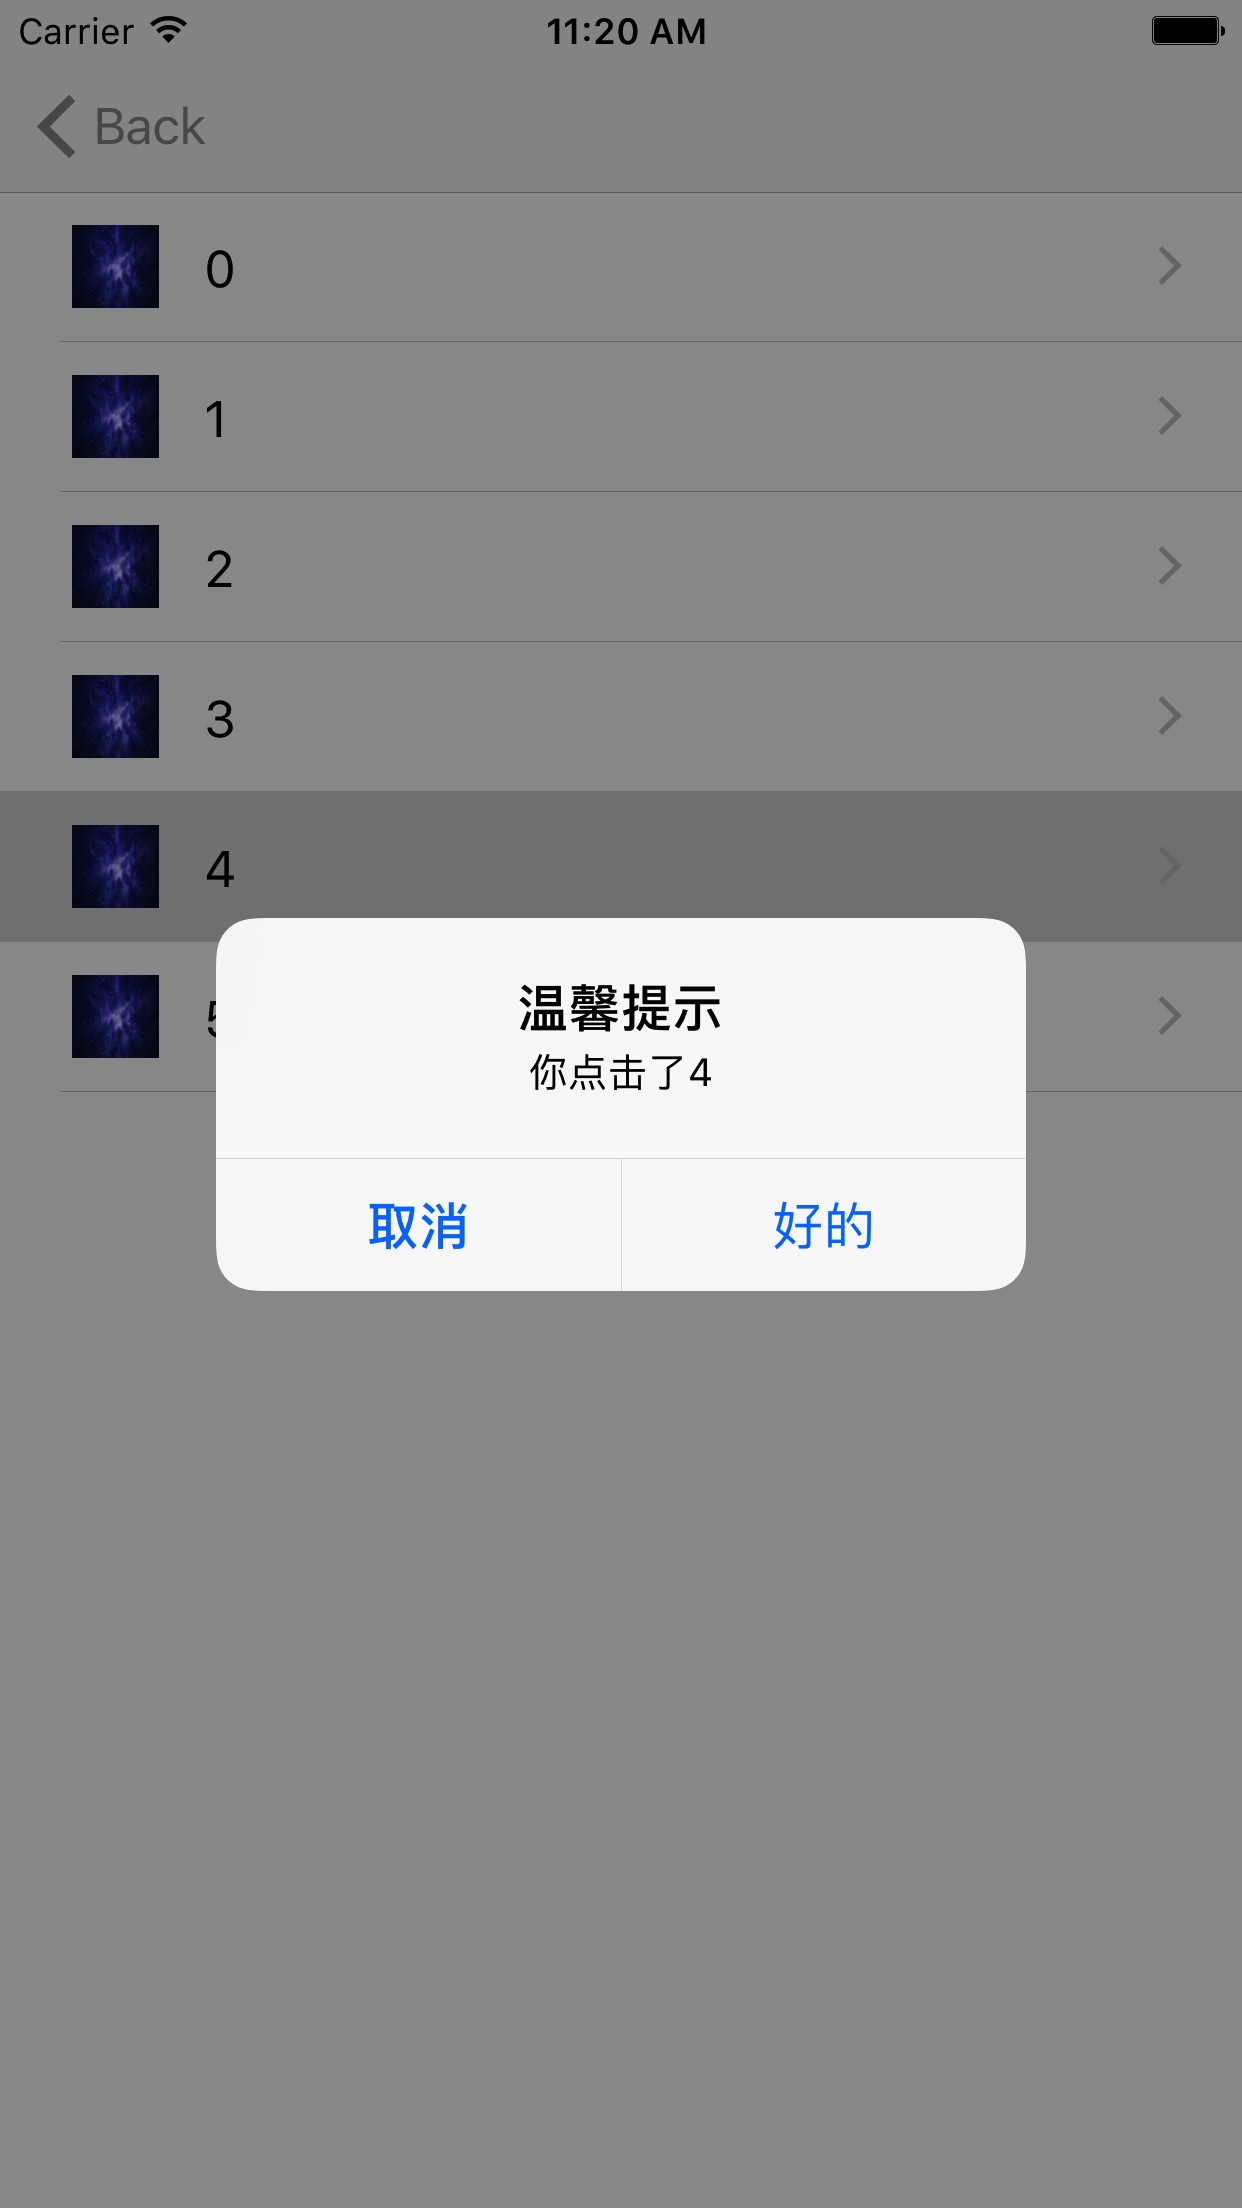
func tableView(_ tableView: UITableView, didSelectRowAt indexPath: IndexPath) {
        switch indexPath.row {
        case 0:
            self.creatAlertView(title: "", msg: "(indexPath.row)")
            break
        case 1:
            self.creatAlertView(title: "", msg: "(indexPath.row)")
            break
        case 2:
            self.creatAlertView(title: "", msg: "(indexPath.row)")
            break
        case 3:
            self.creatAlertView(title: "", msg: "(indexPath.row)")
            break
        case 4:
            self.creatAlertView(title: "", msg: "(indexPath.row)")
            break
        case 5:
            self.creatAlertView(title: "", msg: "(indexPath.row)")
            break
        default:
            break
        }
    }

    func creatAlertView(title:String,msg:String){
        let hAlertView = UIAlertController(title:"温馨提示",message:"你点击了(msg)",preferredStyle:.alert)
        let cancelAction = UIAlertAction(title:"取消",style:.cancel,handler:nil)
        let okAction = UIAlertAction(title:"好的",style:.default)
        hAlertView.addAction(cancelAction)
        hAlertView.addAction(okAction)
        self.present(hAlertView, animated: true, completion: nil)

    }
最终效果如下:
注:当然了,还有很多其他的方法,如果用到了,可以自己看一下!
三、在这里为tableview做一个分组,代码如下
1)声明
self.imgAry1 = ["2.jpeg","2.jpeg","2.jpeg","2.jpeg","2.jpeg","2.jpeg",]
2)添加并修改相关代理方法
 func numberOfSections(in tableView: UITableView) -> Int {
            return 2
    }

    func tableView(_ tableView: UITableView, numberOfRowsInSection section: Int) -> Int {
        if section == 0 {
            return self.imgAry.count
        }

        return self.imgAry1.count
    }

    func tableView(_ tableView: UITableView, titleForHeaderInSection section: Int) -> String? {
        var header = NSArray()
        header = ["第一区","第二区"]
        return header[section] as? String
    }

    func tableView(_ tableView: UITableView, cellForRowAt indexPath: IndexPath) -> UITableViewCell {

        let cell:MyCell = tableView.dequeueReusableCell(withIdentifier: "MyCell") as! MyCell
        if indexPath.section == 0 {
            cell.headerImg.image = UIImage(named:self.imgAry[indexPath.row])
            cell.fileLab.text = "(indexPath.section+indexPath.row)"
        }else
        {
            cell.headerImg.image = UIImage(named:self.imgAry1[indexPath.row])
            cell.fileLab.text = "(indexPath.section+indexPath.row)"
        }

        return cell
    }
这样的话,一个简单的分组就完成了,不过tableview博大精深,还得继续钻研啊!
效果图如下:
