Gitlab介绍
Gitlab是一个开源分布式版本控制系统,由Ruby开发,有管理项目源代码、版本控制、代码复用与查找等功能。
gitlab与github的区别
github是分布式在线代码托管仓库,个人版本可直接在线免费使用,企业版本收费且需要服务器安装。

gitlab是分布式在线代码仓库托管软件,分社区免费版本与企业收费版本,都需要服务器安装。
gitlab的优势
1. 开源免费,社区免费版本适合中小型公司;

2. 差异化的版本管理,离线同步以及强大分支管理功能;

3. 便捷的GUI操作界面以及强大账户权限管理功能;

4. 集成度很高,能够集成绝大多数的开发工具;

5. 支持内置HA,保证在高并发下仍旧实现高可用性。
gitlab主要服务构成
Nginx   静态Web服务器

Gitlab-workhorse    轻量级的反向代理服务器

Gitlab-shell    用于处理Git命令和修改authorized keys列表

Logrotate   日志文件管理工具

Postgresql  数据库

Redis   缓存服务器
gitlab的工作流程
1. 创建并克隆项目

2. 创建项目某Feature分支

3. 编写代码并提交至该分支

4. 推送该项目分支至远程Gitlab服务器

5. 进行代码检查并提交Master主分支合并申请

6. 项目领导审查代码并确认合并申请
1 GitLab安装
1.1准备
# 安装依赖
yum install -y curl policycoreutils-python openssh-server postfix

# 启动SSH和postfix
systemctl enable sshd
systemctl start sshd
systemctl enable postfix
systemctl start postfix
1.2安装
wget https://mirrors.tuna.tsinghua.edu.cn/gitlab-ce/yum/el7/gitlab-ce-12.5.0-ce.0.el7.x86_64.rpm
rpm -i gitlab-ce-12.5.0-ce.0.el7.x86_64.rpm
2 .初始化配置
GitLab默认的配置文件路径:/etc/gitlab/
- /etc/gitlab/gitlab.rb:主配置文件,包含外部URL、仓库目录、备份目录等
- /etc/gitlab/gitlab-secrets.json:(执行gitlab-ctl reconfigure命令行后生成),包含各类密钥的加密信息
2.1 初始化配置
- 配置首页地址(需将设置的域名DNS解析到服务器IP,或者修改本地host将域名指向服务器IP)
- 修改服务端口,避免和其他服务端口冲突
- 重新配置并启动,使配置生效,并确认相关组件或进程的状态
- 设置账号密码和管理员信息
vim /etc/gitlab/gitlab.rb
#添加如下配置
external_url 'http://192.168.52.129'
unicorn['listen'] = '192.168.52.129'
unicorn['port'] = 8081

#初始化gitlab相关服务并完成安装
gitlab-ctl reconfigure
[root@yanglin1 ~]# gitlab-ctl status
run: alertmanager: (pid 27213) 2032s; run: log: (pid 24592) 2519s
run: gitaly: (pid 27129) 2038s; run: log: (pid 16020) 2675s
run: gitlab-exporter: (pid 27170) 2036s; run: log: (pid 23486) 2542s
run: gitlab-workhorse: (pid 27154) 2037s; run: log: (pid 21663) 2566s
run: grafana: (pid 27234) 2031s; run: log: (pid 27037) 2086s
run: logrotate: (pid 22169) 2557s; run: log: (pid 22431) 2554s
run: nginx: (pid 21739) 2563s; run: log: (pid 21764) 2562s
run: node-exporter: (pid 27163) 2037s; run: log: (pid 22753) 2550s
run: postgres-exporter: (pid 27225) 2031s; run: log: (pid 25586) 2515s
run: postgresql: (pid 16133) 2663s; run: log: (pid 16148) 2659s
run: prometheus: (pid 27188) 2034s; run: log: (pid 24311) 2529s
run: redis: (pid 15971) 2685s; run: log: (pid 15982) 2682s
run: redis-exporter: (pid 27179) 2035s; run: log: (pid 24175) 2536s
run: sidekiq: (pid 21488) 2575s; run: log: (pid 21522) 2574s
run: unicorn: (pid 18305) 2581s; run: log: (pid 18476) 2580s
2.2 登录
http://192.168.52.129 注意:这个地址是“external_url 'http://192.168.52.129'”,也可以在/etc/hosts里指定 192.168.52.129 gitlab.example.com
首次登录显示为密码设置界面,设置管理员密码,管理员账号默认username是root
设置完成之后,刷新即可使用root账号登录,登陆后会进入欢迎界面。
########如果需要配置HTTPS访问,参照如下#####################
mkdir -p /etc/gitlab/ssl

openssl genrsa -out "/etc/gitlab/ssl/gitlab.example.com.key" 2048

openssl req -new -key "/etc/gitlab/ssl/gitlab.example.com.key" -out "/etc/gitlab/ssl/gitlab.example.com.csr"

[root@yanglin1 ~]# openssl req -new -key "/etc/gitlab/ssl/gitlab.example.com.key" -out "/etc/gitlab/ssl/gitlab.example.com.csr"
You are about to be asked to enter information that will be incorporated
into your certificate request.
What you are about to enter is what is called a Distinguished Name or a DN.
There are quite a few fields but you can leave some blank
For some fields there will be a default value,
If you enter '.', the field will be left blank.
-----
Country Name (2 letter code) [XX]:cn
State or Province Name (full name) []:bj
Locality Name (eg, city) [Default City]:bj
Organization Name (eg, company) [Default Company Ltd]:
Organizational Unit Name (eg, section) []:
Common Name (eg, your name or your server's hostname) []:gitlab.example.com
Email Address []:admin@example.com

Please enter the following 'extra' attributes
to be sent with your certificate request
A challenge password []:123456
An optional company name []:


openssl x509 -req -days 365 -in "/etc/gitlab/ssl/gitlab.example.com.csr" -signkey "/etc/gitlab/ssl/gitlab.example.com.key" -out "/etc/gitlab/ssl/gitlab.example.com.crt"

openssl dhparam -out /etc/gitlab/ssl/dhparams.pem 2048

chmod 600 /etc/gitlab/ssl/*

[root@yanglin1 ~]# ll /etc/gitlab/ssl
总用量 16
-rw------- 1 root root  424 9月  19 16:08 dhparams.pem
-rw------- 1 root root 1281 9月  19 16:08 gitlab.example.com.crt
-rw------- 1 root root 1074 9月  19 16:07 gitlab.example.com.csr
-rw------- 1 root root 1679 9月  19 16:04 gitlab.example.com.key


##nginx SSL代理服务配置

vim /etc/gitlab/gitlab.rb             #修改下面内容
external_url 'https://gitlab.example.com'
nginx['redirect_http_to_https'] = true
nginx['ssl_certificate'] = "/etc/gitlab/ssl/gitlab.example.com.crt"
nginx['ssl_certificate_key'] = "/etc/gitlab/ssl/gitlab.example.com.key"
nginx['ssl_dhparam'] = "/etc/gitlab/ssl/dhparams.pem"
#第一个 server_name gitlab.example.com; 下添加该行
vim /var/opt/gitlab/nginx/conf/gitlab-http.conf
rewrite ^(.*)$ https://$host$1 permanent;
#重启gitlab
gitlab-ctl restart
##########################################################
点击右上方+ → New porject,Project name输入test-repo,Visibility Level选择默认的Private即可,最后点击Create project创建项目。
2.3 gitlab工作流程
选择一台其他机器yanglin2
[root@yanglin2 ~]# yum install -y git
[root@yanglin2 ~]# echo '192.168.52.129 gitlab.example.com' >> /etc/hosts
[root@yanglin2 ~]# ping gitlab.example.com
PING gitlab.example.com (192.168.52.129) 56(84) bytes of data.
64 bytes from gitlab.example.com (192.168.52.129): icmp_seq=1 ttl=64 time=2.08 ms
64 bytes from gitlab.example.com (192.168.52.129): icmp_seq=2 ttl=64 time=0.411 ms
[root@yanglin2 ~]# mkdir /home/repo && cd /home/repo
[root@yanglin2 repo]# git config --global user.name "admin"
[root@yanglin2 repo]# git config --global user.email "admin@example.com"
[root@yanglin2 repo]# git -c http.sslVerify=false clone http://gitlab.example.com/root/test-repo.git
正克隆到 'test-repo'...
Username for 'http://gitlab.example.com': root
Password for 'http://root@gitlab.example.com':
warning: 您似乎克隆了一个空版本库。
[root@yanglin2 repo]# cd test-repo/
[root@yanglin2 test-repo]# vim test.py
[root@yanglin2 test-repo]# cat test.py
print("this is test code")
[root@yanglin2 test-repo]# git add .
[root@yanglin2 test-repo]# git commit -m "First commit"
[master(根提交) 5ee0e50] First commit
1 file changed, 1 insertion(+)
create mode 100644 test.py
[root@yanglin2 test-repo]# git -c http.sslVerify=false push origin master
Username for 'http://gitlab.example.com': root
Password for 'http://root@gitlab.example.com':
Counting objects: 3, done.
Writing objects: 100% (3/3), 230 bytes | 0 bytes/s, done.
Total 3 (delta 0), reused 0 (delta 0)
To http://gitlab.example.com/root/test-repo.git
* [new branch] master -> master
刷新浏览器,即可看到刚推送到gitlab服务端的代码
三.Gitlab的使用
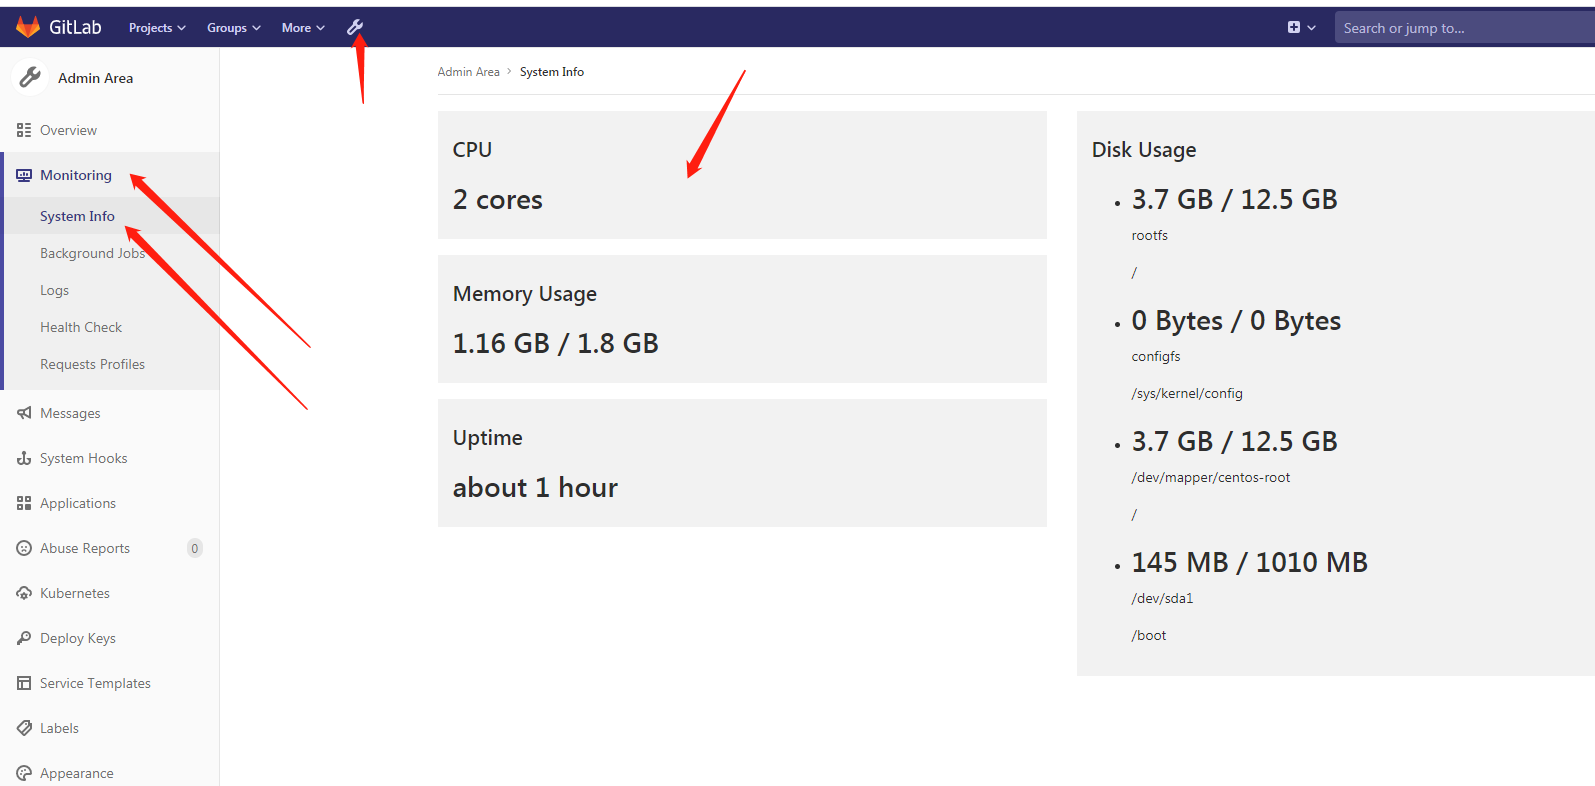
1.检查gitlab健康状态:点击左上方小扳手的图标,Admin Area → Monitoring
#monitor内选项及作用:

System Info     gitlab系统运行情况,内存、磁盘使用

Logs
    application.log     gitlab项目日志
    production.log      gitlab页面访问日志

Health Check        gitlab健康状态检查
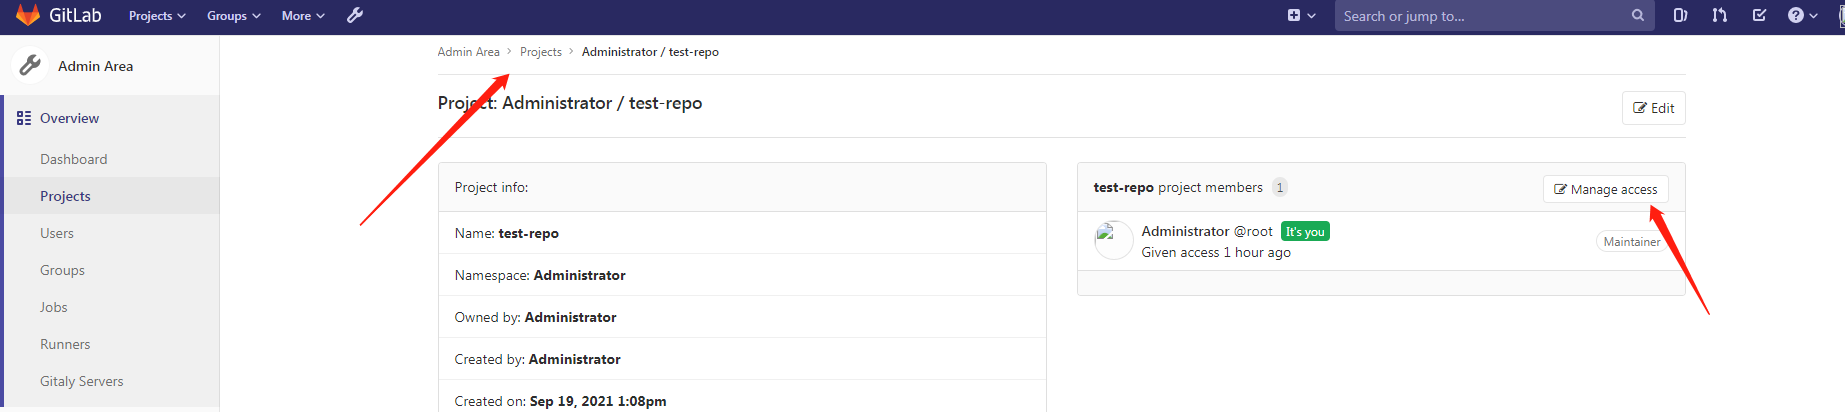
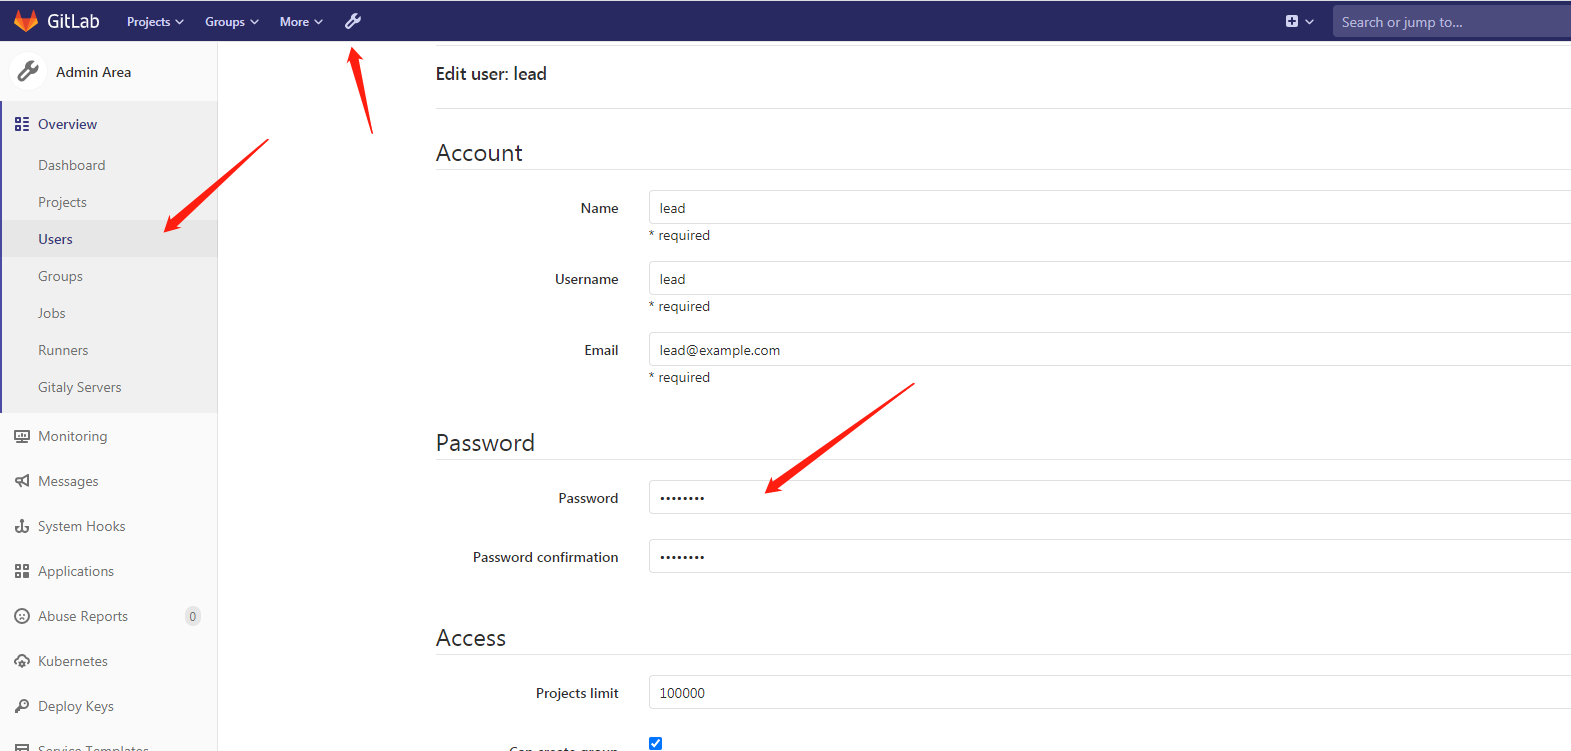
2.创建开发人员与项目领导的账号并分配各自角色权限:
点击左上方Admin Area → New user,首先创建开发人员的账号

填入用户名和邮箱地址后,其余保持默认,点击Create user创建用户,同样方式创建项目领导的账号。用户名为lead,邮箱为lead@example.com
接着将新增用户加入到之前创建的项目test-repo中。点击左侧Projects → test-repo → Manage access
选中dev账号,然后分配Developer角色权限,点击Add to project添加该用户到项目中
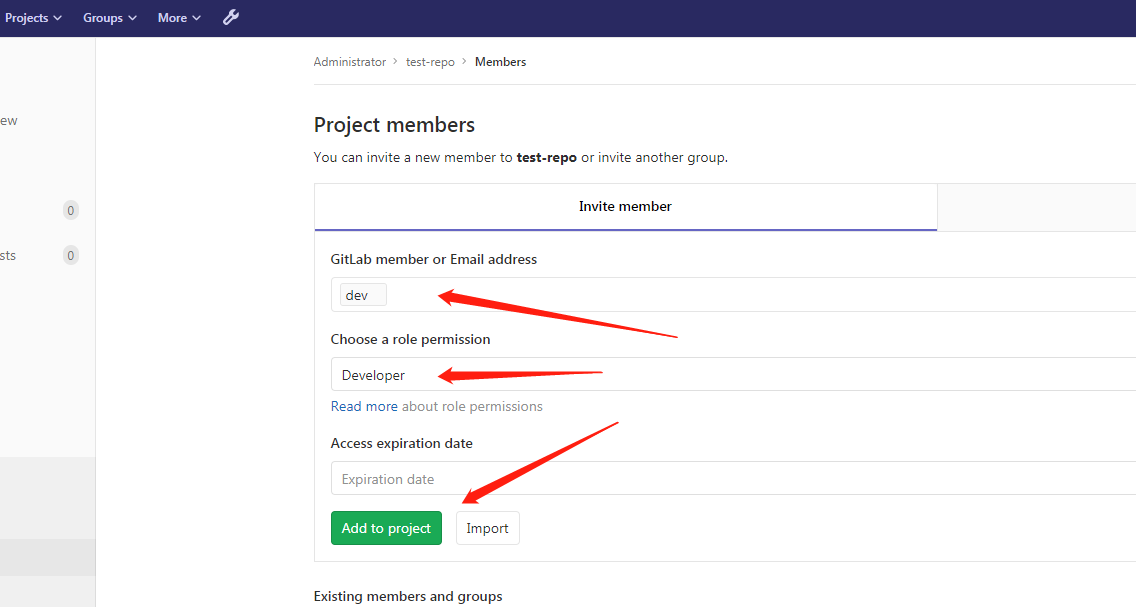
同样方法添加lead账号到项目中
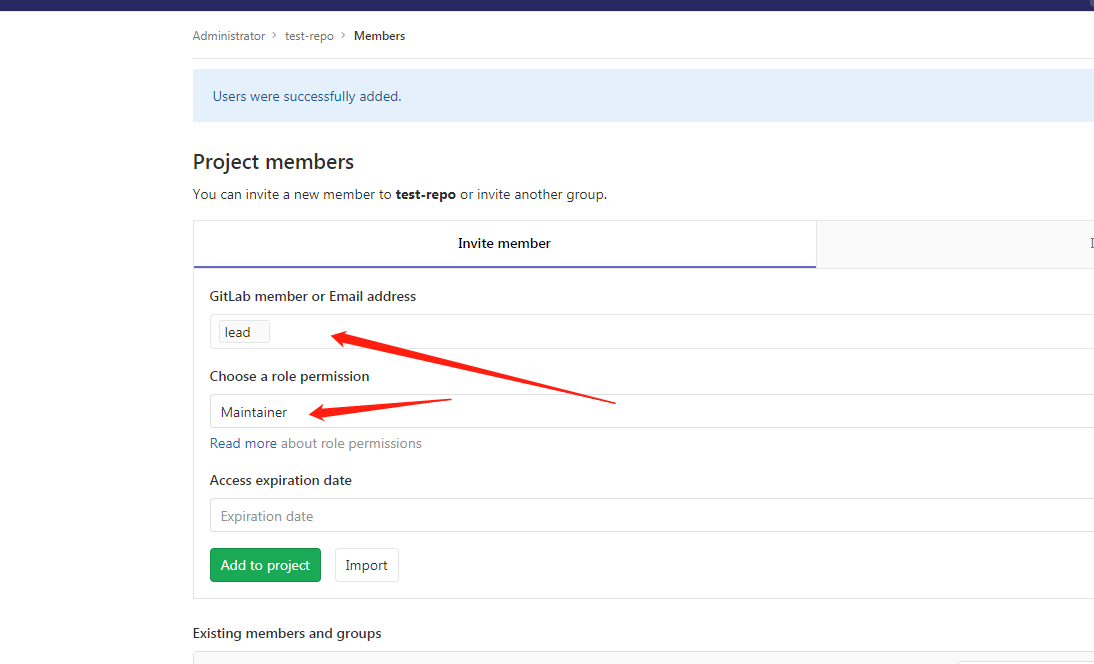
接着修改两个账号的密码,设置初始密码为12345678
2.开发人员提交代码到feature分支并发出合并master分支申请,依然在yanglin2操作
[root@yanglin2 test-repo]# cd /home/repo
[root@yanglin2 repo]# rm -rf test-repo/
[root@yanglin2 repo]# git -c http.sslVerify=false clone http://gitlab.example.com/root/test-repo.git
正克隆到 'test-repo'...
Username for 'http://gitlab.example.com': dev
Password for 'http://dev@gitlab.example.com':
remote: Enumerating objects: 3, done.
remote: Counting objects: 100% (3/3), done.
remote: Total 3 (delta 0), reused 0 (delta 0)
Unpacking objects: 100% (3/3), done.

[root@yanglin2 repo]# cd test-repo/
[root@yanglin2 test-repo]# git checkout -b release-1.0
切换到一个新分支 'release-1.0'
[root@yanglin2 test-repo]# ls
test.py
[root@yanglin2 test-repo]# vim test.py
[root@yanglin2 test-repo]# cat test.py
print("this is test code for release-1.0")

[root@yanglin2 test-repo]# git add .
[root@yanglin2 test-repo]# git commit -m "release-1.0"
[release-1.0 02942c5] release-1.0
 1 file changed, 1 insertion(+), 1 deletion(-)

[root@yanglin2 test-repo]# git -c http.sslVerify=false push origin release-1.0
Username for 'http://gitlab.example.com': dev
Password for 'http://dev@gitlab.example.com':
Counting objects: 5, done.
Writing objects: 100% (3/3), 274 bytes | 0 bytes/s, done.
Total 3 (delta 0), reused 0 (delta 0)
remote:
remote: To create a merge request for release-1.0, visit:
remote:   http://192.168.52.129/root/test-repo/merge_requests/new?merge_request%5Bsource_branch%5D=release-1.0
remote:
To http://gitlab.example.com/root/test-repo.git
 * [new branch]      release-1.0 -> release-1.0
接下来使用dev账号登录gitlab,点击Create merge request提交合并申请。
完