Setting up Eclipse to create and debug plugins for ImageJ
最近在做一个关于卫星遥感全链路仿真的项目,由于项目是基于ImageJ开发,而ImageJ提供了强大的插件机制,所以特来写一个东西说明如何将自己的代码转化为ImageJ的插件。
-
Alt-File –> New
-
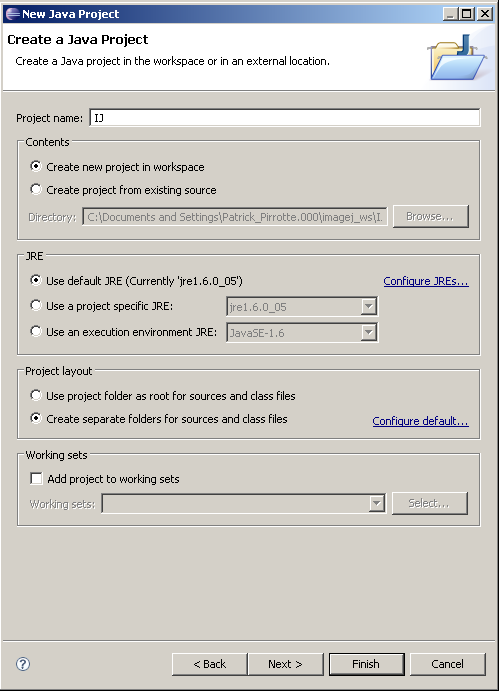
Select the Java Project wizard and click Next
-
Project name: IJ. Check Create separate folders for sources and class files. Click Next
-
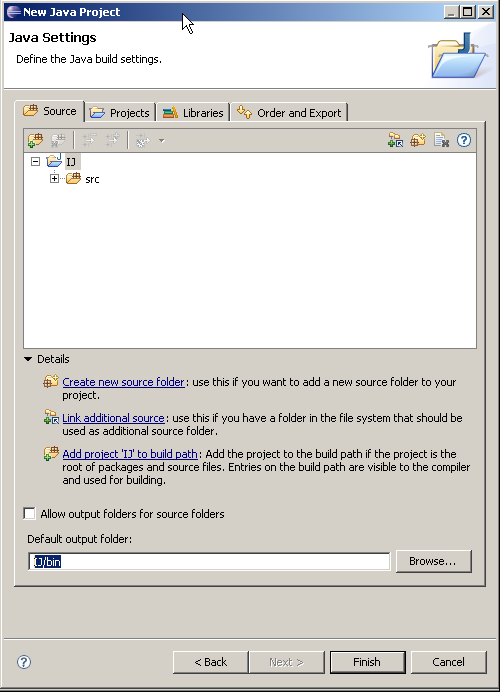
On the following panel, select Source tab and check if Default output folder is set to IJ/bin
-
On the Libraries tab click on Add external JARs, browse to your Java SDK library folder , select tools.jar, click Ok and click on Finish to create the project.
(on my computer the Java SDK library folder is located at C:Program FilesJavajdk1.6.0_02lib)
-
Finally, get the latest copy of ij here, extract the zip
-
Copy the ij folder and its subfolders into the source folder
-
Copy the images, macros and plugins folder and only IJ_Props.txt to the IJ project root.
-
Click on F5 to tell Eclipse to refresh its Package list
Create a new plugin (or import your previously developed plugins).
-
Alt-File –> New
-
Select the Java Project wizard and click Next
-
Give your plugin a name (don't forget to add an underscore if you want it to appear in the ImageJ menu!)
-
On the Source tab, check that the output folder is set TestPlugin_/bin
-
On the Project tab, click Add… and select your previously created IJ project containing the ImageJ source.
-
Click Finish
-
Create your Java plugin files. In our example, I created a sample TESTPlugin_.java with the following content:
import ij.IJ;
import ij.plugin.PlugIn;
public class TestPlugin_ implements PlugIn {
public void run(String arg) {
IJ.error("Hello world!");
}
}
-
Create a file called build.xml in the project root folder. A sample build.xml file follows, which you should adapt to your needs.
<project name="TESTPlugin_" default="" basedir=".">
<description>
TESTPlugin_ build file
</description>
<property name="src" location="src" />
<property name="build" location="bin" />
<property name="dist" location="dist" />
<property name="pluginsDir" location="$basedir/../../IJ/plugins/" />
<property name="user.name" value="Patrick Pirrotte" />
<target name="main" depends="compress" description="Main target">
<echo>
Building the .jar file.
</echo>
</target>
<target name="compress" depends="" description="generate the distribution">
<jar jarfile="TESTPlugin_.jar">
<fileset dir="." includes="plugins.config" />
<fileset dir="${build}" includes="**/*.*" />
<manifest>
<attribute name="Built-By" value="${user.name}"/>
</manifest>
</jar>
<copy file="TESTPlugin_.jar" toDir="${pluginsDir}" />
</target>
</project>
-
In the Package Explorer, right click on the TESTPlugin_ project, click on Properties, select Builders, click New… and select Ant Builder
-
In the Main Tab, click Browse workspace and select the build.xml from your TESTPlugin_ project.
-
In the Targets tab, click Set Targets for both After clean and Auto build targets, and select both main and compress.
-
Click Ok twice to keep your changes.
-
Goto Run→ Debug Configurations and create a new Java Application Debug Configuration. Fill in IJ In the field Project, and ij.ImageJ in the field Main class.
-
Select the Source tab, then in the Source lookup path, Add→Add Java Project. Select the TestPlugin_ project. This step is crucial if you want to step into your plugin source during the debug phase. Apply the changes.
-
If you select Debug, ImageJ will start and your TESTPlugin_ will show up in the Plugins menu…
-
Set breakpoints in plugins or in the ImageJ source, the debugger should break accordingly.
后注:当然上文只是其中一种方法,也还有其他方法可以实现!!!


