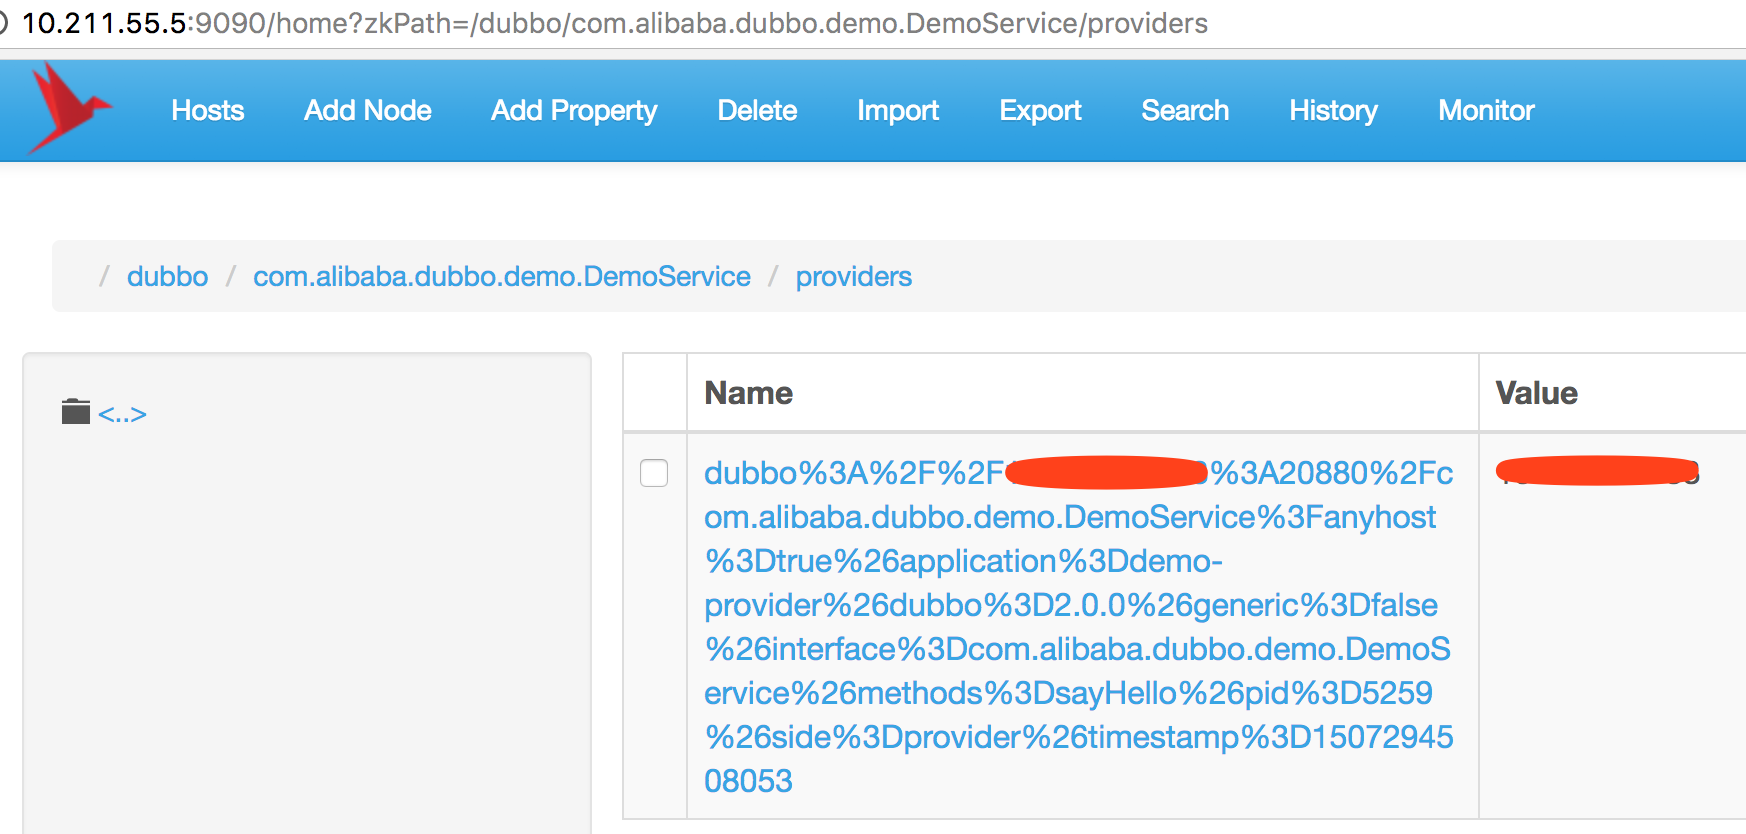
6.1 如何在spring中自定义xml标签
dubbo自定义了很多xml标签,例如<dubbo:application>,那么这些自定义标签是怎么与spring结合起来的呢?我们先看一个简单的例子。
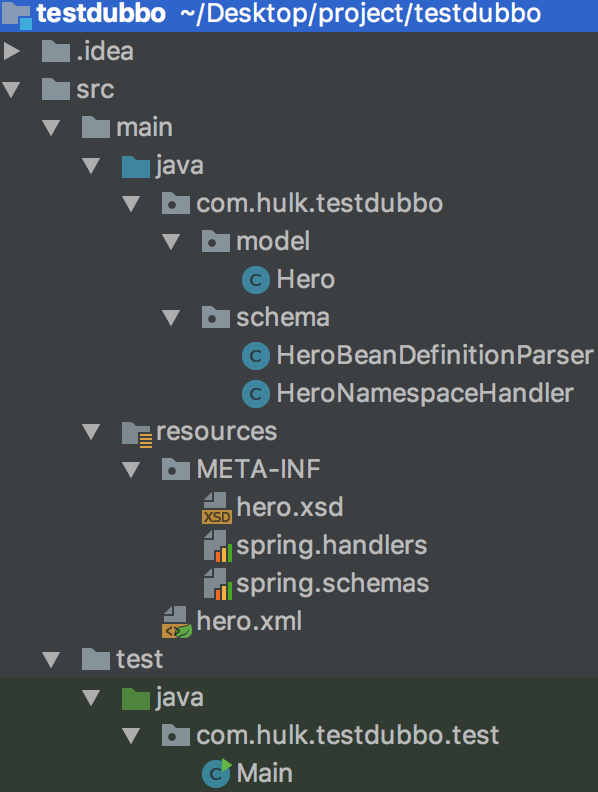
一 编写模型类
 1 package com.hulk.testdubbo.model;
 2
 3 public class Hero {
 4     private  String name;
 5     private  int    age;
 6
 7     public String getName() {
 8         return name;
 9     }
10
11     public void setName(String name) {
12         this.name = name;
13     }
14
15     public int getAge() {
16         return age;
17     }
18
19     public void setAge(int age) {
20         this.age = age;
21     }
22 }
二 定义xsd文件
 1 <xsd:schema
 2         xmlns="http://hulk.com/schema"
 3         xmlns:xsd="http://www.w3.org/2001/XMLSchema"
 4         targetNamespace="http://hulk.com/schema">
 5     <xsd:complexType name="elementname1complexType">
 6         <xsd:attribute name="name" type="xsd:string">
 7             <xsd:annotation>
 8                 <xsd:documentation><![CDATA[ The elementname1 name. ]]></xsd:documentation>
 9             </xsd:annotation>
10         </xsd:attribute>
11         <xsd:attribute name="age" type="xsd:int">
12             <xsd:annotation>
13                 <xsd:documentation><![CDATA[ The elementname1 age. ]]></xsd:documentation>
14             </xsd:annotation>
15         </xsd:attribute>
16     </xsd:complexType>
17
18     <xsd:element name="elementname1" type="elementname1complexType">
19         <xsd:annotation>
20             <xsd:documentation><![CDATA[ elementname1的文档 ]]></xsd:documentation>
21         </xsd:annotation>
22     </xsd:element>
23 </xsd:schema>
说明:
- 定义targetNamespace(目标命名空间),xmlns的值要与这个相同
- xsd:element定义的就是将来会在xml文件中用到的元素,例如<dubbo:application>中的application
- xsd:attribute定义的就是模型类中的属性,例如<dubbo:application name="xxx">中的name,并且可以指定属性类型,进而起到检测的作用(当我们定义的是int,如果在xml中的值是非int型的,直接会报错)。
三 编写spring.schemas
作用:该文件用来指定xsd文件的位置。
http\://hulk.com/schema/hero.xsd=META-INF/hero.xsd
注意:红色部分要与xsd文件中的targetNamespace相同。
四 编写BeanDefinition解析器
作用:主要用来解析自定义的xml标签。
 1 package com.hulk.testdubbo.schema;
 2
 3 import org.springframework.beans.factory.config.BeanDefinition;
 4 import org.springframework.beans.factory.support.BeanDefinitionRegistry;
 5 import org.springframework.beans.factory.support.RootBeanDefinition;
 6 import org.springframework.beans.factory.xml.BeanDefinitionParser;
 7 import org.springframework.beans.factory.xml.ParserContext;
 8 import org.w3c.dom.Element;
 9
10 public class HeroBeanDefinitionParser implements BeanDefinitionParser {
11     private final Class<?> beanClass;
12
13     public HeroBeanDefinitionParser(Class<?> beanClass) {
14         this.beanClass = beanClass;
15     }
16
17     public BeanDefinition parse(Element element, ParserContext parserContext) {
18         RootBeanDefinition beanDefinition = new RootBeanDefinition();
19         beanDefinition.setBeanClass(beanClass);
20         beanDefinition.setLazyInit(false);
21         beanDefinition.getPropertyValues().add("name", element.getAttribute("name"));
22         beanDefinition.getPropertyValues().add("age", element.getAttribute("age"));
23         BeanDefinitionRegistry beanDefinitionRegistry = parserContext.getRegistry();
24         beanDefinitionRegistry.registerBeanDefinition(beanClass.getName(),beanDefinition);//注册bean到BeanDefinitionRegistry中
25         return beanDefinition;
26     }
27 }
五 编写命名空间处理器
作用:主要用来注册BeanDefinition解析器。
 1 package com.hulk.testdubbo.schema;
 2
 3 import com.hulk.testdubbo.model.Hero;
 4 import org.springframework.beans.factory.xml.NamespaceHandlerSupport;
 5
 6 public class HeroNamespaceHandler extends NamespaceHandlerSupport {
 7     public void init() {
 8         registerBeanDefinitionParser("elementname1", new HeroBeanDefinitionParser(Hero.class));
 9     }
10 }
说明:通常为每一个xsd:element都要注册一个BeanDefinitionParser。
六 编写spring.handlers文件
作用:主要用于关联命名空间处理器和xsd中的targetNamespace。
http\://hulk.com/schema=com.hulk.testdubbo.schema.HeroNamespaceHandler
说明:key是xsd文件中的targetNamespace。
七 测试 - 编写hero.xml
1 <?xml version="1.0" encoding="UTF-8"?>
2 <beans xmlns="http://www.springframework.org/schema/beans"
3        xmlns:xsi="http://www.w3.org/2001/XMLSchema-instance"
4        xmlns:hero="http://hulk.com/schema"
5        xsi:schemaLocation="http://www.springframework.org/schema/beans http://www.springframework.org/schema/beans/spring-beans.xsd
6        http://hulk.com/schema http://hulk.com/schema/hero.xsd">
7     <hero:elementname1 name="xiaona" age="18"/>
8 </beans>
说明:
- xmlns:hero的value是xsd文件中的targetNamespace。
- xmlns:hero可以写成xmlns:xxx,此时<hero:elementname1/>就要写成<xxx:elementname1/>
八 测试 - 编写测试主类
 1 package com.hulk.testdubbo.test;
 2
 3 import com.hulk.testdubbo.model.Hero;
 4 import org.springframework.context.ApplicationContext;
 5 import org.springframework.context.support.ClassPathXmlApplicationContext;
 6
 7 public class Main {
 8     public static void main(String[] args) {
 9         ApplicationContext applicationContext = new ClassPathXmlApplicationContext("hero.xml");
10         Hero hero = (Hero) applicationContext.getBean(Hero.class.getName());
11         System.out.println("name: " + hero.getName() + " age: " + hero.getAge());
12     }
13 }
如何在spring中自定义xml标签的方法就结束了。在实际中,随着注解和javaconfg的盛行,xml的方式渐渐的会淡出舞台,但是spring的启动流程还是会的。来看一下上述代码涉及到的流程。
- 使用ResourceLoader将配置文件xml装载为Resource对象;
- 使用BeanDefinitionReader解析配置信息:将每一个<bean>解析为一个BeanDefinition对象,然后存储到BeanDefinitionRegistry中
- 实际上是BeanDefinitionReader调用BeanDefinitionParser进行了解析操作,解析完成后注册到BeanDefinitionRegistry(代码看上边的HeroBeanDefinitionParser)
6.2 dubbo在spring中自定义xml标签源码解析
在6.1 如何在spring中自定义xml标签中我们看到了在spring中自定义xml标签的方式。dubbo也是这样来实现的。

一 META_INF/dubbo.xsd
比较长,只列出<dubbo:applicaton>元素相关的。
 1 <?xml version="1.0" encoding="UTF-8" standalone="no"?>
 2 <xsd:schema xmlns:xsd="http://www.w3.org/2001/XMLSchema"
 3             xmlns:beans="http://www.springframework.org/schema/beans"
 4             xmlns:tool="http://www.springframework.org/schema/tool"
 5             xmlns="http://code.alibabatech.com/schema/dubbo"
 6             targetNamespace="http://code.alibabatech.com/schema/dubbo">
 7
 8     。。。
 9
10    <xsd:complexType name="applicationType">
11         <xsd:attribute name="id" type="xsd:ID">
12             <xsd:annotation>
13                 <xsd:documentation><![CDATA[ The unique identifier for a bean. ]]></xsd:documentation>
14             </xsd:annotation>
15         </xsd:attribute>
16         <xsd:attribute name="name" type="xsd:string" use="required">
17             <xsd:annotation>
18                 <xsd:documentation><![CDATA[ The application name. ]]></xsd:documentation>
19             </xsd:annotation>
20         </xsd:attribute>
21         <xsd:attribute name="version" type="xsd:string">
22             <xsd:annotation>
23                 <xsd:documentation><![CDATA[ The application version. ]]></xsd:documentation>
24             </xsd:annotation>
25         </xsd:attribute>
26         <xsd:attribute name="owner" type="xsd:string">
27             <xsd:annotation>
28                 <xsd:documentation><![CDATA[ The application owner name (email prefix). ]]></xsd:documentation>
29             </xsd:annotation>
30         </xsd:attribute>
31         <xsd:attribute name="organization" type="xsd:string">
32             <xsd:annotation>
33                 <xsd:documentation><![CDATA[ The organization name. ]]></xsd:documentation>
34             </xsd:annotation>
35         </xsd:attribute>
36         <xsd:attribute name="architecture" type="xsd:string">
37             <xsd:annotation>
38                 <xsd:documentation><![CDATA[ The architecture. ]]></xsd:documentation>
39             </xsd:annotation>
40         </xsd:attribute>
41         <xsd:attribute name="environment" type="xsd:string">
42             <xsd:annotation>
43                 <xsd:documentation><![CDATA[ The application environment, eg: dev/test/run ]]></xsd:documentation>
44             </xsd:annotation>
45         </xsd:attribute>
46         <xsd:attribute name="compiler" type="xsd:string">
47             <xsd:annotation>
48                 <xsd:documentation><![CDATA[ The java code compiler. ]]></xsd:documentation>
49             </xsd:annotation>
50         </xsd:attribute>
51         <xsd:attribute name="logger" type="xsd:string">
52             <xsd:annotation>
53                 <xsd:documentation><![CDATA[ The application logger. ]]></xsd:documentation>
54             </xsd:annotation>
55         </xsd:attribute>
56         <xsd:attribute name="registry" type="xsd:string" use="optional">
57             <xsd:annotation>
58                 <xsd:documentation><![CDATA[ The application registry. ]]></xsd:documentation>
59             </xsd:annotation>
60         </xsd:attribute>
61         <xsd:attribute name="monitor" type="xsd:string" use="optional">
62             <xsd:annotation>
63                 <xsd:documentation><![CDATA[ The application monitor. ]]></xsd:documentation>
64             </xsd:annotation>
65         </xsd:attribute>
66         <xsd:attribute name="default" type="xsd:string" use="optional">
67             <xsd:annotation>
68                 <xsd:documentation><![CDATA[ Is default. ]]></xsd:documentation>
69             </xsd:annotation>
70         </xsd:attribute>
71     </xsd:complexType>
72
73     。。。
74
75     <xsd:element name="application" type="applicationType">
76         <xsd:annotation>
77             <xsd:documentation><![CDATA[ The application config ]]></xsd:documentation>
78         </xsd:annotation>
79     </xsd:element>
80
81     。。。
82
83 </xsd:schema>
与上一节完全相似。
二 META_INF/spring.schemas
1 http\://code.alibabatech.com/schema/dubbo/dubbo.xsd=META-INF/dubbo.xsd
与上一节完全相似。
三 DubboBeanDefinitionParser
代码较长,不再贴出来了,与上一节完全相似。
四 DubboNamespaceHandler
 1 package com.alibaba.dubbo.config.spring.schema;
 2
 3 import com.alibaba.dubbo.common.Version;
 4 import com.alibaba.dubbo.config.ApplicationConfig;
 5 import com.alibaba.dubbo.config.ConsumerConfig;
 6 import com.alibaba.dubbo.config.ModuleConfig;
 7 import com.alibaba.dubbo.config.MonitorConfig;
 8 import com.alibaba.dubbo.config.ProtocolConfig;
 9 import com.alibaba.dubbo.config.ProviderConfig;
10 import com.alibaba.dubbo.config.RegistryConfig;
11 import com.alibaba.dubbo.config.spring.AnnotationBean;
12 import com.alibaba.dubbo.config.spring.ReferenceBean;
13 import com.alibaba.dubbo.config.spring.ServiceBean;
14
15 import org.springframework.beans.factory.xml.NamespaceHandlerSupport;
16
17 public class DubboNamespaceHandler extends NamespaceHandlerSupport {
18
19     static {
20         Version.checkDuplicate(DubboNamespaceHandler.class);
21     }
22
23     public void init() {
24         registerBeanDefinitionParser("application", new DubboBeanDefinitionParser(ApplicationConfig.class, true));
25         registerBeanDefinitionParser("module", new DubboBeanDefinitionParser(ModuleConfig.class, true));
26         registerBeanDefinitionParser("registry", new DubboBeanDefinitionParser(RegistryConfig.class, true));
27         registerBeanDefinitionParser("monitor", new DubboBeanDefinitionParser(MonitorConfig.class, true));
28         registerBeanDefinitionParser("provider", new DubboBeanDefinitionParser(ProviderConfig.class, true));
29         registerBeanDefinitionParser("consumer", new DubboBeanDefinitionParser(ConsumerConfig.class, true));
30         registerBeanDefinitionParser("protocol", new DubboBeanDefinitionParser(ProtocolConfig.class, true));
31         registerBeanDefinitionParser("service", new DubboBeanDefinitionParser(ServiceBean.class, true));
32         registerBeanDefinitionParser("reference", new DubboBeanDefinitionParser(ReferenceBean.class, false));
33         registerBeanDefinitionParser("annotation", new DubboBeanDefinitionParser(AnnotationBean.class, true));
34     }
35 }
功能与上一节完全相似。这里可以看出,dubbo自定义了10个xml元素(也可以从xsd中看出)。从上边也可以看出,<dubbo:service>会被解析成ServiceBean,该bean极其重要。
五 META_INF/spring.handlers
1 http\://code.alibabatech.com/schema/dubbo=com.alibaba.dubbo.config.spring.schema.DubboNamespaceHandler
与上一节完全相似。
7.1 服务暴露前的准备-ServiceBean的装配
dubbo的服务暴露以第一章 第一个dubbo项目中的dubbo-demo-provider来讲述。
列出dubbo-demo-provider的xml配置:
 1 <?xml version="1.0" encoding="UTF-8"?>
 2 <beans xmlns:xsi="http://www.w3.org/2001/XMLSchema-instance"
 3        xmlns:dubbo="http://code.alibabatech.com/schema/dubbo"
 4        xmlns="http://www.springframework.org/schema/beans"
 5        xsi:schemaLocation="http://www.springframework.org/schema/beans http://www.springframework.org/schema/beans/spring-beans-2.5.xsd
 6        http://code.alibabatech.com/schema/dubbo http://code.alibabatech.com/schema/dubbo/dubbo.xsd">
 7
 8     <!-- 提供方应用信息,用于计算依赖关系 -->
 9     <dubbo:application name="demo-provider"/>
10
11     <!-- 使用zookeeper注册中心,并使用curator客户端 -->
12     <dubbo:registry protocol="zookeeper" address="10.211.55.5:2181" client="curator"/>
13
14     <!-- 用dubbo协议在20880端口暴露服务 -->
15     <dubbo:protocol name="dubbo" port="20880"/>
16
17     <!-- 和本地bean一样实现服务 -->
18     <bean id="demoService" class="com.alibaba.dubbo.demo.provider.DemoServiceImpl"/>
19     <!--<bean id="demo2Service" class="com.alibaba.dubbo.demo.provider.Demo2ServiceImpl"/>-->
20
21     <!-- 声明需要暴露的服务接口 -->
22     <dubbo:service interface="com.alibaba.dubbo.demo.DemoService" ref="demoService"/>
23     <!--<dubbo:service interface="com.alibaba.dubbo.demo.Demo2Service" ref="demo2Service"/>-->
24 </beans>
服务暴露是由com.alibaba.dubbo.config.spring.ServiceBean这个类来实现的,这个类是spring通过解析<dubbo:service>节点创建的单例Bean,每一个<dubbo:service>都会创建一个ServiceBean。先看一下ServiceBean的继承类图:
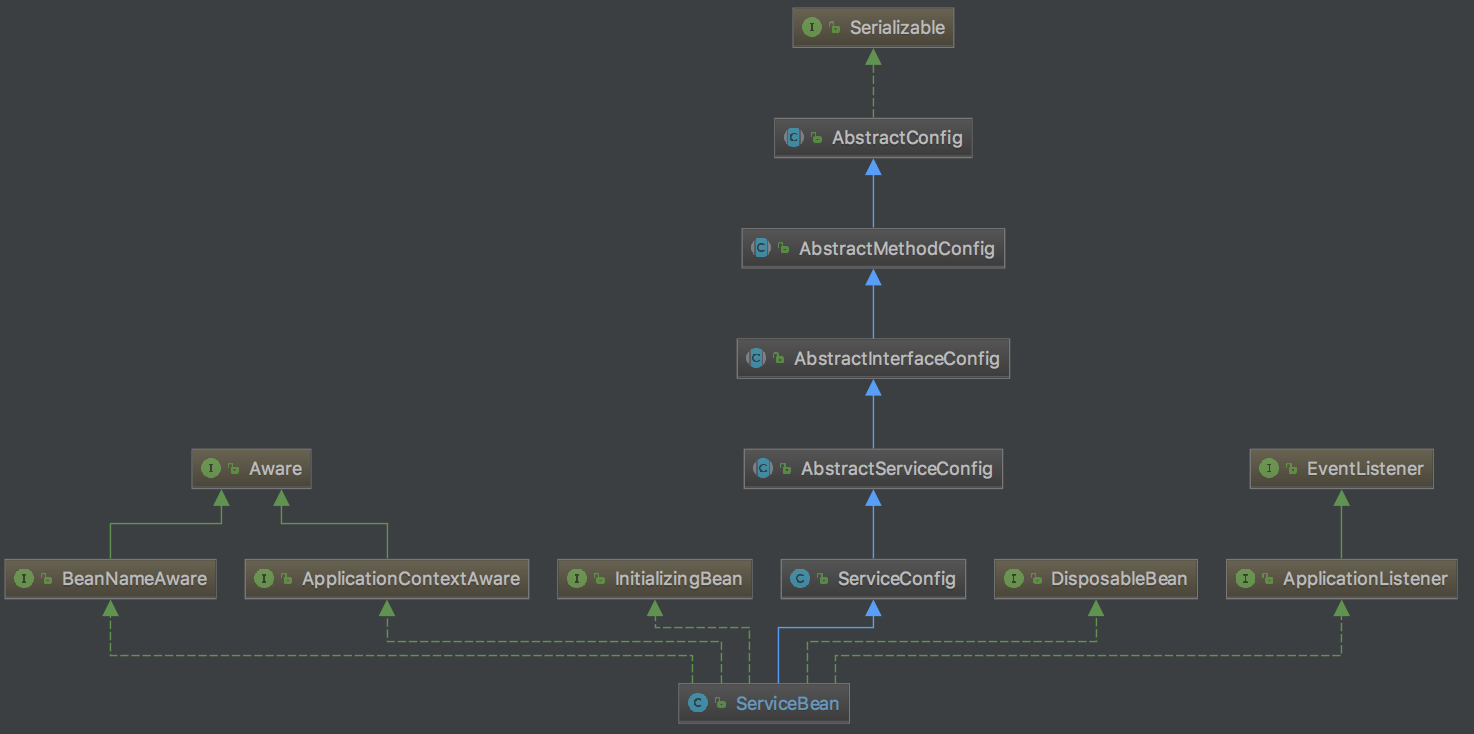
看一下ServiceBean的源码:
  1 package com.alibaba.dubbo.config.spring;
  2
  3 import com.alibaba.dubbo.config.ApplicationConfig;
  4 import com.alibaba.dubbo.config.ModuleConfig;
  5 import com.alibaba.dubbo.config.MonitorConfig;
  6 import com.alibaba.dubbo.config.ProtocolConfig;
  7 import com.alibaba.dubbo.config.ProviderConfig;
  8 import com.alibaba.dubbo.config.RegistryConfig;
  9 import com.alibaba.dubbo.config.ServiceConfig;
 10 import com.alibaba.dubbo.config.annotation.Service;
 11 import com.alibaba.dubbo.config.spring.extension.SpringExtensionFactory;
 12
 13 import org.springframework.beans.factory.BeanFactoryUtils;
 14 import org.springframework.beans.factory.BeanNameAware;
 15 import org.springframework.beans.factory.DisposableBean;
 16 import org.springframework.beans.factory.InitializingBean;
 17 import org.springframework.context.ApplicationContext;
 18 import org.springframework.context.ApplicationContextAware;
 19 import org.springframework.context.ApplicationEvent;
 20 import org.springframework.context.ApplicationListener;
 21 import org.springframework.context.event.ContextRefreshedEvent;
 22 import org.springframework.context.support.AbstractApplicationContext;
 23
 24 import java.lang.reflect.Method;
 25 import java.util.ArrayList;
 26 import java.util.List;
 27 import java.util.Map;
 28
 29 /**
 30  * ServiceFactoryBean
 31  */
 32 public class ServiceBean<T> extends ServiceConfig<T> implements InitializingBean, DisposableBean, ApplicationContextAware, ApplicationListener, BeanNameAware {
 33     private static final long serialVersionUID = 213195494150089726L;
 34
 35     private static transient ApplicationContext SPRING_CONTEXT;
 36
 37     private transient ApplicationContext applicationContext;
 38
 39     private transient String beanName;
 40
 41     private transient boolean supportedApplicationListener;
 42
 43     public ServiceBean() {
 44         super();
 45     }
 46
 47     public ServiceBean(Service service) {
 48         super(service);
 49     }
 50
 51     public static ApplicationContext getSpringContext() {
 52         return SPRING_CONTEXT;
 53     }
 54
 55     /**
 56      * ApplicationContextAware接口的方法
 57      * Set the ApplicationContext that this object runs in.
 58      * Invoked after population of normal bean properties but before an init callback such
 59      * as {@link org.springframework.beans.factory.InitializingBean#afterPropertiesSet()}
 60      * or a custom init-method.
 61      *
 62      * 流程:
 63      * 1 将applicationContext设置到SpringExtensionFactory中,用于后续从SpringExtensionFactory中获取Bean
 64      * 2 获取方法addApplicationListener(ApplicationListener<?> listener),之后将当前类(因为当前类监听了ContextRefreshedEvent事件)加入spring的监听器列表
 65      */
 66     @Override
 67     public void setApplicationContext(ApplicationContext applicationContext) {
 68         this.applicationContext = applicationContext;
 69         SpringExtensionFactory.addApplicationContext(applicationContext);
 70         if (applicationContext != null) {
 71             SPRING_CONTEXT = applicationContext;
 72             try {
 73                 /**  */
 74                 Method method = applicationContext.getClass().getMethod("addApplicationListener", new Class<?>[]{ApplicationListener.class}); // 兼容Spring2.0.1
 75                 method.invoke(applicationContext, new Object[]{this});
 76                 supportedApplicationListener = true;
 77             } catch (Throwable t) {
 78                 if (applicationContext instanceof AbstractApplicationContext) {
 79                     try {
 80                         Method method = AbstractApplicationContext.class.getDeclaredMethod("addListener", new Class<?>[]{ApplicationListener.class}); // 兼容Spring2.0.1
 81                         if (!method.isAccessible()) {
 82                             method.setAccessible(true);
 83                         }
 84                         method.invoke(applicationContext, new Object[]{this});
 85                         supportedApplicationListener = true;
 86                     } catch (Throwable t2) {
 87                     }
 88                 }
 89             }
 90         }
 91     }
 92
 93     /**
 94      * BeanNameAware接口的方法
 95      * Set the name of the bean in the bean factory that created this bean.
 96      * Invoked after population of normal bean properties but before an
 97      * init callback such as {@link InitializingBean#afterPropertiesSet()}
 98      * or a custom init-method.
 99      */
100     @Override
101     public void setBeanName(String name) {
102         this.beanName = name;
103     }
104
105     /**
106      * ApplicationListener接口的方法
107      * delay没有设置或者是-1 && 服务没有暴露 && 服务没有反注册,则进行服务暴露
108      */
109     @Override
110     public void onApplicationEvent(ApplicationEvent event) {
111         if (ContextRefreshedEvent.class.getName().equals(event.getClass().getName())) {
112             if (isDelay() && !isExported() && !isUnexported()) {
113                 if (logger.isInfoEnabled()) {
114                     logger.info("The service ready on spring started. service: " + getInterface());
115                 }
116                 export();
117             }
118         }
119     }
120
121     private boolean isDelay() {
122         Integer delay = getDelay();
123         ProviderConfig provider = getProvider();
124         if (delay == null && provider != null) {
125             delay = provider.getDelay();
126         }
127         return supportedApplicationListener && (delay == null || delay.intValue() == -1);
128     }
129
130     /**
131      * InitializingBean接口的方法:
132      * This method allows the bean instance to perform initialization only
133      * possible when all bean properties have been set
134      *
135      * 流程:
136      * 1 检查ServiceBean的ProviderConfig provider,如果为空,从applicationContext获取ProviderConfig类型的bean(这里查找的过程其实就是看有没有配置<dubbo:provider>),如果获取到了,进行设置
137      * 2 后续会参照1分别进行
138      *   -- ApplicationConfig application
139      *   -- ModuleConfig module
140      *   -- List<RegistryConfig> registries
141      *   -- MonitorConfig monitor
142      *   -- List<ProtocolConfig> protocols
143      *   -- String path:服务名称
144      * 3 判断延迟的事件是否大于0,如果是,执行export(),进行服务暴露,如果不是,结束(这种情况下服务暴露,会发生在发布上下文刷新事件的时候)
145      */
146     @Override
147     @SuppressWarnings({"unchecked", "deprecation"})
148     public void afterPropertiesSet() throws Exception {
149         if (getProvider() == null) {
150             Map<String, ProviderConfig> providerConfigMap = applicationContext == null ? null : BeanFactoryUtils.beansOfTypeIncludingAncestors(applicationContext, ProviderConfig.class, false, false);
151             if (providerConfigMap != null && providerConfigMap.size() > 0) {
152                 Map<String, ProtocolConfig> protocolConfigMap = applicationContext == null ? null : BeanFactoryUtils.beansOfTypeIncludingAncestors(applicationContext, ProtocolConfig.class, false, false);
153                 if ((protocolConfigMap == null || protocolConfigMap.size() == 0)
154                         && providerConfigMap.size() > 1) { // 兼容旧版本
155                     List<ProviderConfig> providerConfigs = new ArrayList<ProviderConfig>();
156                     for (ProviderConfig config : providerConfigMap.values()) {
157                         if (config.isDefault() != null && config.isDefault().booleanValue()) {
158                             providerConfigs.add(config);
159                         }
160                     }
161                     if (providerConfigs.size() > 0) {
162                         setProviders(providerConfigs);
163                     }
164                 } else {
165                     ProviderConfig providerConfig = null;
166                     for (ProviderConfig config : providerConfigMap.values()) {
167                         if (config.isDefault() == null || config.isDefault().booleanValue()) {
168                             if (providerConfig != null) {
169                                 throw new IllegalStateException("Duplicate provider configs: " + providerConfig + " and " + config);
170                             }
171                             providerConfig = config;
172                         }
173                     }
174                     if (providerConfig != null) {
175                         setProvider(providerConfig);
176                     }
177                 }
178             }
179         }
180         if (getApplication() == null
181                 && (getProvider() == null || getProvider().getApplication() == null)) {
182             Map<String, ApplicationConfig> applicationConfigMap = applicationContext == null ? null : BeanFactoryUtils.beansOfTypeIncludingAncestors(applicationContext, ApplicationConfig.class, false, false);
183             if (applicationConfigMap != null && applicationConfigMap.size() > 0) {
184                 ApplicationConfig applicationConfig = null;
185                 for (ApplicationConfig config : applicationConfigMap.values()) {
186                     if (config.isDefault() == null || config.isDefault().booleanValue()) {
187                         if (applicationConfig != null) {
188                             throw new IllegalStateException("Duplicate application configs: " + applicationConfig + " and " + config);
189                         }
190                         applicationConfig = config;
191                     }
192                 }
193                 if (applicationConfig != null) {
194                     setApplication(applicationConfig);
195                 }
196             }
197         }
198         if (getModule() == null
199                 && (getProvider() == null || getProvider().getModule() == null)) {
200             Map<String, ModuleConfig> moduleConfigMap = applicationContext == null ? null : BeanFactoryUtils.beansOfTypeIncludingAncestors(applicationContext, ModuleConfig.class, false, false);
201             if (moduleConfigMap != null && moduleConfigMap.size() > 0) {
202                 ModuleConfig moduleConfig = null;
203                 for (ModuleConfig config : moduleConfigMap.values()) {
204                     if (config.isDefault() == null || config.isDefault().booleanValue()) {
205                         if (moduleConfig != null) {
206                             throw new IllegalStateException("Duplicate module configs: " + moduleConfig + " and " + config);
207                         }
208                         moduleConfig = config;
209                     }
210                 }
211                 if (moduleConfig != null) {
212                     setModule(moduleConfig);
213                 }
214             }
215         }
216         if ((getRegistries() == null || getRegistries().size() == 0)
217                 && (getProvider() == null || getProvider().getRegistries() == null || getProvider().getRegistries().size() == 0)
218                 && (getApplication() == null || getApplication().getRegistries() == null || getApplication().getRegistries().size() == 0)) {
219             Map<String, RegistryConfig> registryConfigMap = applicationContext == null ? null : BeanFactoryUtils.beansOfTypeIncludingAncestors(applicationContext, RegistryConfig.class, false, false);
220             if (registryConfigMap != null && registryConfigMap.size() > 0) {
221                 List<RegistryConfig> registryConfigs = new ArrayList<RegistryConfig>();
222                 for (RegistryConfig config : registryConfigMap.values()) {
223                     if (config.isDefault() == null || config.isDefault().booleanValue()) {
224                         registryConfigs.add(config);
225                     }
226                 }
227                 if (registryConfigs != null && registryConfigs.size() > 0) {
228                     super.setRegistries(registryConfigs);
229                 }
230             }
231         }
232         if (getMonitor() == null
233                 && (getProvider() == null || getProvider().getMonitor() == null)
234                 && (getApplication() == null || getApplication().getMonitor() == null)) {
235             Map<String, MonitorConfig> monitorConfigMap = applicationContext == null ? null : BeanFactoryUtils.beansOfTypeIncludingAncestors(applicationContext, MonitorConfig.class, false, false);
236             if (monitorConfigMap != null && monitorConfigMap.size() > 0) {
237                 MonitorConfig monitorConfig = null;
238                 for (MonitorConfig config : monitorConfigMap.values()) {
239                     if (config.isDefault() == null || config.isDefault().booleanValue()) {
240                         if (monitorConfig != null) {
241                             throw new IllegalStateException("Duplicate monitor configs: " + monitorConfig + " and " + config);
242                         }
243                         monitorConfig = config;
244                     }
245                 }
246                 if (monitorConfig != null) {
247                     setMonitor(monitorConfig);
248                 }
249             }
250         }
251         if ((getProtocols() == null || getProtocols().size() == 0)
252                 && (getProvider() == null || getProvider().getProtocols() == null || getProvider().getProtocols().size() == 0)) {
253             Map<String, ProtocolConfig> protocolConfigMap = applicationContext == null ? null : BeanFactoryUtils.beansOfTypeIncludingAncestors(applicationContext, ProtocolConfig.class, false, false);
254             if (protocolConfigMap != null && protocolConfigMap.size() > 0) {
255                 List<ProtocolConfig> protocolConfigs = new ArrayList<ProtocolConfig>();
256                 for (ProtocolConfig config : protocolConfigMap.values()) {
257                     if (config.isDefault() == null || config.isDefault().booleanValue()) {
258                         protocolConfigs.add(config);
259                     }
260                 }
261                 if (protocolConfigs != null && protocolConfigs.size() > 0) {
262                     super.setProtocols(protocolConfigs);
263                 }
264             }
265         }
266         if (getPath() == null || getPath().length() == 0) {
267             if (beanName != null && beanName.length() > 0
268                     && getInterface() != null && getInterface().length() > 0
269                     && beanName.startsWith(getInterface())) {
270                 setPath(beanName);
271             }
272         }
273         if (!isDelay()) {//设置的延迟时间大于0
274             export();
275         }
276     }
277
278     /**
279      * DisposableBean接口的方法
280      */
281     @Override
282     public void destroy() throws Exception {
283         unexport();
284     }
285 }
这里最重要的两个方法:afterPropertiesSet()和onApplicationEvent(ApplicationEvent event)。
一 设置属性与服务暴露
当所有的Bean的属性被设置好之后,执行afterPropertiesSet()。该方法的流程:
1 设置属性
检查ServiceBean的某个属性(这里的属性包含如下6个)是否为空,如果为空,从applicationContext获取相应类型的bean,如果获取到了,则进行相应的设置。
- ProviderConfig provider:其实就是看有没有配置<dubbo:provider>
- ApplicationConfig application:其实就是看有没有配置<dubbo:application>
- ModuleConfig module:其实就是看有没有配置<dubbo:module>
- List<RegistryConfig> registries:其实就是看有没有配置<dubbo:registry>
- MonitorConfig monitor:其实就是看有没有配置<dubbo:monitor>
- List<ProtocolConfig> protocols:其实就是看有没有配置<dubbo:protocol>
- String path:服务名称
2 是否暴露服务
之后判断延迟的时间是否大于0,如果是,执行export(),进行服务暴露,如果不是,结束(这种情况下服务暴露会发生在容器发布上下文刷新事件的时候)。在这里,我们并没有指定delay,所以delay==null,服务暴露会发生在容器发布上下文刷新事件的时候。
当afterPropertiesSet()结束之后,来看一下此时的ServiceBean实例,实例的私有属性如下:(没有值的暂时不说)
 1 id = com.alibaba.dubbo.demo.DemoService
 2 applicationContext = ClassPathXmlApplicationContext实例
 3 beanName = com.alibaba.dubbo.demo.DemoService
 4 interfaceName = com.alibaba.dubbo.demo.DemoService
 5 supportedApplicationListener = true
 6 ref = DemoServiceImpl实例
 7 path = com.alibaba.dubbo.demo.DemoService
 8
 9 application:
10 -- id = demo-provider
11 -- name = demo-provider
12
13 registries = [
14     RegistryConfig:
15     -- id = com.alibaba.dubbo.config.RegistryConfig
16     -- protocol = zookeeper
17     -- address = 10.211.55.5:2181
18     -- client = curator
19 ]
20
21 protocols = [
22     ProtocolConfig:
23     -- id = dubbo
24     -- name = dubbo
25     -- port = 20880
26 ]
实际上在创建ServiceBean实例的时候,也会初始化其父类ServiceConfig的静态属性:
1     private static final Protocol protocol = ExtensionLoader.getExtensionLoader(Protocol.class).getAdaptiveExtension();
2     private static final ProxyFactory proxyFactory = ExtensionLoader.getExtensionLoader(ProxyFactory.class).getAdaptiveExtension();
其中protocol的实例是:Protocol$Adaptive实例,Protocol$Adaptive类的代码在5.2 dubbo-compiler源码解析已经列出。
下边来看一下第二句代码的源码。首先,看一下ProxyFactory的定义:
 1 package com.alibaba.dubbo.rpc;
 2
 3 import com.alibaba.dubbo.common.Constants;
 4 import com.alibaba.dubbo.common.URL;
 5 import com.alibaba.dubbo.common.extension.Adaptive;
 6 import com.alibaba.dubbo.common.extension.SPI;
 7
 8 /**
 9  * ProxyFactory. (API/SPI, Singleton, ThreadSafe)
10  */
11 @SPI("javassist")
12 public interface ProxyFactory {
13     /**
14      * create proxy.
15      */
16     @Adaptive({Constants.PROXY_KEY})
17     <T> T getProxy(Invoker<T> invoker) throws RpcException;
18
19     /**
20      * create invoker.
21      */
22     @Adaptive({Constants.PROXY_KEY})
23     <T> Invoker<T> getInvoker(T proxy, Class<T> type, URL url) throws RpcException;
24 }
ExtensionLoader.getExtensionLoader(ProxyFactory.class)的实现结果还是:
ExtensionLoader<com.alibaba.dubbo.rpc.ProxyFactory> loader,最终的loader包含如下属性:
- Class<?> type = interface com.alibaba.dubbo.rpc.ProxyFactory
- ExtensionFactory objectFactory = AdaptiveExtensionFactory(适配类)
- factories = [SpringExtensionFactory实例, SpiExtensionFactory实例]
之后,执行getAdaptiveExtension()。
来看一下:META-INF/dubbo/internal/com.alibaba.dubbo.rpc.ProxyFactory的内容:
1 stub=com.alibaba.dubbo.rpc.proxy.wrapper.StubProxyFactoryWrapper
2 jdk=com.alibaba.dubbo.rpc.proxy.jdk.JdkProxyFactory
3 javassist=com.alibaba.dubbo.rpc.proxy.javassist.JavassistProxyFactory
从ProxyFactory的@SPI("javassist"),默认选用的实现是com.alibaba.dubbo.rpc.proxy.javassist.JavassistProxyFactory。com.alibaba.dubbo.rpc.proxy.wrapper.StubProxyFactoryWrapper是一个wrapper类,但是wrapper类只在getExtension("xxx")中会实现aop,而在getAdaptiveExtension()不会进行aop包裹。
这里的三个实现类没有一个类上带有@Adaptive注解,所以会动态创建类。动态生成的类ProxyFactory$Adaptive代码如下:
 1 package com.alibaba.dubbo.rpc;
 2 import com.alibaba.dubbo.common.extension.ExtensionLoader;
 3
 4 public class ProxyFactory$Adaptive implements com.alibaba.dubbo.rpc.ProxyFactory {
 5     public com.alibaba.dubbo.rpc.Invoker getInvoker(java.lang.Object arg0, java.lang.Class arg1, com.alibaba.dubbo.common.URL arg2) throws com.alibaba.dubbo.rpc.RpcException {
 6         if (arg2 == null)
 7             throw new IllegalArgumentException("url == null");
 8         com.alibaba.dubbo.common.URL url = arg2;
 9         String extName = url.getParameter("proxy", "javassist");
10         if(extName == null)
11             throw new IllegalStateException("Fail to get extension(com.alibaba.dubbo.rpc.ProxyFactory) name from url(" + url.toString() + ") use keys([proxy])");
12         com.alibaba.dubbo.rpc.ProxyFactory extension = (com.alibaba.dubbo.rpc.ProxyFactory)ExtensionLoader.getExtensionLoader(com.alibaba.dubbo.rpc.ProxyFactory.class).getExtension(extName);
13         return extension.getInvoker(arg0, arg1, arg2);
14     }
15
16     public java.lang.Object getProxy(com.alibaba.dubbo.rpc.Invoker arg0) throws com.alibaba.dubbo.rpc.RpcException {
17         if (arg0 == null)
18             throw new IllegalArgumentException("com.alibaba.dubbo.rpc.Invoker argument == null");
19         if (arg0.getUrl() == null)
20             throw new IllegalArgumentException("com.alibaba.dubbo.rpc.Invoker argument getUrl() == null");com.alibaba.dubbo.common.URL url = arg0.getUrl();
21         String extName = url.getParameter("proxy", "javassist");
22         if(extName == null)
23             throw new IllegalStateException("Fail to get extension(com.alibaba.dubbo.rpc.ProxyFactory) name from url(" + url.toString() + ") use keys([proxy])");
24         com.alibaba.dubbo.rpc.ProxyFactory extension = (com.alibaba.dubbo.rpc.ProxyFactory)ExtensionLoader.getExtensionLoader(com.alibaba.dubbo.rpc.ProxyFactory.class).getExtension(extName);
25         return extension.getProxy(arg0);
26     }
27 }
所以ServiceConfig中的静态属性proxyFactory为ProxyFactory$Adaptive实例。
至此,一个ServiceBean实例完成了。
二 在上下文刷新时进行初始化
 1     /**
 2      * ApplicationListener接口的方法
 3      * delay没有设置或者是-1 && 服务没有暴露 && 服务没有反注册,则进行服务暴露
 4      */
 5     @Override
 6     public void onApplicationEvent(ApplicationEvent event) {
 7         if (ContextRefreshedEvent.class.getName().equals(event.getClass().getName())) {
 8             if (isDelay() && !isExported() && !isUnexported()) {
 9                 if (logger.isInfoEnabled()) {
10                     logger.info("The service ready on spring started. service: " + getInterface());
11                 }
12                 export();
13             }
14         }
15     }
一切准备好之后,就在这里开始进行服务暴露!export()!!!
7.2 服务本地暴露
为了安全:服务启动的ip全部使用10.10.10.10
服务暴露的流程其实就是下边这样(图片来自:http://www.iteye.com/topic/1123039)
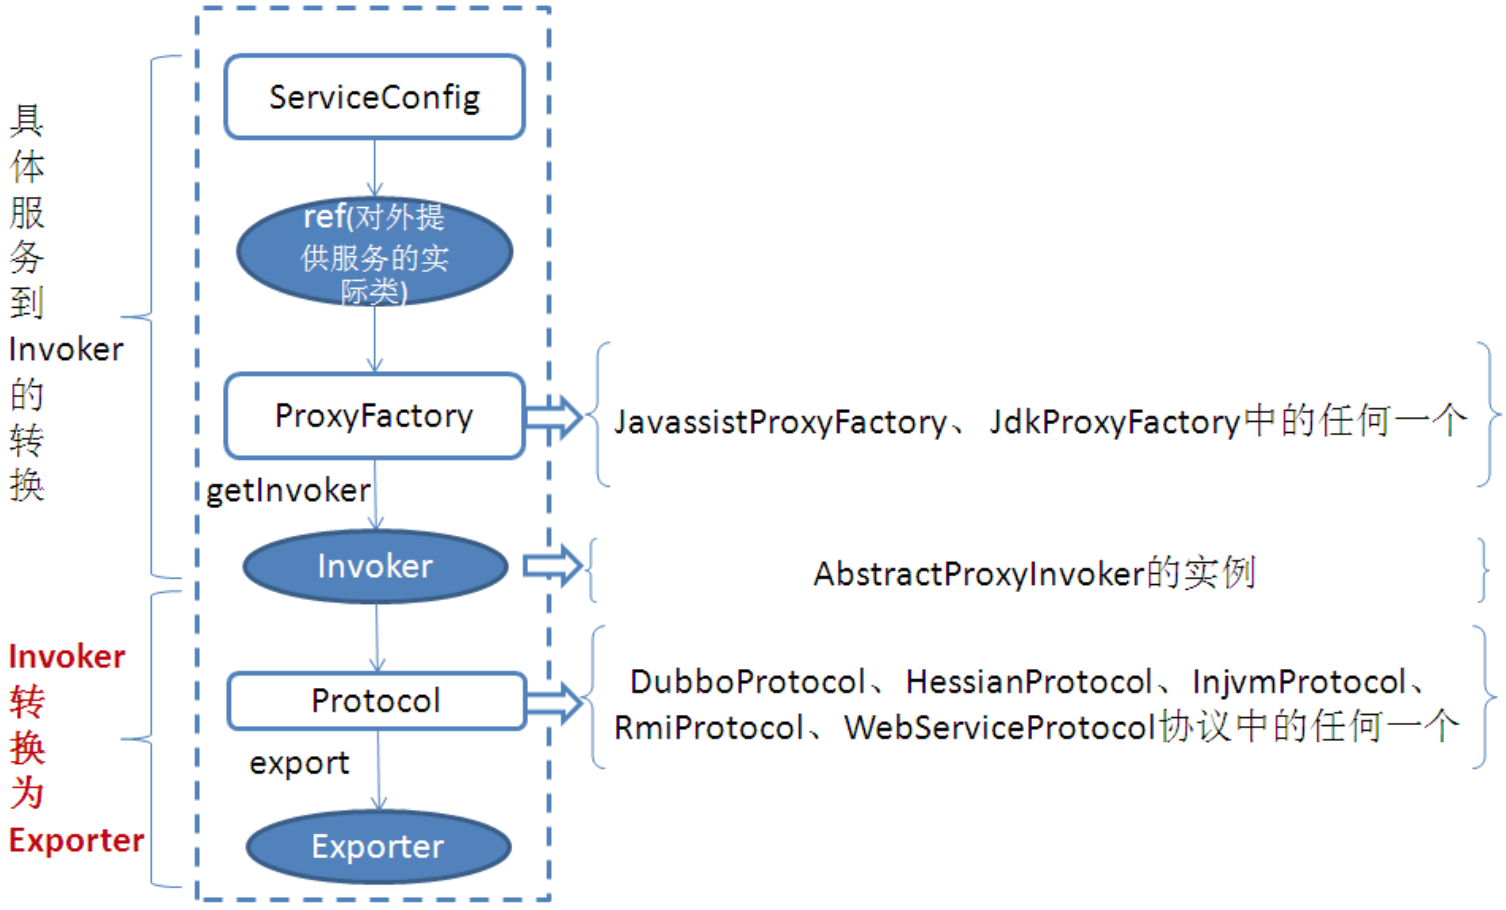
简单看一下服务暴露的伪代码:
1 /**
2 * dubbo 服务暴露伪代码
3 */
4 public class DubboProviderSimpleCode {
5 private final List<Exporter<?>> exporters = new ArrayList<Exporter<?>>();
6 /**
7 * 获取注册中心url列表
8 * [ registry://10.211.55.5:2181/com.alibaba.dubbo.registry.RegistryService?application=demo-provider&client=curator&dubbo=2.0.0&pid=2956®istry=zookeeper×tamp=1507004600231 ]
9 */
10 List<URL> registryURLs = loadRegistries();//获取注册中心url列表
11 for (ProtocolConfig protocolConfig : protocols) {
12 /**
13 * 创建协议url
14 * dubbo://10.10.10.10:20880/com.alibaba.dubbo.demo.DemoService?anyhost=true&application=demo-provider&dubbo=2.0.0&generic=false&interface=com.alibaba.dubbo.demo.DemoService&methods=sayHello&pid=2956&side=provider×tamp=1507004625957
15 */
16 URL url = new URL(name, host, port, path, map);
17 /**
18 * 本地暴露
19 */
20 if (<dubbo:service scope!=remote>) {
21 /**
22 * 构造injvm协议的url
23 * injvm://127.0.0.1/com.alibaba.dubbo.demo.DemoService?anyhost=true&application=demo-provider&dubbo=2.0.0&generic=false&interface=com.alibaba.dubbo.demo.DemoService&methods=sayHello&pid=2956&side=provider×tamp=1507004625957
24 */
25 URL local = URL.valueOf(url.toFullString())
26 .setProtocol(Constants.LOCAL_PROTOCOL)
27 .setHost(NetUtils.LOCALHOST)
28 .setPort(0);
29 Invoker<?> invoker = proxyFactory.getInvoker(ref, (Class) interfaceClass, local);
30 Exporter<?> exporter = protocol.export(invoker);
31 exporters.add(exporter);
32 }
33 /**
34 * 远程暴露
35 */
36 if (<dubbo:service scope!=local>) {
37 for (URL registryURL : registryURLs) {
38 Invoker<?> invoker = proxyFactory.getInvoker(ref, (Class) interfaceClass, registryURL.addParameterAndEncoded(Constants.EXPORT_KEY, url.toFullString()));
39 Exporter<?> exporter = protocol.export(invoker);
40 exporters.add(exporter);
41 }
42 }
43 }
44 }
本地暴露:
- 通过JavassistProxyFactory(默认)将具体的实现类包装成AbstractProxyInvoker实例
- InjvmProtocol将上述的AbstractProxyInvoker实例转换成Exporter
远程暴露:
- 通过JavassistProxyFactory(默认)将具体的实现类包装成AbstractProxyInvoker实例
- DubboProtocol将上述的AbstractProxyInvoker实例转换成Exporter
本节来看本地暴露。首先给出整个本地服务暴露的调用链。
1 ServiceBean.onApplicationEvent(ApplicationEvent event)
2 -->ServiceConfig.export()
3 -->doExport()
4 -->doExportUrls()
5 -->loadRegistries(boolean provider) //
6 -->doExportUrlsFor1Protocol(ProtocolConfig protocolConfig, List<URL> registryURLs)
7 -->Wrapper getWrapper(Class<?> c)
8 -->makeWrapper(Class<?> c)
9 -->new URL(name, host, port, (contextPath == null || contextPath.length() == 0 ? "" : contextPath + "/") + path, map)
10
11 <!-- 本地暴露 -->
12 -->exportLocal(url)
13 -->构造injvm协议的url:injvmUrl
14 <!-- 1 将ref包装成Invoker -->
15 -->ProxyFactory$Adaptive.getInvoker(ref实例, interfaceClass, injvmUrl)
16 -->ExtensionLoader.getExtensionLoader(com.alibaba.dubbo.rpc.ProxyFactory.class).getExtension("javassist")
17 -->StubProxyFactoryWrapper.getInvoker(T proxy, Class<T> type, URL url)
18 -->JavassistProxyFactory.getInvoker(T proxy, Class<T> type, URL url)
19 -->Wrapper getWrapper(Class<?> c)
20 -->makeWrapper(Class<?> c)
21 -->new AbstractProxyInvoker<T>(ref实例, interfaceClass, injvmUrl)
22 <!-- 2 将Invoker暴露为Exporter -->
23 -->Protocol$Adaptive.export(Invoker<T> invoker)
24 -->ExtensionLoader.getExtensionLoader(com.alibaba.dubbo.rpc.Protocol.class).getExtension("injvm")
25 -->ProtocolListenerWrapper.export(Invoker<T> invoker)
26 -->ProtocolFilterWrapper.export(Invoker<T> invoker)
27 -->buildInvokerChain(final Invoker<T> invoker, key:"service.filter", group:"provider")
28 -->ExtensionLoader.getExtensionLoader(Filter.class).getActivateExtension(injvmUrl, "service.filter", "provider")
29 -->InjvmProtocol.export(Invoker<T> invoker)
30 -->new InjvmExporter(Invoker<T> invoker, key:"com.alibaba.dubbo.demo.DemoService", Map<String, Exporter<?>> exporterMap)
31 -->InjvmExporter.exporterMap({"com.alibaba.dubbo.demo.DemoService" -> "injvm://127.0.0.1/com.alibaba.dubbo.demo.DemoService?anyhost=true&application=demo-provider&dubbo=2.0.0&generic=false&interface=com.alibaba.dubbo.demo.DemoService&methods=sayHello&pid=3207&side=provider×tamp=1507009133930"})
32 -->new ListenerExporterWrapper(Exporter<T> exporter, List<ExporterListener> listeners) : 使用listener包装invoker
33 <!-- 3 将Invoker暴露为Exporter -->
34 -->ServiceConfig#exporters.add(exporter)
本地暴露的代码如下:
1 /**
2 * 本地暴露
3 * 1 根据传进来的url(例如dubbo协议的url)构造injvm协议的url
4 * injvm://127.0.0.1/com.alibaba.dubbo.demo.DemoService?anyhost=true&application=demo-provider&dubbo=2.0.0&generic=false&interface=com.alibaba.dubbo.demo.DemoService&methods=sayHello&pid=2999&side=provider×tamp=1507005507343
5 *
6 * 2 将ref包装为AbstractProxyInvoker实例
7 * 3 将AbstractProxyInvoker实例转换为InjvmExporter
8 *
9 * @param url dubbo://10.10.10.10:20880/com.alibaba.dubbo.demo.DemoService?anyhost=true&application=demo-provider&dubbo=2.0.0&generic=false&interface=com.alibaba.dubbo.demo.DemoService&methods=sayHello&pid=2999&side=provider×tamp=1507005507343
10 */
11 @SuppressWarnings({"unchecked", "rawtypes"})
12 private void exportLocal(URL url) {
13 if (!Constants.LOCAL_PROTOCOL.equalsIgnoreCase(url.getProtocol())) {
14 URL local = URL.valueOf(url.toFullString()).setProtocol(Constants.LOCAL_PROTOCOL).setHost(NetUtils.LOCALHOST).setPort(0);
15 Invoker<?> invoker = proxyFactory.getInvoker(ref, (Class) interfaceClass, local);
16 Exporter<?> exporter = protocol.export(invoker);
17 exporters.add(exporter);
18 logger.info("Export dubbo service " + interfaceClass.getName() + " to local registry");
19 }
20 }
为了清晰,这里对exportLocal(URL url)做了稍稍的改动。整体流程如下:
1 首先将dubbo协议的url,改成了injvm协议的url:local;
2 将具体服务类ref通过proxyFactory包装成AbstractProxyInvoker实例;
3 将AbstractProxyInvoker实例转化为Exporter实例;
4 最后将生成的Exporter实例存放在ServiceConfig的List<Exporter> exporters中。
一 具体服务包装成AbstractProxyInvoker实例
Invoker<?> invoker = proxyFactory.getInvoker(ref, (Class) interfaceClass, local);
具体服务:com.alibaba.dubbo.demo.provider.DemoServiceImpl。调用链如下:
1                <!--  1 将ref包装成Invoker   -->
2                -->ProxyFactory$Adaptive.getInvoker(ref实例, interfaceClass, injvmUrl)
3                   -->ExtensionLoader.getExtensionLoader(com.alibaba.dubbo.rpc.ProxyFactory.class).getExtension("javassist")
4                   -->StubProxyFactoryWrapper.getInvoker(T proxy, Class<T> type, URL url)
5                      -->JavassistProxyFactory.getInvoker(T proxy, Class<T> type, URL url)
6                         -->Wrapper getWrapper(Class<?> c)
7                            -->makeWrapper(Class<?> c)
8                         -->new AbstractProxyInvoker<T>(ref实例, interfaceClass, injvmUrl)
1 ProxyFactory$Adaptive.getInvoker(java.lang.Object arg0, java.lang.Class arg1, com.alibaba.dubbo.common.URL arg2)
 1     public com.alibaba.dubbo.rpc.Invoker getInvoker(java.lang.Object arg0, java.lang.Class arg1, com.alibaba.dubbo.common.URL arg2) throws com.alibaba.dubbo.rpc.RpcException {
 2         if (arg2 == null)
 3             throw new IllegalArgumentException("url == null");
 4         com.alibaba.dubbo.common.URL url = arg2;
 5         String extName = url.getParameter("proxy", "javassist");
 6         if(extName == null)
 7             throw new IllegalStateException("Fail to get extension(com.alibaba.dubbo.rpc.ProxyFactory) name from url(" + url.toString() + ") use keys([proxy])");
 8         com.alibaba.dubbo.rpc.ProxyFactory extension = (com.alibaba.dubbo.rpc.ProxyFactory)ExtensionLoader.getExtensionLoader(com.alibaba.dubbo.rpc.ProxyFactory.class).getExtension(extName);
 9         return extension.getInvoker(arg0, arg1, arg2);
10     }
- arg0: com.alibaba.dubbo.demo.provider.DemoServiceImpl 实例
- arg1: interface com.alibaba.dubbo.demo.DemoService Class对象
- arg2: injvm://127.0.0.1/com.alibaba.dubbo.demo.DemoService?anyhost=true&application=demo-provider&dubbo=2.0.0&generic=false&interface=com.alibaba.dubbo.demo.DemoService&methods=sayHello&pid=3275&side=provider×tamp=1507010529605
这里,首先是参数检查和赋值。之后获取key为javassist的ProxyFactory实现类:JavassistProxyFactory,该类会在spi进行aop的时候包裹在StubProxyFactoryWrapper中,最终调用链为:
ProxyFactory$Adaptive -> StubProxyFactoryWrapper -> JavassistProxyFactory
2 StubProxyFactoryWrapper.getInvoker(T proxy, Class<T> type, URL url)
1     public <T> Invoker<T> getInvoker(T proxy, Class<T> type, URL url) throws RpcException {
2         return proxyFactory.getInvoker(proxy, type, url);
3     }
这里的proxyFactory就是JavassistProxyFactory实例了。
3 JavassistProxyFactory.getInvoker(T proxy, Class<T> type, URL url)
 1     public <T> Invoker<T> getInvoker(T proxy, Class<T> type, URL url) {
 2         // TODO Wrapper类不能正确处理带$的类名
 3         final Wrapper wrapper = Wrapper.getWrapper(proxy.getClass().getName().indexOf('$') < 0 ? proxy.getClass() : type);
 4         return new AbstractProxyInvoker<T>(proxy, type, url) {
 5             @Override
 6             protected Object doInvoke(T proxy, String methodName,
 7                                       Class<?>[] parameterTypes,
 8                                       Object[] arguments) throws Throwable {
 9                 return wrapper.invokeMethod(proxy, methodName, parameterTypes, arguments);
10             }
11         };
12     }
这里首先会创建一个class com.alibaba.dubbo.demo.provider.DemoServiceImpl的包装类Wrapper:Wrapper.getWrapper(Class<DemoServiceImpl>)。该类记录了DemoServiceImpl的属性名称,方法名称等信息。具体代码如下:
 1 package com.alibaba.dubbo.demo;
 2
 3 import com.alibaba.dubbo.common.bytecode.Wrapper;
 4 import java.util.HashMap;
 5
 6 public class Wrapper1 extends Wrapper {
 7
 8     public static String[] pns;//property name array
 9     public static java.util.Map pts = new HashMap();//<property key, property value>
10     public static String[] mns;//method names
11     public static String[] dmns;//
12     public static Class[] mts0;
13
14     public Wrapper1() {
15     }
16
17     public String[] getPropertyNames() {
18         return pns;
19     }
20
21     public boolean hasProperty(String n) {
22         return pts.containsKey(n);
23     }
24
25     public Class getPropertyType(String n) {
26         return (Class) pts.get(n);
27     }
28
29     public String[] getMethodNames() {
30         return mns;
31     }
32
33     public String[] getDeclaredMethodNames() {
34         return dmns;
35     }
36
37     public void setPropertyValue(Object o, String n, Object v) {
38         com.alibaba.dubbo.demo.provider.DemoServiceImpl w;
39         try {
40             w = ((com.alibaba.dubbo.demo.provider.DemoServiceImpl) o);
41         } catch (Throwable e) {
42             throw new IllegalArgumentException(e);
43         }
44         throw new com.alibaba.dubbo.common.bytecode.NoSuchPropertyException("Not found property \"" + n + "\" filed or setter method in class com.alibaba.dubbo.demo.provider.DemoServiceImpl.");
45     }
46
47     public Object getPropertyValue(Object o, String n) {
48         com.alibaba.dubbo.demo.provider.DemoServiceImpl w;
49         try {
50             w = ((com.alibaba.dubbo.demo.provider.DemoServiceImpl) o);
51         } catch (Throwable e) {
52             throw new IllegalArgumentException(e);
53         }
54         throw new com.alibaba.dubbo.common.bytecode.NoSuchPropertyException("Not found property \"" + n + "\" filed or setter method in class com.alibaba.dubbo.demo.provider.DemoServiceImpl.");
55     }
56
57     /**
58      * @param o  实现类
59      * @param n  方法名称
60      * @param p  参数类型
61      * @param v  参数名称
62      * @return
63      * @throws java.lang.reflect.InvocationTargetException
64      */
65     public Object invokeMethod(Object o, String n, Class[] p, Object[] v) throws java.lang.reflect.InvocationTargetException {
66         com.alibaba.dubbo.demo.provider.DemoServiceImpl w;
67         try {
68             w = ((com.alibaba.dubbo.demo.provider.DemoServiceImpl) o);
69         } catch (Throwable e) {
70             throw new IllegalArgumentException(e);
71         }
72         try {
73             if ("sayHello".equals(n) && p.length == 1) {
74                 return ($w) w.sayHello((java.lang.String) v[0]);
75             }
76         } catch (Throwable e) {
77             throw new java.lang.reflect.InvocationTargetException(e);
78         }
79         throw new com.alibaba.dubbo.common.bytecode.NoSuchMethodException("Not found method \"" + n + "\" in class com.alibaba.dubbo.demo.provider.DemoServiceImpl.");
80     }
81 }
之后创建一个AbstractProxyInvoker实例。
 1 package com.alibaba.dubbo.rpc.proxy;
 2
 3 import com.alibaba.dubbo.common.URL;
 4 import com.alibaba.dubbo.rpc.Invocation;
 5 import com.alibaba.dubbo.rpc.Invoker;
 6 import com.alibaba.dubbo.rpc.Result;
 7 import com.alibaba.dubbo.rpc.RpcException;
 8 import com.alibaba.dubbo.rpc.RpcResult;
 9
10 import java.lang.reflect.InvocationTargetException;
11
12 public abstract class AbstractProxyInvoker<T> implements Invoker<T> {
13     private final T proxy;
14     private final Class<T> type;
15     private final URL url;
16
17     public AbstractProxyInvoker(T proxy, Class<T> type, URL url) {
18         if (proxy == null) {
19             throw new IllegalArgumentException("proxy == null");
20         }
21         if (type == null) {
22             throw new IllegalArgumentException("interface == null");
23         }
24         if (!type.isInstance(proxy)) {
25             throw new IllegalArgumentException(proxy.getClass().getName() + " not implement interface " + type);
26         }
27         this.proxy = proxy;
28         this.type = type;
29         this.url = url;
30     }
31
32     public Class<T> getInterface() {
33         return type;
34     }
35
36     public URL getUrl() {
37         return url;
38     }
39
40     public boolean isAvailable() {
41         return true;
42     }
43
44     public void destroy() {
45     }
46
47     public Result invoke(Invocation invocation) throws RpcException {
48         try {
49             return new RpcResult(doInvoke(proxy, invocation.getMethodName(), invocation.getParameterTypes(), invocation.getArguments()));
50         } catch (InvocationTargetException e) {
51             return new RpcResult(e.getTargetException());
52         } catch (Throwable e) {
53             throw new RpcException("Failed to invoke remote proxy method " + invocation.getMethodName() + " to " + getUrl() + ", cause: " + e.getMessage(), e);
54         }
55     }
56
57     /**
58      * 由创建的实例来复写
59      * @param proxy
60      * @param methodName
61      * @param parameterTypes
62      * @param arguments
63      * @return
64      * @throws Throwable
65      */
66     protected abstract Object doInvoke(T proxy, String methodName, Class<?>[] parameterTypes, Object[] arguments) throws Throwable;
67
68     @Override
69     public String toString() {
70         return getInterface() + " -> " + getUrl() == null ? " " : getUrl().toString();
71     }
72 }
其中:
- proxy: com.alibaba.dubbo.demo.provider.DemoServiceImpl 实例
- type: interface com.alibaba.dubbo.demo.DemoService Class对象
- url: injvm://127.0.0.1/com.alibaba.dubbo.demo.DemoService?anyhost=true&application=demo-provider&dubbo=2.0.0&generic=false&interface=com.alibaba.dubbo.demo.DemoService&methods=sayHello&pid=3275&side=provider×tamp=1507010529605
这样,具体服务就被包装成AbstractProxyInvoker实例了。
二 AbstractProxyInvoker实例转换为Exporter
Exporter<?> exporter = protocol.export(invoker);
调用链如下:
1 <!-- 2 将Invoker暴露为Exporter -->
2 -->Protocol$Adaptive.export(Invoker<T> invoker)
3 -->ExtensionLoader.getExtensionLoader(com.alibaba.dubbo.rpc.Protocol.class).getExtension("injvm")
4 -->ProtocolListenerWrapper.export(Invoker<T> invoker)
5 -->ProtocolFilterWrapper.export(Invoker<T> invoker)
6 -->buildInvokerChain(final Invoker<T> invoker, key:"service.filter", group:"provider")
7 -->ExtensionLoader.getExtensionLoader(Filter.class).getActivateExtension(injvmUrl, "service.filter", "provider")
8 -->InjvmProtocol.export(Invoker<T> invoker)
9 -->new InjvmExporter(Invoker<T> invoker, key:"com.alibaba.dubbo.demo.DemoService", Map<String, Exporter<?>> exporterMap)
10 -->InjvmExporter.exporterMap({"com.alibaba.dubbo.demo.DemoService" -> "injvm://127.0.0.1/com.alibaba.dubbo.demo.DemoService?anyhost=true&application=demo-provider&dubbo=2.0.0&generic=false&interface=com.alibaba.dubbo.demo.DemoService&methods=sayHello&pid=3207&side=provider×tamp=1507009133930"})
11 -->new ListenerExporterWrapper(Exporter<T> exporter, List<ExporterListener> listeners) : 使用listener包装invoker
1 Protocol$Adaptive.export(Invoker<T> invoker)
 1     public com.alibaba.dubbo.rpc.Exporter export(com.alibaba.dubbo.rpc.Invoker arg0) throws com.alibaba.dubbo.rpc.RpcException {
 2         if (arg0 == null)
 3             throw new IllegalArgumentException("com.alibaba.dubbo.rpc.Invoker argument == null");
 4         if (arg0.getUrl() == null)
 5             throw new IllegalArgumentException("com.alibaba.dubbo.rpc.Invoker argument getUrl() == null");
 6         com.alibaba.dubbo.common.URL url = arg0.getUrl();
 7         String extName = (url.getProtocol() == null ? "dubbo" : url.getProtocol());
 8         if(extName == null)
 9             throw new IllegalStateException("Fail to get extension(com.alibaba.dubbo.rpc.Protocol) name from url(" + url.toString() + ") use keys([protocol])");
10         com.alibaba.dubbo.rpc.Protocol extension = (com.alibaba.dubbo.rpc.Protocol)ExtensionLoader.getExtensionLoader(com.alibaba.dubbo.rpc.Protocol.class).getExtension(extName);
11         return extension.export(arg0);
12     }
- arg0:上边创建出来的AbstractProxyInvoker实例。
这里,首先是参数检查和赋值。之后获取key为injvm的Protocol实现类:InjvmProtocol,该类会在spi进行aop的时候被ProtocolFilterWrapper和ProtocolListenerWrapper递归包裹,最终调用链为:
ProxyFactory$Adaptive -> ProtocolListenerWrapper -> ProtocolFilterWrapper -> InjvmProtocol
2 ProtocolListenerWrapper.export(Invoker<T> invoker)
1     public <T> Exporter<T> export(Invoker<T> invoker) throws RpcException {
2         if (Constants.REGISTRY_PROTOCOL.equals(invoker.getUrl().getProtocol())) {
3             return protocol.export(invoker);
4         }
5         return new ListenerExporterWrapper<T>(protocol.export(invoker),
6                                               Collections.unmodifiableList(ExtensionLoader.getExtensionLoader(ExporterListener.class).getActivateExtension(invoker.getUrl(), Constants.EXPORTER_LISTENER_KEY)));
7     }
这里先调用ProtocolFilterWrapper.export(Invoker<T> invoker),之后获取listener,最后进行递归包裹。(这里没有listener)
3 ProtocolFilterWrapper.export(Invoker<T> invoker)
1     public <T> Exporter<T> export(Invoker<T> invoker) throws RpcException {
2         if (Constants.REGISTRY_PROTOCOL.equals(invoker.getUrl().getProtocol())) {
3             return protocol.export(invoker);
4         }
5         return protocol.export(buildInvokerChain(invoker, Constants.SERVICE_FILTER_KEY, Constants.PROVIDER));
6     }
这里首先使用filter对invoker进行了递归包裹,之后使用InjvmProtocol将包裹后的invoker转化为InjvmExporter。
buildInvokerChain(final Invoker<T> invoker, String key, String group)
 1     /**
 2      * 1 根据key从url中获取相应的filter的values,再根据这个values和group去获取类上带有@Active注解的filter集合
 3      * 2 之后将这些filter对传入的invoker进行递归包装层invoker(就是一个链表)
 4      */
 5     private static <T> Invoker<T> buildInvokerChain(final Invoker<T> invoker, String key, String group) {
 6         Invoker<T> last = invoker;
 7         List<Filter> filters = ExtensionLoader.getExtensionLoader(Filter.class).getActivateExtension(invoker.getUrl(), key, group);
 8         if (filters.size() > 0) {
 9             for (int i = filters.size() - 1; i >= 0; i--) {
10                 final Filter filter = filters.get(i);
11                 final Invoker<T> next = last;
12                 last = new Invoker<T>() {
13
14                     public Class<T> getInterface() {
15                         return invoker.getInterface();
16                     }
17
18                     public URL getUrl() {
19                         return invoker.getUrl();
20                     }
21
22                     public boolean isAvailable() {
23                         return invoker.isAvailable();
24                     }
25
26                     public Result invoke(Invocation invocation) throws RpcException {
27                         return filter.invoke(next, invocation);
28                     }
29
30                     public void destroy() {
31                         invoker.destroy();
32                     }
33
34                     @Override
35                     public String toString() {
36                         return invoker.toString();
37                     }
38                 };
39             }
40         }
41         return last;
42     }
这里:
- invoker:之前创建出来的AbstractProxyInvoker实例;
- key:service.filter
- group:provider
List<Filter> filters = ExtensionLoader.getExtensionLoader(Filter.class).getActivateExtension(invoker.getUrl(), key, group);
这句代码,是:根据key从url中获取相应的filter的values,再根据这个values和group去获取类上带有@Active注解的filter集合。这一块儿具体的代码可以查看讲解spi中的loadFile方法。最终会获取到8个filter,关于filter,后续会说。
4 InjvmProtocol.export(Invoker<T> invoker)
1     public <T> Exporter<T> export(Invoker<T> invoker) throws RpcException {
2         return new InjvmExporter<T>(invoker, invoker.getUrl().getServiceKey(), exporterMap);
3     }
 1 class InjvmExporter<T> extends AbstractExporter<T> {
 2     private final String key;
 3     private final Map<String, Exporter<?>> exporterMap;
 4
 5     InjvmExporter(Invoker<T> invoker, String key, Map<String, Exporter<?>> exporterMap) {
 6         super(invoker);
 7         this.key = key;
 8         this.exporterMap = exporterMap;
 9         exporterMap.put(key, this);
10     }
11
12     public void unexport() {
13         super.unexport();
14         exporterMap.remove(key);
15     }
16 }
最终的InjvmExporter实例:
- key = "com.alibaba.dubbo.demo.DemoService"
- exporterMap: { "com.alibaba.dubbo.demo.DemoService" -> 当前的InjvmExporter实例 }
- Invoker<T> invoker = 被filter进行递归包裹后的Invoker
最终的ServiceConfig的exporters列表:
- List<Exporter<?>> exporters = [ 上边的injvmExporter实例 ]
为什么要有本地暴露?
同一个jvm中的服务,相互调用不需要通过远程注册中心,但是又想使用filter链,可以使用本地暴露。
https://dubbo.gitbooks.io/dubbo-user-book/demos/local-call.html:
“本地调用使用了 injvm 协议,是一个伪协议,它不开启端口,不发起远程调用,只在 JVM 内直接关联,但执行 Dubbo 的 Filter 链。”
7.3 netty3基本使用
由于dubbo默认使用的是netty3进行通信的,这里简单的列出一个netty3通信的例子。
一 server端
1 Server
 1 package com.hulk.netty.server;
 2
 3 import org.jboss.netty.bootstrap.ServerBootstrap;
 4 import org.jboss.netty.channel.*;
 5 import org.jboss.netty.channel.socket.nio.NioServerSocketChannelFactory;
 6 import org.jboss.netty.handler.codec.string.StringDecoder;
 7 import org.jboss.netty.handler.codec.string.StringEncoder;
 8
 9 import java.net.InetSocketAddress;
10 import java.util.concurrent.Executors;
11
12 public class Server {
13     public void start(){
14         ChannelFactory factory = new NioServerSocketChannelFactory(
15                 Executors.newCachedThreadPool(),//boss线程池
16                 Executors.newCachedThreadPool(),//worker线程池
17                 8//worker线程数
18         );
19         ServerBootstrap bootstrap = new ServerBootstrap(factory);
20         /**
21          * 对于每一个连接channel, server都会调用PipelineFactory为该连接创建一个ChannelPipline
22          */
23         bootstrap.setPipelineFactory(new ChannelPipelineFactory() {
24             public ChannelPipeline getPipeline() throws Exception {
25                 ChannelPipeline pipeline = Channels.pipeline();
26                 pipeline.addLast("decoder", new StringDecoder());
27                 pipeline.addLast("encoder", new StringEncoder());
28                 pipeline.addLast("handler", new ServerLogicHandler());
29                 return pipeline;
30             }
31         });
32
33         Channel channel = bootstrap.bind(new InetSocketAddress("127.0.0.1", 8080));
34         System.out.println("server start success!");
35     }
36
37     public static void main(String[] args) throws InterruptedException {
38         Server server = new Server();
39         server.start();
40         Thread.sleep(Integer.MAX_VALUE);
41     }
42 }
步骤:
- 首先创建了NioServerSocketChannelFactory:创建boss线程池,创建worker线程池以及worker线程数。(boss线程数默认为1个)
- 创建ServerBootstrap server端启动辅助类
- 为ServerBootstrap设置ChannelPipelineFactory工厂,并为ChannelPipelineFactory将来创建出的ChannelPipeline设置编码器/解码器/事件处理器
- 使用ServerBootstrap绑定监听地址和端口
2 事件处理器ServerLogicHandler
 1 package com.hulk.netty.server;
 2
 3 import org.jboss.netty.channel.Channel;
 4 import org.jboss.netty.channel.ChannelHandlerContext;
 5 import org.jboss.netty.channel.ChannelStateEvent;
 6 import org.jboss.netty.channel.ExceptionEvent;
 7 import org.jboss.netty.channel.MessageEvent;
 8 import org.jboss.netty.channel.SimpleChannelHandler;
 9
10 public class ServerLogicHandler extends SimpleChannelHandler {
11     @Override
12     public void channelConnected(ChannelHandlerContext ctx, ChannelStateEvent e) throws Exception {
13         System.out.println("连接成功, channel: " + e.getChannel().toString());
14     }
15
16     @Override
17     public void messageReceived(ChannelHandlerContext ctx, MessageEvent e) throws Exception {
18         String msg = (String) e.getMessage();
19         System.out.println("接收到了client的消息, msg: " + msg);
20
21         Channel channel = e.getChannel();
22         String str = "hi, client";
23
24         channel.write(str);//写消息发给client端
25         System.out.println("服务端发送数据: " + str + "完成");
26     }
27
28     @Override
29     public void exceptionCaught(ChannelHandlerContext ctx, ExceptionEvent e) throws Exception {
30         e.getCause().printStackTrace();
31         e.getChannel().close();
32     }
33 }
说明:
- 监听与客户端连接成功事件
- 监听接收到来自客户端的消息,之后写回给客户端消息
- 捕捉异常事件
二 client端
1 Client
 1 package com.hulk.netty.client;
 2
 3 import org.jboss.netty.bootstrap.ClientBootstrap;
 4 import org.jboss.netty.channel.ChannelFactory;
 5 import org.jboss.netty.channel.ChannelPipeline;
 6 import org.jboss.netty.channel.ChannelPipelineFactory;
 7 import org.jboss.netty.channel.Channels;
 8 import org.jboss.netty.channel.socket.nio.NioClientSocketChannelFactory;
 9 import org.jboss.netty.handler.codec.string.StringDecoder;
10 import org.jboss.netty.handler.codec.string.StringEncoder;
11
12 import java.net.InetSocketAddress;
13 import java.util.concurrent.Executors;
14
15 public class Client {
16     public static void main(String[] args) {
17         ChannelFactory factory = new NioClientSocketChannelFactory(
18                 Executors.newCachedThreadPool(),
19                 Executors.newCachedThreadPool(),
20                 8
21         );
22         ClientBootstrap bootstrap = new ClientBootstrap(factory);
23         bootstrap.setPipelineFactory(new ChannelPipelineFactory() {
24             public ChannelPipeline getPipeline() throws Exception {
25                 ChannelPipeline pipeline = Channels.pipeline();
26                 pipeline.addLast("decoder", new StringDecoder());
27                 pipeline.addLast("encoder", new StringEncoder());
28                 pipeline.addLast("handler", new ClientLogicHandler());
29                 return pipeline;
30             }
31         });
32
33         bootstrap.connect(new InetSocketAddress("127.0.0.1", 8080));
34         System.out.println("client start success!");
35     }
36 }
步骤:(与Server几乎相同)
- 首先创建了NioClientSocketChannelFactory:创建boss线程池,创建worker线程池以及worker线程数。(boss线程数默认为1个)
- 创建ClientBootstrap client端启动辅助类
- 为ClientBootstrap设置ChannelPipelineFactory工厂,并为ChannelPipelineFactory将来创建出的ChannelPipeline设置编码器/解码器/事件处理器
- 使用ClientBootstrap连接Server端监听的地址和端口
2 ClientLogicHandler
 1 package com.hulk.netty.client;
 2
 3 import org.jboss.netty.channel.ChannelHandlerContext;
 4 import org.jboss.netty.channel.ChannelStateEvent;
 5 import org.jboss.netty.channel.ExceptionEvent;
 6 import org.jboss.netty.channel.MessageEvent;
 7 import org.jboss.netty.channel.SimpleChannelHandler;
 8 import org.jboss.netty.channel.WriteCompletionEvent;
 9
10 public class ClientLogicHandler extends SimpleChannelHandler {
11     @Override
12     public void channelConnected(ChannelHandlerContext ctx, ChannelStateEvent e) throws Exception {
13         System.out.println("客户端连接成功!");
14         String str = "hi server!";
15         e.getChannel().write(str);//异步
16     }
17
18     @Override
19     public void writeComplete(ChannelHandlerContext ctx, WriteCompletionEvent e) throws Exception {
20         System.out.println("客户端写消息完成");
21     }
22
23     @Override
24     public void messageReceived(ChannelHandlerContext ctx, MessageEvent e) throws Exception {
25         String msg = (String) e.getMessage();
26         System.out.println("客户端接收到消息, msg: " + msg);
27     }
28
29     @Override
30     public void exceptionCaught(ChannelHandlerContext ctx, ExceptionEvent e) throws Exception {
31         e.getCause().printStackTrace();
32         e.getChannel().close();
33     }
34 }
说明:
- 监听与服务端连接成功事件,连接成功后,写消息给服务端
- 监听向服务端写消息完成的事件
- 监听接收到来自服务端的消息
- 捕捉异常事件
这就是一个简单的netty3通信的例子,关于netty,后续会读源码。
7.4 服务远程暴露 - 创建Exporter与启动netty服务端
为了安全:服务启动的ip全部使用10.10.10.10
远程服务的暴露总体步骤:
- 将ref封装为invoker
- 将invoker转换为exporter
- 启动netty
- 注册服务到zookeeper
- 订阅
- 返回新的exporter实例
服务远程暴露的代码:
 1             //如果配置不是local则暴露为远程服务.(配置为local,则表示只暴露本地服务)
 2             if (!Constants.SCOPE_LOCAL.toString().equalsIgnoreCase(scope)) {
 3                 if (logger.isInfoEnabled()) {
 4                     logger.info("Export dubbo service " + interfaceClass.getName() + " to url " + url);
 5                 }
 6                 if (registryURLs != null && registryURLs.size() > 0
 7                         && url.getParameter("register", true)) {
 8                     for (URL registryURL : registryURLs) {
 9                         url = url.addParameterIfAbsent("dynamic", registryURL.getParameter("dynamic"));
10                         URL monitorUrl = loadMonitor(registryURL);
11                         if (monitorUrl != null) {
12                             url = url.addParameterAndEncoded(Constants.MONITOR_KEY, monitorUrl.toFullString());
13                         }
14                         if (logger.isInfoEnabled()) {
15                             logger.info("Register dubbo service " + interfaceClass.getName() + " url " + url + " to registry " + registryURL);
16                         }
17                         Invoker<?> invoker = proxyFactory.getInvoker(ref, (Class) interfaceClass, registryURL.addParameterAndEncoded(Constants.EXPORT_KEY, url.toFullString()));
18                         Exporter<?> exporter = protocol.export(invoker);
19                         exporters.add(exporter);
20                     }
21                 } else {
22                     Invoker<?> invoker = proxyFactory.getInvoker(ref, (Class) interfaceClass, url);
23                     Exporter<?> exporter = protocol.export(invoker);
24                     exporters.add(exporter);
25                 }
26             }
首先将实现类ref封装为Invoker,之后将invoker转换为exporter,最后将exporter放入缓存List<Exporter> exporters中。
一 将实现类ref封装为Invoker
1 Invoker<?> invoker = proxyFactory.getInvoker(ref, (Class) interfaceClass, registryURL.addParameterAndEncoded(Constants.EXPORT_KEY, url.toFullString()));
1 为registryURL拼接export=providerUrl参数
一开始的registryURL:
registry://10.211.55.5:2181/com.alibaba.dubbo.registry.RegistryService?application=demo-provider&client=curator&dubbo=2.0.0&pid=887®istry=zookeeper×tamp=1507096022072
registryURL.addParameterAndEncoded(Constants.EXPORT_KEY, url.toFullString())这句代码为registryURL添加了参数并编码:(这里给出没有编码的样子)
1 export=dubbo://10.10.10.10:20880/com.alibaba.dubbo.demo.DemoService?anyhost=true&application=demo-provider&dubbo=2.0.0&generic=false&interface=com.alibaba.dubbo.demo.DemoService&methods=sayHello&pid=887&side=provider×tamp=1507096024334
2 ProxyFactory$Adaptive.getInvoker(DemoServiceImpl实例, Class<DemoService>, registryURL)
 1     public com.alibaba.dubbo.rpc.Invoker getInvoker(java.lang.Object arg0, java.lang.Class arg1, com.alibaba.dubbo.common.URL arg2) throws com.alibaba.dubbo.rpc.RpcException {
 2         if (arg2 == null)
 3             throw new IllegalArgumentException("url == null");
 4         com.alibaba.dubbo.common.URL url = arg2;
 5         String extName = url.getParameter("proxy", "javassist");//结果是javassist
 6         if(extName == null)
 7             throw new IllegalStateException("Fail to get extension(com.alibaba.dubbo.rpc.ProxyFactory) name from url(" + url.toString() + ") use keys([proxy])");
 8         com.alibaba.dubbo.rpc.ProxyFactory extension = (com.alibaba.dubbo.rpc.ProxyFactory)ExtensionLoader.getExtensionLoader(com.alibaba.dubbo.rpc.ProxyFactory.class).getExtension(extName);
 9         return extension.getInvoker(arg0, arg1, arg2);
10     }
这里,本来是调用JavassistProxyFactory的getInvoker方法,但是JavassistProxyFactory被StubProxyFactoryWrapper给aop了。
3 StubProxyFactoryWrapper.getInvoker(DemoServiceImpl实例, Class<DemoService>, registryURL)
1     public <T> Invoker<T> getInvoker(T proxy, Class<T> type, URL url) throws RpcException {
2         return proxyFactory.getInvoker(proxy, type, url);
3     }
4 JavassistProxyFactory.getInvoker(DemoServiceImpl实例, Class<DemoService>, registryURL)
 1     public <T> Invoker<T> getInvoker(T proxy, Class<T> type, URL url) {
 2         // TODO Wrapper类不能正确处理带$的类名
 3         final Wrapper wrapper = Wrapper.getWrapper(proxy.getClass().getName().indexOf('$') < 0 ? proxy.getClass() : type);
 4         return new AbstractProxyInvoker<T>(proxy, type, url) {
 5             @Override
 6             protected Object doInvoke(T proxy, String methodName,
 7                                       Class<?>[] parameterTypes,
 8                                       Object[] arguments) throws Throwable {
 9                 return wrapper.invokeMethod(proxy, methodName, parameterTypes, arguments);
10             }
11         };
12     }
首先是创建Wrapper类:Wrapper.getWrapper(Class<DemoServiceImpl>)。该类记录了DemoServiceImpl的属性名称,方法名称等信息。关键代码如下:(完整代码见:7.2 服务本地暴露)
 1 import com.alibaba.dubbo.common.bytecode.Wrapper;
 2 import java.util.HashMap;
 3
 4 public class Wrapper1 extends Wrapper {
 5
 6     public static String[] pns;//property name array
 7     public static java.util.Map pts = new HashMap();//<property key, property value>
 8     public static String[] mns;//method names
 9     public static String[] dmns;//
10     public static Class[] mts0;
55     /**
56      * @param o  实现类
57      * @param n  方法名称
58      * @param p  参数类型
59      * @param v  参数名称
60      * @return
61      * @throws java.lang.reflect.InvocationTargetException
62      */
63     public Object invokeMethod(Object o, String n, Class[] p, Object[] v) throws java.lang.reflect.InvocationTargetException {
64         com.alibaba.dubbo.demo.provider.DemoServiceImpl w;
65         try {
66             w = ((com.alibaba.dubbo.demo.provider.DemoServiceImpl) o);
67         } catch (Throwable e) {
68             throw new IllegalArgumentException(e);
69         }
70         try {
71             if ("sayHello".equals(n) && p.length == 1) {
72                 return ($w) w.sayHello((java.lang.String) v[0]);
73             }
74         } catch (Throwable e) {
75             throw new java.lang.reflect.InvocationTargetException(e);
76         }
77         throw new com.alibaba.dubbo.common.bytecode.NoSuchMethodException("Not found method \"" + n + "\" in class com.alibaba.dubbo.demo.provider.DemoServiceImpl.");
78     }
79 }
创建完DemoServiceImpl的Wrapper类之后(实际上该实例在本地暴露的时候已经存入缓存了,这里只是从缓存中拿出来而已),创建一个AbstractProxyInvoker实例。
 1     private final T proxy;
 2     private final Class<T> type;
 3     private final URL url;
 4
 5     public AbstractProxyInvoker(T proxy, Class<T> type, URL url) {
 6         if (proxy == null) {
 7             throw new IllegalArgumentException("proxy == null");
 8         }
 9         if (type == null) {
10             throw new IllegalArgumentException("interface == null");
11         }
12         if (!type.isInstance(proxy)) {
13             throw new IllegalArgumentException(proxy.getClass().getName() + " not implement interface " + type);
14         }
15         this.proxy = proxy;
16         this.type = type;
17         this.url = url;
18     }
最后创建完成的AbstractProxyInvoker实例属性如下:
- proxy:DemoServiceImpl实例
- type:Class<com.alibaba.dubbo.demo.DemoService>
- url:registry://10.211.55.5:2181/com.alibaba.dubbo.registry.RegistryService?application=demo-provider&client=curator&dubbo=2.0.0&export=dubbo%3A%2F%2F10.10.10.10%3A20880%2Fcom.alibaba.dubbo.demo.DemoService%3Fanyhost%3Dtrue%26application%3Ddemo-provider%26dubbo%3D2.0.0%26generic%3Dfalse%26interface%3Dcom.alibaba.dubbo.demo.DemoService%26methods%3DsayHello%26pid%3D993%26side%3Dprovider%26timestamp%3D1507100322516&pid=993®istry=zookeeper×tamp=1507100319830
这样我们就将ref实现类转换成了Invoker,之后在调用该invoker.invoke(Invocation invocation)的时候,会调用invoker.doInvoke(T proxy, String methodName,Class<?>[] parameterTypes, Object[] arguments)的时候,就会调用相应的实现类proxy的wrapper类的invokeMethod(proxy, methodName, parameterTypes, arguments),该方法又会调用真实的实现类methodName方法。这里可以先给出AbstractProxyInvoker.invoke(Invocation invocation)源码:
1     public Result invoke(Invocation invocation) throws RpcException {
2         try {
3             return new RpcResult(doInvoke(proxy, invocation.getMethodName(), invocation.getParameterTypes(), invocation.getArguments()));
4         } catch (InvocationTargetException e) {
5             return new RpcResult(e.getTargetException());
6         } catch (Throwable e) {
7             throw new RpcException("Failed to invoke remote proxy method " + invocation.getMethodName() + " to " + getUrl() + ", cause: " + e.getMessage(), e);
8         }
9     }
这里的proxy就是上边赋好值的proxy:DemoServiceImpl实例。而方法信息会封装在Invocation对象中,该对象在服务引用时介绍。
二 将Invoker转换为Exporter
1 Exporter<?> exporter = protocol.export(invoker)
1 Protocol$Adaptive.export(com.alibaba.dubbo.rpc.Invoker AbstractProxyInvoker实例)
 1     public com.alibaba.dubbo.rpc.Exporter export(com.alibaba.dubbo.rpc.Invoker arg0) throws com.alibaba.dubbo.rpc.RpcException {
 2         if (arg0 == null)
 3             throw new IllegalArgumentException("com.alibaba.dubbo.rpc.Invoker argument == null");
 4         if (arg0.getUrl() == null)
 5             throw new IllegalArgumentException("com.alibaba.dubbo.rpc.Invoker argument getUrl() == null");
 6         com.alibaba.dubbo.common.URL url = arg0.getUrl();
 7         String extName = (url.getProtocol() == null ? "dubbo" : url.getProtocol());//registry
 8         if(extName == null)
 9             throw new IllegalStateException("Fail to get extension(com.alibaba.dubbo.rpc.Protocol) name from url(" + url.toString() + ") use keys([protocol])");
10         com.alibaba.dubbo.rpc.Protocol extension = (com.alibaba.dubbo.rpc.Protocol)ExtensionLoader.getExtensionLoader(com.alibaba.dubbo.rpc.Protocol.class).getExtension(extName);
11         return extension.export(arg0);
12     }
这里,由于aop的原因,首先调用了ProtocolListenerWrapper的export(Invoker<T> invoker),如下:
1     public <T> Exporter<T> export(Invoker<T> invoker) throws RpcException {
2         if (Constants.REGISTRY_PROTOCOL.equals(invoker.getUrl().getProtocol())) {
3             return protocol.export(invoker);
4         }
5         return new ListenerExporterWrapper<T>(protocol.export(invoker),
6                                               Collections.unmodifiableList(ExtensionLoader.getExtensionLoader(ExporterListener.class).getActivateExtension(invoker.getUrl(), Constants.EXPORTER_LISTENER_KEY)));
7     }
由于协议是“registry”,所以不做任何处理,继续调用ProtocolFilterWrapper的export(Invoker<T> invoker),如下:
1     public <T> Exporter<T> export(Invoker<T> invoker) throws RpcException {
2         if (Constants.REGISTRY_PROTOCOL.equals(invoker.getUrl().getProtocol())) {
3             return protocol.export(invoker);
4         }
5         return protocol.export(buildInvokerChain(invoker, Constants.SERVICE_FILTER_KEY, Constants.PROVIDER));
6     }
同理,由于协议是“registry”,所以不做任何处理,继续调用RegistryProtocol.export(final Invoker<T> originInvoker),如下:
 1     public <T> Exporter<T> export(final Invoker<T> originInvoker) throws RpcException {
 2         //export invoker
 3         final ExporterChangeableWrapper<T> exporter = doLocalExport(originInvoker);
 4         //registry provider
 5         final Registry registry = getRegistry(originInvoker);
 6         final URL registedProviderUrl = getRegistedProviderUrl(originInvoker);
 7         registry.register(registedProviderUrl);
 8         // 订阅override数据
 9         // FIXME 提供者订阅时,会影响同一JVM即暴露服务,又引用同一服务的的场景,因为subscribed以服务名为缓存的key,导致订阅信息覆盖。
10         final URL overrideSubscribeUrl = getSubscribedOverrideUrl(registedProviderUrl);
11         final OverrideListener overrideSubscribeListener = new OverrideListener(overrideSubscribeUrl, originInvoker);
12         overrideListeners.put(overrideSubscribeUrl, overrideSubscribeListener);
13         registry.subscribe(overrideSubscribeUrl, overrideSubscribeListener);
14         //保证每次export都返回一个新的exporter实例
15         return new Exporter<T>() {
16             public Invoker<T> getInvoker() {
17                 return exporter.getInvoker();
18             }
19
20             public void unexport() {
21                 try {
22                     exporter.unexport();
23                 } catch (Throwable t) {
24                     logger.warn(t.getMessage(), t);
25                 }
26                 try {
27                     registry.unregister(registedProviderUrl);
28                 } catch (Throwable t) {
29                     logger.warn(t.getMessage(), t);
30                 }
31                 try {
32                     overrideListeners.remove(overrideSubscribeUrl);
33                     registry.unsubscribe(overrideSubscribeUrl, overrideSubscribeListener);
34                 } catch (Throwable t) {
35                     logger.warn(t.getMessage(), t);
36                 }
37             }
38         };
39     }
该方法完成了远程暴露的全部流程。
- 将invoker转换为exporter
- 启动netty
- 注册服务到zookeeper
- 订阅
- 返回新的exporter实例
2 将invoker转换为exporter并启动netty服务
1 final ExporterChangeableWrapper<T> exporter = doLocalExport(originInvoker);
doLocalExport(final Invoker<T> originInvoker)
 1     /**
 2      * 1 从invoker的URL中的Map<String, String> parameters中获取key为export的地址providerUrl,该地址将是服务注册在zk上的节点
 3      * 2 从 Map<String, ExporterChangeableWrapper<?>> bounds 缓存中获取key为上述providerUrl的exporter,如果有,直接返回,如果没有,创建并返回
 4      * @return
 5      */
 6     @SuppressWarnings("unchecked")
 7     private <T> ExporterChangeableWrapper<T> doLocalExport(final Invoker<T> originInvoker) {
 8         String key = getCacheKey(originInvoker);//根据originInvoker获取providerUrl
 9         ExporterChangeableWrapper<T> exporter = (ExporterChangeableWrapper<T>) bounds.get(key);
10         if (exporter == null) {
11             synchronized (bounds) {
12                 exporter = (ExporterChangeableWrapper<T>) bounds.get(key);
13                 if (exporter == null) {
14                     final Invoker<?> invokerDelegete = new InvokerDelegete<T>(originInvoker, getProviderUrl(originInvoker));//存储originInvoker和providerUrl
15                     exporter = new ExporterChangeableWrapper<T>((Exporter<T>) protocol.export(invokerDelegete), originInvoker);
16                     bounds.put(key, exporter);
17                 }
18             }
19         }
20         return exporter;
21     }
2.1 从originInvoker中获取providerUrl
该方法直接首先调用getCacheKey(final Invoker<?> originInvoker)中获取providerUrl,这里的originInvoker就是上述创建出来的AbstractProxyInvoker实例,注意他的url是registry协议的,该url的export参数的value就是我们要获取的providerUrl。获取providerUrl的源码如下:
 1     private String getCacheKey(final Invoker<?> originInvoker) {
 2         URL providerUrl = getProviderUrl(originInvoker);
 3         String key = providerUrl.removeParameters("dynamic", "enabled").toFullString();
 4         return key;
 5     }
 6
 7     private URL getProviderUrl(final Invoker<?> origininvoker) {
 8         String export = origininvoker.getUrl().getParameterAndDecoded(Constants.EXPORT_KEY);
 9         if (export == null || export.length() == 0) {
10             throw new IllegalArgumentException("The registry export url is null! registry: " + origininvoker.getUrl());
11         }
12
13         URL providerUrl = URL.valueOf(export);
14         return providerUrl;
15     }
之后一系列的操作,就是获取该providerUrl对应的exporter,之后放入缓存Map<String, ExporterChangeableWrapper<?>> bounds中,所以一个providerUrl只会对应一个exporter。
2.2 创建InvokerDelegete
1 final Invoker<?> invokerDelegete = new InvokerDelegete<T>(originInvoker, getProviderUrl(originInvoker));
InvokerDelegete是RegistryProtocol的一个静态内部类,该类是一个originInvoker的委托类,该类存储了originInvoker,其父类InvokerWrapper还会存储providerUrl,InvokerWrapper会调用originInvoker的invoke方法,也会销毁invoker。可以管理invoker的生命周期。
 1     public static class InvokerDelegete<T> extends InvokerWrapper<T> {
 2         private final Invoker<T> invoker;
 3
 4         /**
 5          * @param invoker
 6          * @param url     invoker.getUrl返回此值
 7          */
 8         public InvokerDelegete(Invoker<T> invoker, URL url) {
 9             super(invoker, url);
10             this.invoker = invoker;
11         }
12
13         public Invoker<T> getInvoker() {
14             if (invoker instanceof InvokerDelegete) {
15                 return ((InvokerDelegete<T>) invoker).getInvoker();
16             } else {
17                 return invoker;
18             }
19         }
20     }
InvokerWrapper的核心代码:
 1 public class InvokerWrapper<T> implements Invoker<T> {
 2     private final Invoker<T> invoker;//originInvoker
 3     private final URL url;//providerUrl
 4
 5     public InvokerWrapper(Invoker<T> invoker, URL url) {
 6         this.invoker = invoker;
 7         this.url = url;
 8     }
 9
10     public boolean isAvailable() {
11         return invoker.isAvailable();
12     }
13
14     public Result invoke(Invocation invocation) throws RpcException {
15         return invoker.invoke(invocation);
16     }
17
18     public void destroy() {
19         invoker.destroy();
20     }
21 }
这样一个InvokerDelegete对象就创建好了,属性如下:
- invoker:originInvoker(AbstractProxyInvoker对象)
- InvokerWrapper.invoker:originInvoker(AbstractProxyInvoker对象)
- url:providerUrl(dubbo://10.10.10.10:20880/com.alibaba.dubbo.demo.DemoService?anyhost=true&application=demo-provider&dubbo=2.0.0&generic=false&interface=com.alibaba.dubbo.demo.DemoService&methods=sayHello&pid=1035&side=provider×tamp=1507101286063)
2.3 使用DubboProtocol将InvokerDelegete转换为Exporter
1 exporter = new ExporterChangeableWrapper<T>((Exporter<T>) protocol.export(invokerDelegete), originInvoker)
2.3.1 Protocol$Adaptive.export(com.alibaba.dubbo.rpc.Invoker InvokerDelegete对象)
 1     public com.alibaba.dubbo.rpc.Exporter export(com.alibaba.dubbo.rpc.Invoker arg0) throws com.alibaba.dubbo.rpc.RpcException {
 2         if (arg0 == null)
 3             throw new IllegalArgumentException("com.alibaba.dubbo.rpc.Invoker argument == null");
 4         if (arg0.getUrl() == null)
 5             throw new IllegalArgumentException("com.alibaba.dubbo.rpc.Invoker argument getUrl() == null");
 6         com.alibaba.dubbo.common.URL url = arg0.getUrl();
 7         String extName = (url.getProtocol() == null ? "dubbo" : url.getProtocol());//dubbo
 8         if(extName == null)
 9             throw new IllegalStateException("Fail to get extension(com.alibaba.dubbo.rpc.Protocol) name from url(" + url.toString() + ") use keys([protocol])");
10         com.alibaba.dubbo.rpc.Protocol extension = (com.alibaba.dubbo.rpc.Protocol)ExtensionLoader.getExtensionLoader(com.alibaba.dubbo.rpc.Protocol.class).getExtension(extName);
11         return extension.export(arg0);
12     }
该代码再贴最后一遍了。之后调用ProtocolListenerWrapper的ProtocolListenerWrapper.export(Invoker<T> InvokerDelegete),之后调用ProtocolFilterWrapper.export(Invoker<T> InvokerDelegete):首先对InvokerDelegete对象进行8个filter的递归包装,之后使用DubboProtocol对包装后的InvokerDelegete对象进行export。
层层包装的源码:
 1     /**
 2      * 1 根据key从url中获取相应的filter的values,再根据这个values和group去获取类上带有@Active注解的filter集合
 3      * 2 之后将这些filter对传入的invoker进行递归包装层invoker(就是一个链表)
 4      */
 5     private static <T> Invoker<T> buildInvokerChain(final Invoker<T> invoker, String key, String group) {
 6         Invoker<T> last = invoker;
 7         List<Filter> filters = ExtensionLoader.getExtensionLoader(Filter.class).getActivateExtension(invoker.getUrl(), key, group);
 8         if (filters.size() > 0) {
 9             for (int i = filters.size() - 1; i >= 0; i--) {
10                 final Filter filter = filters.get(i);
11                 final Invoker<T> next = last;
12                 last = new Invoker<T>() {
13
14                     public Class<T> getInterface() {
15                         return invoker.getInterface();
16                     }
17
18                     public URL getUrl() {
19                         return invoker.getUrl();
20                     }
21
22                     public boolean isAvailable() {
23                         return invoker.isAvailable();
24                     }
25
26                     public Result invoke(Invocation invocation) throws RpcException {
27                         return filter.invoke(next, invocation);
28                     }
29
30                     public void destroy() {
31                         invoker.destroy();
32                     }
33
34                     @Override
35                     public String toString() {
36                         return invoker.toString();
37                     }
38                 };
39             }
40         }
41         return last;
42     }
上述方法中最重要的就是Invoker的Result invoke(Invocation invocation),在该方法中,是使用了filter.invoke(next, invocation),而这里的next又可能是另一个filter。这里我们打开一个filter来看一下源码:
1 @Activate(group = Constants.PROVIDER, order = -110000)
2 public class EchoFilter implements Filter {
3     public Result invoke(Invoker<?> invoker, Invocation inv) throws RpcException {
4         if (inv.getMethodName().equals(Constants.$ECHO) && inv.getArguments() != null && inv.getArguments().length == 1)
5             return new RpcResult(inv.getArguments()[0]);
6         return invoker.invoke(inv);
7     }
8 }
可以看到,该filter会调用传入的next的invoke方法。
这里给出被递归包装后的对象:(命名为InvokerDelegete的filter对象)
1 EchoFilter
2 -->ClassLoaderFilter
3    -->GenericFilter
4       -->ContextFilter
5          -->TraceFilter
6             -->TimeoutFilter
7                -->MonitorFilter
8                   -->ExceptionFilter
9                      -->InvokerDelegete对象
2.3.2 DubboProtocol.export(Invoker<T> InvokerDelegete的filter对象)
    /**
     * 1 从invoker的url中获取将要暴露的远程服务的key:com.alibaba.dubbo.demo.DemoService:20880(实际上是:serviceGroup/serviceName:serviceVersion:port)
     * 注意:本地暴露的key就是:com.alibaba.dubbo.demo.DemoService
     * 2 打开ExchangeServer
     */
    public <T> Exporter<T> export(Invoker<T> invoker) throws RpcException {
        URL url = invoker.getUrl();
        // export service.
        String key = serviceKey(url);
        DubboExporter<T> exporter = new DubboExporter<T>(invoker, key, exporterMap);
        exporterMap.put(key, exporter);

        //export an stub service for dispaching event
        Boolean isStubSupportEvent = url.getParameter(Constants.STUB_EVENT_KEY, Constants.DEFAULT_STUB_EVENT);
        Boolean isCallbackservice = url.getParameter(Constants.IS_CALLBACK_SERVICE, false);
        if (isStubSupportEvent && !isCallbackservice) {
            String stubServiceMethods = url.getParameter(Constants.STUB_EVENT_METHODS_KEY);
            if (stubServiceMethods == null || stubServiceMethods.length() == 0) {
                if (logger.isWarnEnabled()) {
                    logger.warn(new IllegalStateException("consumer [" + url.getParameter(Constants.INTERFACE_KEY) +
                            "], has set stubproxy support event ,but no stub methods founded."));
                }
            } else {
                stubServiceMethodsMap.put(url.getServiceKey(), stubServiceMethods);
            }
        }

        openServer(url);

        return exporter;
    }
首先从“InvokerDelegete的filter对象”中的url获取key,这段代码很简单,就是获取serviceGroup/serviceName:serviceVersion:port这样形式的一个key,这里最后获取到的是com.alibaba.dubbo.demo.DemoService:20880。
之后创建DubboExporter。
2.3.2.1 DubboExporter<T>(InvokerDelegete的filter对象, "com.alibaba.dubbo.demo.DemoService:20880", exporterMap)
 1 public class DubboExporter<T> extends AbstractExporter<T> {
 2     //serviceGroup/serviceName:serviceVersion:port, 例如:com.alibaba.dubbo.demo.DemoService:20880
 3     private final String key;//
 4     //{ "com.alibaba.dubbo.demo.DemoService:20880" -> 当前的DubboExporter实例 }
 5     private final Map<String, Exporter<?>> exporterMap;
 6
 7     public DubboExporter(Invoker<T> invoker, String key, Map<String, Exporter<?>> exporterMap) {
 8         super(invoker);
 9         this.key = key;
10         this.exporterMap = exporterMap;
11     }
12
13     @Override
14     public void unexport() {
15         super.unexport();
16         exporterMap.remove(key);
17     }
18 }
注意这里的exporterMap是引用传递。
父类:
 1 public abstract class AbstractExporter<T> implements Exporter<T> {
 2     protected final Logger logger = LoggerFactory.getLogger(getClass());
 3     private final Invoker<T> invoker;
 4     private volatile boolean unexported = false;
 5
 6     public AbstractExporter(Invoker<T> invoker) {
 7         if (invoker == null)
 8             throw new IllegalStateException("service invoker == null");
 9         if (invoker.getInterface() == null)
10             throw new IllegalStateException("service type == null");
11         if (invoker.getUrl() == null)
12             throw new IllegalStateException("service url == null");
13         this.invoker = invoker;
14     }
15
16     public Invoker<T> getInvoker() {
17         return invoker;
18     }
19
20     public void unexport() {
21         if (unexported) {
22             return;
23         }
24         unexported = true;
25         getInvoker().destroy();
26     }
27
28     public String toString() {
29         return getInvoker().toString();
30     }
31 }
这里,我们把一个“InvokerDelegete的filter对象”赋给了AbstractExporter的Invoker引用,也就是说从exporter中可以获取到invoker。最后在DubboProtocol.export(Invoker<T> invoker)中执行:exporterMap.put(key, exporter); 这样就将{ "com.alibaba.dubbo.demo.DemoService:20880" -> 当前的DubboExporter实例 }存储起来了。
来看一下现在的DubboExporter实例:
- key:com.alibaba.dubbo.demo.DemoService:20880
- invoker:“InvokerDelegete的filter对象”
- exporterMap:{ "com.alibaba.dubbo.demo.DemoService:20880" -> 当前的DubboExporter实例 }
2.3.2.2 开启ExchangeServer
 1     /**
 2      * 从缓存Map<String, ExchangeServer> serverMap中根据"host:port"获取ExchangeServer,如果没有,创建ExchangeServer,之后放入缓存。
 3      * @param url
 4      */
 5     private void openServer(URL url) {
 6         // find server.
 7         String key = url.getAddress();//10.10.10.10:20880
 8         //client 也可以暴露一个只有server可以调用的服务。
 9         boolean isServer = url.getParameter(Constants.IS_SERVER_KEY, true);
10         if (isServer) {
11             ExchangeServer server = serverMap.get(key);
12             if (server == null) {
13                 serverMap.put(key, createServer(url));
14             } else {
15                 //server支持reset,配合override功能使用
16                 server.reset(url);
17             }
18         }
19     }
首先从provderUrl中获取host:port作为key,之后从缓存serverMap中获取ExchangeServer,如果没有,创建ExchangeServer,最后以如下方式放入缓存:
Map<String, ExchangeServer> serverMap:{ "10.10.10.10:20880"<->ExchangeServer实例 }。
创建ExchangeServer:createServer(URL providerUrl)
 1     private ExchangeServer createServer(URL url) {
 2         //默认开启server关闭时发送readonly事件
 3         url = url.addParameterIfAbsent(Constants.CHANNEL_READONLYEVENT_SENT_KEY, Boolean.TRUE.toString());
 4         //默认开启heartbeat
 5         url = url.addParameterIfAbsent(Constants.HEARTBEAT_KEY, String.valueOf(Constants.DEFAULT_HEARTBEAT));
 6         String str = url.getParameter(Constants.SERVER_KEY, Constants.DEFAULT_REMOTING_SERVER);
 7
 8         if (str != null && str.length() > 0 && !ExtensionLoader.getExtensionLoader(Transporter.class).hasExtension(str))
 9             throw new RpcException("Unsupported server type: " + str + ", url: " + url);
10
11         url = url.addParameter(Constants.CODEC_KEY, Version.isCompatibleVersion() ? COMPATIBLE_CODEC_NAME : DubboCodec.NAME);
12         ExchangeServer server;
13         try {
14             server = Exchangers.bind(url, requestHandler);
15         } catch (RemotingException e) {
16             throw new RpcException("Fail to start server(url: " + url + ") " + e.getMessage(), e);
17         }
18         str = url.getParameter(Constants.CLIENT_KEY);
19         if (str != null && str.length() > 0) {
20             Set<String> supportedTypes = ExtensionLoader.getExtensionLoader(Transporter.class).getSupportedExtensions();
21             if (!supportedTypes.contains(str)) {
22                 throw new RpcException("Unsupported client type: " + str);
23             }
24         }
25         return server;
26     }
首先是在原本providerUrl上添加参数:channel.readonly.sent=true&heartbeat=60000&codec=dubbo(其中的heartbeat参数会在HeaderExchangeServer启动心跳计时器时使用)
之后使用Exchangers.bind("添加参数后的providerUrl", requestHandler)创建ExchangeServer。首先来看一下DubboProtocol#requestHandler。这个类极其重要,后续经过层层包装后,会成为最终netty的服务端逻辑处理器。
 1     private ExchangeHandler requestHandler = new ExchangeHandlerAdapter() {
 2         public Object reply(ExchangeChannel channel, Object message) throws RemotingException {
 3             if (message instanceof Invocation) {
 4                 Invocation inv = (Invocation) message;
 5                 Invoker<?> invoker = getInvoker(channel, inv);
 6                 //如果是callback 需要处理高版本调用低版本的问题
 7                 if (Boolean.TRUE.toString().equals(inv.getAttachments().get(IS_CALLBACK_SERVICE_INVOKE))) {
 8                     String methodsStr = invoker.getUrl().getParameters().get("methods");
 9                     boolean hasMethod = false;
10                     if (methodsStr == null || methodsStr.indexOf(",") == -1) {
11                         hasMethod = inv.getMethodName().equals(methodsStr);
12                     } else {
13                         String[] methods = methodsStr.split(",");
14                         for (String method : methods) {
15                             if (inv.getMethodName().equals(method)) {
16                                 hasMethod = true;
17                                 break;
18                             }
19                         }
20                     }
21                     if (!hasMethod) {
22                         logger.warn(new IllegalStateException("The methodName " + inv.getMethodName() + " not found in callback service interface ,invoke will be ignored. please update the api interface. url is:" + invoker.getUrl()) + " ,invocation is :" + inv);
23                         return null;
24                     }
25                 }
26                 RpcContext.getContext().setRemoteAddress(channel.getRemoteAddress());
27                 return invoker.invoke(inv);
28             }
29             throw new RemotingException(channel, "Unsupported request: " + message == null ? null : (message.getClass().getName() + ": " + message) + ", channel: consumer: " + channel.getRemoteAddress() + " --> provider: " + channel.getLocalAddress());
30         }
31
32         @Override
33         public void received(Channel channel, Object message) throws RemotingException {
34             if (message instanceof Invocation) {
35                 reply((ExchangeChannel) channel, message);
36             } else {
37                 super.received(channel, message);
38             }
39         }
40
41         @Override
42         public void connected(Channel channel) throws RemotingException {
43             invoke(channel, Constants.ON_CONNECT_KEY);
44         }
45
46         @Override
47         public void disconnected(Channel channel) throws RemotingException {
48             if (logger.isInfoEnabled()) {
49                 logger.info("disconected from " + channel.getRemoteAddress() + ",url:" + channel.getUrl());
50             }
51             invoke(channel, Constants.ON_DISCONNECT_KEY);
52         }
53
54         private void invoke(Channel channel, String methodKey) {
55             Invocation invocation = createInvocation(channel, channel.getUrl(), methodKey);
56             if (invocation != null) {
57                 try {
58                     received(channel, invocation);
59                 } catch (Throwable t) {
60                     logger.warn("Failed to invoke event method " + invocation.getMethodName() + "(), cause: " + t.getMessage(), t);
61                 }
62             }
63         }
64
65         private Invocation createInvocation(Channel channel, URL url, String methodKey) {
66             String method = url.getParameter(methodKey);
67             if (method == null || method.length() == 0) {
68                 return null;
69             }
70             RpcInvocation invocation = new RpcInvocation(method, new Class<?>[0], new Object[0]);
71             invocation.setAttachment(Constants.PATH_KEY, url.getPath());
72             invocation.setAttachment(Constants.GROUP_KEY, url.getParameter(Constants.GROUP_KEY));
73             invocation.setAttachment(Constants.INTERFACE_KEY, url.getParameter(Constants.INTERFACE_KEY));
74             invocation.setAttachment(Constants.VERSION_KEY, url.getParameter(Constants.VERSION_KEY));
75             if (url.getParameter(Constants.STUB_EVENT_KEY, false)) {
76                 invocation.setAttachment(Constants.STUB_EVENT_KEY, Boolean.TRUE.toString());
77             }
78             return invocation;
79         }
80     };
从上可以看出在该handler中,定义了与客户端连接成功/断开连接/接受到客户端消息/相应消息,以及创造Invocation的方法。其中的getInvoker(Channel channel, Invocation inv)方法简码如下:
1         String serviceKey = serviceKey(port, path, inv.getAttachments().get(Constants.VERSION_KEY), inv.getAttachments().get(Constants.GROUP_KEY));
2         DubboExporter<?> exporter = (DubboExporter<?>) exporterMap.get(serviceKey);
3         return exporter.getInvoker();
这不就是我们刚刚放置到exporterMap中的DubboExporter,而其中的invoker不就是我们的“filter的invokerdelegete对象”。
使用Exchangers.bind(providerUrl, ExchangeHandlerAdapter对象)创建ExchangeServer
 1     public static ExchangeServer bind(URL url, ExchangeHandler handler) throws RemotingException {
 2         if (url == null) {
 3             throw new IllegalArgumentException("url == null");
 4         }
 5         if (handler == null) {
 6             throw new IllegalArgumentException("handler == null");
 7         }
 8         url = url.addParameterIfAbsent(Constants.CODEC_KEY, "exchange");
 9         return getExchanger(url).bind(url, handler);
10     }
11
12     public static Exchanger getExchanger(URL url) {
13         String type = url.getParameter(Constants.EXCHANGER_KEY, Constants.DEFAULT_EXCHANGER);//header
14         return getExchanger(type);
15     }
16
17     public static Exchanger getExchanger(String type) {
18         return ExtensionLoader.getExtensionLoader(Exchanger.class).getExtension(type);
19     }
getExchanger(URL url)返回一个HeaderExchanger实例。所以ExchangeServer的创建交由HeaderExchanger来实现。
HeaderExchanger.bind(providerUrl, ExchangeHandlerAdapter对象)
1     /**
2      * 1 对handler进行三次包装:首先将ExchangeHandlerAdapter赋给HeaderExchangeHandler中的ExchangeHandler handler属性;然后将创建出来的HeaderExchangeHandler赋给DecodeHandler的父类AbstractChannelHandlerDelegate的ChannelHandler handler属性
3      */
4     public ExchangeServer bind(URL url, ExchangeHandler handler) throws RemotingException {
5         return new HeaderExchangeServer(Transporters.bind(url, new DecodeHandler(new HeaderExchangeHandler(handler))));
6     }
说明:
- 这里首先对传入的ExchangeHandlerAdapter进行了两次包装,最终得到DecodeHandler实例;
- 之后,使用Transporters.bind(providerUrl, DecodeHandler对象)创建了一个NettyServer;
- 最后使用HeaderExchangeServer包装了上边的NettyServer,并启动了心跳计数器。
- HeaderExchangeServer实例也是最终返回的ExchangeServer实例,将最终被存储在Map<String, ExchangeServer> serverMap:{ "10.10.10.10:20880"<->HeaderExchangeServer实例 }
包装ExchangeHandlerAdapter,获取DecodeHandler实例。代码比较简单,不列出来了。
最终获取到的DecodeHandler实例的层级关系:
1 DecodeHandler实例
2 -->HeaderExchangeHandler实例
3    -->ExchangeHandlerAdapter实例
使用Transporters.bind(providerUrl, DecodeHandler对象)创建了一个NettyServer
Transporters.bind(providerUrl, DecodeHandler对象)
 1     public static Server bind(URL url, ChannelHandler... handlers) throws RemotingException {
 2         if (url == null) {
 3             throw new IllegalArgumentException("url == null");
 4         }
 5         if (handlers == null || handlers.length == 0) {
 6             throw new IllegalArgumentException("handlers == null");
 7         }
 8         ChannelHandler handler;
 9         if (handlers.length == 1) {
10             handler = handlers[0];
11         } else {
12             handler = new ChannelHandlerDispatcher(handlers);
13         }
14         return getTransporter().bind(url, handler);
15     }
16
17     public static Transporter getTransporter() {
18         return ExtensionLoader.getExtensionLoader(Transporter.class).getAdaptiveExtension();
19     }
Transporter$Adaptive.bind(providerUrl, DecodeHandler对象)
 1     public com.alibaba.dubbo.remoting.Server bind(com.alibaba.dubbo.common.URL arg0, com.alibaba.dubbo.remoting.ChannelHandler arg1) throws com.alibaba.dubbo.remoting.RemotingException {
 2         if (arg0 == null)
 3             throw new IllegalArgumentException("url == null");
 4         com.alibaba.dubbo.common.URL url = arg0;
 5         String extName = url.getParameter("server", url.getParameter("transporter", "netty"));//netty
 6         if(extName == null)
 7             throw new IllegalStateException("Fail to get extension(com.alibaba.dubbo.remoting.Transporter) name from url(" + url.toString() + ") use keys([server, transporter])");
 8         com.alibaba.dubbo.remoting.Transporter extension = (com.alibaba.dubbo.remoting.Transporter)ExtensionLoader.getExtensionLoader(com.alibaba.dubbo.remoting.Transporter.class).getExtension(extName);
 9         return extension.bind(arg0, arg1);
10     }
最后NettyServer的创建由NettyTransporter来创建。
NettyTransporter.bind(providerUrl, DecodeHandler对象)
 1 public class NettyTransporter implements Transporter {
 2     public static final String NAME = "netty";
 3
 4     public Server bind(URL url, ChannelHandler listener) throws RemotingException {
 5         return new NettyServer(url, listener);
 6     }
 7
 8     public Client connect(URL url, ChannelHandler listener) throws RemotingException {
 9         return new NettyClient(url, listener);
10     }
11 }
new NettyServer(providerUrl, DecodeHandler对象)
1     public NettyServer(URL url, ChannelHandler handler) throws RemotingException {
2         super(url, ChannelHandlers.wrap(handler, ExecutorUtil.setThreadName(url, SERVER_THREAD_POOL_NAME)));
3     }
这里首先为providerUrl添加参数:threadname=DubboServerHandler-10.10.10.10:20880(ExecutorUtil.setThreadName(url, SERVER_THREAD_POOL_NAME));
之后,使用ChannelHandlers.wrap(DecodeHandler对象, providerUrl)对DecodeHandler对象进行了三层包装,最终得到MultiMessageHandler实例;
最后调用父类的构造器初始化NettyServer的各个属性,最后启动netty。
先看一下
ChannelHandlers.wrap(DecodeHandler对象, providerUrl)
 1     /**
 2      * 这里又是层层包裹:
 3      * MultiMessageHandler
 4      * --HeartbeatHandler
 5      *   --AllChannelHandler
 6      *     --DecodeHandler
 7      *       --HeaderExchangeHandler
 8      *         --ExchangeHandlerAdapter
 9      * @param handler
10      * @param url
11      * @return
12      */
13     protected ChannelHandler wrapInternal(ChannelHandler handler, URL url) {
14         return new MultiMessageHandler(new HeartbeatHandler(ExtensionLoader.getExtensionLoader(Dispatcher.class)
15                 .getAdaptiveExtension().dispatch(handler, url)));
16     }
ExtensionLoader.getExtensionLoader(Dispatcher.class).getAdaptiveExtension()获取到一个Dispatcher$Adaptive适配类。
Dispatcher$Adaptive.dispatch(DecodeHandler对象, providerUrl)
 1     public com.alibaba.dubbo.remoting.ChannelHandler dispatch(com.alibaba.dubbo.remoting.ChannelHandler arg0, com.alibaba.dubbo.common.URL arg1) {
 2         if (arg1 == null)
 3             throw new IllegalArgumentException("url == null");
 4         com.alibaba.dubbo.common.URL url = arg1;
 5         String extName = url.getParameter("dispatcher", url.getParameter("dispather", url.getParameter("channel.handler", "all")));//all
 6         if(extName == null)
 7             throw new IllegalStateException("Fail to get extension(com.alibaba.dubbo.remoting.Dispatcher) name from url(" + url.toString() + ") use keys([dispatcher, dispather, channel.handler])");
 8         com.alibaba.dubbo.remoting.Dispatcher extension = (com.alibaba.dubbo.remoting.Dispatcher)ExtensionLoader.getExtensionLoader(com.alibaba.dubbo.remoting.Dispatcher.class).getExtension(extName);
 9         return extension.dispatch(arg0, arg1);
10     }
这里获取到AllDispatcher,Dispatcher决定了dubbo的线程模型,指定了哪些做什么,哪些线程做什么。讲到dubbo通信的时候再写。
AllDispatcher.dispatch(DecodeHandler对象, providerUrl)
1     public ChannelHandler dispatch(ChannelHandler handler, URL url) {
2         return new AllChannelHandler(handler, url);
3     }
new AllChannelHandler(DecodeHandler对象, providerUrl)
1     public AllChannelHandler(ChannelHandler handler, URL url) {
2         super(handler, url);
3     }
来看其父类的WrappedChannelHandler的构造器:
WrappedChannelHandler(DecodeHandler对象, providerUrl)
 1     protected static final ExecutorService SHARED_EXECUTOR = Executors.newCachedThreadPool(new NamedThreadFactory("DubboSharedHandler", true));
 2     protected final ExecutorService executor;
 3     protected final ChannelHandler handler;
 4     protected final URL url;
 5
 6     public WrappedChannelHandler(ChannelHandler handler, URL url) {
 7         this.handler = handler;
 8         this.url = url;
 9         executor = (ExecutorService) ExtensionLoader.getExtensionLoader(ThreadPool.class).getAdaptiveExtension().getExecutor(url);
10
11         String componentKey = Constants.EXECUTOR_SERVICE_COMPONENT_KEY;
12         if (Constants.CONSUMER_SIDE.equalsIgnoreCase(url.getParameter(Constants.SIDE_KEY))) {
13             componentKey = Constants.CONSUMER_SIDE;
14         }
15         DataStore dataStore = ExtensionLoader.getExtensionLoader(DataStore.class).getDefaultExtension();
16         dataStore.put(componentKey, Integer.toString(url.getPort()), executor);//{"java.util.concurrent.ExecutorService":{"20880":executor}}
17     }
首先创建了一个共享线程池:SHARED_EXECUTOR;
之后为handler/url/executor赋值,其中executor是一个200个线程数的fixed线程池(队列为0,即同步队列);
 1     public Executor getExecutor(URL url) {
 2         String name = url.getParameter(Constants.THREAD_NAME_KEY, Constants.DEFAULT_THREAD_NAME);//默认为dubbo,但是我们这里是DubboServerHandler-10.10.10.10:20880(就是之前设置到url上的threadname)
 3         int threads = url.getParameter(Constants.THREADS_KEY, Constants.DEFAULT_THREADS);//200
 4         int queues = url.getParameter(Constants.QUEUES_KEY, Constants.DEFAULT_QUEUES);//0
 5         return new ThreadPoolExecutor(threads, threads, 0, TimeUnit.MILLISECONDS,
 6                 queues == 0 ? new SynchronousQueue<Runnable>() :
 7                         (queues < 0 ? new LinkedBlockingQueue<Runnable>()
 8                                 : new LinkedBlockingQueue<Runnable>(queues)),
 9                 new NamedThreadFactory(name, true), new AbortPolicyWithReport(name, url));
10     }
之后获取了一个数据存储器:SimpleDataStore;
最后将{"java.util.concurrent.ExecutorService":{"20880": executor}}数据存储在SimpleDataStore的ConcurrentMap<String, ConcurrentMap<String, Object>> data数据结构中。也就是说:每一个端口,有一个线程池。
注意:为什么SimpleDataSource可以做缓存来使用?
 1     public T getExtension(String name) {
 2         if (name == null || name.length() == 0)
 3             throw new IllegalArgumentException("Extension name == null");
 4         if ("true".equals(name)) {
 5             return getDefaultExtension();
 6         }
 7         Holder<Object> holder = cachedInstances.get(name);
 8         if (holder == null) {
 9             cachedInstances.putIfAbsent(name, new Holder<Object>());
10             holder = cachedInstances.get(name);
11         }
12         Object instance = holder.get();
13         if (instance == null) {
14             synchronized (holder) {
15                 instance = holder.get();
16                 if (instance == null) {
17                     instance = createExtension(name);
18                     holder.set(instance);
19                 }
20             }
21         }
22         return (T) instance;
23     }
其实,就是这样SimpleDataStore实例会存储在cachedInstances缓存中,下一次不会再创建,而是直接获取该缓存。
这样之后,一个AllChannelHandler实例就完成了,该实例属性如下:
- WrappedChannelHandler.url:dubbo://10.10.10.10:20880/com.alibaba.dubbo.demo.DemoService?anyhost=true&application=demo-provider&channel.readonly.sent=true&codec=dubbo&dubbo=2.0.0&generic=false&heartbeat=60000&interface=com.alibaba.dubbo.demo.DemoService&methods=sayHello&pid=1287&side=provider&threadname=DubboServerHandler-10.10.10.10:20880×tamp=1507116859919
- WrappedChannelHandler.handler:DecodeHandler对象
- WrappedChannelHandler.executor:FixedThreadPool实例
当然还有一个类变量WrappedChannelHandler.SHARED_EXECUTOR=CachedThreadPool实例。
之后AllChannelHandler实例会被HeartbeatHandler进行包裹,之后HeartbeatHandler实例又会被MultiMessageHandler所包裹,最后得到的MultiMessageHandler实例的层级结构如下:
1 MultiMessageHandler
2 -->handler: HeartbeatHandler
3    -->handler: AllChannelHandler
4          -->url: providerUrl
5          -->executor: FixedExecutor
6          -->handler: DecodeHandler
7             -->handler: HeaderExchangeHandler
8                -->handler: ExchangeHandlerAdapter
MultiMessageHandler实例创建出来之后,NettyServer就开始调用其各个父类进行属性的初始化了。首先来看一下NettyServer的父类层级图:

AbstractServer:
 1     protected static final String SERVER_THREAD_POOL_NAME = "DubboServerHandler";
 2     ExecutorService executor;
 3     private InetSocketAddress localAddress;
 4     private InetSocketAddress bindAddress;
 5     private int accepts;
 6     private int idleTimeout = 600;
 7
 8     public AbstractServer(URL url, ChannelHandler handler) throws RemotingException {
 9         super(url, handler);
10         localAddress = getUrl().toInetSocketAddress();
11         String host = url.getParameter(Constants.ANYHOST_KEY, false)
12                 || NetUtils.isInvalidLocalHost(getUrl().getHost())
13                 ? NetUtils.ANYHOST : getUrl().getHost();
14         bindAddress = new InetSocketAddress(host, getUrl().getPort());
15         this.accepts = url.getParameter(Constants.ACCEPTS_KEY, Constants.DEFAULT_ACCEPTS);
16         this.idleTimeout = url.getParameter(Constants.IDLE_TIMEOUT_KEY, Constants.DEFAULT_IDLE_TIMEOUT);
17         try {
18             doOpen();
19             if (logger.isInfoEnabled()) {
20                 logger.info("Start " + getClass().getSimpleName() + " bind " + getBindAddress() + ", export " + getLocalAddress());
21             }
22         } catch (Throwable t) {
23             throw new RemotingException(url.toInetSocketAddress(), null, "Failed to bind " + getClass().getSimpleName()
24                     + " on " + getLocalAddress() + ", cause: " + t.getMessage(), t);
25         }
26         //fixme replace this with better method
27         DataStore dataStore = ExtensionLoader.getExtensionLoader(DataStore.class).getDefaultExtension();
28         executor = (ExecutorService) dataStore.get(Constants.EXECUTOR_SERVICE_COMPONENT_KEY, Integer.toString(url.getPort()));
29     }
首先调用父类初始化属性,之后启动服务。
AbstractEndpoint:
 1     private Codec2 codec;
 2     private int timeout;
 3     private int connectTimeout;
 4
 5     public AbstractEndpoint(URL url, ChannelHandler handler) {
 6         super(url, handler);
 7         this.codec = getChannelCodec(url);
 8         this.timeout = url.getPositiveParameter(Constants.TIMEOUT_KEY, Constants.DEFAULT_TIMEOUT);//1000
 9         this.connectTimeout = url.getPositiveParameter(Constants.CONNECT_TIMEOUT_KEY, Constants.DEFAULT_CONNECT_TIMEOUT);//3000
10     }
AbstractPeer:
 1     private final ChannelHandler handler;
 2     private volatile URL url;
 3
 4     public AbstractPeer(URL url, ChannelHandler handler) {
 5         if (url == null) {
 6             throw new IllegalArgumentException("url == null");
 7         }
 8         if (handler == null) {
 9             throw new IllegalArgumentException("handler == null");
10         }
11         this.url = url;
12         this.handler = handler;
13     }
来看一下最后初始化好的NettyServer实例:
- url:providerUrl(dubbo://10.10.10.10:20880/com.alibaba.dubbo.demo.DemoService?anyhost=true&application=demo-provider&channel.readonly.sent=true&codec=dubbo&dubbo=2.0.0&generic=false&heartbeat=60000&interface=com.alibaba.dubbo.demo.DemoService&methods=sayHello&pid=1287&side=provider×tamp=1507116859919)
- handler:MultiMessageHandler实例
- codec:DubboCountCodec实例
- timeout:1000
- connectTimeout:3000
- idleTime:600*1000
- localAddress:10.10.10.10:20880
- bindAddress:0.0.0.0:20880
- accepts:0
- executor:null(此时的executor还没实例话,要等netty服务起来之后才会从缓存中获取之前存储在SimpleDataStore缓存中的那个200个线程数的FixedThreadPool实例)
之后,就要启动netty服务了。
 1     /**
 2      * 启动netty服务,监听客户端连接
 3      */
 4     @Override
 5     protected void doOpen() throws Throwable {
 6         NettyHelper.setNettyLoggerFactory();
 7         ExecutorService boss = Executors.newCachedThreadPool(new NamedThreadFactory("NettyServerBoss", true));
 8         ExecutorService worker = Executors.newCachedThreadPool(new NamedThreadFactory("NettyServerWorker", true));
 9         ChannelFactory channelFactory = new NioServerSocketChannelFactory(boss, worker, getUrl().getPositiveParameter(Constants.IO_THREADS_KEY, Constants.DEFAULT_IO_THREADS));
10         bootstrap = new ServerBootstrap(channelFactory);
11
12         final NettyHandler nettyHandler = new NettyHandler(getUrl(), this);
13         channels = nettyHandler.getChannels();
14         // https://issues.jboss.org/browse/NETTY-365
15         // https://issues.jboss.org/browse/NETTY-379
16         // final Timer timer = new HashedWheelTimer(new NamedThreadFactory("NettyIdleTimer", true));
17         bootstrap.setPipelineFactory(new ChannelPipelineFactory() {
18             public ChannelPipeline getPipeline() {
19                 NettyCodecAdapter adapter = new NettyCodecAdapter(getCodec(), getUrl(), NettyServer.this);
20                 ChannelPipeline pipeline = Channels.pipeline();
21                 /*int idleTimeout = getIdleTimeout();
22                 if (idleTimeout > 10000) {
23                     pipeline.addLast("timer", new IdleStateHandler(timer, idleTimeout / 1000, 0, 0));
24                 }*/
25                 pipeline.addLast("decoder", adapter.getDecoder());
26                 pipeline.addLast("encoder", adapter.getEncoder());
27                 pipeline.addLast("handler", nettyHandler);
28                 return pipeline;
29             }
30         });
31         // bind
32         channel = bootstrap.bind(getBindAddress());
33     }
说明:
- boss线程数默认只有一个;
- worker线程数:Runtime.getRuntime().availableProcessors() + 1,为计算机核数+1;
- 服务端逻辑处理器为NettyHandler:
- 编码器为:InternalEncoder实例,内部使用NettyServer的DubboCountCodec实例来编码
- 解码器为:InternalDecoder实例,内部使用NettyServer的DubboCountCodec实例来解码
NettyHandler:
 1 @Sharable
 2 public class NettyHandler extends SimpleChannelHandler {
 3     private final Map<String, Channel> channels = new ConcurrentHashMap<String, Channel>(); // <ip:port, channel>
 4     private final URL url;
 5     private final ChannelHandler handler;
 6
 7     public NettyHandler(URL url, ChannelHandler handler) {
 8         if (url == null) {
 9             throw new IllegalArgumentException("url == null");
10         }
11         if (handler == null) {
12             throw new IllegalArgumentException("handler == null");
13         }
14         this.url = url;
15         this.handler = handler;
16     }
17
18     public Map<String, Channel> getChannels() {
19         return channels;
20     }
21
22     @Override
23     public void channelConnected(ChannelHandlerContext ctx, ChannelStateEvent e) throws Exception {
24         NettyChannel channel = NettyChannel.getOrAddChannel(ctx.getChannel(), url, handler);
25         try {
26             if (channel != null) {
27                 channels.put(NetUtils.toAddressString((InetSocketAddress) ctx.getChannel().getRemoteAddress()), channel);
28             }
29             handler.connected(channel);
30         } finally {
31             NettyChannel.removeChannelIfDisconnected(ctx.getChannel());
32         }
33     }
34
35     @Override
36     public void channelDisconnected(ChannelHandlerContext ctx, ChannelStateEvent e) throws Exception {
37         NettyChannel channel = NettyChannel.getOrAddChannel(ctx.getChannel(), url, handler);
38         try {
39             channels.remove(NetUtils.toAddressString((InetSocketAddress) ctx.getChannel().getRemoteAddress()));
40             handler.disconnected(channel);
41         } finally {
42             NettyChannel.removeChannelIfDisconnected(ctx.getChannel());
43         }
44     }
45
46     @Override
47     public void messageReceived(ChannelHandlerContext ctx, MessageEvent e) throws Exception {
48         NettyChannel channel = NettyChannel.getOrAddChannel(ctx.getChannel(), url, handler);
49         try {
50             handler.received(channel, e.getMessage());
51         } finally {
52             NettyChannel.removeChannelIfDisconnected(ctx.getChannel());
53         }
54     }
55
56     @Override
57     public void writeRequested(ChannelHandlerContext ctx, MessageEvent e) throws Exception {
58         super.writeRequested(ctx, e);
59         NettyChannel channel = NettyChannel.getOrAddChannel(ctx.getChannel(), url, handler);
60         try {
61             handler.sent(channel, e.getMessage());
62         } finally {
63             NettyChannel.removeChannelIfDisconnected(ctx.getChannel());
64         }
65     }
66
67     @Override
68     public void exceptionCaught(ChannelHandlerContext ctx, ExceptionEvent e) throws Exception {
69         NettyChannel channel = NettyChannel.getOrAddChannel(ctx.getChannel(), url, handler);
70         try {
71             handler.caught(channel, e.getCause());
72         } finally {
73             NettyChannel.removeChannelIfDisconnected(ctx.getChannel());
74         }
75     }
76 }
说明:
属性
- handler:就是当前的NettyServer实例
- url:providerUrl
- channels:存放连接到来的channel
监听连接完成/连接断开/接收到消息/发送完消息/异常捕捉事件,之后使用NettyServer实例进行相应的处理,NettyServer又会调用MultiMessageHandler实例(该handler属性位于NettyServer的父类AbstractPeer中)进行处理。
在来看编码器和解码器:
NettyCodecAdapter(DubboCountCodec实例, providerUrl, 当前的NettyServer实例)
 1 final class NettyCodecAdapter {
 2     private final ChannelHandler encoder = new InternalEncoder();
 3     private final ChannelHandler decoder = new InternalDecoder();
 4     private final Codec2 codec;
 5     private final URL url;
 6     private final int bufferSize;
 7     private final com.alibaba.dubbo.remoting.ChannelHandler handler;
 8
 9     public NettyCodecAdapter(Codec2 codec, URL url, com.alibaba.dubbo.remoting.ChannelHandler handler) {
10         this.codec = codec;
11         this.url = url;
12         this.handler = handler;
13         int b = url.getPositiveParameter(Constants.BUFFER_KEY, Constants.DEFAULT_BUFFER_SIZE);//8*1024
14         this.bufferSize = b >= Constants.MIN_BUFFER_SIZE && b <= Constants.MAX_BUFFER_SIZE ? b : Constants.DEFAULT_BUFFER_SIZE;//8*1024
15     }
16
17     public ChannelHandler getEncoder() {
18         return encoder;
19     }
20
21     public ChannelHandler getDecoder() {
22         return decoder;
23     }
24
25     @Sharable
26     private class InternalEncoder extends OneToOneEncoder {
27         @Override
28         protected Object encode(ChannelHandlerContext ctx, Channel ch, Object msg) throws Exception {
29             ...
30             codec.encode(channel, buffer, msg);
31             ...
32         }
33     }
34
35     private class InternalDecoder extends SimpleChannelUpstreamHandler {
36         @Override
37         public void messageReceived(ChannelHandlerContext ctx, MessageEvent event) throws Exception {
38            ...
39             msg = codec.decode(channel, message);
40            ...
41         }
42         ...
43     }
44 }
只列出核心代码:可以看到,InternalEncoder实例和InternalDecoder实例内部还是使用NettyServer的DubboCountCodec实例来编解码的。dubbo的编解码做的非常好,后续会写。
到此为止,NettyServer就创建成功了。 之后,终于执行到了:
new HeaderExchangeServer(Server NettyServer)。
 1     private final ScheduledExecutorService scheduled = Executors.newScheduledThreadPool(1, new NamedThreadFactory("dubbo-remoting-server-heartbeat",true));
 2     private final Server server;
 3     // 心跳定时器
 4     private ScheduledFuture<?> heatbeatTimer;
 5     // 心跳超时,毫秒。缺省0,不会执行心跳。
 6     private int heartbeat;
 7     private int heartbeatTimeout;
 8     private AtomicBoolean closed = new AtomicBoolean(false);
 9
10     public HeaderExchangeServer(Server server) {
11         if (server == null) {
12             throw new IllegalArgumentException("server == null");
13         }
14         this.server = server;
15         this.heartbeat = server.getUrl().getParameter(Constants.HEARTBEAT_KEY, 0);//60000 在createServer(URL providerUrl)中拼接了heartbeat参数
16         this.heartbeatTimeout = server.getUrl().getParameter(Constants.HEARTBEAT_TIMEOUT_KEY, heartbeat * 3);//3*60000
17         if (heartbeatTimeout < heartbeat * 2) {
18             throw new IllegalStateException("heartbeatTimeout < heartbeatInterval * 2");
19         }
20         startHeatbeatTimer();
21     }
说明:
- 属性
- scheduled:是一个有1个名字为dubbo-remoting-server-heartbeat的后台线程的定时线程池;
- server:之前创建出来的NettyServer实例;
- heartbeatTimer:心跳计时器
- heartbeat:心跳时间,该参数会在HeaderExchangeServer的构造器中进行赋值,60000
- heartbeatTimeout:心跳超时时间,超过该时间,会进行channel重连,180000
- 启动心跳计时器
startHeatbeatTimer()
 1     private void startHeatbeatTimer() {
 2         stopHeartbeatTimer();
 3         if (heartbeat > 0) {
 4             heatbeatTimer = scheduled.scheduleWithFixedDelay(
 5                     new HeartBeatTask(new HeartBeatTask.ChannelProvider() {
 6                         public Collection<Channel> getChannels() {
 7                             return Collections.unmodifiableCollection(HeaderExchangeServer.this.getChannels());
 8                         }
 9                     }, heartbeat, heartbeatTimeout),
10                     heartbeat,
11                     heartbeat,
12                     TimeUnit.MILLISECONDS);
13         }
14     }
15
16     private void stopHeartbeatTimer() {
17         try {
18             ScheduledFuture<?> timer = heatbeatTimer;
19             if (timer != null && !timer.isCancelled()) {
20                 timer.cancel(true);
21             }
22         } catch (Throwable t) {
23             logger.warn(t.getMessage(), t);
24         } finally {
25             heatbeatTimer = null;
26         }
27     }
首先停掉之前的计时器,之后在线程创建开始heartbeat毫秒(60s)后执行第一次HeartBeatTask任务,之后每隔heartbeat毫秒(60s)执行一次HeartBeatTask任务。来看一下HeartBeatTask:
HeartBeatTask
 1 final class HeartBeatTask implements Runnable {
 2     private ChannelProvider channelProvider;
 3     private int heartbeat;//60s
 4     private int heartbeatTimeout;//180s
 5
 6     HeartBeatTask(ChannelProvider provider, int heartbeat, int heartbeatTimeout) {
 7         this.channelProvider = provider;
 8         this.heartbeat = heartbeat;
 9         this.heartbeatTimeout = heartbeatTimeout;
10     }
11
12     public void run() {
13         try {
14             long now = System.currentTimeMillis();
15             for (Channel channel : channelProvider.getChannels()) {
16                 if (channel.isClosed()) {
17                     continue;
18                 }
19                 try {
20                     Long lastRead = (Long) channel.getAttribute(HeaderExchangeHandler.KEY_READ_TIMESTAMP);//"READ_TIMESTAMP"
21                     Long lastWrite = (Long) channel.getAttribute(HeaderExchangeHandler.KEY_WRITE_TIMESTAMP);//"WRITE_TIMESTAMP"
22                     //如果最后一次读和写在heartbeat时间(60s)内,则最后一次的读和写本身可以看作心跳;否则,需要程序发送心跳
23                     if ((lastRead != null && now - lastRead > heartbeat)
24                             || (lastWrite != null && now - lastWrite > heartbeat)) {
25                         Request req = new Request();
26                         req.setVersion("2.0.0");
27                         req.setTwoWay(true);
28                         req.setEvent(Request.HEARTBEAT_EVENT);
29                         channel.send(req);
30                         if (logger.isDebugEnabled()) {
31                             logger.debug("Send heartbeat to remote channel " + channel.getRemoteAddress()
32                                     + ", cause: The channel has no data-transmission exceeds a heartbeat period: " + heartbeat + "ms");
33                         }
34                     }
35                     //如果最后一次读的时间距离现在已经超过heartbeatTimeout了,我们认为channel已经断了(因为在这个过程中,发送了三次心跳都没反应),此时channel进行重连
36                     if (lastRead != null && now - lastRead > heartbeatTimeout) {
37                         logger.warn("Close channel " + channel
38                                 + ", because heartbeat read idle time out: " + heartbeatTimeout + "ms");
39                         if (channel instanceof Client) {
40                             try {
41                                 ((Client) channel).reconnect();
42                             } catch (Exception e) {
43                                 //do nothing
44                             }
45                         } else {
46                             channel.close();
47                         }
48                     }
49                 } catch (Throwable t) {
50                     logger.warn("Exception when heartbeat to remote channel " + channel.getRemoteAddress(), t);
51                 }
52             }
53         } catch (Throwable t) {
54             logger.warn("Unhandled exception when heartbeat, cause: " + t.getMessage(), t);
55         }
56     }
57
58     interface ChannelProvider {
59         Collection<Channel> getChannels();
60     }
61 }
说明:
- 属性
- channelProvider在startHeatbeatTimer()中创建,并且获取了当前的HeaderExchangeServer的所有channels
- heartbeat:60s
- heartbeatTimeout:180s
- run()
- 如果最后一次读和写的时间距离现在在heartbeat时间(60s)内,则最后一次的读和写本身可以看作心跳;否则,发送心跳
- 如果最后一次读的时间距离现在已经超过heartbeatTimeout了,认为channel已经断了(因为在这个过程中,发送了三次心跳都没反应),此时channel进行重连
到现在一个完整的ExchangeServer就OK了。之后我们将创建出来的ExchangeServer实例存放在DubboProtocol的Map<String, ExchangeServer> serverMap属性中:
{ "10.10.10.10:20880" : ExchangeServer实例 }
最后,DubboProtocol.export(Invoker<T> invoker)将之前创建的DubboExporter实例返回。
2.4 创建RegistryProtocol.ExporterChangeableWrapper来封装Exporter和originInvoker
1 exporter = new ExporterChangeableWrapper<T>((Exporter<T>) protocol.export(invokerDelegete), originInvoker)
 1     private class ExporterChangeableWrapper<T> implements Exporter<T> {
 2         private final Invoker<T> originInvoker;
 3         private Exporter<T> exporter;
 4
 5         public ExporterChangeableWrapper(Exporter<T> exporter, Invoker<T> originInvoker) {
 6             this.exporter = exporter;
 7             this.originInvoker = originInvoker;
 8         }
 9
10         public Invoker<T> getOriginInvoker() {
11             return originInvoker;
12         }
13
14         public Invoker<T> getInvoker() {
15             return exporter.getInvoker();
16         }
17
18         public void setExporter(Exporter<T> exporter) {
19             this.exporter = exporter;
20         }
21
22         public void unexport() {
23             String key = getCacheKey(this.originInvoker);
24             bounds.remove(key);
25             exporter.unexport();
26         }
27     }
ExporterChangeableWrapper类是RegistryProtocol的私有内部类。
最后,将<providerUrl, ExporterChangeableWrapper实例>放入RegistryProtocol的属性Map<String, ExporterChangeableWrapper<?>> bounds中。
- key:dubbo://10.10.10.10:20880/com.alibaba.dubbo.demo.DemoService?anyhost=true&application=demo-provider&dubbo=2.0.0&generic=false&interface=com.alibaba.dubbo.demo.DemoService&methods=sayHello&pid=744&side=provider×tamp=1507176748026
- value:RegistryProtocol$ExporterChangeableWrapper实例
- originInvoker:即AbstractProxyInvoker实例属性如下:
- proxy:DemoServiceImpl实例
- type:Class<com.alibaba.dubbo.demo.DemoService>
- url:registry://10.211.55.5:2181/com.alibaba.dubbo.registry.RegistryService?application=demo-provider&client=curator&dubbo=2.0.0&export=dubbo%3A%2F%2F10.10.10.10%3A20880%2Fcom.alibaba.dubbo.demo.DemoService%3Fanyhost%3Dtrue%26application%3Ddemo-provider%26dubbo%3D2.0.0%26generic%3Dfalse%26interface%3Dcom.alibaba.dubbo.demo.DemoService%26methods%3DsayHello%26pid%3D993%26side%3Dprovider%26timestamp%3D1507100322516&pid=993®istry=zookeeper×tamp=1507100319830
- DubboExporter实例
- key:com.alibaba.dubbo.demo.DemoService:20880
- invoker:"InvokerDelegete的filter对象"
- exporterMap:{ "com.alibaba.dubbo.demo.DemoService:20880" -> 当前的DubboExporter实例 }
- originInvoker:即AbstractProxyInvoker实例属性如下:
到此为止,RegistryProtocol.export(final Invoker<T> originInvoker)的第一行代码就完成了。
 1     public <T> Exporter<T> export(final Invoker<T> originInvoker) throws RpcException {
 2         //export invoker
 3         final ExporterChangeableWrapper<T> exporter = doLocalExport(originInvoker);
 4         //registry provider
 5         final Registry registry = getRegistry(originInvoker);
 6         final URL registedProviderUrl = getRegistedProviderUrl(originInvoker);
 7         registry.register(registedProviderUrl);
 8         // 订阅override数据
 9         // FIXME 提供者订阅时,会影响同一JVM即暴露服务,又引用同一服务的的场景,因为subscribed以服务名为缓存的key,导致订阅信息覆盖。
10         final URL overrideSubscribeUrl = getSubscribedOverrideUrl(registedProviderUrl);
11         final OverrideListener overrideSubscribeListener = new OverrideListener(overrideSubscribeUrl, originInvoker);
12         overrideListeners.put(overrideSubscribeUrl, overrideSubscribeListener);
13         registry.subscribe(overrideSubscribeUrl, overrideSubscribeListener);
14         //保证每次export都返回一个新的exporter实例
15         return new Exporter<T>() {
16             public Invoker<T> getInvoker() {
17                 return exporter.getInvoker();
18             }
19
20             public void unexport() {
21                 try {
22                     exporter.unexport();
23                 } catch (Throwable t) {
24                     logger.warn(t.getMessage(), t);
25                 }
26                 try {
27                     registry.unregister(registedProviderUrl);
28                 } catch (Throwable t) {
29                     logger.warn(t.getMessage(), t);
30                 }
31                 try {
32                     overrideListeners.remove(overrideSubscribeUrl);
33                     registry.unsubscribe(overrideSubscribeUrl, overrideSubscribeListener);
34                 } catch (Throwable t) {
35                     logger.warn(t.getMessage(), t);
36                 }
37             }
38         };
39     }
7.5 zookeeper客户端curator的基本使用 + zkui
使用zookeeper原生API实现一些复杂的东西比较麻烦。所以,出现了两款比较好的开源客户端,对zookeeper的原生API进行了包装:zkClient和curator。后者是Netflix出版的,必属精品,也是最好用的zk的开源客户端。
一 curator基本API使用
引入依赖:
1         <dependency>
2             <groupId>org.apache.curator</groupId>
3             <artifactId>curator-framework</artifactId>
4             <version>2.12.0</version>
5         </dependency>
该依赖引入后,默认引入的zookeeper版本是3.4.8。
注意:不要引入>=3.0.0的curator-framework,默认引入的zookeeper版本是3.5.x(该版本还不稳定),目前测试起来还是有点问题的。
完整代码:
 1 package com.hulk.curator;
 2
 3 import org.apache.curator.framework.CuratorFramework;
 4 import org.apache.curator.framework.CuratorFrameworkFactory;
 5 import org.apache.curator.framework.api.BackgroundCallback;
 6 import org.apache.curator.framework.api.CuratorEvent;
 7 import org.apache.curator.retry.ExponentialBackoffRetry;
 8 import org.apache.zookeeper.CreateMode;
 9 import org.apache.zookeeper.data.Stat;
10
11 import java.util.concurrent.Executors;
12
13 public class CuratorTest {
14     private static CuratorFramework client = CuratorFrameworkFactory.builder()
15             .connectString("10.211.55.4:2181")
16             .sessionTimeoutMs(50000)
17             .connectionTimeoutMs(30000)
18             .retryPolicy(new ExponentialBackoffRetry(1000, 3)).build();
19
20     public static void main(String[] args) throws Exception {
21         /**
22          * 创建会话
23          */
24         client.start();
25
26         /**
27          * 创建节点
28          * 注意:
29          * 1 除非指明创建节点的类型,默认是持久节点
30          * 2 ZooKeeper规定:所有非叶子节点都是持久节点,所以递归创建出来的节点,只有最后的数据节点才是指定类型的节点,其父节点是持久节点
31          */
32         client.create().forPath("/China");//创建一个初始内容为空的节点
33         client.create().forPath("/America", "zhangsan".getBytes());
34         client.create().withMode(CreateMode.EPHEMERAL).forPath("/France");//创建一个初始内容为空的临时节点
35         client.create().creatingParentsIfNeeded().withMode(CreateMode.EPHEMERAL).forPath("/Russia/car", "haha".getBytes());//递归创建,/Russia是持久节点
36
37         /**
38          * 异步创建节点
39          * 注意:如果自己指定了线程池,那么相应的操作就会在线程池中执行,如果没有指定,那么就会使用Zookeeper的EventThread线程对事件进行串行处理
40          */
41         client.create().withMode(CreateMode.EPHEMERAL).inBackground(new BackgroundCallback() {
42             @Override
43             public void processResult(CuratorFramework client, CuratorEvent event) throws Exception {
44                 System.out.println("当前线程:" + Thread.currentThread().getName() + ",code:" + event.getResultCode()
45                                    + ",type:" + event.getType());
46             }
47         }, Executors.newFixedThreadPool(10)).forPath("/async-curator-my");
48
49         client.create().withMode(CreateMode.EPHEMERAL).inBackground(new BackgroundCallback() {
50             @Override
51             public void processResult(CuratorFramework client, CuratorEvent event) throws Exception {
52                 System.out.println("当前线程:" + Thread.currentThread().getName() + ",code:" + event.getResultCode()
53                                    + ",type:" + event.getType());
54             }
55         }).forPath("/async-curator-zookeeper");
56
57         /**
58          * 获取节点内容
59          */
60         byte[] data = client.getData().forPath("/America");
61         System.out.println(new String(data));
62         byte[] data2 = client.getData().storingStatIn(new Stat()).forPath("/America"); //传入一个旧的stat变量,来存储服务端返回的最新的节点状态信息
63         System.out.println(new String(data2));
64         /**
65          * 更新数据
66          */
67         Stat stat = client.setData().forPath("/America");
68         client.setData().withVersion(4).forPath("/America", "lisi".getBytes());
69
70         /**
71          * 删除节点
72          */
73         client.delete().forPath("/China");//只能删除叶子节点
74         client.delete().deletingChildrenIfNeeded().forPath("/Russia");//删除一个节点,并递归删除其所有子节点
75         client.delete().withVersion(5).forPath("/America");//强制指定版本进行删除
76         client.delete().guaranteed().forPath("/America");//注意:由于一些网络原因,上述的删除操作有可能失败,使用guaranteed(),如果删除失败,会记录下来,只要会话有效,就会不断的重试,直到删除成功为止
77
78         Thread.sleep(Integer.MAX_VALUE);
79     }
80 }
1 创建会话
curator创建会话有两种方式,推荐流式API。
1 CuratorFramework client = CuratorFrameworkFactory.builder()
2             .connectString("10.211.55.4:2181")
3             .sessionTimeoutMs(50000)
4             .connectionTimeoutMs(30000)
5             .retryPolicy(new ExponentialBackoffRetry(1000, 3)).build();
参数:
- connectString:zk的server地址,多个server之间使用英文逗号分隔开
- connectionTimeoutMs:连接超时时间,如上是30s,默认是15s
- sessionTimeoutMs:会话超时时间,如上是50s,默认是60s
- retryPolicy:失败重试策略
- ExponentialBackoffRetry:构造器含有三个参数 ExponentialBackoffRetry(int baseSleepTimeMs, int maxRetries, int maxSleepMs)
- baseSleepTimeMs:初始的sleep时间,用于计算之后的每次重试的sleep时间,
- 计算公式:当前sleep时间=baseSleepTimeMs*Math.max(1, random.nextInt(1<<(retryCount+1)))
- maxRetries:最大重试次数
- maxSleepMs:最大sleep时间,如果上述的当前sleep计算出来比这个大,那么sleep用这个时间
- baseSleepTimeMs:初始的sleep时间,用于计算之后的每次重试的sleep时间,
- 其他,查看org.apache.curator.RetryPolicy接口的实现类
- ExponentialBackoffRetry:构造器含有三个参数 ExponentialBackoffRetry(int baseSleepTimeMs, int maxRetries, int maxSleepMs)
此时会话还没创建,使用如下代码创建会话:
1 client.start();
start()会阻塞到会话创建成功为止。
2 创建节点
2.1 同步创建
1         client.create().forPath("/China");//创建一个初始内容为空的节点
2         client.create().forPath("/America", "zhangsan".getBytes());
3         client.create().withMode(CreateMode.EPHEMERAL).forPath("/France");//创建一个初始内容为空的临时节点
4         client.create().creatingParentsIfNeeded().withMode(CreateMode.EPHEMERAL).forPath("/Russia/car", "haha".getBytes());//递归创建,/Russia是持久节点
注意:
- 除非指明创建节点的类型,默认是持久节点
- ZooKeeper规定:所有非叶子节点都是持久节点,所以递归创建出来的节点,只有最后的数据节点才是指定类型的节点,其父节点是持久节点
- creatingParentsIfNeeded():可以实现递归创建
2.2 异步创建
 1         client.create().withMode(CreateMode.EPHEMERAL).inBackground(new BackgroundCallback() {
 2             @Override
 3             public void processResult(CuratorFramework client, CuratorEvent event) throws Exception {
 4                 System.out.println("当前线程:" + Thread.currentThread().getName() + ",code:" + event.getResultCode()
 5                                    + ",type:" + event.getType());
 6             }
 7         }, Executors.newFixedThreadPool(10)).forPath("/async-curator-my");
 8
 9         client.create().withMode(CreateMode.EPHEMERAL).inBackground(new BackgroundCallback() {
10             @Override
11             public void processResult(CuratorFramework client, CuratorEvent event) throws Exception {
12                 System.out.println("当前线程:" + Thread.currentThread().getName() + ",code:" + event.getResultCode()
13                                    + ",type:" + event.getType());
14             }
15         }).forPath("/async-curator-zookeeper");
注意:
- 在curator中所有异步操作,都使用org.apache.curator.framework.api.BackgroundCallback接口的实现类完成
- 如果在BackgroundCallback中自己指定了线程池,那么相应的操作就会在线程池中执行,如果没有指定,那么就会使用Zookeeper的EventThread线程对事件进行串行处理,所以上述的两个输出分别如下:
当前线程:pool-3-thread-1,code:0,type:CREATE
当前线程:main-EventThread,code:0,type:CREATE
3 获取节点内容
1         byte[] data = client.getData().forPath("/America");
2         System.out.println(new String(data));
3         byte[] data2 = client.getData().storingStatIn(new Stat()).forPath("/America"); //传入一个旧的stat变量,来存储服务端返回的最新的节点状态信息
4         System.out.println(new String(data2));
4 获取节点子节点列表
1 List<String> children = client.getChildren().forPath("/Russia");
5 更新数据
1         Stat stat = client.setData().forPath("/America");
2         client.setData().withVersion(4).forPath("/America", "lisi".getBytes());
注意:
- version版本号还是为了实现CAS并发处理,也会强制某个线程必须更新相应的版本的数据
6 删除节点
1         client.delete().forPath("/China");//只能删除叶子节点
2         client.delete().deletingChildrenIfNeeded().forPath("/Russia");//删除一个节点,并递归删除其所有子节点
3         client.delete().withVersion(5).forPath("/America");//强制指定版本进行删除
4         client.delete().guaranteed().forPath("/America");
注意:
- deletingChildrenIfNeeded()实现级联删除
- guaranteed()由于一些网络原因,上述的删除操作有可能失败,使用guaranteed(),如果删除失败,会记录下来,只要会话有效,就会不断的重试,直到删除成功为止
二 curator实现事件监听
引入两个依赖:
 1         <dependency>
 2             <groupId>org.apache.curator</groupId>
 3             <artifactId>curator-framework</artifactId>
 4             <version>2.12.0</version>
 5         </dependency>
 6         <dependency>
 7             <groupId>org.apache.curator</groupId>
 8             <artifactId>curator-recipes</artifactId>
 9             <version>2.12.0</version>
10         </dependency>
给出全部代码:
 1 package com.hulk.curator;
 2
 3 import org.apache.curator.framework.CuratorFramework;
 4 import org.apache.curator.framework.CuratorFrameworkFactory;
 5 import org.apache.curator.framework.recipes.cache.NodeCache;
 6 import org.apache.curator.framework.recipes.cache.NodeCacheListener;
 7 import org.apache.curator.framework.recipes.cache.PathChildrenCache;
 8 import org.apache.curator.framework.recipes.cache.PathChildrenCacheEvent;
 9 import org.apache.curator.framework.recipes.cache.PathChildrenCacheListener;
10 import org.apache.curator.retry.ExponentialBackoffRetry;
11
12 /**
13  * 事件监听器
14  */
15 public class CuratorWatcherTest {
16     private static CuratorFramework client = CuratorFrameworkFactory.builder()
17             .connectString("10.211.55.4:2181")
18             .sessionTimeoutMs(50000)
19             .connectionTimeoutMs(30000)
20             .retryPolicy(new ExponentialBackoffRetry(1000, 3))
21             .build();
22
23     public static void main(String[] args) throws Exception {
24         /**
25          * 创建会话
26          */
27         client.start();
28         client.create().creatingParentsIfNeeded().forPath("/book/computer","java".getBytes());
29         /**
30          * 监听指定节点本身的变化,包括节点本身的创建和节点本身数据的变化
31          */
32         NodeCache nodeCache = new NodeCache(client,"/book/computer");
33         nodeCache.getListenable().addListener(new NodeCacheListener() {
34             @Override
35             public void nodeChanged() throws Exception {
36                 System.out.println("新的节点数据:" + new String(nodeCache.getCurrentData().getData()));
37             }
38         });
39         nodeCache.start(true);
40
41         client.setData().forPath("/book/computer","c++".getBytes());
42         /**
43          * 监听子节点变化情况
44          * 1 新增子节点
45          * 2 删除子节点
46          * 3 子节点数据变更
47          */
48         PathChildrenCache pathChildrenCache = new PathChildrenCache(client,"/book13",true);
49         pathChildrenCache.getListenable().addListener(new PathChildrenCacheListener() {
50             @Override
51             public void childEvent(CuratorFramework client, PathChildrenCacheEvent event) throws Exception {
52                 switch (event.getType()){
53                     case CHILD_ADDED:
54                         System.out.println("新增子节点:" + event.getData().getPath());
55                         break;
56                     case CHILD_UPDATED:
57                         System.out.println("子节点数据变化:" + event.getData().getPath());
58                         break;
59                     case CHILD_REMOVED:
60                         System.out.println("删除子节点:" + event.getData().getPath());
61                         break;
62                     default:
63                         break;
64                 }
65             }
66         });
67         pathChildrenCache.start();
68
69         client.create().forPath("/book13");
70
71         client.create().forPath("/book13/car", "bmw".getBytes());
72
73         client.setData().forPath("/book13/car", "audi".getBytes());
74
75         client.delete().forPath("/book13/car");
76     }
77 }
curator的事件监听分为:
- NodeCache:对节点本身的监听
- 监听节点本身的创建
- 监听节点本身的数据的变化
- PathChildrenCache:对节点的子节点的监听
- 监听新增子节点
- 监听删除子节点
- 监听子节点数据变化
注意:
- PathChildrenCache只会监听指定节点的一级子节点,不会监听节点本身(例如:“/book13”),也不会监听子节点的子节点(例如,“/book13/car/color”)
三 zkui
zk的操作我们一般可以登上zk所在的机器,然后执行“sh zkCli.sh”,之后执行一些命令,但是由于这样始终效率低下,这里推荐一款比较好用的zk的ui界面:zkui。
假设我们要在10.211.55.5机器上安装该程序。
1 下载打包
1 git clone https://github.com/DeemOpen/zkui.git
2 cd zkui/
3 mvn clean install
通过上述的操作,在zkui/target目录下我们会生成一个fatjar:zkui-2.0-SNAPSHOT-jar-with-dependencies.jar,在启动这个jar之前先要进行相关配置。
2 配置zkui
1 cp config.cfg target/
2 vi config.cfg
3 修改内容如下,其他不变:
4 zkServer=10.211.55.5:2181
注意:需要将配置文件config.cfg与fatjar放在同一个目录下。
3 启动zkui
之后进入target/目录下,执行:
1 nohup java -jar zkui-2.0-SNAPSHOT-jar-with-dependencies.jar &
4 浏览器访问
浏览器访问“http://10.211.55.5:9090”,之后在登录页面输入用户名密码:admin/manager进行登录。(可以去config.cfg进行配置)