1.首先需要先安装好apache服务器,此处不做叙述。
2.首先,判断CentOS7上是否已经安装了SSL证书服务模块:mod_ssl与openssl;
rpm -qa mod_ssl
rpm -qa openssl
键入上式,没有反应就是没有安装SSL证书服务模块 openssl。一般新装的CentOS7默认有安装。
安装mod_ssl 与openssl:
yum install mod_ssl openssl
安装后,CentOS7中会自动生成 /etc/httpd/conf.d/ssl.conf 文件,ssl.conf文件就是SSL模块的配置文件。如果系统中没有找到ss.conf文件;
执行:yum remove mod_ssl; yum install mod_ssl即可重新生成一个;
3.创建mkdir /var/www/ssl 文件夹
将从云服务商中下载的证书上传到/var/www/ssl/下,从云服务商中下载的证书为: www.域名.com.zip 的zip文件。解压,有:
Apache/
IIS/
Nginx/
Tomcat/
共四个文件夹,分别用于存放适合对应的类型的服务系统的格式的SSL证书文件。
另外还有一个:www.域名.com.csr 的csr文件。
应为是配置Apache的httpd服务器系统,所以我们将只需要将Apache文件夹下面的三个ssl证书文件复制到在CentOS上创建的 /var/www/ssl 文件夹即可。
这三个ssl证书文件分别是:
1_root_bundle.crt
2_www.ydook.com.crt
3_www.ydook.com.key
4.通过OpenSSL生成自签名证书
openssl genrsa -des3 -out weapp.key 2048
openssl req -new -key weapp.key -out weapp.csr
openssl req -new -x509 -days 3650 -key weapp.key -out weapp.crt
如何执行过程中出现如下错误:
openssl: error while loading shared libraries: libssl.so.1.1: cannot open shared object file: No such file or directory
这是由于openssl库的位置不正确造成的。
解决办法,在root中
ln -s /usr/local/lib64/libssl.so.1.1 /usr/lib64/libssl.so.1.1
ln -s /usr/local/lib64/libcrypto.so.1.1 /usr/lib64/libcrypto.so.1.1
生成的证书为:weapp.crt ;weapp.key ;weapp.csr
对证书进行重命名:
mv weapp.crt _www.ydook.com.crt;
mv weapp.key _www.ydook.com.key;
5.修改/etc/httpd/conf.d/ssl.conf文件
修改1:
SSLCertificateFile /etc/pki/tls/certs/localhost.crt 修改为:
SSLCertificateFile /var/www/ssl/2_www.ydook.com.crt
修改2:
SSLCertificateKeyFile /etc/pki/tls/private/localhost.key 修改为:
SSLCertificateKeyFile /var/www/ssl/3_www.ydook.com.key
修改3:
#SSLCACertificateFile /etc/pki/tls/certs/ca-bundle.crt 去掉#号,修改为:
SSLCACertificateFile /var/www/ssl/1_root_bundle.crt
修改4:查看设置是否为:SSLEngine on ,如果不是就改为 SSLEngine on 。
修改5:
修改为:
<VirtualHost *:443>
修改6:
#DocumentRoot “/var/www/html” 去掉#号注释,修改为:
DocumentRoot “/var/www/ydook”
修改7:
#ServerName www.example.com:443 去掉#号注释,修改为:
ServerName www.ydook.com:443
修改8:
ErrorLog logs/ssl_error_log 修改为:
ErrorLog /var/www/ydook/logs/error.log
修改9:
CustomLog logs/ssl_request_log 修改为:
CustomLog /var/www/ydook/logs/access.log combined
并将下面一行的:"%t %h %{SSL_PROTOCOL}x %{SSL_CIPHER}x “%r” %b" 注释掉。
或者 去掉 combined 直接改为:
CustomLog /var/www/ydook/logs/access.log (推荐这种方法,保留通配符)
6.创建mkdir /var/www/ydook/logs/文件夹
最后,重新httpd 服务,使得修改生效:
systemctl restart httpd
完成!!!
修改示例:
<VirtualHost *:443>
SSLEngine On
SSLCertificateFile /etc/pki/tls/certs/example.com.crt
SSLCertificateKeyFile /etc/pki/tls/private/example.com.key
SSLCACertificateFile /etc/pki/tls/certs/root-certificate.crt # 如果使用自签名的证书或者由 ca-certificates 提供的根证书, 请删除此行代码
7.开发https端口
firewall-cmd --add-service=https

出现该种请情况,说明没用开发443端口
注意:sysstemctl restart httpd需要输入密码
故在openssl中,需要实现确定号密码:如密码:一律填写:LongXing;其它一律填写:FL
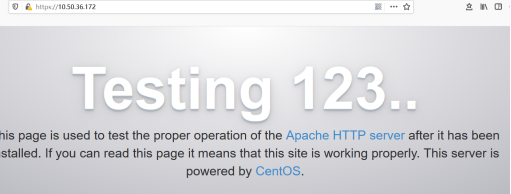
访问服务器:http://10.50.36.172/

https://10.50.36.172/
当使用curl http://ip:prot/访问时,出现
Connection Refused 或者 No route to host时
如:

说明服务器端没用该端口号所绑定的进程,此时可以更改服务器端口号,占用该端口,即可访问,如果还不行,需要开发对应端口;
附件:
httpd.conf配置:


#
# This is the main Apache HTTP server configuration file.  It contains the
# configuration directives that give the server its instructions.
# See <URL:http://httpd.apache.org/docs/2.4/> for detailed information.
# In particular, see
# <URL:http://httpd.apache.org/docs/2.4/mod/directives.html>
# for a discussion of each configuration directive.
#
# Do NOT simply read the instructions in here without understanding
# what they do.  They're here only as hints or reminders.  If you are unsure
# consult the online docs. You have been warned.
#
# Configuration and logfile names: If the filenames you specify for many
# of the server's control files begin with "/" (or "drive:/" for Win32), the
# server will use that explicit path.  If the filenames do *not* begin
# with "/", the value of ServerRoot is prepended -- so 'log/access_log'
# with ServerRoot set to '/www' will be interpreted by the
# server as '/www/log/access_log', where as '/log/access_log' will be
# interpreted as '/log/access_log'.

#
# ServerRoot: The top of the directory tree under which the server's
# configuration, error, and log files are kept.
#
# Do not add a slash at the end of the directory path.  If you point
# ServerRoot at a non-local disk, be sure to specify a local disk on the
# Mutex directive, if file-based mutexes are used.  If you wish to share the
# same ServerRoot for multiple httpd daemons, you will need to change at
# least PidFile.
#
ServerRoot "/etc/httpd"

#
# Listen: Allows you to bind Apache to specific IP addresses and/or
# ports, instead of the default. See also the <VirtualHost>
# directive.
#
# Change this to Listen on specific IP addresses as shown below to
# prevent Apache from glomming onto all bound IP addresses.
#
#Listen 12.34.56.78:80
Listen 80

#
# Dynamic Shared Object (DSO) Support
#
# To be able to use the functionality of a module which was built as a DSO you
# have to place corresponding `LoadModule' lines at this location so the
# directives contained in it are actually available _before_ they are used.
# Statically compiled modules (those listed by `httpd -l') do not need
# to be loaded here.
#
# Example:
# LoadModule foo_module modules/mod_foo.so
#
Include conf.modules.d/*.conf

#
# If you wish httpd to run as a different user or group, you must run
# httpd as root initially and it will switch.
#
# User/Group: The name (or #number) of the user/group to run httpd as.
# It is usually good practice to create a dedicated user and group for
# running httpd, as with most system services.
#
User apache
Group apache

# 'Main' server configuration
#
# The directives in this section set up the values used by the 'main'
# server, which responds to any requests that aren't handled by a
# <VirtualHost> definition.  These values also provide defaults for
# any <VirtualHost> containers you may define later in the file.
#
# All of these directives may appear inside <VirtualHost> containers,
# in which case these default settings will be overridden for the
# virtual host being defined.
#

#
# ServerAdmin: Your address, where problems with the server should be
# e-mailed.  This address appears on some server-generated pages, such
# as error documents.  e.g. admin@your-domain.com
#
ServerAdmin root@localhost

#
# ServerName gives the name and port that the server uses to identify itself.
# This can often be determined automatically, but we recommend you specify
# it explicitly to prevent problems during startup.
#
# If your host doesn't have a registered DNS name, enter its IP address here.
#
#ServerName www.example.com:80
ServerName localhost:80

#
# Deny access to the entirety of your server's filesystem. You must
# explicitly permit access to web content directories in other
# <Directory> blocks below.
#
<Directory />
    AllowOverride none
    Require all denied
</Directory>

#
# Note that from this point forward you must specifically allow
# particular features to be enabled - so if something's not working as
# you might expect, make sure that you have specifically enabled it
# below.
#

#
# DocumentRoot: The directory out of which you will serve your
# documents. By default, all requests are taken from this directory, but
# symbolic links and aliases may be used to point to other locations.
#
DocumentRoot "/var/www/html"

#
# Relax access to content within /var/www.
#
<Directory "/var/www">
    AllowOverride All
    # Allow open access:
    Require all granted
</Directory>

# Further relax access to the default document root:
<Directory "/var/www/html">
    #
    # Possible values for the Options directive are "All", "All",
    # or any combination of:
    #   Indexes Includes FollowSymLinks SymLinksifOwnerMatch ExecCGI MultiViews
    #
    # Note that "MultiViews" must be named *explicitly* --- "Options All"
    # doesn't give it to you.
    #
    # The Options directive is both complicated and important.  Please see
    # http://httpd.apache.org/docs/2.4/mod/core.html#options
    # for more information.
    #
    Options Indexes FollowSymLinks

    #
    # AllowOverride controls what directives may be placed in .htaccess files.
    # It can be "All", "All", or any combination of the keywords:
    #   Options FileInfo AuthConfig Limit
    #
    AllowOverride All

    #
    # Controls who can get stuff from this server.
    #
    Require all granted
</Directory>

#
# DirectoryIndex: sets the file that Apache will serve if a directory
# is requested.
#
<IfModule dir_module>
    DirectoryIndex index.html
</IfModule>

#
# The following lines prevent .htaccess and .htpasswd files from being
# viewed by Web clients.
#
<Files ".ht*">
    Require all denied
</Files>

#
# ErrorLog: The location of the error log file.
# If you do not specify an ErrorLog directive within a <VirtualHost>
# container, error messages relating to that virtual host will be
# logged here.  If you *do* define an error logfile for a <VirtualHost>
# container, that host's errors will be logged there and not here.
#
ErrorLog "logs/error_log"

#
# LogLevel: Control the number of messages logged to the error_log.
# Possible values include: debug, info, notice, warn, error, crit,
# alert, emerg.
#
LogLevel warn

<IfModule log_config_module>
    #
    # The following directives define some format nicknames for use with
    # a CustomLog directive (see below).
    #
    LogFormat "%h %l %u %t "%r" %>s %b "%{Referer}i" "%{User-Agent}i"" combined
    LogFormat "%h %l %u %t "%r" %>s %b" common

    <IfModule logio_module>
      # You need to enable mod_logio.c to use %I and %O
      LogFormat "%h %l %u %t "%r" %>s %b "%{Referer}i" "%{User-Agent}i" %I %O" combinedio
    </IfModule>

    #
    # The location and format of the access logfile (Common Logfile Format).
    # If you do not define any access logfiles within a <VirtualHost>
    # container, they will be logged here.  Contrariwise, if you *do*
    # define per-<VirtualHost> access logfiles, transactions will be
    # logged therein and *not* in this file.
    #
    #CustomLog "logs/access_log" common

    #
    # If you prefer a logfile with access, agent, and referer information
    # (Combined Logfile Format) you can use the following directive.
    #
    CustomLog "logs/access_log" combined
</IfModule>

<IfModule alias_module>
    #
    # Redirect: Allows you to tell clients about documents that used to
    # exist in your server's namespace, but do not anymore. The client
    # will make a new request for the document at its new location.
    # Example:
    # Redirect permanent /foo http://www.example.com/bar

    #
    # Alias: Maps web paths into filesystem paths and is used to
    # access content that does not live under the DocumentRoot.
    # Example:
    # Alias /webpath /full/filesystem/path
    #
    # If you include a trailing / on /webpath then the server will
    # require it to be present in the URL.  You will also likely
    # need to provide a <Directory> section to allow access to
    # the filesystem path.

    #
    # ScriptAlias: This controls which directories contain server scripts.
    # ScriptAliases are essentially the same as Aliases, except that
    # documents in the target directory are treated as applications and
    # run by the server when requested rather than as documents sent to the
    # client.  The same rules about trailing "/" apply to ScriptAlias
    # directives as to Alias.
    #
    ScriptAlias /cgi-bin/ "/var/www/cgi-bin/"

</IfModule>

#
# "/var/www/cgi-bin" should be changed to whatever your ScriptAliased
# CGI directory exists, if you have that configured.
#
<Directory "/var/www/cgi-bin">
    AllowOverride All
    Options All
    Require all granted
</Directory>

<IfModule mime_module>
    #
    # TypesConfig points to the file containing the list of mappings from
    # filename extension to MIME-type.
    #
    TypesConfig /etc/mime.types

    #
    # AddType allows you to add to or override the MIME configuration
    # file specified in TypesConfig for specific file types.
    #
    #AddType application/x-gzip .tgz
    #
    # AddEncoding allows you to have certain browsers uncompress
    # information on the fly. Note: Not all browsers support this.
    #
    #AddEncoding x-compress .Z
    #AddEncoding x-gzip .gz .tgz
    #
    # If the AddEncoding directives above are commented-out, then you
    # probably should define those extensions to indicate media types:
    #
    AddType application/x-compress .Z
    AddType application/x-gzip .gz .tgz

    #
    # AddHandler allows you to map certain file extensions to "handlers":
    # actions unrelated to filetype. These can be either built into the server
    # or added with the Action directive (see below)
    #
    # To use CGI scripts outside of ScriptAliased directories:
    # (You will also need to add "ExecCGI" to the "Options" directive.)
    #
    #AddHandler cgi-script .cgi

    # For type maps (negotiated resources):
    #AddHandler type-map var

    #
    # Filters allow you to process content before it is sent to the client.
    #
    # To parse .shtml files for server-side includes (SSI):
    # (You will also need to add "Includes" to the "Options" directive.)
    #
    AddType text/html .shtml
    AddOutputFilter INCLUDES .shtml
</IfModule>

#
# Specify a default charset for all content served; this enables
# interpretation of all content as UTF-8 by default.  To use the
# default browser choice (ISO-8859-1), or to allow the META tags
# in HTML content to override this choice, comment out this
# directive:
#
AddDefaultCharset UTF-8

<IfModule mime_magic_module>
    #
    # The mod_mime_magic module allows the server to use various hints from the
    # contents of the file itself to determine its type.  The MIMEMagicFile
    # directive tells the module where the hint definitions are located.
    #
    MIMEMagicFile conf/magic
</IfModule>

#
# Customizable error responses come in three flavors:
# 1) plain text 2) local redirects 3) external redirects
#
# Some examples:
#ErrorDocument 500 "The server made a boo boo."
#ErrorDocument 404 /missing.html
#ErrorDocument 404 "/cgi-bin/missing_handler.pl"
#ErrorDocument 402 http://www.example.com/subscription_info.html
#

#
# EnableMMAP and EnableSendfile: On systems that support it,
# memory-mapping or the sendfile syscall may be used to deliver
# files.  This usually improves server performance, but must
# be turned off when serving from networked-mounted
# filesystems or if support for these functions is otherwise
# broken on your system.
# Defaults if commented: EnableMMAP On, EnableSendfile Off
#
#EnableMMAP off
EnableSendfile on

# Supplemental configuration
#
# Load config files in the "/etc/httpd/conf.d" directory, if any.
IncludeOptional conf.d/*.conf
ssl.conf配置:
#
# When we also provide SSL we have to listen to the
# the HTTPS port in addition.
#
Listen 443 https

##
##  SSL Global Context
##
##  All SSL configuration in this context applies both to
##  the main server and all SSL-enabled virtual hosts.
##

#   Pass Phrase Dialog:
#   Configure the pass phrase gathering process.
#   The filtering dialog program (`builtin' is a internal
#   terminal dialog) has to provide the pass phrase on stdout.
SSLPassPhraseDialog exec:/usr/libexec/httpd-ssl-pass-dialog

#   Inter-Process Session Cache:
#   Configure the SSL Session Cache: First the mechanism
#   to use and second the expiring timeout (in seconds).
SSLSessionCache         shmcb:/run/httpd/sslcache(512000)
SSLSessionCacheTimeout  300

#   Pseudo Random Number Generator (PRNG):
#   Configure one or more sources to seed the PRNG of the
#   SSL library. The seed data should be of good random quality.
#   WARNING! On some platforms /dev/random blocks if not enough entropy
#   is available. This means you then cannot use the /dev/random device
#   because it would lead to very long connection times (as long as
#   it requires to make more entropy available). But usually those
#   platforms additionally provide a /dev/urandom device which doesn't
#   block. So, if available, use this one instead. Read the mod_ssl User
#   Manual for more details.
SSLRandomSeed startup file:/dev/urandom  256
SSLRandomSeed connect builtin
#SSLRandomSeed startup file:/dev/random  512
#SSLRandomSeed connect file:/dev/random  512
#SSLRandomSeed connect file:/dev/urandom 512

#
# Use "SSLCryptoDevice" to enable any supported hardware
# accelerators. Use "openssl engine -v" to list supported
# engine names.  NOTE: If you enable an accelerator and the
# server does not start, consult the error logs and ensure
# your accelerator is functioning properly.
#
SSLCryptoDevice builtin
#SSLCryptoDevice ubsec

##
## SSL Virtual Host Context
##

#<VirtualHost _default_:443>
<VirtualHost *:443>

# General setup for the virtual host, inherited from global configuration
#DocumentRoot "/var/www/html"
DocumentRoot "/var/www/ydook"
#ServerName www.example.com:443
ServerName www.ydook.com:443

# Use separate log files for the SSL virtual host; note that LogLevel
# is not inherited from httpd.conf.
#ErrorLog logs/ssl_error_log
ErrorLog /var/www/ydook/logs/error.log
TransferLog logs/ssl_access_log
LogLevel warn

#   SSL Engine Switch:
#   Enable/Disable SSL for this virtual host.
SSLEngine on

#   SSL Protocol support:
# List the enable protocol levels with which clients will be able to
# connect.  Disable SSLv2 access by default:
SSLProtocol all -SSLv2 -SSLv3

#   SSL Cipher Suite:
#   List the ciphers that the client is permitted to negotiate.
#   See the mod_ssl documentation for a complete list.
SSLCipherSuite HIGH:3DES:!aNULL:!MD5:!SEED:!IDEA

#   Speed-optimized SSL Cipher configuration:
#   If speed is your main concern (on busy HTTPS servers e.g.),
#   you might want to force clients to specific, performance
#   optimized ciphers. In this case, prepend those ciphers
#   to the SSLCipherSuite list, and enable SSLHonorCipherOrder.
#   Caveat: by giving precedence to RC4-SHA and AES128-SHA
#   (as in the example below), most connections will no longer
#   have perfect forward secrecy - if the server's key is
#   compromised, captures of past or future traffic must be
#   considered compromised, too.
#SSLCipherSuite RC4-SHA:AES128-SHA:HIGH:MEDIUM:!aNULL:!MD5
#SSLHonorCipherOrder on

#   Server Certificate:
# Point SSLCertificateFile at a PEM encoded certificate.  If
# the certificate is encrypted, then you will be prompted for a
# pass phrase.  Note that a kill -HUP will prompt again.  A new
# certificate can be generated using the genkey(1) command.
#SSLCertificateFile /etc/pki/tls/certs/localhost.crt
SSLCertificateFile /var/www/ssl/_www.ydook.com.crt

#   Server Private Key:
#   If the key is not combined with the certificate, use this
#   directive to point at the key file.  Keep in mind that if
#   you've both a RSA and a DSA private key you can configure
#   both in parallel (to also allow the use of DSA ciphers, etc.)
#SSLCertificateKeyFile /etc/pki/tls/private/localhost.key
SSLCertificateKeyFile /var/www/ssl/_www.ydook.com.key

#   Server Certificate Chain:
#   Point SSLCertificateChainFile at a file containing the
#   concatenation of PEM encoded CA certificates which form the
#   certificate chain for the server certificate. Alternatively
#   the referenced file can be the same as SSLCertificateFile
#   when the CA certificates are directly appended to the server
#   certificate for convinience.
#SSLCertificateChainFile /etc/pki/tls/certs/server-chain.crt

#   Certificate Authority (CA):
#   Set the CA certificate verification path where to find CA
#   certificates for client authentication or alternatively one
#   huge file containing all of them (file must be PEM encoded)
#SSLCACertificateFile /etc/pki/tls/certs/ca-bundle.crt

#   Client Authentication (Type):
#   Client certificate verification type and depth.  Types are
#   none, optional, require and optional_no_ca.  Depth is a
#   number which specifies how deeply to verify the certificate
#   issuer chain before deciding the certificate is not valid.
#SSLVerifyClient require
#SSLVerifyDepth  10

#   Access Control:
#   With SSLRequire you can do per-directory access control based
#   on arbitrary complex boolean expressions containing server
#   variable checks and other lookup directives.  The syntax is a
#   mixture between C and Perl.  See the mod_ssl documentation
#   for more details.
#<Location />
#SSLRequire (    %{SSL_CIPHER} !~ m/^(EXP|NULL)/
#            and %{SSL_CLIENT_S_DN_O} eq "Snake Oil, Ltd."
#            and %{SSL_CLIENT_S_DN_OU} in {"Staff", "CA", "Dev"}
#            and %{TIME_WDAY} >= 1 and %{TIME_WDAY} <= 5
#            and %{TIME_HOUR} >= 8 and %{TIME_HOUR} <= 20       )
#           or %{REMOTE_ADDR} =~ m/^192.76.162.[0-9]+$/
#</Location>

#   SSL Engine Options:
#   Set various options for the SSL engine.
#   o FakeBasicAuth:
#     Translate the client X.509 into a Basic Authorisation.  This means that
#     the standard Auth/DBMAuth methods can be used for access control.  The
#     user name is the `one line' version of the client's X.509 certificate.
#     Note that no password is obtained from the user. Every entry in the user
#     file needs this password: `xxj31ZMTZzkVA'.
#   o ExportCertData:
#     This exports two additional environment variables: SSL_CLIENT_CERT and
#     SSL_SERVER_CERT. These contain the PEM-encoded certificates of the
#     server (always existing) and the client (only existing when client
#     authentication is used). This can be used to import the certificates
#     into CGI scripts.
#   o StdEnvVars:
#     This exports the standard SSL/TLS related `SSL_*' environment variables.
#     Per default this exportation is switched off for performance reasons,
#     because the extraction step is an expensive operation and is usually
#     useless for serving static content. So one usually enables the
#     exportation for CGI and SSI requests only.
#   o StrictRequire:
#     This denies access when "SSLRequireSSL" or "SSLRequire" applied even
#     under a "Satisfy any" situation, i.e. when it applies access is denied
#     and no other module can change it.
#   o OptRenegotiate:
#     This enables optimized SSL connection renegotiation handling when SSL
#     directives are used in per-directory context.
#SSLOptions +FakeBasicAuth +ExportCertData +StrictRequire
<Files ~ ".(cgi|shtml|phtml|php3?)$">
    SSLOptions +StdEnvVars
</Files>
<Directory "/var/www/cgi-bin">
    SSLOptions +StdEnvVars
</Directory>

#   SSL Protocol Adjustments:
#   The safe and default but still SSL/TLS standard compliant shutdown
#   approach is that mod_ssl sends the close notify alert but doesn't wait for
#   the close notify alert from client. When you need a different shutdown
#   approach you can use one of the following variables:
#   o ssl-unclean-shutdown:
#     This forces an unclean shutdown when the connection is closed, i.e. no
#     SSL close notify alert is send or allowed to received.  This violates
#     the SSL/TLS standard but is needed for some brain-dead browsers. Use
#     this when you receive I/O errors because of the standard approach where
#     mod_ssl sends the close notify alert.
#   o ssl-accurate-shutdown:
#     This forces an accurate shutdown when the connection is closed, i.e. a
#     SSL close notify alert is send and mod_ssl waits for the close notify
#     alert of the client. This is 100% SSL/TLS standard compliant, but in
#     practice often causes hanging connections with brain-dead browsers. Use
#     this only for browsers where you know that their SSL implementation
#     works correctly.
#   Notice: Most problems of broken clients are also related to the HTTP
#   keep-alive facility, so you usually additionally want to disable
#   keep-alive for those clients, too. Use variable "nokeepalive" for this.
#   Similarly, one has to force some clients to use HTTP/1.0 to workaround
#   their broken HTTP/1.1 implementation. Use variables "downgrade-1.0" and
#   "force-response-1.0" for this.
BrowserMatch "MSIE [2-5]"
         nokeepalive ssl-unclean-shutdown
         downgrade-1.0 force-response-1.0

#   Per-Server Logging:
#   The home of a custom SSL log file. Use this when you want a
#   compact non-error SSL logfile on a virtual host basis.
#CustomLog logs/ssl_request_log
CustomLog /var/www/ydook/logs/access.log combined
   #       "%t %h %{SSL_PROTOCOL}x %{SSL_CIPHER}x "%r" %b"

</VirtualHost>
脚本执行:
apache.sh:
rpm -qa mod_ssl
rpm -qa openssl
yum install mod_ssl openssl

mkdir /var/www/ssl
#apache服务器开启ssl功能
openssl genrsa -des3 -out weapp.key 2048
openssl req -new -key weapp.key -out weapp.csr
openssl req -new -x509 -days 3650 -key weapp.key -out weapp.crt

#!/bin/bash
sed -i 's#SSLCertificateFile /etc/pki/tls/certs/localhost.crt#SSLCertificateFile /var/www/ssl/weapp.crt#g'  /etc/httpd/conf.d/ssl.conf
sed -i 's#SSLCertificateKeyFile /etc/pki/tls/private/localhost.key#SSLCertificateKeyFile /var/www/ssl/weapp.key#g' /etc/httpd/conf.d/ssl.conf
sed -i 's#<VirtualHost _default_:443>#<VirtualHost *:443>#' /etc/httpd/conf.d/ssl.conf
sed -i 's@#DocumentRoot "/var/www/html"@DocumentRoot "/var/www/ydook"'  /etc/httpd/conf.d/ssl.conf
sed -i 's@#ServerName www.example.com:443@ServerName www.example.com:443@g' /etc/httpd/conf.d/ssl.conf
sed -i 's#ErrorLog logs/ssl_error_log#ErrorLog /var/www/ydook/logs/error.log#g' /etc/httpd/conf.d/ssl.conf
sed -i 's#CustomLog logs/ssl_request_log \#CustomLog /var/www/ydook/logs/access.log combined#g' /etc/httpd/conf.d/ssl.conf
sed -i 's@"%t %h %{SSL_PROTOCOL}x %{SSL_CIPHER}x \"%r\" %b"@#"%t %h %{SSL_PROTOCOL}x %{SSL_CIPHER}x \"%r\" %b"@g' /etc/httpd/conf.d/ssl.conf

mkdir /var/www/ydook
cd /var/www/ydook
mkdir logs
firewall-cmd --add-service=https
systemctl restart httpd
二、nginx启用https功能:
Centos7下nginx安装:
#CentOS7 nginx开启https
yum install gcc -y
yum install gcc-c++
yum install -y pcre pcre-devel
yum install -y openssl openssl-devel
yum install wget
mkdir nginx
cd nginx
wget https://nginx.org/download/nginx-1.16.1.tar.gz
tar -zxvf nginx-1.16.1.tar.gz
cd nginx-1.16.1
./configure
make && make install
whereis nginx
启动、停止nginx
cd /usr/local/nginx/sbin/
./nginx
./nginx -s stop
./nginx -s quit
./nginx -s reload

ps aux|grep nginx
firewall-cmd --zone=public --add-port=8082/tcp --permanent
systemctl restart firewalld.service
yum search 包名
nginx配置成功后无法访问页面:
执行:/sbin/iptables -I INPUT -p tcp --dport 80 -j ACCEPT
启用https功能:
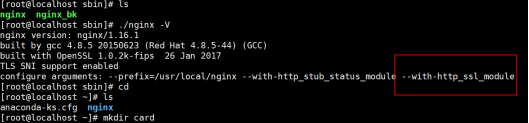
#注意这里是大写的V,小写的只显示版本号
./nginx -V
#可以看到这里出现了configure arguments: --with-http_ssl_module 证明已经安装成功
如果没用需要从安装ssl_modeul有
./configure --prefix=/usr/local/nginx --with-http_stub_status_module --with-http_ssl_module
make
#切记不要执行make install,否则会重新安装nginx
上述操作执行完成以后,你的目录下会出现objs文件夹,文件夹内存在nginx文件
接下来使用新的nginx文件替换掉之前安装目录sbin下的nginx,注意这里的替换的时候可以先将之前的文件备份下,停掉nginx服务
cp /root/nginx/nginx-1.16.1/objs/nginx /usr/local/nginx/sbin/nginx
再次执行:
./nginx -V:
上传证书:
#在root目录下创建card文件夹,将公钥与私钥放入该文件夹下:
cd /root
mkdir card
在:vi /usr/local/nginx/conf/nginx.conf中修改:

重新启动nginx
发现报以下错误:
nginx: [error] open() "/usr/local/nginx/logs/nginx.pid" failed (2: No such file or directory)
解决办法,执行以下语法即可修复:
/usr/local/nginx/sbin/nginx -c /usr/local/nginx/conf/nginx.conf
原理:
使用nginx -c的参数指定nginx.conf文件的位置
在此启用nginx
./nginx -s reload
开发443端口:
firewall-cmd --zone=public --add-port=443/tcp --permanent
/sbin/iptables -I INPUT -p tcp --dport 443 -j ACCEPT
nginx搭建IPV6服务器: