写在前面
前面介绍了分发文件管理、前端反向代理与管理后台服务器的配置操作,今天介绍下前端负载与APP服务器(用户与商家)、官网、FTP服务器的配置操作
01前端负载均衡配置
安装所需的依赖包
yum install pcre-devel zlib-devle openssl-devel gcc-c++ –y
编译安装nginx
cd /download/tools/
wget http://nginx.org/download/nginx-1.12.1.tar.gz
tar zxf nginx-1.12.1.tar.gz
cd nginx-1.12.1
./configure --prefix=/app/nginx-1.12.1
make && make install
[root@centos ~]# cd /app/
[root@centos app]# ln -s nginx-1.12.1 nginx
[root@centos ~]# cd /app/nginx/conf/
[root@centos conf]# mkdir extra
[root@centos conf]# cp nginx.conf nginx.conf.bak
在nginx.conf文件后增加下面的配置
include extra/*.conf;
[root@centos conf]# cd extra/
oot@centos extra]# vim user.app.conf
#
# HTTPS server configuration
#
upstream userapp {
server 10.0.0.4:8080;
server 10.0.0.4:8081;
}
server {
listen 80;
server_name app.mingongge.com;
location / {
proxy_pass http://userapp;
proxy_connect_timeout 600;
proxy_read_timeout 600;
proxy_send_timeout 600;
}
[root@centos conf]# cd extra/
[root@centos conf]# vim sj.app.conf
#
# HTTPS server configuration
#
upstream sjapp {
server 10.0.0.5:8080;
server 10.0.0.5:8081;
}
server {
listen 80;
server_name sjapp.mingongge.com;
location / {
proxy_pass http://sjapp;
proxy_connect_timeout 600;
proxy_read_timeout 600;
proxy_send_timeout 600;
}
}
02后端APP服务器配置
后端APP服务器JAVA环境安装配置
[root@centos tools]# ll
total 181168
-rw-r--r-- 1 root root 185515842 Sep 20 15:52 jdk-8u144-linux-x64.tar.gz
[root@centos tools]# tar zxf jdk-8u144-linux-x64.tar.gz -C /usr/local/
[root@centos tools]# ln -s /usr/local/jdk1.8.0_144 /usr/local/jdk
[root@centos tools]# cat >>/etc/profile<<EOF
export JAVA_HOME=/usr/local/jdk
export CLASSPATH=.CLASSPATH:$JAVA_HOME/lib/dt.jar:$JAVA_HOME/lib/tools.jar
export PATH=$JAVA_HOME/bin:$PATH
EOF
[root@centos tools]# tail -3 /etc/profile
export JAVA_HOME=/usr/local/jdk
export CLASSPATH=.CLASSPATH:/lib/dt.jar:/lib/tools.jar
export PATH=$JAVA_HOME/bin:$PATH
[root@centos tools]# source /etc/profile
[root@centos tools]# java -version
java version "1.8.0_144"
Java(TM) SE Runtime Environment (build 1.8.0_144-b01)
Java HotSpot(TM) 64-Bit Server VM (build 25.144-b01, mixed mode)
后端tomcat 配置
wget http://mirrors.hust.edu.cn/apache/tomcat/tomcat-8/v8.5.20/bin/apache-tomcat-8.5.20.tar.gz
[root@centos tools]# tar zxf apache-tomcat-8.5.20.tar.gz -C /usr/local/
[root@centos tools]# ln -s /usr/local/apache-tomcat-8.5.20 /usr/local/tomcat
[root@centos tools]# cd /usr/local/apache-tomcat-8.5.20/conf/
[root@centos conf]# vim server.xml
-------------此处省略N行--------------
<Valve className="org.apache.catalina.valves.AccessLogValve" directory="logs"
prefix="localhost_access_log" suffix=".txt"
pattern="%h %l %u %t "%r" %s %b" />
<Context path="" docBase="/www/userapp" debug="0" reloadable="true" crossContext="true" />
#增加上述站点目录
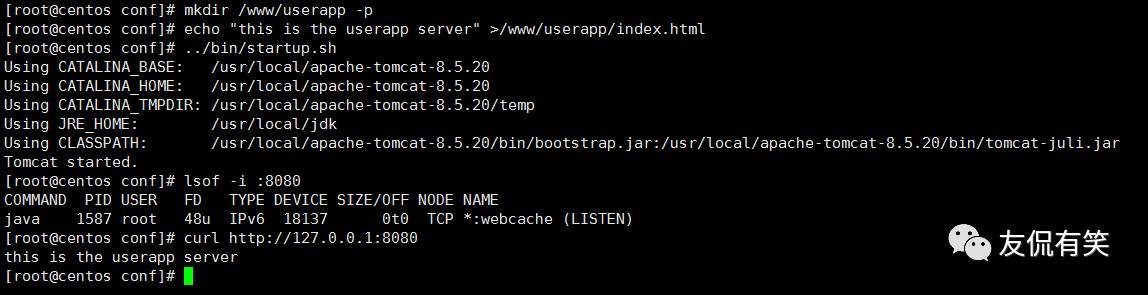
[root@centos conf]# mkdir /www/userapp -p
echo "this is the frist userapp server" >/www/userapp/index.html
[root@centos conf]# ../bin/startup.sh
Using CATALINA_BASE: /usr/local/apache-tomcat-8.5.20
Using CATALINA_HOME: /usr/local/apache-tomcat-8.5.20
Using CATALINA_TMPDIR: /usr/local/apache-tomcat-8.5.20/temp
Using JRE_HOME: /usr/local/jdk
Using CLASSPATH: /usr/local/apache-tomcat-8.5.20/bin/bootstrap.jar:/usr/local/apache-tomcat-8.5.20/bin/tomcat-juli.jar
Tomcat started.
[root@centos conf]# lsof -i :8080
COMMAND PID USER FD TYPE DEVICE SIZE/OFF NODE NAME
java 1587 root 48u IPv6 18137 0t0 TCP *:webcache (LISTEN)
另外一台用户APP 服务器按上述的配置进行
[root@centos conf]# mkdir /www/userapp -p
echo "this is the second userapp ">/www/userapp/index.html
商家APP环境配置请参考上面的配置
[root@centos conf]# mkdir /www/sjapp -p
echo "this is the frist sjapp ">/www/userapp/index.html
echo "this is the second sjapp ">/www/userapp/index.html
接下来测试下负载均衡
前端负载均衡测试
[root@centos conf]# curl http://10.0.0.1
this is the userapp server
[root@centos conf]# curl http://10.0.0.1
this is the second userapp
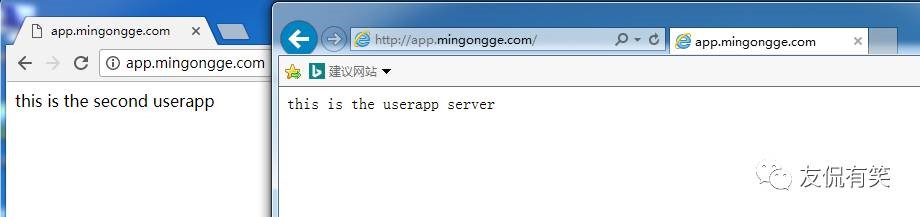
[root@centos conf]# curl http://app.mingongge.com
this is the userapp server
[root@centos conf]# curl http://app.mingongge.com
this is the second userapp
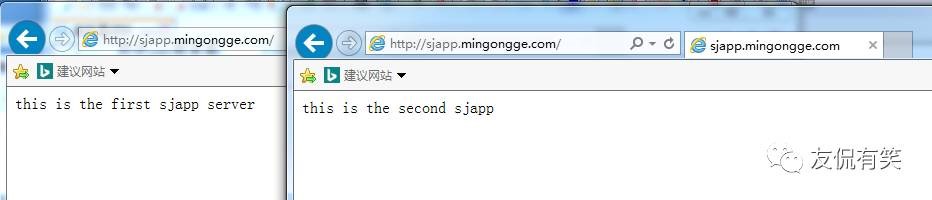
[root@centos extra]# curl http://sjapp.mingongge.com
this is the first sjapp server
[root@centos extra]# curl http://sjapp.mingongge.com
this is the second sjapp
浏览器访问测试
本地浏览器测试需要配置hosts文件
10.0.0.1 app.mingongge.com
10.0.0.1 sjapp.mingongge.com
03官网与图片服务器配置
基本的架构也是一样使用反向代理,为了后期整体架构扩展
Nginx FTP的安装就不再描述了,太简单了,扯多了累
前面反向代理配置如下
[root@centos extra]# vim web.mingongge.conf
#
# HTTPS server configuration
#
server {
listen 80;
server_name www.mingongge.com;
location / {
proxy_pass http://10.0.0.8;
proxy_connect_timeout 600;
proxy_read_timeout 600;
proxy_send_timeout 600;
}
}
[root@centos extra]# vim ftp.mingongge.com
#
# HTTPS server configuration
#
server {
listen 80;
server_name ftp.mingongge.com;
location / {
proxy_pass http://10.0.0.8:88;
proxy_connect_timeout 600;
proxy_read_timeout 600;
proxy_send_timeout 600;
}
}
后端WEB服务器配置
[root@centos html]# vim index.html
welcome to mingongge.s web stie!!!!!!!!!!!!!
[root@centos ~]# /usr/local/nginx/sbin/nginx -t
nginx: the configuration file /usr/local/nginx/conf/nginx.conf syntax is ok
nginx: configuration file /usr/local/nginx/conf/nginx.conf test is successful
[root@centos ~]# /usr/local/nginx/sbin/nginx
[root@centos ~]# curl 10.0.0.8
welcome to mingongge.s web stie!!!!!!!!!!!!!
FTP这块的配置其实是就是管理后台通过应用程序上传图片,前面用户通过nginx能访问到正确的页面即可,由于线下测试环境,不可能拿生产代码来做实验,因此管理后台上传图片无法模拟,过程就是后台上传图片是通过FTP的功能上传到指定的目录,然后前端通过nginx来调用这个图片去显示
因此就配置下访问图片即可
[root@centos conf]# cd extra/
[root@centos extra]# vim ftp.mingongge.conf
server {
listen 88;
server_name localhost;
location / {
root /www/ftp;
}
上传图片进行测试

通过前端反向代理直接访问域名来读取图,来实现应用程序调用图片的功能在其它前台页面展示的功能
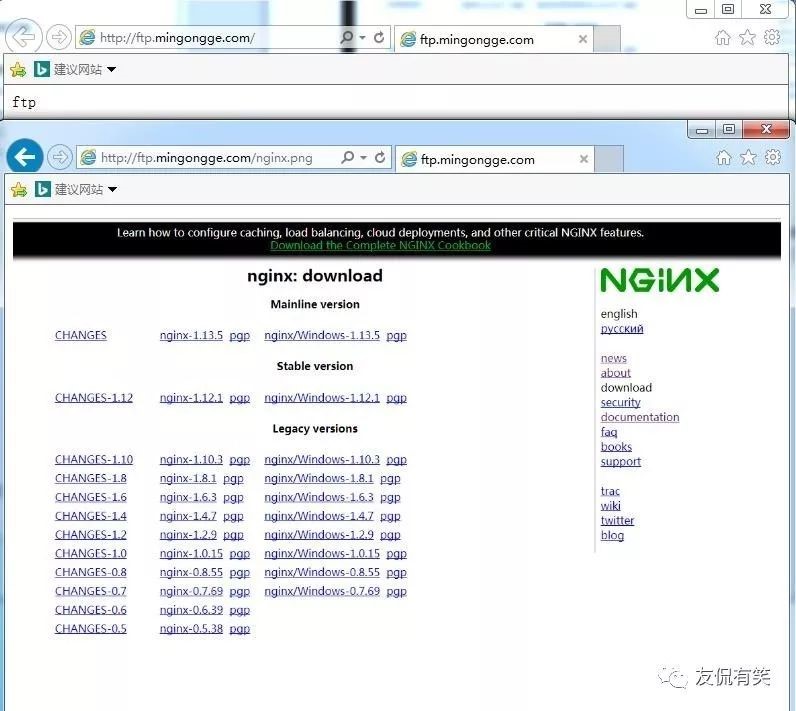
发现也是可以正常访问的