本地部署maven
1、下载maven,在pc端安装maven,然后将下载的maven解压到本地目录。如解压到d:developapache-maven-3.5.0,配置maven的环境变量,通过mvn -version来验证maven是否成功部署

2、pc端安装完maven后,如果IDE开发工具中没有maven插件的话,要在IDE(比如eclipse)中使用自定义安装的maven的话,需要在ide中安装maven插件。
安装的方式有两种:1.在线安装 2.离线安装
1)、在线安装:
这貌似是用的最多的,就是:Help –> Install New Software,然后输入 HTTP 地址来安装,但有一个很明显的缺点,就是慢,即使网络好也不见得很快安装好!
打开eclipse,点击Help –> Install New Software 弹出窗口,在work with的输入栏中输入:juno - http://download.eclipse.org/releases/juno,然后点击ADD稍等片刻后再输入maven来查找maven插件,待maven插件安装成功后重启eclipse即可
2)、离线安装maven插件
- 下载maven离线插件eclipse-maven3-plugin.zip 下载地址为:http://pan.baidu.com/s/1kTHXgxD
- 在你的 eclipse 安装的根目录(path= D:/develop/eclipse/)下创建两个文件夹:links,plugins(名字可以随便取)
- eclipse-maven3-plugin.7z 解压缩到 plugins 目录下
- 在 links 目录下创建一个maven.link(名字可以随便取,但必须是.link结尾的文件)文件,打开maven.link并输入:path= D:/develop/eclipse/plugins/maven
- 重启 eclipse,OK,完成了,启动后你打开Window —> Preferences 会发现一个多了一个选项Maven,说明安装成功了。
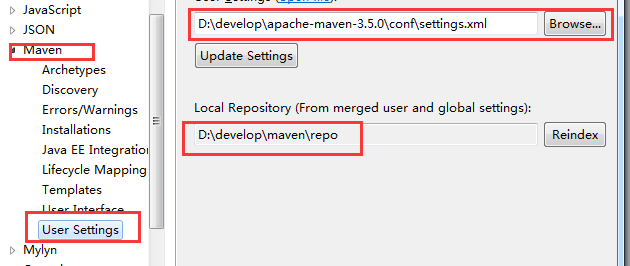
3、打开eclipse,将eclipse默认使用的maven改为自定义安装的maven

创建maven的本地仓库目录:d:developmaven epo
修改maven的setting.xml配置文件,即修改maven的本地仓库目录
<settings xmlns="http://maven.apache.org/SETTINGS/1.0.0"
          xmlns:xsi="http://www.w3.org/2001/XMLSchema-instance"
          xsi:schemaLocation="http://maven.apache.org/SETTINGS/1.0.0 http://maven.apache.org/xsd/settings-1.0.0.xsd">
  <!-- localRepository
   | The path to the local repository maven will use to store artifacts.
   |
   | Default: ${user.home}/.m2/repository
  <localRepository>/path/to/local/repo</localRepository>
  -->
<localRepository>D:developmaven
epo</localRepository>
修改eclipse的maven插件的user setting如下:
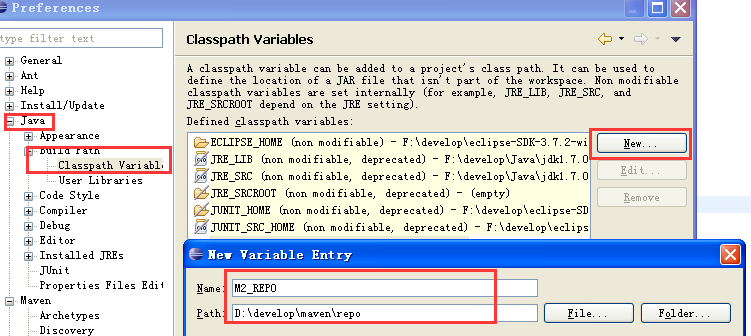
添加maven的仓库路径的buildpath
maven私服nexus的部署
1、下载开源的maven私服工具nexus,下载地址为:https://www.sonatype.com/download-oss-sonatype
2、部署nexus私服服务器
[root@linux-node1 ~]# tar  xf nexus-2.14.8-01-bundle.tar.gz -C  /soft/
[root@linux-node1 soft]# ln  -s  /soft/nexus-2.14.8-01  /soft/nexus
#修改nexu配置文件
[root@linux-node1 conf]# vim  nexus.properties
# Jetty section
application-port=8888
application-host=192.168.80.200
nexus-webapp=${bundleBasedir}/nexus
nexus-webapp-context-path=/nexus

# Nexus section
nexus-work=${bundleBasedir}/../sonatype-work/nexus
runtime=${bundleBasedir}/nexus/WEB-INF

# orientdb buffer size in megabytes
storage.diskCache.bufferSize=4096

#启动nexus服务
[root@linux-node1 ~]# /soft/nexus/bin/nexus  start
#检查nexus启动是否正常
[root@linux-node1 ~]# netstat -lntup
tcp        0      0 192.168.80.200:8888         0.0.0.0:*                   LISTEN      3755/java
3、使用http://192.168.80.200/nexus地址打开nexus的url,默认的用户名是 admin 密码是 admin123登陆,配置一下maven的代理服务器
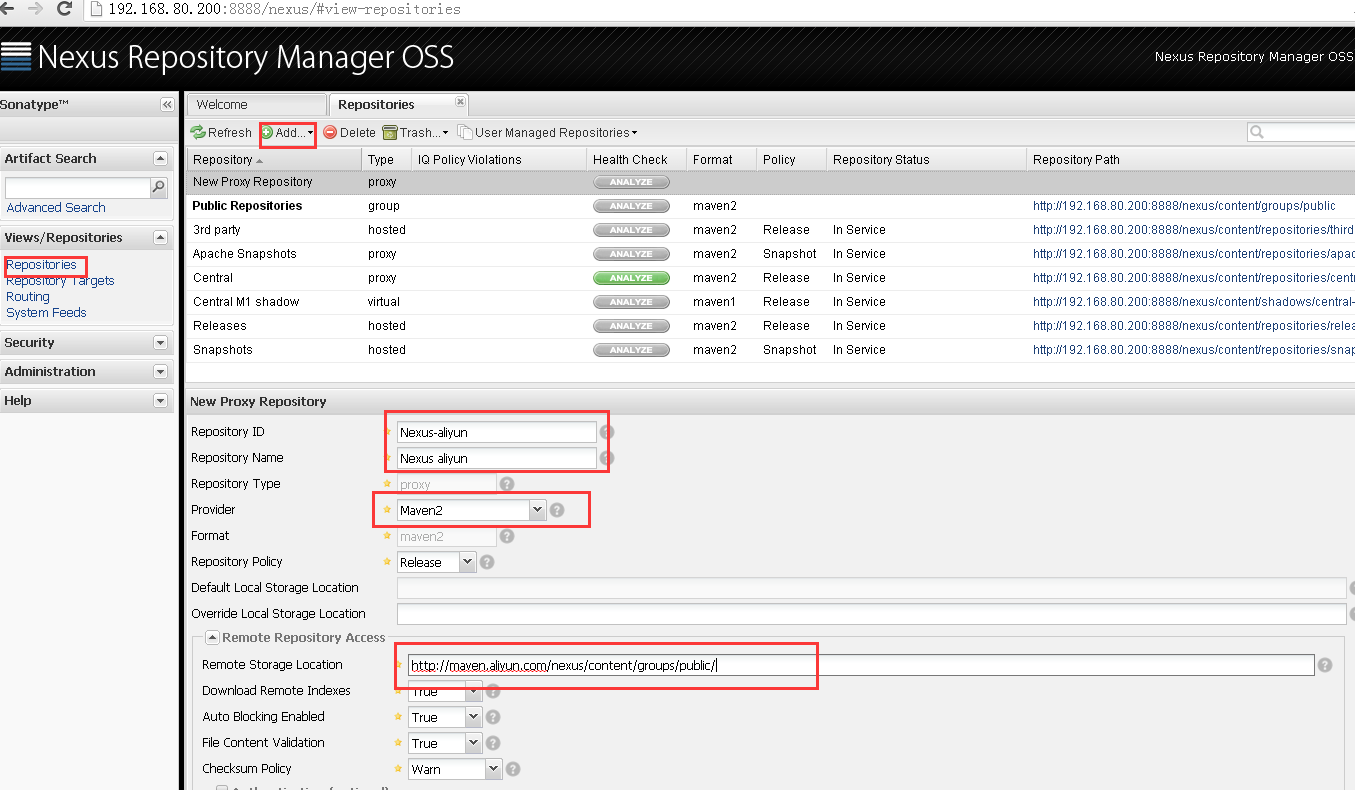
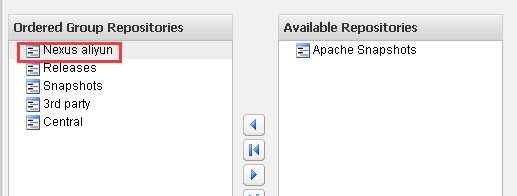
选择Public Repositories,将新配置问的代理服务nexus aliyun添加到这个组中
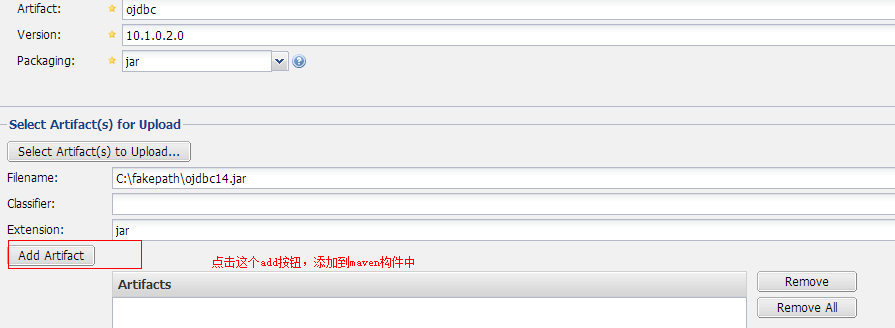
nexus可以使用代理仓库的方式构建mavens组件,也可以让第三方的jar上传到nexus供maven项目使用。上传oracle的驱动包

4、nexus私服设置好后就可以创建maven项目了
在eclipse中创建好maven项目后,修改pom.xml,修改maven的远程仓库地址为:http://192.168.80.200:8888/nexus/content/groups/public/配置如下:
<?xml version="1.0" encoding="UTF-8"?>

<project xmlns="http://maven.apache.org/POM/4.0.0" xmlns:xsi="http://www.w3.org/2001/XMLSchema-instance"
  xsi:schemaLocation="http://maven.apache.org/POM/4.0.0 http://maven.apache.org/xsd/maven-4.0.0.xsd">
  <modelVersion>4.0.0</modelVersion>

  <groupId>com.goser</groupId>
  <artifactId>mvnDemo</artifactId>
  <version>0.0.1-SNAPSHOT</version>
  <name>mvnDemo</name>
  <properties>
    <project.build.sourceEncoding>UTF-8</project.build.sourceEncoding>
    <maven.compiler.source>1.7</maven.compiler.source>
    <maven.compiler.target>1.7</maven.compiler.target>
  </properties>

   <repositories>
     <repository>
          <id>nexus</id>
          <name>Team Nexus Repository</name>
          <url>http://192.168.80.200:8888/nexus/content/groups/public/</url>
     </repository>
   </repositories>
  <pluginRepositories>
    <pluginRepository>
      <id>nexus</id>
      <name>Team Nexus Repository</name>
      <url>http://192.168.80.200:8888/nexus/content/groups/public/</url>
    </pluginRepository>
  </pluginRepositories>
  <dependencies>
    <dependency>
      <groupId>junit</groupId>
      <artifactId>junit</artifactId>
      <version>4.11</version>
      <scope>test</scope>
    </dependency>
  </dependencies>
</project>
比如maven项目中需要mysql-java包,可以在pom.xml配置文件中添加mysql依赖包信息即可:
   <dependency>
       <groupId>Mysql</groupId>
       <artifactId>mysql-connector-java</artifactId>
       <version>5.1.38</version>
   </dependency>
保存pom.xml文件后,maven项目会先从本地仓库查找这个mysql依赖包,如果本地没有则会从远程仓库中下载,而这个远程仓库就需要nexus代理访问并下载到nexus服务器上,同时也将这个需要下载的依赖包下载到pc端的本地仓库中。

验证是否在nexus服务器上保存有下载的依赖包:
[root@linux-node1 ~]# ll /soft/sonatype-work/nexus/storage/Nexus-aliyun/Mysql/mysql-connector-java/5.1.38/total 968
-rw-r--r-- 1 root root 983911 Dec  2  2015 mysql-connector-java-5.1.38.jar
-rw-r--r-- 1 root root   1105 Dec  2  2015 mysql-connector-java-5.1.38.pom
验证是否在pc端本地是否有下载的依赖包
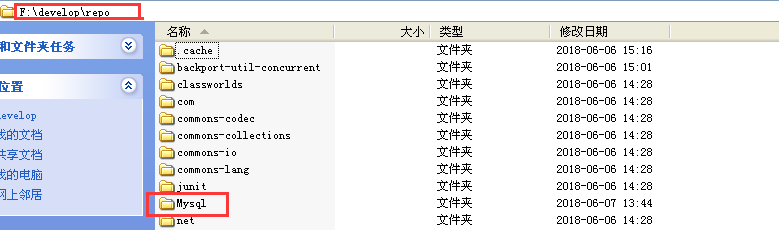
这样nexus私服部署完成,只要pc端构建maven项目后新的依赖包就会在nexus服务器上保存一份依赖,其他开发组成员如果也要这些依赖包就会直接从nexus服务器上下载。
5、更新仓库索引
1)、强制更新索引
nexus索引经常会出现与远程仓库索引不一致的情况,导致某些包不能正常下载,可以强制更新仓库索引,保持索引同步
右键点击仓库,选择Update Index
2)、定时更新索引
左侧导航栏选择Administration->Scheduled Tasks ,点击add添加一个计划任务
任务类型选择:Update Repositories Index,Repository/Group选择要更新的仓库,Recurrence选择计划任务的周期类型
6、maven发布项目到nexus
当我们的项目开发完成以后,可能要进行发布(如果是独立的项目,就不需要发布啦,如果是模块项目,那么就要发布到nexus里,供其他开发人员下载调用。要想发布项目到nexus里,必须通过<distributionManagement>标签来进行配置。在之前的文章中有介绍nexus的工厂类别.当我们发布项目到nexus里时,如果项目版本是x.x.x-Releases,则会发布到Releases工厂中;而项目版本是x.x.x-SNAPSHOTS则发布到Snapshots工厂中。
在pom.xml中添加maven发布项目到nexus的仓库
	<distributionManagement>
	  	<repository>
	  		<id>releasesId</id>
	  		<name>Releases name</name>
	  		<url>http://192.168.80.200:8888/nexus/content/repositories/releases/</url>
	  	</repository>
	  	<snapshotRepository>
	  		<id>snapshotsid</id>
	  		<name>snapshots name</name>
	  		<url>http://192.168.80.200:8888/nexus/content/repositories/snapshots/</url>
	  	</snapshotRepository>
	  </distributionManagement>
配置settings.xml授权用户可以发布maven到nexus: 在setting.xml里使用<server>标签进行授权。server里的id对应<distributionManagement>里设置的id。
  <servers>
	<server>
		  <id>releasesId</id>
		  <username>admin</username>
		  <password>admin123</password>
	</server>

	<server>
		  <id>snapshotsid</id>
		  <username>admin</username>
		  <password>admin123</password>
	</server>
  </servers>
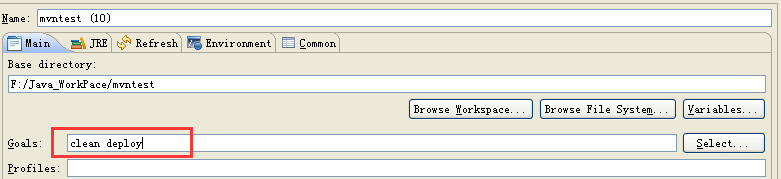
最后右键项目 --> run as ---> maven Build... --> 输入clean deploy命令,maven项目便上传到nexus中,如果是snapshot版则上传到snapshot仓库中,如果是release版则上传到release仓库中。
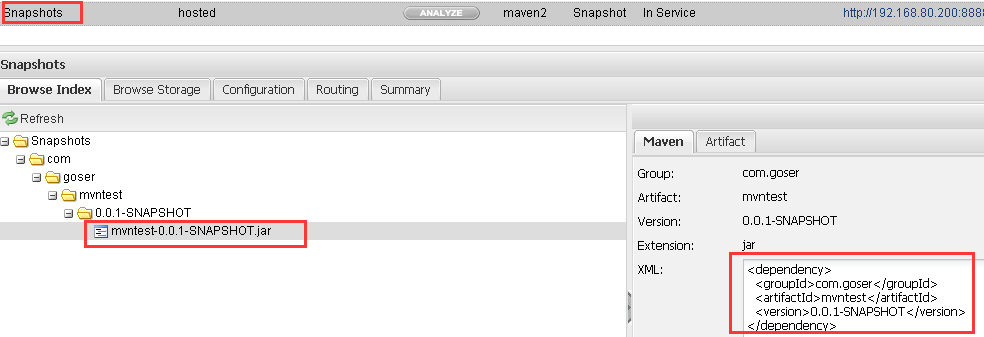
maven build完成后,查看snapshot仓库,可以看到maven的snapshot版的包已经上传到snapshot仓库了。如下:
当然在生产环境中不应该使用admin用户作为maven项目来上传到nexus仓库,应该创建一个用户、角色等来作为maven项目的上传操作。