一、setup
setup是组合Composition API中的入口函数,也是第一个要使用的函数。
1、setup只在初始化时执行一次,所有的Composition API函数都在此使用。
2、setup是在beforeCreate生命周期之前执行的(只执行一次)
  beforeCreate() {
    console.log('beforeCreate执行了');
  },
  setup() {
    console.log('setup执行了');
    return {};
  },
  //setup执行了
  //beforeCreate执行了
由此可以推断出setup执行的时候,组件对象还没有创建,组件实例对象this还不可用,此时this是undefined, 不能通过this来访问data/computed/methods/props。
3、返回对象中的属性会与data函数返回对象的属性合并成为组件对象的属性,返回对象中的方法会与methods中的方法合并成功组件对象的方法,如果有重名,setup 优先。
因为在setup中this不可用,methods中可以访问setup提供的属性和方法, 但在setup方法中不能访问data和methods里的内容,所以还是不建议混合使用。
4、setup函数如果返回对象, 对象中的 属性 或 方法 , 模板 中可以直接使用
//templete
<div>{{number}}</div>

//JS
setup() {
  const number = 18;
  return {
    number
  };
},
5、注意:setup不能是一个async函数: 因为返回值不再是return的对象,而是promise,模板中就不可以使用return中返回对象的数据了。
6、setup的参数(props,context)
(1)props: 是一个对象,里面有父级组件向子级组件传递的数据,并且是在子级组件中使用 props 接收到的所有的属性
(2)context:上下文对象,可以通过es6语法解构 setup(props, {attrs, slots, emit})
- attrs:获取当前组件标签上所有没有通过
props接收的属性的对象, 相当于this.$attrs - slots:包含所有传入的插槽内容的对象,相当于
this.$slots - emit:用来分发自定义事件的函数,相当于
this.$emit
二、ref
1、作用:定义一个响应式的数据(一般用来定义一个基本类型的响应式数据Undefined、Null、Boolean、Number和String)
2、语法:const xxx = ref(initValue);
注意:script中操作数据需要使用xxx.value的形式,而模板中不需要添加.value
3、ref 用于定义响应式数据
// 用一个例子来演示:实现一个按钮,点击可以增加数字
<template>
  <div>{{count}}</div>
  <button @click='updateCount'>增加</button>
</template>

// 在Vue3中
 setup() {
    // ref用于定义一个响应式的数据,返回的是一个Ref对象,对象中有一个value属性
    //如果需要对数据进行操作,需要使用该Ref对象的value属性
    const count = ref(0);
    function updateCount() {
      count.value++;
    }
    return {
      count,
      updateCount,
    };
  },
4、ref 用于获取 dom 节点:在Vue2中我们通过this.$refs来获取dom节点,Vue3中我们通过ref来获取节点
首先需要在标签上添加 ref='xxx',然后再setup中定义一个初始值为null的ref类型,名字要和标签的ref属性一致
const xxx = ref(null)
注意:一定要在setup的return中返回,不然会报错。
// 还是用一个例子来演示:让输入框自动获取焦点
<template>
  <h2>App</h2>
  <input type="text" ref="inputRef">
</template>
<script lang="ts">
import { onMounted, ref } from 'vue'
/*
ref获取元素: 利用ref函数获取组件中的标签元素
功能需求: 让输入框自动获取焦点
*/
export default {
  setup() {
    const inputRef = ref<HTMLElement|null>(null)
    onMounted(() => {
      inputRef.value && inputRef.value.focus()
    })
    return {
      inputRef
    }
  },
}
</script>
三、reactive
1、语法:const proxy = reactive(obj)
2、作用:定义多个数据的响应式,接收一个普通对象然后返回该普通对象的响应式代理器对象(Proxy),响应式转换是“深层的”:会影响对象内部所有嵌套的属性,所有的数据都是响应式的。
<template>
  <h3>姓名:{{user.name}}</h3>
  <h3>wife:{{user.wife}}</h3>
  <button @click="updateUser">更新</button>
</template>

 setup() {
    const user = reactive({
      name: '**',
      wife: {
        name: 'xioaohong',
        age: 18,
        books: [],
      },
    });
    const updateUser = () => {
      user.name = '小红';
      user.age += 2;
      user.wife.books[0] = '**';
    };
    return {
      user,
      updateUser,
    };
  },
3、重点来了:ref 他强调的是一个数据的value的更改,reactive 强调的是定义的对象的某一个属性的更改。
四、toRefs
1、作用:把一个响应式对象转换成普通对象,该普通对象的每个属性都是一个 ref
2、应用:我们使用 reactive 创建的对象,如果想在模板中使用,就必须得使用 xxx.xxx 的形式;如果大量用到的话还是很麻烦的,但是使用 es6 解构以后,会失去响应式。
那么toRefs的作用就体现在这,利用toRefs可以将一个响应式 reactive 对象的所有原始属性转换为响应式的ref属性。
<template>
  <div>
    name:{{name}}
  </div>
</template>

<script lang='ts'>
import { defineComponent, reactive, toRefs } from 'vue';
export default defineComponent({
  name: '',
  setup() {
    const state = reactive({
      name: 'hzw',
    });
    const state2 = toRefs(state);
    setInterval(() => {
      state.name += '===';
    }, 1000);
    return {
      //通过toRefs返回的对象,解构出来的属性也是响应式的
      ...state2,
    };
  },
});
</script>
五、computed函数
1、与Vue2中的computed配置功能一致,返回的是一个ref类型的对象
2、计算属性的函数中如果只传入一个回调函数 表示的是get操作
3、计算属性的函数中可以传入一个对象,可以包含set和get函数,进行读取和修改的操作
const fullName2 = computed({
  get() {
    return user.firstName + '_' + user.lastName;
  },
  set(val: string) {
    const names = val.split('_');
    user.firstName = names[0];
    user.lastName = names[1];
  },
});
return {
  user,
  fullName2,
};
六、watch 函数
1、与Vue2中的watch配置功能一致:(1)参数1 - 要监听的数据;(2)参数2 - 回调函数;(3)参数3 - 配置。
2、作用:监视指定的一个或多个响应式数据,一旦数据变化,就自动执行监视回调。
(1)默认初始时不执行回调,但可以通过配置 immediate为true 来指定初始时立即执行第一次
(2)通过配置 deep为true 来指定深度监视
3、监听单一数据
import { ref, reactive, computed, watch } from 'vue';
setup(props) {
    // ref
    const age = ref(20);
    watch(() => age.value, (nv, ov) => { ... });
   // reactive
   const product = reactive({ name: '饮料', count: 1 });
   watch(() => product.count, (nv, ov) => { ... });
   // props
   watch(() => props.msg, (nv, ov) => { ... });
   // computed
   const userAge = computed(() => `今年${age.value}岁了!`);
   watch(() => userAge.value, (nv, ov) => { ... });
}
4、监听对象
import { ref, reactive, watch } from 'vue';
setup(props) {
    // ref
    const user = ref({ name: 'zhang_san', age: 20 });
    // 字面量引发的监听触发: user.value = { ... };
    watch(() => user.value, (nv, ov) => { ... });
    // 如果使用 user.value.age = 30这种方式去修改user的age值; 将不会触发上面的监听,需要使用watch的第三个参数(深度监听),且触发监听后的nv===ov true
    watch(() => user.value, (nv, ov) => { ... }, { deep: true });
    // 如果我们只需要监听name的值,那么
    watch(() => user.value.name, (nv, ov) => { ... });

   // reactive
   const reactiveData = reactive({ user: { name: 'zhang_san', age: 20 } });
    // 字面量引发的监听触发: reactiveData.user = { ... };
    watch(() => reactiveData.user, (nv, ov) => { ... });
    // 如果使用 user.user.age = 30这种方式去修改user的age值,将不会触发监听,需要使用watch的第三个参数(深度监听),且触发监听后的nv===ov true
    watch(() => reactiveData.user, (nv, ov) => { ... }, { deep: true });
    // 如果我们只需要监听name的值,那么
    watch(() => reactiveData.user.name, (nv, ov) => { ... });
}
5、监听数组
import { ref, reactive, watch } from 'vue';
setup(props) {
   // ref
   const user = ref([
      { name: 'zhang_san', age: 10 },
      { name: 'li_si', age: 10 }
   ]);
   // 字面量引发的监听触发: user.value = [ ... ];
   watch(() => user.value, (nv, ov) => { ... });
  // 如果使用数组的操作方法(如:push())或者user.value[0].age = 20这类操作去修改数组某项的属性值,将不会触发监听,也需要使用深度监听模式,且触发监听后的nv===ov true
  watch(() => user.value, (nv, ov) => { ... }, { deep: true });

  // reactive
  const reactiveData = reactive({
    user: [
      { name: 'zhang_san', age: 10 },
      { name: 'li_si', age: 10 }
   ]
  });
  // 字面量引发的监听触发: user.user = [ ... ];
  watch(() => reactiveData.user, (nv, ov) => { ... });
  // 如果使用数组的操作方法(如:push())或者user.value[0].age = 20这类操作去修改数组某项的属性值,将不会触发监听,也需要使用深度监听模式,且触发监听后的nv===ov true
  watch(() => reactiveData.user, (nv, ov) => { ... }, { deep: true });
}
6、监听多个数据
import { ref, reactive, computed, watch } from 'vue';
setup(props) {
    const age = ref(20);
    const user = ref({ name: 'zhang_san', age: 20 });

    watch([() => age.value, () => user.name], ([newAge, newName], [oldAge, oldName]) => { ... });
}
7、终止监听
import { ref, watch } from 'vue';
const age = ref(20);
// watch监听会返回一个方法
const stop = watch(age, (nv, ov) => { ... });
// 当调用此方法后,该监听就会被移除
stop();
七、watchEffect函数
1、作用:监视数据发生变化时执行回调,不用直接指定要监视的数据,回调函数中使用的哪些响应式数据就监视哪些响应式数据,
2、默认初始时就会执行第一次,从而可以收集需要监视的数据。
import { watchEffect, ref } from 'vue';
const user = reactive({
  firstName: '**',
  lastName: '**',
});
const fullName4 = ref('');
watchEffect(() => {
  fullName4.value = user.firstName + '_' + user.lastName;
});
return {
  user,
  fullName4,
};
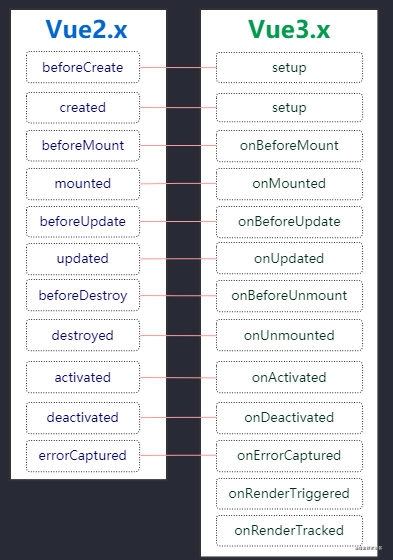
八、生命周期对比

注意:3.0中的生命周期钩子要比2.X中相同生命周期的钩子要快
setup() {
  onBeforeMount(() => {
    console.log('--onBeforeMount')
  })
  onMounted(() => {
    console.log('--onMounted')
  })
  ......
  onBeforeUnmount(() => {
    console.log('--onBeforeUnmount')
  })
  onUnmounted(() => {
    console.log('--onUnmounted')
  })
}
九、provide 与 inject
作用:实现跨层级组件(祖孙)间通信
// 父组件
  setup() {
    const color = ref('red')
    provide('color', color)
    return {
      color
    }

// 孙子组件
  setup() {
    const color = inject('color')
    return {
      color
    }
这个 vue2 里也有,差不多一样的用法。