验证码
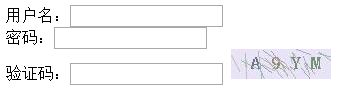
本文的中的验证码使用Java的awt进行绘制,样式如下图所示
接下来开始进行绘制。
(1)创建一个Web项目,项目的目录结构如下

(2)创建Servlet类,继承HttpServlet,重写doGet和doPost方法
PicCodeServlet.java
package com.ghq.controller;

import java.awt.Color;
import java.awt.Font;
import java.awt.Graphics;
import java.awt.image.BufferedImage;
import java.io.IOException;
import java.io.PrintWriter;
import java.util.Random;

import javax.imageio.ImageIO;
import javax.servlet.ServletException;
import javax.servlet.http.HttpServlet;
import javax.servlet.http.HttpServletRequest;
import javax.servlet.http.HttpServletResponse;
import javax.servlet.http.HttpSession;

public class PicCodeServlet extends HttpServlet{
    private static final long serialVersionUID = 1L;

    @Override
    public void doGet(HttpServletRequest request, HttpServletResponse response)
            throws ServletException, IOException {
        this.doPost(request, response);
    }

    @Override
    public void doPost(HttpServletRequest request, HttpServletResponse response)
            throws ServletException, IOException {
        request.setCharacterEncoding("utf-8");

        String method = request.getParameter("whichrequest");
        if (method.equals("getCode")) {
            getCode(request, response);
        }else if (method.equals("checkCode")) {
            checkCode(request, response);
        }
    }

    //验证输入验证码是否正确
    private void checkCode(HttpServletRequest request, HttpServletResponse response)
            throws ServletException, IOException {
        //获取session中存储的验证码
        HttpSession session = request.getSession();
        String syscode = (String)session.getAttribute("checkcode");
        //获取输入的验证码
        String inputcode = request.getParameter("code");

        response.setContentType("text/html;charset=utf-8");
        PrintWriter writer = response.getWriter();
        //判断验证码是否相同
        if (!syscode.equalsIgnoreCase(inputcode)) {
            writer.print("验证码不正确");
        }
        writer.close();
    }

    //获取验证码的方法
    private void getCode(HttpServletRequest request, HttpServletResponse response)
            throws ServletException, IOException {
        Random ran = new Random();
        //定义验证码区域的长和宽
        int w = 100;
        int h = 30;
        //创建图片, bi指向了一个可以访问缓冲区的图片
        BufferedImage bi = new BufferedImage(w, h, BufferedImage.TYPE_INT_RGB);
        //获得画笔
        Graphics g = bi.getGraphics();
        //创建颜色对象 参数范围是[0-255];
        Color c = new Color(200+ran.nextInt(50), 200+ran.nextInt(50), 200+ran.nextInt(50));
        //存放字体对象
        Font f = null;
        //设置画笔颜色
        g.setColor(c);
        //填充矩形
        g.fillRect(0, 0, w, h);
        //存放验证码的StringBuffer
        StringBuffer stringbuffer = new StringBuffer();
        //在图片上写验证码
        for (int i = 0; i < 4; i++) {
            c = new Color(100+ran.nextInt(50), 100+ran.nextInt(50), 100+ran.nextInt(50));
            f = new Font("隶书", Font.BOLD, 18);
            g.setFont(f);
            g.setColor(c);

            //产生大小写字母的Unicode码和数字随机数 a为97 ,A为65
            int lowUni = 97+ran.nextInt(26);
            int upUni = 65+ran.nextInt(26);
            int num = ran.nextInt(10);
            //将Unicode码转为字符串
            String lowUnistr = String.valueOf((char)lowUni);
            String upUnistr = String.valueOf((char)upUni);
            String nstr = String.valueOf(num);

            //随机产生大小写字母或数字中的一个
            String checkcode1 = ran.nextInt(2) < 0.5 ? (ran.nextInt(2) < 0.5 ? lowUnistr : upUnistr) : nstr;
            stringbuffer.append(checkcode1);

            //在图片上写验证码
            g.drawString(checkcode1, (i+1)*20, 20);
        }
        //将验证码保存在session中以便进行校验
        HttpSession session = request.getSession();
        session.setAttribute("checkcode", stringbuffer.toString());

        //绘制干扰线
        for (int i = 0; i < 30; i++) {
            c = new Color(150+ran.nextInt(50), 150+ran.nextInt(50), 150+ran.nextInt(50));
            g.setColor(c);
            //两点确定一条直线
            int x1 = ran.nextInt(90);
            int y1 = ran.nextInt(20);
            int x2 = ran.nextInt(20)+x1;
            int y2 = ran.nextInt(20)+y1;
            g.drawLine(x1, y1, x2, y2);
        }
        //将图片绘制到响应的输出流中
        ImageIO.write(bi, "jpg", response.getOutputStream());
    }

}
(3)在web.xml中配置Servlet
web.xml
<?xml version="1.0" encoding="UTF-8"?>
<web-app xmlns:xsi="http://www.w3.org/2001/XMLSchema-instance" xmlns="http://java.sun.com/xml/ns/javaee" xmlns:web="http://java.sun.com/xml/ns/javaee/web-app_2_5.xsd" xsi:schemaLocation="http://java.sun.com/xml/ns/javaee http://java.sun.com/xml/ns/javaee/web-app_3_0.xsd" id="WebApp_ID" version="3.0">
  <servlet>
    <servlet-name>PicCodeServlet</servlet-name>
    <servlet-class>com.ghq.controller.PicCodeServlet</servlet-class>
  </servlet>
  <servlet-mapping>
    <servlet-name>PicCodeServlet</servlet-name>
    <url-pattern>/PicCodeServlet</url-pattern>
  </servlet-mapping>

  <welcome-file-list>
    <welcome-file>index.jsp</welcome-file>
  </welcome-file-list>
</web-app>
(4)开发jsp页面
index.jsp
 <script type="text/javascript" src="<%=path %>/js/jquery-1.9.1.min.js"></script>
  <script type="text/javascript">
  function changeCode(){
      $("#img").attr("src","<%=path %>/PicCodeServlet?whichrequest=getCode&t="+Math.random());
  }
  function judgeCode(code){
      $.ajax({
          type:"post",
        url:"<%=path%>/PicCodeServlet",
        data:"whichrequest=checkCode&code="+code,
        success:function(resText){
            if (resText == "") {
                $("#spancode").html(resText);
            }else{
                $("#spancode").html(resText);
                changeCode();
            }
        },
        error:function(){
            window.location.href="<%=path%>/building.jsp";
        }
      });
  }

  function judgename(name){
      if (name.trim().length <= 0) {
           $("#spanname").html("用户名不能为空");
        }else{
             $("#spanname").html("");
        }
  }

  function judgepass(pass){
        if (pass.trim().length <= 0) {
           $("#spanpass").html("密码不能为空");
        }else{
           $("#spanpass").html("");
        }
      }

  </script>
  <body>
    <form action="" method="post">
      用户名:<input type="text" name="username" onblur="judgename(this.value)"><span id="spanname"></span><br>
      密码:<input type="password" name="userpass" onblur="judgepass(this.value)"><span id="spanpass"></span><br>
      验证码:<input type="text" name="checkcode" onblur="judgeCode(this.value)">
      <img src="<%=path %>/PicCodeServlet?whichrequest=getCode" onclick="changeCode()" id="img"><span id="spancode"></span>
    </form>
  </body>
效果展示

点击验证码的图片,实现验证码的更换。