Django之学员管理
实现-------在前端页面提交的数据,后端可直接写入数据库。在页面实现操作数据库的增删改查。
数据表设计:(三个角色四张表)
    班级表:

      id  title

      1   花果山国小一年级

      2  水帘洞小学二年级


    学生表:

      id  name  班级ID (FK)

      1  抠脚大汉  1

      2  一杯倒    2


    老师表:

      id  name

      1  George

      2  BJ

      3  CF


    老师班级关系表:

      id  老师ID  班级ID

      1    1    1

      2    2    1

      3    2    2
在Django之初里,我们将几乎所有的url所对应的功能函数都写在里url文件里。这样是不好看也不方便管理的。
所以,我们会创建很多文件夹,每个文件夹里存放针对某一功能的代码。便于管理代码。
代码在APP的views.py里。
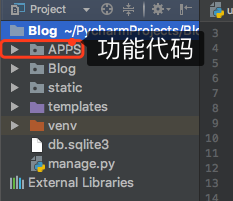
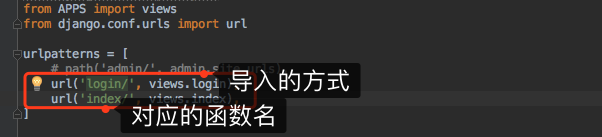
在url中,将APP的导入即可。这样url就依旧可以找到相应的函数。
from APPS import views
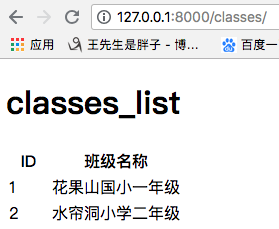
在页面拿到数据库表的数据:
前端classes.html的MK1呈现:
 1 <!DOCTYPE html>
 2 <html lang="en">
 3 <head>
 4     <meta charset="UTF-8">
 5     <title>classes</title>
 6 </head>
 7 <body>
 8     <h1>classes_list</h1>
 9     <table>
10         <thead>
11             <tr>
12                 <th>ID</th>
13                 <th>班级名称</th>
14             </tr>
15         </thead>
16         <tbody>
17             {% for item in class_lsit %}
18                 <tr>
19                     <td>{{ item.cid }}</td>
20                     <td>{{ item.caption }}</td>
21                 </tr>
22             {% endfor %}
23         </tbody>
24     </table>
25 </body>
26 </html>
后端的views.py 中的classes函数的代码呈现:
 1 def classes(request):
 2     """
 3     链接数据库
 4     :param request: 用户请求的相关的所有信息(对象)
 5     :return:
 6     """
 7     import pymysql
 8     conn = pymysql.connect(host="127.0.0.1",port=3306,user='root',passwd='劳资的数据库密码你也想知道',db='劳资的数据库名字',charset='utf8')
 9     cursor = conn.cursor(cursor=pymysql.cursors.DictCursor) #改为字典
10     cursor.execute("select cid,caption from classes")
11     class_list = cursor.fetchall()
12     cursor.close()
13     conn.close()
14
15     return render(request, "classes.html",{"class_lsit":class_list})
测试结果:如愿拿到了。
总体进阶:MK2
在classes.html页面,可以在页面直接添加数据并存到数据库保存。
这样的话,就需要有一个add_class啦。
MK2.1
classes.html页面加一个div标签
 1 <!DOCTYPE html>
 2 <html lang="en">
 3 <head>
 4     <meta charset="UTF-8">
 5     <title>classes</title>
 6 </head>
 7 <body>
 8     <h1>classes_list</h1>
 9     <div>
10         <a href="/add_class/">添加</a>
11     </div>
12     <table>
13         <thead>
14             <tr>
15                 <th>ID</th>
16                 <th>班级名称</th>
17             </tr>
18         </thead>
19         <tbody>
20             {% for item in class_lsit %}
21                 <tr>
22                     <td>{{ item.cid }}</td>
23                     <td>{{ item.caption }}</td>
24                 </tr>
25             {% endfor %}
26         </tbody>
27     </table>
28 </body>
29 </html>
加add_class.html 页面:
 1 <!DOCTYPE html>
 2 <html lang="en">
 3 <head>
 4     <meta charset="UTF-8">
 5     <title>add_class</title>
 6 </head>
 7 <body>
 8     <h1>添加班级</h1>
 9     <form action="">
10         <p>班级名称:<input type="text" placeholder="请输入内容"/></p>
11         <input type="submit" value="提交">
12     </form>
13 </body>
14 </html>
views.py中的add_class函数:
1 def add_class(request):
2     """
3     前端添加数据到数据库
4     :param request:
5     :return:
6     """
7     return render(request,'add_class.html')
MK2.5
现在应该是在add_class页面中添加要提交的数据,点击submit,数据会给数据库,数据库刷新并返回结果。
而add_class页面也应该再有以一次post请求。完成跳转去classes.html页面。
add_class函数的实现:
 1 def add_class(request):
 2     """
 3     前端添加数据到数据库
 4     :param request:
 5     :return:
 6     """
 7     if request.method == "GET":
 8         return render(request,"add_class.html")
 9     else:
10         print(request.POST)
11         v = request.POST.get("caption")
12         conn = pymysql.connect(host="127.0.0.1", port=3306, user='root', passwd='XXXXx', db='XXXXx',charset='utf8')
13         cursor = conn.cursor(cursor=pymysql.cursors.DictCursor)  # 改为字典
14         cursor.execute("insert into classes(caption) values(%s)",[v,]) #插入操作
15         conn.commit()  #提交数据
16         cursor.close()
17         conn.close()
18         return redirect("/classes/")
add_class.html 页面
 1 <!DOCTYPE html>
 2 <html lang="en">
 3 <head>
 4     <meta charset="UTF-8">
 5     <title>add_class</title>
 6 </head>
 7 <body>
 8     <h1>添加班级</h1>
 9     <form method="POST" action="/add_class/">
10         <p>班级名称:<input type="text" name="caption" placeholder="请输入内容"/></p>
11         <input type="submit" value="提交">
12     </form>
13 </body>
14 </html>
MK3:删除。在每行数据的后面加一个删除操作按钮。使其可以去数据库删除掉对应的数据。并返回删除后刷新的结果,跳转到classes页面。
classes.html 页面的删除按钮的添加:
在删除过程中,设法使其知道要删除的是哪一行的数据。通过id实现。
 1 <!DOCTYPE html>
 2 <html lang="en">
 3 <head>
 4     <meta charset="UTF-8">
 5     <title>classes</title>
 6 </head>
 7 <body>
 8     <h1>classes_list</h1>
 9     <div>
10         <a href="/add_class/">添加</a>
11     </div>
12     <table>
13         <thead>
14             <tr>
15                 <th>ID</th>
16                 <th>班级名称</th>
17                 <th>操作</th>
18             </tr>
19         </thead>
20         <tbody>
21             {% for item in class_lsit %}
22                 <tr>
23                     <td>{{ item.cid }}</td>
24                     <td>{{ item.caption }}</td>
25                     <td><a href="/del_class/?nid={{ item.cid }}">删除</a></td>
26                 </tr>
27             {% endfor %}
28         </tbody>
29     </table>
30 </body>
31 </html>
del_class函数:
 1 def del_class(request):
 2     """
 3     删除操作
 4     :param request:
 5     :return:
 6     """
 7     #那删除操作的nid。
 8     nid = request.GET.get("nid")
 9     conn = pymysql.connect(host="127.0.0.1", port=3306, user='root', passwd='XXXx', db='XXXXx', charset='utf8')
10     cursor = conn.cursor(cursor=pymysql.cursors.DictCursor)  # 改为字典
11     cursor.execute("delete from classes where cid=%s", [nid,])
12     conn.commit()
13     cursor.close()
14     conn.close()
15     return redirect('/classes/')
改编辑了:
MK4:
问题,在后端的编辑的过程中,由于是基于Http协议的请求,所以前端页面在拿到要编辑的数据后,在在编辑完提交时,数据库不知道提交的是哪一行的数据。
所以,前端需要连同数据行的id也一并拿走,在提交是,也一并返回,好告知数据库是哪一行的数据。
解决方案一:
edit_class函数:
 1 def edit_class(request):
 2     """
 3     编辑班级
 4     :param request:
 5     :return:
 6     """
 7     if request.method == "GET":
 8         nid = request.GET.get('nid')
 9         conn = pymysql.connect(host="127.0.0.1", port=3306, user='root', passwd='XXXX', db='XXXXXst', charset='utf8')
10         cursor = conn.cursor(cursor=pymysql.cursors.DictCursor)  # 改为字典
11         cursor.execute("select cid,caption from classes where cid=%s", [nid, ])
12         result = cursor.fetchone()
13         cursor.close()
14         conn.close()
15         print(result)
16         return render(request,"edit_class.html",{"result":result})
17     else:
18         nid = request.POST.get("cid")
19         caption = request.POST.get("caption")
edit_class.html
 1 <!DOCTYPE html>
 2 <html lang="en">
 3 <head>
 4     <meta charset="UTF-8">
 5     <title>edit_class</title>
 6 </head>
 7 <body>
 8     <h1>编辑班级</h1>
 9     <form method="POST" action="/edit_class/">
10         <input style="display: none" name="cid" value="{{ result.cid }}">
11         <p>班级名称:<input type="text" name="caption" value="{{ result.caption }}" placeholder="请输入替换数据"></p>
12         <input type="submit" value="submit">
13     </form>
14 </body>
15 </html>
方案二:区别在前端页面的不通,在与如何隐藏不该用户见到的数据行id。
 1 <!DOCTYPE html>
 2 <html lang="en">
 3 <head>
 4     <meta charset="UTF-8">
 5     <title>edit_class</title>
 6 </head>
 7 <body>
 8     <h1>编辑班级</h1>
 9     <form method="POST" action="/edit_class/?nid={{ result.cid }}">
10         <p>班级名称:<input type="text" name="caption" value="{{ result.caption }}" placeholder="请输入替换数据"></p>
11         <input type="submit" value="submit">
12     </form>
13 </body>
14 </html>
在views函数中,request也变了。
 1 def edit_class(request):
 2     """
 3     编辑班级
 4     :param request:
 5     :return:
 6     """
 7     if request.method == "GET":
 8         nid = request.GET.get('nid')
 9         conn = pymysql.connect(host="127.0.0.1", port=3306, user='root', passwd='redhat', db='GeorgeTest', charset='utf8')
10         cursor = conn.cursor(cursor=pymysql.cursors.DictCursor)  # 改为字典
11         cursor.execute("select cid,caption from classes where cid=%s", [nid, ])
12         result = cursor.fetchone()
13         cursor.close()
14         conn.close()
15         print(result)
16         return render(request,"edit_class.html",{"result":result})
17     else:
18         nid = request.GET.get("nid")  #这里与方案一的不一样
19         caption = request.POST.get("caption")
20         conn = pymysql.connect(host="127.0.0.1", port=3306, user='root', passwd='redhat', db='GeorgeTest',charset='utf8')
21         cursor = conn.cursor(cursor=pymysql.cursors.DictCursor)  # 改为字典
22         cursor.execute("update classes set caption=%s where cid=%s",[caption,nid,])
23         conn.commit()
24         cursor.close()
25         conn.close()
26         return redirect("/classes/")
----------------以上是班级的增删改操作。----------------
老师的操作同理。就直接上最终版本啦。
teacher.html 页面代码:
 1 <!DOCTYPE html>
 2 <html lang="en">
 3 <head>
 4     <meta charset="UTF-8">
 5     <title>teacher</title>
 6 </head>
 7 <body>
 8     <h1>老师表</h1>
 9     <div>
10         <a href="/add_teacher/">添加</a>
11     </div>
12     <table>
13         <thead>
14             <tr>
15                 <th>ID</th>
16                 <th>name</th>
17                 <th>操作</th>
18             </tr>
19         </thead>
20         <tbody>
21             {% for foo in teacher_list %}
22                 <tr>
23                     <td>{{ foo.id }}</td>
24                     <td>{{ foo.name }}</td>
25                     <td>
26                         <a href="/del_teacher/?nid={{ foo.id }}">删除</a>
27                         |
28                         <a href="/edit_teacher/?nid={{ foo.id }}">编辑</a>
29                     </td>
30                 </tr>
31             {% endfor %}
32         </tbody>
33     </table>
34 </body>
35 </html>
add_teacher.html 页面代码:
 1 <!DOCTYPE html>
 2 <html lang="en">
 3 <head>
 4     <meta charset="UTF-8">
 5     <title>add_teacher</title>
 6 </head>
 7 <body>
 8     <h1>添加老师表</h1>
 9     <form method="POST" action="/add_teacher/">
10         <p>老师添加:<input type="text" name="name" placeholder="添加老师"/></p>
11         <input type="submit" value="submit">
12     </form>
13 </body>
14 </html>
edit_teacher.html 页面代码:
 1 <!DOCTYPE html>
 2 <html lang="en">
 3 <head>
 4     <meta charset="UTF-8">
 5     <title>edit_teacher</title>
 6 </head>
 7 <body>
 8     <h1>编辑老师</h1>
 9     <form method="POST" action="/edit_teacher/?nid={{ result.id }}">
10         <p>老师名称:<input type="text" name="name" value="{{ result.name }}" placeholder="请输入替换数据"></p>
11         <input type="submit" value="submit">
12     </form>
13 </body>
14 </html>
teacher相关函数功能代码:
 1 def teacher(request):
 2     conn = pymysql.connect(host="127.0.0.1", port=3306, user='root', passwd='redhat', db='GeorgeTest', charset='utf8')
 3     cursor = conn.cursor(cursor=pymysql.cursors.DictCursor)  # 改为字典
 4     cursor.execute("select id,name from user")
 5     teacher_list = cursor.fetchall()
 6     cursor.close()
 7     conn.close()
 8     return render(request,"teacher.html",{"teacher_list":teacher_list})
 9
10 def add_teacher(request):
11     if request.method == "GET":
12         return render(request,"add_teacher.html")
13     else:
14         print(request.POST)
15         v = request.POST.get("caption")
16         conn = pymysql.connect(host="127.0.0.1", port=3306, user='root', passwd='redhat', db='GeorgeTest',charset='utf8')
17         cursor = conn.cursor(cursor=pymysql.cursors.DictCursor)  # 改为字典
18         cursor.execute("insert into user(name) values(%s,)", [v,])
19         conn.commit()
20         cursor.close()
21         conn.close()
22         return redirect("/teacher/")
23
24 def del_teacher(request):
25     """
26     删除操作
27     :param request:
28     :return:
29     """
30     # 那删除操作的nid。
31     nid = request.GET.get("id")
32     conn = pymysql.connect(host="127.0.0.1", port=3306, user='root', passwd='redhat', db='GeorgeTest', charset='utf8')
33     cursor = conn.cursor(cursor=pymysql.cursors.DictCursor)  # 改为字典
34     cursor.execute("delete from user where id=%s", [nid, ])
35     conn.commit()
36     cursor.close()
37     conn.close()
38     return redirect('/teacher/')
39
40
41 def edit_teacher(request):
42     """
43     编辑老师
44     :param request:
45     :return:
46     """
47     if request.method == "GET":
48         nid = request.GET.get('nid')
49         conn = pymysql.connect(host="127.0.0.1", port=3306, user='root', passwd='redhat', db='GeorgeTest',charset='utf8')
50         cursor = conn.cursor(cursor=pymysql.cursors.DictCursor)  # 改为字典
51         cursor.execute("select id,name from user where id=%s", [nid, ])
52         result = cursor.fetchone()
53         cursor.close()
54         conn.close()
55         print(result)
56         return render(request, "edit_teacher.html", {"result": result})
57     else:
58         id = request.GET.get("nid")
59         name = request.POST.get("name")
60         conn = pymysql.connect(host="127.0.0.1", port=3306, user='root', passwd='redhat', db='GeorgeTest',
61                                charset='utf8')
62         cursor = conn.cursor(cursor=pymysql.cursors.DictCursor)  # 改为字典
63         cursor.execute("update user set name=%s where id=%s",[name,id,])
64         conn.commit()
65         cursor.close()
66         conn.close()
67         return redirect("/teacher/")
68
69
70 # Create your views here.
----------------------------- 以上就是老师表的全部代码 -------------------
学生表,这里的学生表就要出现一对多的关系了。一个班级对应多个学生。
学生表这里讲用到模态对话框和Ajax的知识。
获取学生表数据:
 1 def students(request):
 2     """
 3     学生列表
 4     :param request:
 5     :return:
 6     """
 7     conn = pymysql.connect(host="127.0.0.1", port=3306, user='root', passwd='redhat', db='GeorgeTest', charset='utf8')
 8     cursor = conn.cursor(cursor=pymysql.cursors.DictCursor)  # 改为字典
 9     cursor.execute("select student.id,student.name,class.title from student left JOIN class on student.class_id = class.id")
10     students_list = cursor.fetchall()
11     cursor.close()
12     conn.close()
13
14     return render(request,"students.html",{"students_list":students_list})
students.html 页面代码:
 1 <!DOCTYPE html>
 2 <html lang="en">
 3 <head>
 4     <meta charset="UTF-8">
 5     <title>students</title>
 6 </head>
 7 <body>
 8     <h1>students_list</h1>
 9     <div>
10         <a href="/add_students/">添加</a>
11     </div>
12     <table>
13         <thead>
14             <tr>
15                 <th>ID</th>
16                 <th>学生姓名</th>
17                 <th>所属班级</th>
18                 <th>操作</th>
19             </tr>
20         </thead>
21         <tbody>
22             {% for item in students_list %}
23                 <tr>
24                     <td>{{ item.id }}</td>
25                     <td>{{ item.name }}</td>
26                     <td>{{ item.title }}</td>
27                     <td>
28                         <a href="/del_students/?nid={{ item.id }}">删除</a>
29                         |
30                         <a href="/edit_students/?nid={{ item.id }}">编辑</a>
31                     </td>
32                 </tr>
33             {% endfor %}
34         </tbody>
35     </table>
36 </body>
37 </html>
创建学生信息:也就是添加学生。
和删除学生信息,删除学生信息和删除班级的一样。
 1 def add_students(request):
 2     if request.method == "GET":
 3         conn = pymysql.connect(host='127.0.0.1', port=3306, user='root', passwd='redhat', db='GeorgeTest', charset='utf8')
 4         cursor = conn.cursor(cursor=pymysql.cursors.DictCursor)
 5         cursor.execute("select id,title from classes")
 6         class_list = cursor.fetchall()
 7         cursor.close()
 8         conn.close()
 9
10         return render(request, 'add_students.html', {'class_list': class_list})
11     else:
12         name = request.POST.get('name') #获取POST里的name,也就是前端输入的name
13         class_id = request.POST.get('class_id') #获取班级表,班级的id
14         conn = pymysql.connect(host='127.0.0.1', port=3306, user='root', passwd='redhat', db='GeorgeTest', charset='utf8')
15         cursor = conn.cursor(cursor=pymysql.cursors.DictCursor)
16         cursor.execute("insert into student(name,class_id) values(%s,%s)", [name, class_id, ])
17         conn.commit()
18         cursor.close()
19         conn.close()
20         return redirect('/students/')
21
22 def del_students(request):
23     nid = request.GET.get("nid")
24     conn = pymysql.connect(host="127.0.0.1", port=3306, user='root', passwd='redhat', db='GeorgeTest', charset='utf8')
25     cursor = conn.cursor(cursor=pymysql.cursors.DictCursor)  # 改为字典
26     cursor.execute("delete from students where id=%s", [nid,])
27     conn.commit()
28     cursor.close()
29     conn.close()
30     return redirect('/students/')
add_students.html 页面代码:
 1 <!DOCTYPE html>
 2 <html lang="en">
 3 <head>
 4     <meta charset="UTF-8">
 5     <title>add_students</title>
 6 </head>
 7 <body>
 8     <h1>添加学生</h1>
 9     <form method="POST" action="/add_students/">
10         <p>学生姓名<input type="text" name="name" /></p>
11         <p>
12             所属班级
13             <select name="class_id">
14                 {% for row in class_list %}
15                     <option value="{{ row.id }}">{{ row.title }}</option>
16                 {% endfor %}
17             </select>
18         </p>
19         <input type="submit" value="提交" />
20     </form>
21 </body>
22 </html>
接下来是编辑学生表。
可是,大哥们,劳资频繁的每个函数都要连一下数据库。怎的很烦。我要改一下玩法。将数据库的剔除,单独放在一个文件夹里。用的时候直接导入。
等到后期,会在每个APP里见model。model里写ORM,就更方便了,但是现在慢慢来!
创建一个utils,里边写一个sqlheper.py,这个py文件,放pymysql的操作。
sqlheper.py
import pymysql

def get_list(sql,args):
    """
    获取列表信息
    :param sql: pymysql语句
    :param args:
    :return:
    """
    conn = pymysql.connect(host='127.0.0.1', port=3306, user='root', passwd='redhat', db='GeorgeTest', charset='utf8')
    cursor = conn.cursor(cursor=pymysql.cursors.DictCursor)
    cursor.execute(sql,args)
    result = cursor.fetchall()
    cursor.close()
    conn.close()
    return result

def get_one(sql,args):
    """
   获取一条数据信息
    :param sql: pymysql语句
    :param args:
    :return:
    """
    conn = pymysql.connect(host='127.0.0.1', port=3306, user='root', passwd='redhat', db='GeorgeTest', charset='utf8')
    cursor = conn.cursor(cursor=pymysql.cursors.DictCursor)
    cursor.execute(sql,args)
    result = cursor.fetchone()
    cursor.close()
    conn.close()
    return result

def modify(sql,args):
    """
    更新,删除,修改
    :param sql: pymysql语句
    :param args:
    :return:
    """
    conn = pymysql.connect(host='127.0.0.1', port=3306, user='root', passwd='redhat', db='GeorgeTest', charset='utf8')
    cursor = conn.cursor(cursor=pymysql.cursors.DictCursor)
    cursor.execute(sql,args)
    conn.commit()
    cursor.close()
    conn.close()
编辑学生表的函数:edit_students:
 1 from utils import sqlheper
 2 def edit_student(request):
 3     if request.method == "GET":
 4         nid = request.GET.get('nid')
 5         class_list = sqlheper.get_list("select id,title from class",[])
 6         # 获取所有班级 sqlheper.get_list()
 7         current_student_info = sqlheper.get_one('select id,name,class_id from student where id=%s',[nid,])
 8         # 获取一条数据信息 sqlheper.get_one()
 9         return render(request,'edit_student.html',{'class_list': class_list,'current_student_info':current_student_info})
10     else:
11         nid = request.GET.get('nid')
12         name = request.POST.get('name')
13         class_id = request.POST.get('class_id')
14         sqlheper.modify('update student set name=%s,class_id=%s where id=%s',[name,class_id,nid,])
15         return redirect('/students/')
edit_students.html 页面代码:
 1 <!DOCTYPE html>
 2 <html lang="en">
 3 <head>
 4     <meta charset="UTF-8">
 5     <title>edit_students</title>
 6 </head>
 7 <body>
 8     <h1>编辑学生</h1>
 9     <form method="POST" action="/edit_students/?nid={{  current_student_info.id }}">
10
11         <p>学生姓名<input type="text" name="name"  value="{{ current_student_info.name }}" /></p>
12         <p>
13             所属班级
14             <select name="class_id">
15                 <!-- 循环所有的班级 -->
16                 {% for row in class_list %}
17                     <!-- 如果是当前学生所在班级,则默认选中 -->
18                     {% if row.id == current_student_info.class_id %}
19                         <option selected value="{{ row.id }}">{{ row.title }}</option>
20                     {% else %}
21                         <option value="{{ row.id }}">{{ row.title }}</option>
22                     {% endif %}
23
24                 {% endfor %}
25             </select>
26         </p>
27         <input type="submit" value="提交" />
28     </form>
29 </body>
30 </html>
对之前的内容优化,其中:
班级的添加,对空字符串没有识别。所以,如果在添加页面,不添加数据,直接提交是可行的。
但是,这样不符合设定。对此进行优化。
优化如下:
add_classes 函数代码:
 1 def add_class(request):
 2     """
 3     前端添加数据到数据库
 4     :param request:
 5     :return:
 6     """
 7     if request.method == "GET":
 8         return render(request,"add_class.html")
 9     else:
10         print(request.POST)
11         v = request.POST.get("caption")
12         if len(v)>0:
13             conn = pymysql.connect(host="127.0.0.1", port=3306, user='root', passwd='redhat', db='GeorgeTest',charset='utf8')
14             cursor = conn.cursor(cursor=pymysql.cursors.DictCursor)  # 改为字典
15             cursor.execute("insert into classes(caption) values(%s)",[v,])
16             conn.commit()
17             cursor.close()
18             conn.close()
19             return redirect("/classes/")
20         else:
21             return render(request,"add_class.html",{"msg":"班级名称不能为空"})
add_classes.html 页面代码:
 1 <!DOCTYPE html>
 2 <html lang="en">
 3 <head>
 4     <meta charset="UTF-8">
 5     <title>add_class</title>
 6 </head>
 7 <body>
 8     <h1>添加班级</h1>
 9     <form method="POST" action="/add_class/">
10         <p>班级名称:<input type="text" name="caption" placeholder="请输入内容"/></p>
11         <input type="submit" value="提交">{{ msg }}
12     </form>
13 </body>
14 </html>
以后再views中,对用户提交的数据进行判断,要用form组件。
模态对话框:
就是在前端做两层装饰,第一层是遮罩层,第二层是内容层(对话框)。
针对班级管理,进行进一步的优化,用模态对话框的知识。
班级管理:
-添加操作。用模态对话框实现。
模态对话框有两层,就写两个div。
但要在前端的页面里加装饰,在head里加。
.shadow加在遮罩层。
.modal 加在内容层。
模态对话框加在classes.html 里。
用到了form表单提交,form表提交会导致页面刷新。
页面一涮新,模态对话框就不保留了。
classes.html 页面:
 1 <!DOCTYPE html>
 2 <html lang="en">
 3 <head>
 4     <meta charset="UTF-8">
 5     <title>classes</title>
 6     <style>
 7         .hide{
 8             display: none;
 9         }
10         .shadow{
11             position: fixed;
12             left: 0;
13             top: 0;
14             right: 0;
15             bottom: 0;
16             background-color: black;
17             opacity: 0.4;
18             z-index: 999;
19         }
20         .modal{
21             z-index: 1000;
22             position: fixed;
23             left: 50%;
24             top: 50%;
25             height: 300px;
26              400px;
27             background-color: white;
28             margin-left: -200px;
29             margin-top: -150px;
30         }
31     </style>
32 </head>
33 <body>
34     <h1>classes_list</h1>
35     <div>
36         <a href="/add_class/">添加</a>
37         |
38         <a onclick="showModal();">对话框添加</a>
39     </div>
40     <table>
41         <thead>
42             <tr>
43                 <th>ID</th>
44                 <th>班级名称</th>
45                 <th>操作</th>
46             </tr>
47         </thead>
48         <tbody>
49             {% for item in class_lsit %}
50                 <tr>
51                     <td>{{ item.cid }}</td>
52                     <td>{{ item.caption }}</td>
53                     <td>
54                         <a href="/del_class/?nid={{ item.cid }}">删除</a>
55                         |
56                         <a href="/edit_class/?nid={{ item.cid }}">编辑</a>
57                     </td>
58                 </tr>
59             {% endfor %}
60         </tbody>
61     </table>
62
63     <div id="shadow" class="shadow hide"></div>
64     <div id="modal" class="modal hide">
65         <form method="POST" action="modal_add_classes" >
66             <p>
67             <input type="text" name="title" placeholder="班级名称">
68             </p>
69             <input type="submit" name="submit">
70         </form>
71
72     </div>
73     <script>
74         function showModal() {
75             document.getElementById("shadow").classList.remove("hide");   #找到遮罩层,并去挑遮罩层
76             document.getElementById("modal").classList.remove("hide");
77
78         }
79     </script>
80 </body>
81 </html>
模态对话框添加代码:
 1 def modal_add_classes(request):
 2     #获取前端的title
 3     title = request.POST.get('title')
 4     if len(title) > 0:
 5         sqlheper.modify('insert into class(title) values(%s)',[title,])
 6         # return HttpResponse('ok')
 7         return redirect('/classes/')
 8     elif title == "*?#.":
 9         pass
10     else:
11         return HttpResponse('班级标题不能为空')
对话框提交数据,不建议使用form表单。
在Django中的Ajax的应用:数据提交,建议使用。
Ajax,在页面不刷新的情况下,默默的向后台提交数据。这里要引入jQuery。
基于Ajax,创建学员管理的班级:
给前端的提交按键,绑定事件,onclick="AjaxSend();"
在script里的function函数里加AjaxSend(),这时在提交时,就是Ajax提交。$.ajax()
要注意:Ajax提交的数据有指定:
数据提交到哪里,要指定:url 数据提交到指定的url中
数据提交的方法,要指定:type 以什么方法提交数据
数据提交的数据,要指定:data 要提交的数据,字典存储 data:{"title":"XXXXX"}
定义success:function(data){
} :作用是,在url,type,data发完数据后,ajax会等。等到服务端处理完了,返回数据了,这个success会自动调用。
function里的data是服务端返回的值。
数据提交成功后,要干嘛:
数据提交失败后,要干嘛:
ajax提交不能实现跳转,是因为ajax本质上只返回字符串。要想实现跳转,只能自己写JS进行跳转。
=============== Ajax添加 ===============
 1 <!DOCTYPE html>
 2 <html lang="en">
 3 <head>
 4     <meta charset="UTF-8">
 5     <title>classes</title>
 6     <style>
 7         .hide{
 8             display: none;
 9         }
10         .shadow{
11             position: fixed;
12             left: 0;
13             top: 0;
14             right: 0;
15             bottom: 0;
16             background-color: black;
17             opacity: 0.4;
18             z-index: 999;
19         }
20         .modal{
21             z-index: 1000;
22             position: fixed;
23             left: 50%;
24             top: 50%;
25             height: 300px;
26              400px;
27             background-color: white;
28             margin-left: -200px;
29             margin-top: -150px;
30         }
31     </style>
32 </head>
33 <body>
34     <h1>classes_list</h1>
35     <div>
36         <a href="/add_class/">添加</a>
37         |
38         <a onclick="showModal();">对话框添加</a>
39     </div>
40     <table>
41         <thead>
42             <tr>
43                 <th>ID</th>
44                 <th>班级名称</th>
45                 <th>操作</th>
46             </tr>
47         </thead>
48         <tbody>
49             {% for item in class_lsit %}
50                 <tr>
51                     <td>{{ item.cid }}</td>
52                     <td>{{ item.caption }}</td>
53                     <td>
54                         <a href="/del_class/?nid={{ item.cid }}">删除</a>
55                         |
56                         <a href="/edit_class/?nid={{ item.cid }}">编辑</a>
57                     </td>
58                 </tr>
59             {% endfor %}
60         </tbody>
61     </table>
62
63     <div id="shadow" class="shadow hide"></div>
64     <div id="modal" class="modal hide">
65         <form method="POST" action="modal_add_classes" >
66             <p>
67             <input id="title" type="text" name="title" placeholder="班级名称">
68             </p>
69             <input type="button" name="submit" onclick="AjaxSend();"/>
70         </form>
71
72     </div>
73     <script src="/static/jquery-1.12.4.js"></script>
74     <script>
75         function showModal() {
76             document.getElementById("shadow").classList.remove("hide");   #找到遮罩层,并去挑遮罩层
77             document.getElementById("modal").classList.remove("hide");
78
79         }
80         function AjaxSend() {
81             $.ajax({
82                 url:'/modal_add_classes/',
83                 type:'POST',
84                 data:{"title":$("#title").val()},  //拿到全段输入的值
85                 success:function (data) {
86                     //当服务端处理完成后,返回数据时,该函数自动调用
87                     //data是服务端返回的值
88                     console.log(data);
89                     if(data=="ok"){
90                         alert('添加成功');
91                     }else {
92                         alert('添加失败');
93                     }
94                 }
95             })
96         }
97     </script>
98 </body>
99 </html>
提交的解决方案:
在提交的后面加一个span标签。
<span id="errormsg"></span>
效果:classes.html
  1 <!DOCTYPE html>
  2 <html lang="en">
  3 <head>
  4     <meta charset="UTF-8">
  5     <title>classes</title>
  6     <style>
  7         .hide{
  8             display: none;
  9         }
 10         .shadow{
 11             position: fixed;
 12             left: 0;
 13             top: 0;
 14             right: 0;
 15             bottom: 0;
 16             background-color: black;
 17             opacity: 0.4;
 18             z-index: 999;
 19         }
 20         .modal{
 21             z-index: 1000;
 22             position: fixed;
 23             left: 50%;
 24             top: 50%;
 25             height: 300px;
 26              400px;
 27             background-color: white;
 28             margin-left: -200px;
 29             margin-top: -150px;
 30         }
 31     </style>
 32 </head>
 33 <body>
 34     <h1>classes_list</h1>
 35     <div>
 36         <a href="/add_class/">添加</a>
 37         |
 38         <a onclick="showModal();">对话框添加</a>
 39     </div>
 40     <table>
 41         <thead>
 42             <tr>
 43                 <th>ID</th>
 44                 <th>班级名称</th>
 45                 <th>操作</th>
 46             </tr>
 47         </thead>
 48         <tbody>
 49             {% for item in class_lsit %}
 50                 <tr>
 51                     <td>{{ item.cid }}</td>
 52                     <td>{{ item.caption }}</td>
 53                     <td>
 54                         <a href="/del_class/?nid={{ item.cid }}">删除</a>
 55                         |
 56                         <a href="/edit_class/?nid={{ item.cid }}">编辑</a>
 57                     </td>
 58                 </tr>
 59             {% endfor %}
 60         </tbody>
 61     </table>
 62
 63     <div id="shadow" class="shadow hide"></div>
 64     <div id="modal" class="modal hide">
 65         <form method="POST" action="modal_add_classes" >
 66             <p>
 67             <input id="title" type="text" name="title" placeholder="班级名称">
 68             </p>
 69             <input type="button" name="submit" onclick="AjaxSend();"/><span id="errormsg"></span>
 70             <input type="button" name="取消" onclick="cancleModal();"/>
 71         </form>
 72
 73     </div>
 74     <script src="/static/jquery-1.12.4.js"></script>
 75     <script>
 76         function showModal() {
 77             document.getElementById("shadow").classList.remove("hide");   //找到遮罩层,并去挑遮罩层
 78             document.getElementById("modal").classList.remove("hide");
 79
 80         }
 81         function cancleModal() {
 82             document.getElementById('shadow').classList.add('hide');
 83             document.getElementById('modal').classList.add('hide')
 84         }
 85         function AjaxSend() {
 86             $.ajax({
 87                 url:'/modal_add_classes/',
 88                 type:'POST',
 89                 data:{"title":$("#title").val()},  //拿到全段输入的值
 90                 success:function (data) {
 91                     //当服务端处理完成后,返回数据时,该函数自动调用
 92                     //data是服务端返回的值
 93                     console.log(data);
 94                     if(data=="ok"){
 95                         location.href='/classes/'; //指定提交成功后跳转到哪里
 96                     }else {
 97                         $('#errormsg').text(data);
 98                     }
 99                 }
100             })
101         }
102     </script>
103 </body>
104 </html>
modal_add_classes:
 1 def modal_add_classes(request):
 2     #获取前端的title
 3     title = request.POST.get('title')
 4     if len(title) > 0:
 5         sqlheper.modify('insert into class(title) values(%s)',[title,])
 6         return HttpResponse('ok')
 7         # return redirect('/classes/')
 8     elif title == "*?#.":
 9         pass
10     else:
11         return HttpResponse('班级标题不能为空')
============ 班级的编辑操作,用ajax实现:单表的 =============
技巧,对于a标签的事件,跳转的问题,可以绑定再绑定一个事件,跳转到别的地方。
在a标签中的onclick事件中加return。
在function modelEdit(){
alert(123);
return false
}
在return 这里是关键,事件优先执行onclick,执行完后执行href,返回return,在function中将return的返回值设为False,就不会执行href里要跳转的url。
改为True,就会进行跳转。
这个功能用在form表单里。
在点击编辑后,需要将要编辑的内容放在编辑框,需要做的方法是,将获取当前点击的标签,以及他上一级的标签。
其次是标签父标签,再找其上方标签。
后端代码:
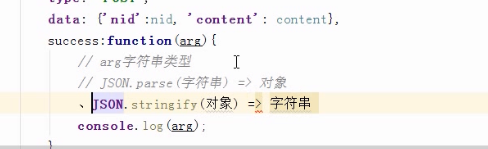
 1 def modal_edit_classes(request):
 2     ret = {"status":True,"message":None}
 3     try:
 4         nid = request.POST.get("nid") # 拿id
 5         content = request.POST.get("content") #拿内容
 6         sqlheper.modify("update class set title=%s where id=%s",[content,nid,])
 7     except Exception as e:
 8         ret['status'] = False
 9         ret['message'] = "处理异常"
10     return HttpResponse(json.dumps(ret)) #json将数据转成字符串,在发给前端
前端代码:
  1 <!DOCTYPE html>
  2 <html lang="en">
  3 <head>
  4     <meta charset="UTF-8">
  5     <title>classes</title>
  6     <style>
  7         .hide{
  8             display: none;
  9         }
 10         .shadow{
 11             position: fixed;
 12             left: 0;
 13             top: 0;
 14             right: 0;
 15             bottom: 0;
 16             background-color: black;
 17             opacity: 0.4;
 18             z-index: 999;
 19         }
 20         .modal{
 21             z-index: 1000;
 22             position: fixed;
 23             left: 50%;
 24             top: 50%;
 25             height: 300px;
 26              400px;
 27             background-color: white;
 28             margin-left: -200px;
 29             margin-top: -150px;
 30         }
 31     </style>
 32 </head>
 33 <body>
 34     <h1>classes_list</h1>
 35     <div>
 36         <a href="/add_class/">添加</a>
 37         |
 38         <a onclick="showModal();">对话框添加</a>
 39     </div>
 40     <table>
 41         <thead>
 42             <tr>
 43                 <th>ID</th>
 44                 <th>班级名称</th>
 45                 <th>操作</th>
 46             </tr>
 47         </thead>
 48         <tbody>
 49             {% for item in class_lsit %}
 50                 <tr>
 51                     <td>{{ item.cid }}</td>
 52                     <td>{{ item.caption }}</td>
 53                     <td>
 54                         <a href="/del_class/?nid={{ item.cid }}">删除</a>
 55                         |
 56                         <a onclick="modelEdit();">对话框删除</a>
 57                         |
 58                         <a href="/edit_class/?nid={{ item.cid }}">编辑</a>
 59                     </td>
 60                 </tr>
 61             {% endfor %}
 62         </tbody>
 63     </table>
 64
 65     <div id="shadow" class="shadow hide"></div>
 66     <div id="modal" class="modal hide">
 67         <form method="POST" action="modal_add_classes" >
 68             <p>
 69             <input id="title" type="text" name="title" placeholder="班级名称">
 70             </p>
 71             <input type="button" name="submit" onclick="AjaxSend();"/><span id="errormsg"></span>
 72             <input type="button" name="取消" onclick="cancleModal();"/>
 73         </form>
 74     </div>
 75
 76     <div id="editModel" class="modal hide">
 77         <h3>编辑框</h3>
 78         <p>
 79             <input id="editId" type="text" name="id" style="display: none" />
 80             <input id="editTitle" type="text" name="title" />
 81         </p>
 82         <input type="button" value="提交" onclick="editAjaxSend();" /><span id="errormsg"></span>
 83         <input type="button" value="取消" onclick="cancleModal();" />
 84     </div>
 85     <script src="/static/jquery-1.12.4.js"></script>
 86     <script>
 87         function showModal() {
 88             document.getElementById("shadow").classList.remove("hide");   //找到遮罩层,并去挑遮罩层
 89             document.getElementById("modal").classList.remove("hide");
 90
 91         }
 92
 93         function cancleModal() {
 94             document.getElementById('shadow').classList.add('hide');
 95             document.getElementById('modal').classList.add('hide')
 96             document.getElementById('eidtModal').classList.add('hide')
 97         }
 98
 99         function AjaxSend() {
100             $.ajax({
101                 url:'/modal_add_classes/',
102                 type:'POST',
103                 data:{"title":$("#title").val()},  //拿到全段输入的值
104                 success:function (data) {
105                     //当服务端处理完成后,返回数据时,该函数自动调用
106                     //data是服务端返回的值
107                     console.log(data);
108                     if(data=="ok"){
109                         location.href='/classes/'; //指定提交成功后跳转到哪里
110                     }else {
111                         $('#errormsg').text(data);
112                     }
113                 }
114             })
115         }
116
117         function modelEdit(ths) {
118             document.getElementById("shadow").classList.remove("hide");   //找到遮罩层,并去挑遮罩层
119             document.getElementById("editModel").classList.remove("hide");
120             /*
121             1、获取当前点击标签
122             2、获取当前标签的父标签,再找其上方标签
123             3、获取当前行班级名称,赋值到编辑对话框中
124             */
125             var row = $(ths).parent().prevAll();
126             var content = $(row[0]).text();
127             $('editTitle').val(content);
128
129             var contentId = $(row[1].text());
130             $('#editId').var(contentId);
131
132         }
133
134         function editAjaxSend() {
135             var nid = $('#editID').val();
136             var content = $('#editTitle').val();
137             console.log(nid,content);
138             $.ajax({
139                 url:'/modal_edit_classes/',
140                 type:"POST",
141                 data:{"nid":nid,"content":content},
142                 success:function (arg) {
143                     // arg字符串类型
144                     // JSON.parse(字符串) => 对象
145                     // JSON.stringify(对象) => 字符串
146                     arg = JSON.parse(arg);
147                     if(arg.status){
148                         //location.href="/classes/"
149                         location.reload();
150                     }else{
151                         alert(arg.message);
152                     }
153                 }
154             })
155         }
156     </script>
157 </body>
158 </html>
================== ajax 学生表,一对多,添加 ==================
绑定事件,都是基于jQuery。
jQuery也可以阻止默认事件的发生。
1 <script>
2     //绑定事件。
3     $(function () {
4         $("#modal_add_students").click(function () {
5             alert(123);
6             return false;   #阻止默认事件
7         })
8     })
9 </script>
后端代码:
 1 def modal_add_students(request):
 2     ret = {"status":True,"message":None}
 3
 4     try:
 5         name = request.POST.get("name")
 6         classes_id = request.POST.get("classes_id")
 7         sqlheper.modify('insert into students(name,classes_id) values(%s,%s)',[name,classes_id,])
 8     except Exception as e:
 9         ret['status'] = False
10         ret['message'] = str(e)
11
12     return HttpResponse(json.dumps(ret))
前端代码:
  1 <!DOCTYPE html>
  2 <html lang="en">
  3 <head>
  4     <meta charset="UTF-8">
  5     <title>students</title>
  6     <style>
  7         .hide{
  8             display: none;
  9         }
 10         .shadow{
 11             position: fixed;
 12             left: 0;
 13             top: 0;
 14             right: 0;
 15             bottom: 0;
 16             background-color: black;
 17             opacity: 0.4;
 18             z-index: 999;
 19         }
 20         .add-modal{
 21             z-index: 1000;
 22             position: fixed;
 23             left: 50%;
 24             top: 50%;
 25             height: 300px;
 26              400px;
 27             background-color: white;
 28             margin-left: -200px;
 29             margin-top: -150px;
 30         }
 31     </style>
 32 </head>
 33 <body>
 34     <h1>students_list</h1>
 35     <div>
 36         <a href="/add_students/">添加</a>
 37         |
 38         <a onclick="modal_add_students">对话框添加</a>
 39     </div>
 40     <table>
 41         <thead>
 42             <tr>
 43                 <th>ID</th>
 44                 <th>学生姓名</th>
 45                 <th>所属班级</th>
 46                 <th>操作</th>
 47             </tr>
 48         </thead>
 49         <tbody>
 50             {% for item in students_list %}
 51                 <tr>
 52                     <td>{{ item.id }}</td>
 53                     <td>{{ item.name }}</td>
 54                     <td>{{ item.title }}</td>
 55                     <td>
 56                         <a href="/del_students/?nid={{ item.id }}">删除</a>
 57                         |
 58                         <a href="/edit_students/?nid={{ item.id }}">编辑</a>
 59                     </td>
 60                 </tr>
 61             {% endfor %}
 62         </tbody>
 63     </table>
 64
 65     <div id="shadow" class="shadow hide"></div>
 66     <div id="addModal" class="add-modal hide"></div>
 67
 68         <p>
 69             Name:<input id="addName" type="text" name="name" placeholder="Name">
 70         </p>
 71         <p>
 72             Classes:<input id="addClassesId" type="text" name="Classes" placeholder="Classes">
 73             <select name="classesID" >
 74                 {% for row in classes_list %}
 75                     <option value="{{ row.id }}">{{ row.title }}</option>
 76                 {% endfor %}
 77
 78             </select>
 79         </p>
 80     <input id="btnAdd" type="button" value="添加" />
 81     <span id="addError" style="color: red;"></span>
 82
 83     <script src="/static/jquery-1.12.4.js"></script>
 84     <script>
 85         //绑定事件。
 86         $(function () {
 87             $("#addModal").click(function () {
 88                 $("#shadow,#addModal").removeClass('hide');
 89             })
 90
 91             $('#btnAdd').click(function () {
 92                 $.ajax({
 93                     url:"/modal_add_students/",
 94                     type:"POST",
 95                     data:{"name":$("#addName").val(),"classes_id":$("#addClassesId").val()},
 96                     success:function (arg) {
 97                         //回调函数,
 98                         //console.log(arg); //将数据发送给后台
 99                         arg = JSON.parse(arg);
100                         if(arg.status){
101                             location.reload();
102                         }else{
103                             $("#addError").text(arg.message);
104                         }
105                     }
106                 })
107             })
108         })
109     </script>
110 </body>
111 </html>
--------- END ----------