1.SSM是什么?
SSM是指目前最主流的项目架构的三大框架:
SpringMVC : spring的 Web层框架,是spring的一个模块
Spring :容器框架
MyBatis :持久层框架
2.spring与mybatis集成示例
我们集成mybatis和spring,主要是为了让mybatis用spring的事务管理
2.1 相关导入jar包
Spring依赖包:

mybatis依赖包:

MyBatis和Spring框架集成的桥梁包:
Spring自己并没有集成MyBatis框架,而是有MyBatis自己来集成,所以还需要Spring框架集成的桥梁包

数据库驱动包和连接池:


Mybatis支持的日志包log4j:

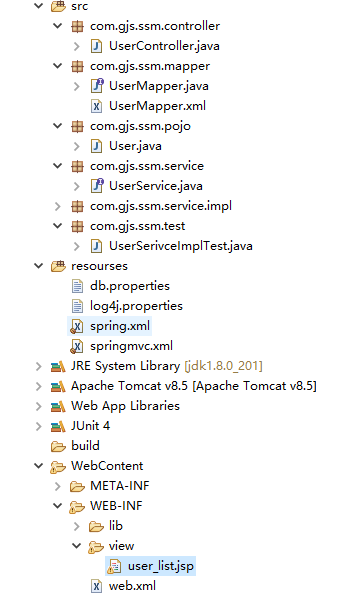
2.2 项目整体结构

2.3 Mapper层
package com.gjs.ssm.mapper;

import java.util.List;
import com.gjs.ssm.pojo.User;

public interface UserMapper {

    public    int insert(User user);

    public User selectByPrimaryKey(Integer id);

    public List<User> selectList();

    public int delteByPrimaryKey(Integer id);
}
Mapper.xml文件
<?xml version="1.0" encoding="UTF-8" ?>
<!DOCTYPE mapper
  PUBLIC "-//mybatis.org//DTD Mapper 3.0//EN"
  "http://mybatis.org/dtd/mybatis-3-mapper.dtd">

<mapper namespace="com.gjs.ssm.mapper.UserMapper">

    <insert id="insert" parameterType="com.gjs.ssm.pojo.User">
        insert into user (name,password,age)values(#{name},#{password},#{age})
    </insert>

    <select id="selectByPrimaryKey" parameterType="Integer" resultType="com.gjs.ssm.pojo.User">
        select * from user where id = #{id}
    </select>

    <select id="selectList"  resultType="com.gjs.ssm.pojo.User">
        select * from user
    </select>

      <delete id="delteByPrimaryKey" parameterType="int">
          delete from user where id = #{id}
      </delete>

</mapper>
2.4 Service层
package com.gjs.ssm.service.impl;

import java.util.List;

import org.springframework.beans.factory.annotation.Autowired;
import org.springframework.stereotype.Service;

import com.gjs.ssm.mapper.UserMapper;
import com.gjs.ssm.pojo.User;
import com.gjs.ssm.service.UserService;

@Service
public class UserSerivceImpl implements UserService{
    @Autowired
    UserMapper userMapper;

    @Override
    public int inset(User user) {
        return userMapper.insert(user);
    }

    @Override
    public User selectByPrimaryKey(Integer id) {
        return userMapper.selectByPrimaryKey(id);
    }

    @Override
    public List<User> selectList() {
        return userMapper.selectList();
    }

    @Override
    public int delteByPrimaryKey(Integer id) {
        return userMapper.delteByPrimaryKey(id);
    }

}
2.5层与层之间(Mapper和Service)spring对象的创建和依赖关系的维护(A)
之前我们Mapper对象的创建是通过sqlSession对象创建的,sqlSession对象又是SqlSessionFactory对象创建出来的,而SqlSessionFactory对象是通过读取配置文件中的相关配置创建的。
所谓的spring与mybatis集成,说白了就是把这些对象的创建都交给spring来处理。那怎么让spring自己创建这些对象呢?
spring-mybatis桥梁包中提供的org.mybatis.spring.SqlSessionFactoryBean类可以创建SqlSessionFactory对象,org.mybatis.spring.mapper.MapperScannerConfigurer类可以用来创建 Mapper接口的代理对象。所以只要在spring中配置这两个对象并注入依赖即可。具体配置如下:
spring.xml:
<?xml version="1.0" encoding="UTF-8"?>
<beans xmlns="http://www.springframework.org/schema/beans"
    xmlns:p="http://www.springframework.org/schema/p"
    xmlns:context="http://www.springframework.org/schema/context"
    xmlns:aop="http://www.springframework.org/schema/aop"
    xmlns:tx="http://www.springframework.org/schema/tx"
    xmlns:xsi="http://www.w3.org/2001/XMLSchema-instance"
    xsi:schemaLocation="
        http://www.springframework.org/schema/beans
        http://www.springframework.org/schema/beans/spring-beans.xsd
        http://www.springframework.org/schema/context
        http://www.springframework.org/schema/context/spring-context.xsd
        http://www.springframework.org/schema/aop
        http://www.springframework.org/schema/aop/spring-aop.xsd
        http://www.springframework.org/schema/tx
        http://www.springframework.org/schema/tx/spring-tx.xsd
        ">

    <!-- 开启注解包扫描 -->
    <context:component-scan base-package="com.gjs.ssm"/>

    <!-- 读取db.properties 配置文件 -->
    <context:property-placeholder location="classpath:db.properties"/>


    <!-- 配置druid连接池 -->
    <bean id="dataSource" class="com.alibaba.druid.pool.DruidDataSource">
        <property name="driverClassName" value="${jdbc.driverClassName}"/>
        <property name="url" value="${jdbc.url}"/>
        <property name="username" value="${jdbc.username}"/>
        <property name="password" value="${jdbc.password}"/>
        <property name="maxActive" value="${jdbc.maxActive}"/>
    </bean>

    <!-- 配置SqlSessionFactoryBean对象 -->
    <bean name="sqlSessionFactory" class="org.mybatis.spring.SqlSessionFactoryBean">
        <!-- 注入数据源 -->
        <property name="dataSource" ref="dataSource"/>

        <!-- 配置映射文件 -->
        <property name="mapperLocations">
            <array>
                <value>classpath:com/gjs/ssm/mapper/*Mapper.xml</value>
            </array>
        </property>

        <!-- 配置包扫描的别名 -->
        <property name="typeAliasesPackage" value="com.gjs.ssm.pojo"/>

        <!--
        如果需要读取mybatis框架的配置文件mybat-config.xml可使用:
        <property name="configLocation" value="classpath:mybatis-config.xml"/>
        不过一般不需要
         -->

    </bean>

    <!-- SqlSession对象的创建只需通过sqlSessionFactory对象调用openSession()方法即可,spring会自动创建 -->

    <!-- 使用包扫描批量创建 Mapper接口对应的代理对象 -->
    <bean class="org.mybatis.spring.mapper.MapperScannerConfigurer">
        <!-- 配置包扫描创建代理对象的位置 -->
        <property name="basePackage" value="com.gjs.ssm.mapper"/>

        <!-- 注入sqlSessionFactory bean的名称 -->
        <property name="sqlSessionFactoryBeanName" value="sqlSessionFactory"/>
    </bean>


    <!-- 配置事务管理器 -->
    <bean id="txManager"  class="org.springframework.jdbc.datasource.DataSourceTransactionManager">
        <!-- 注入数据源 -->
        <property name="dataSource" ref="dataSource"/>
    </bean>


    <!-- 配置事务通知 -->

    <tx:advice id="txAdvice" transaction-manager="txManager">
        <tx:attributes>
            <!-- DQL -->
            <tx:method name="select*" read-only="true" isolation="REPEATABLE_READ" propagation="REQUIRED"/>
            <tx:method name="get*" read-only="true" isolation="REPEATABLE_READ" propagation="REQUIRED"/>
            <tx:method name="find*" read-only="true" isolation="REPEATABLE_READ" propagation="REQUIRED"/>
            <tx:method name="query*" read-only="true" isolation="REPEATABLE_READ" propagation="REQUIRED"/>
            <!-- 非DQL  -->
            <tx:method name="*" read-only="false" isolation="REPEATABLE_READ" propagation="REQUIRED"/>        </tx:attributes>
    </tx:advice>


    <!-- 使用AOP将事务切入到service层 -->
    <aop:config >
        <!-- 切入点 -->
        <aop:pointcut expression="execution(* com.gjs.ssm.service..*.*(..))" id="pt"/>

        <!-- 切面 = 切入点+通知-->
        <aop:advisor advice-ref="txAdvice" pointcut-ref="pt"/>

        <!-- Spring 负责织入 -->
    </aop:config>

</beans>
下面这段代码是其中的关键
<!-- 配置SqlSessionFactoryBean对象 -->
    <bean name="sqlSessionFactory" class="org.mybatis.spring.SqlSessionFactoryBean">
        <!-- 注入数据源 -->
        <property name="dataSource" ref="dataSource"/>

        <!-- 配置映射文件 -->
        <property name="mapperLocations">
            <array>
                <value>classpath:com/gjs/ssm/mapper/*Mapper.xml</value>
            </array>
        </property>

        <!-- 配置包扫描的别名 -->
        <property name="typeAliasesPackage" value="com.gjs.ssm.pojo"/>

        <!--
        如果需要读取mybatis框架的配置文件mybat-config.xml可使用:
        <property name="configLocation" value="classpath:mybatis-config.xml"/>
        不过一般不需要
         -->

    </bean>

    <!-- SqlSession对象的创建只需通过sqlSessionFactory对象调用openSession()方法即可,spring会自动创建 -->

    <!-- 使用包扫描批量创建 Mapper接口对应的代理对象 -->
    <bean class="org.mybatis.spring.mapper.MapperScannerConfigurer">
        <!-- 配置包扫描创建代理对象的位置 -->
        <property name="basePackage" value="com.gjs.ssm.mapper"/>

        <!-- 注入sqlSessionFactory bean的名称 -->
        <property name="sqlSessionFactoryBeanName" value="sqlSessionFactory"/>
    </bean>
2. 5 测试代码
package com.gjs.ssm.test;

import java.util.List;

import org.junit.Test;
import org.junit.runner.RunWith;
import org.springframework.beans.factory.annotation.Autowired;
import org.springframework.test.context.ContextConfiguration;
import org.springframework.test.context.junit4.SpringJUnit4ClassRunner;

import com.gjs.ssm.pojo.User;
import com.gjs.ssm.service.UserService;


@RunWith(SpringJUnit4ClassRunner.class)
@ContextConfiguration("classpath:spring.xml")
public class UserSerivceImplTest {

    @Autowired
    private UserService userService;

    @Test
    public void testInset() {
        User user = new User(null, "张三", "123", 30);
        int row = userService.inset(user);
        System.out.println(row);
    }

    @Test
    public void testSelectByPrimaryKey() {
        User user = userService.selectByPrimaryKey(3);
        System.out.println(user);
    }

    @Test
    public void testSelectList() {
        List<User> selectList = userService.selectList();
        System.out.println(selectList);
    }

    @Test
    public void testDelteByPrimaryKey() {
        int row = userService.delteByPrimaryKey(3);
        System.out.println(row);
    }

}
3.SpringMVC的集成
3.1 导入相关jar包
SpringMVC依赖包:

Jstl标签库依赖包:

3.2 项目整体结构

3.3 springmvc.xml配置文件
<?xml version="1.0" encoding="UTF-8"?>
<beans xmlns="http://www.springframework.org/schema/beans"
    xmlns:p="http://www.springframework.org/schema/p"
    xmlns:mvc="http://www.springframework.org/schema/mvc"
    xmlns:xsi="http://www.w3.org/2001/XMLSchema-instance"
    xsi:schemaLocation="
        http://www.springframework.org/schema/beans
        http://www.springframework.org/schema/beans/spring-beans.xsd
        http://www.springframework.org/schema/mvc
        http://www.springframework.org/schema/mvc/spring-mvc.xsd
        ">
    <!-- 开启springMVC注解驱动 -->
    <mvc:annotation-driven/>

</beans>
3.4 编写控制器
package com.gjs.ssm.controller;

import java.util.List;

import org.springframework.beans.factory.annotation.Autowired;
import org.springframework.stereotype.Controller;
import org.springframework.ui.Model;
import org.springframework.web.bind.annotation.RequestMapping;

import com.gjs.ssm.pojo.User;
import com.gjs.ssm.service.UserService;

@Controller
@RequestMapping("/user")
public class UserController {

    @Autowired
    private UserService userService;

    @RequestMapping("/list")
    public String list(Model model) {

        List<User> users = userService.selectList();
        model.addAttribute("users", users);

        return "/WEB-INF/view/user_list.jsp";
    }
}
3.5 在web.xml配置SpringMVC的前端控制器(关键)
web.xml是整个web项目的入口,其他配置文件都需要通过web.xml直接或间接读取。所以springMVC和spring集成的关键就在于在web.xml中配置读取spring和springMVC的配置文件。
<?xml version="1.0" encoding="UTF-8"?>
<web-app xmlns:xsi="http://www.w3.org/2001/XMLSchema-instance" xmlns="http://xmlns.jcp.org/xml/ns/javaee" xsi:schemaLocation="http://xmlns.jcp.org/xml/ns/javaee http://xmlns.jcp.org/xml/ns/javaee/web-app_3_1.xsd" version="3.1">
  <display-name>SSM集成</display-name>
  <welcome-file-list>
    <welcome-file>index.html</welcome-file>
    <welcome-file>index.htm</welcome-file>
    <welcome-file>index.jsp</welcome-file>
    <welcome-file>default.html</welcome-file>
    <welcome-file>default.htm</welcome-file>
    <welcome-file>default.jsp</welcome-file>
  </welcome-file-list>

  <!-- 配置字符编码过滤器 -->
  <filter>
      <filter-name>CharacterEncodingFilter</filter-name>
      <filter-class>org.springframework.web.filter.CharacterEncodingFilter</filter-class>
      <init-param>
          <param-name>encoding</param-name>
          <param-value>UTF-8</param-value>
      </init-param>
  </filter>

  <filter-mapping>
      <filter-name>CharacterEncodingFilter</filter-name>
      <url-pattern>/*</url-pattern>
  </filter-mapping>

  <!-- 配置前端控制器 (分发器)-->
  <servlet>
      <servlet-name>MVC</servlet-name>
      <servlet-class>org.springframework.web.servlet.DispatcherServlet</servlet-class>

      <init-param>
          <!-- 读取配置文件 用通配符 *可以读取多个有相同前缀和后缀的文件-->
          <param-name>contextConfigLocation</param-name>
          <param-value>classpath:spring*.xml</param-value>
      </init-param>
      <load-on-startup>1</load-on-startup>
  </servlet>
  <servlet-mapping>
      <servlet-name>MVC</servlet-name>
      <url-pattern>*.do</url-pattern>
  </servlet-mapping>
</web-app>
3.6 编写jsp页面测试
<%@ page language="java" contentType="text/html; charset=UTF-8"
pageEncoding="UTF-8"%>
<!-- 引入jstl标签库  -->
<%@ taglib uri="http://java.sun.com/jsp/jstl/core" prefix="c"%>
<!DOCTYPE html>
<html>
    <head>
        <meta charset="UTF-8">
        <title>Insert title here</title>
    </head>
<body>
    <h3>用户列表</h3>

    <table border="1" style=" 500px;" cellspacing="0">
        <tr>
            <th>id</th>
            <th>名称</th>
            <th>密码</th>
            <th>年龄</th>
        </tr>


    <c:forEach items="${users}" var="user">
        <tr>
            <td>${user.id}</td>
            <td>${user.name}</td>
            <td>${user.password}</td>
            <td>${user.age}</td>
        </tr>
    </c:forEach>
    </table>

</body>
</html>