本章节通过在Jenkins创建一个kubernetes云环境,动态的在kubernetes集群中创建pod完成pipeline的构建流程,关于直接在宿主机上搭建Jenkins集群的可参照Kubernetes CI/CD(1)
部署Jenkins
-
下载Jenkins对应的镜像
docker pull jenkins/jenkins:2.221 -
将jenkins镜像上传到自己的私有镜像仓库中
docker tag jenkins/jenkins:2.221 192.168.0.107/k8s/jenkins:2.221 docker push 192.168.0.107/k8s/jenkins:2.221 -
编写启动Jenkins的yml文件
cat > jenkins.yml << EOF
kind: PersistentVolume
apiVersion: v1
metadata:
  name: jenkins
  labels:
    type: local
    app: jenkins
spec:
  capacity:
    storage: 10Gi
  accessModes:
    - ReadWriteOnce
  hostPath:
    path: /opt/k8s/yml/jenkins/data
---

kind: PersistentVolumeClaim
apiVersion: v1
metadata:
  name: jenkins-claim
spec:
  accessModes:
    - ReadWriteOnce
  resources:
    requests:
      storage: 10Gi
---

apiVersion: v1
kind: ServiceAccount
metadata:
  name: jenkins
  namespace: default
automountServiceAccountToken: true
---

apiVersion: rbac.authorization.k8s.io/v1
kind: ClusterRoleBinding
metadata:
  name: Jenkins-cluster-admin
roleRef:
  apiGroup: rbac.authorization.k8s.io
  kind: ClusterRole
  name: cluster-admin
subjects:
- kind: ServiceAccount
  name: jenkins
  namespace: default
---

apiVersion: v1
kind: Service
metadata:
  name: jenkins
  labels:
    app: jenkins
spec:
  ports:
    - port: 80
      targetPort: 8080
      nodePort: 8888
      name: jenkins
    - port: 50000
      targetPort: 50000
      nodePort: 50000
      name: agent
  selector:
    app: jenkins
    tier: jenkins
  type: NodePort
---

apiVersion: apps/v1
kind: Deployment
metadata:
  name: jenkins
  labels:
    app: jenkins
spec:
  strategy:
    type: Recreate
  selector:
    matchLabels:
      app: jenkins
      tier: jenkins
  template:
    metadata:
      labels:
        app: jenkins
        tier: jenkins
    spec:
      serviceAccountName: jenkins
      containers:
      - image: 192.168.0.107/k8s/jenkins:2.221
        imagePullPolicy: IfNotPresent
        name: jenkins
        securityContext:
          privileged: true
          runAsUser: 0
        volumeMounts:
        - name: kubeconfig
          mountPath: /var/jenkins_home/.kube
        - name: docker
          mountPath: /var/run/docker.sock
        - name: docker-bin
          mountPath: /usr/bin/docker
        - name: jenkins-persistent-storage
          mountPath: /var/jenkins_home
        ports:
        - containerPort: 8080
          name: jenkins
        - containerPort: 50000
        	name: agent
      volumes:
      - name: kubeconfig
        emptyDir: {}
      - name: docker
        hostPath:
          path: /var/run/docker.sock
      - name: docker-bin
        hostPath:
          path: /opt/k8s/bin/docker
      - name: jenkins-persistent-storage
        persistentVolumeClaim:
          claimName: jenkins-claim
EOF
安装 kubernetes相关插件
kubernetes-cd
kubernetes-client-api
kubernetes-credentials
kubernetes
配置kubernetes云(配置详情官方网站kubernetes-plugin)
-
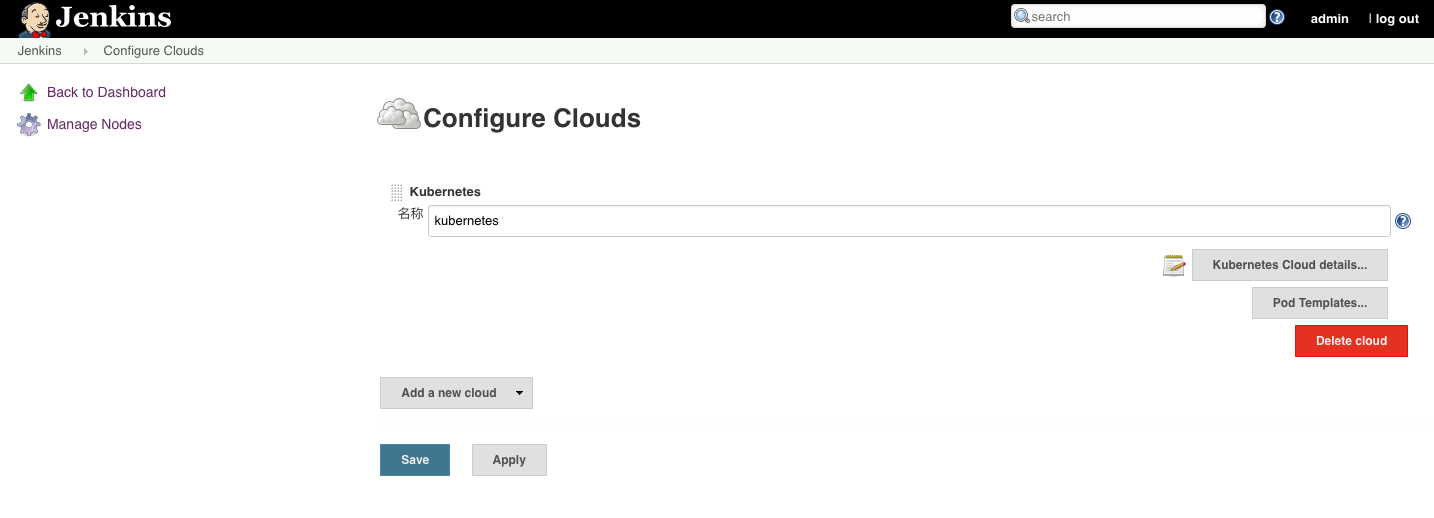
新加一个Cloud
在Jenkins界面执行Manage Jenkins -> Manage Nodes and Clouds -> Configure Clouds -> Add a new Cloud
-
配置cloud,点击Kubernetes Cloud details
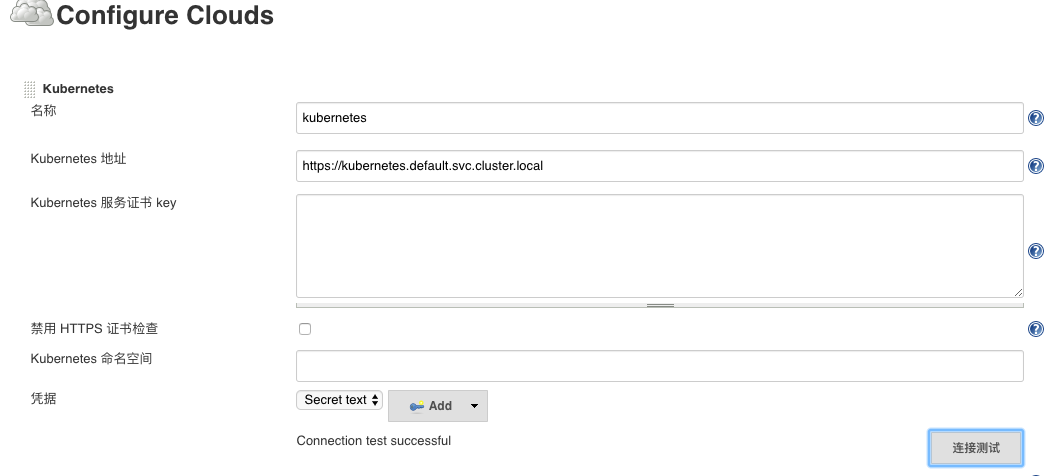
- Kubernetes 地址:指定要连接的k8s集群API地址,因为我们master是在k8s集群中启动的,所以此处可以直接用https://kubernetes.default.svc.cluster.local,其中kubernetes是k8s集群给我们启动的一个service,内部会把对他的访问转发给API server,如果Jenkins不在k8s集群中,或者想要启动的构建pod和master不是一个集群,这个地方就需要相应的k8s集群地址
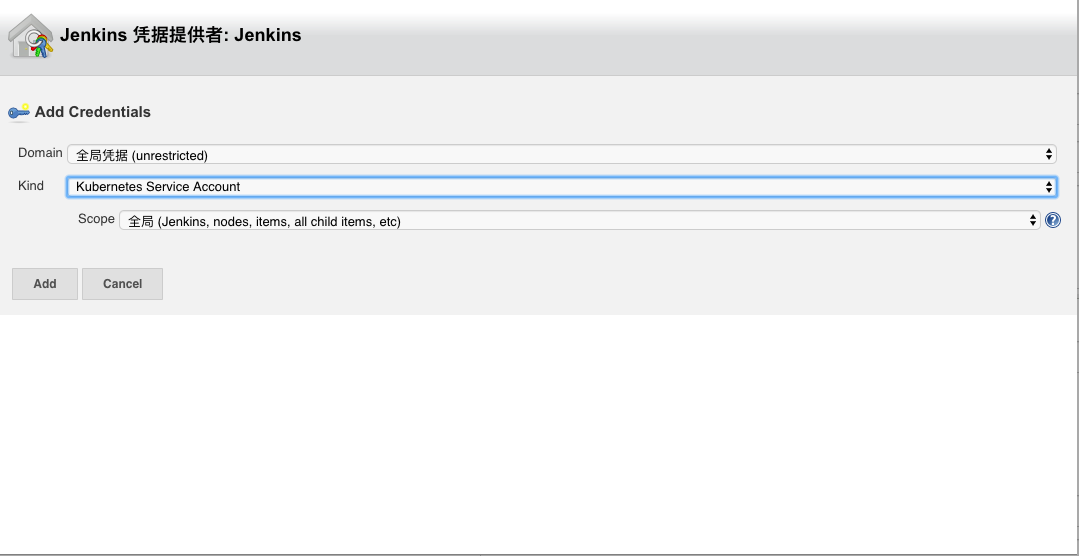
- 凭据:访问k8s集群的认证凭证,我们启动Jenkins集群时同时创建了Service account,并赋给了Jenkins容器,所以这个地方可以直接创建一个service count类型的凭据,如果是访问其他集群,需要用服务证书key来配置
配置好后点击:连接测试,正常的话会出现Connection test successful的提示
-
配置Jenkins相关信息(主要是agent和master通信的信息)

- Jenkins 地址: 连接jenkins master的地址,因为我们jenkins对应的service启动节点是80,所以这个地方就去掉了端口号,并且service也启动了50000端口映射到容器的50000,所以直接配置成http://jenkins
构建一个简单的流水线验证cloud的构建功能
-
在Jenkins界面新建一个item,名称hello-pipeline-cloud, 类型选择:流水线(pipeline)
-
编辑pipeline部分
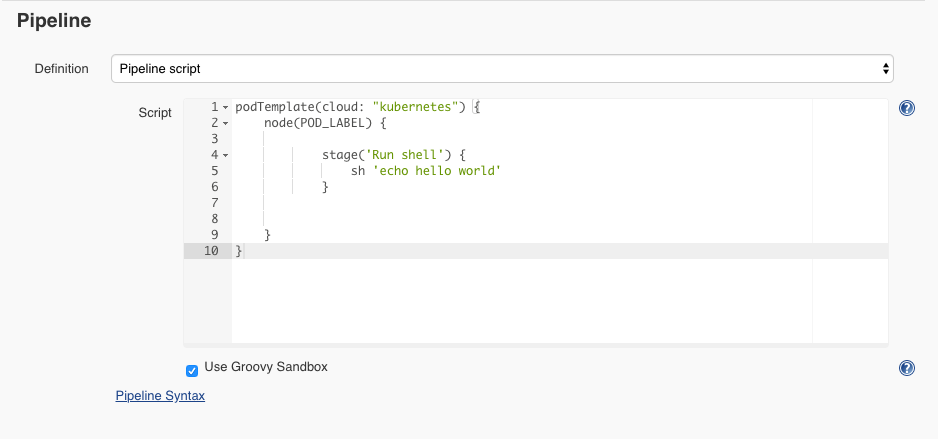
podTemplate(cloud: "kubernetes") { node(POD_LABEL) { stage('Run shell') { sh 'echo hello world' } } }- cloud: "kubernetes",指定执行的云环境,默认是kubernetes,所以这个地方可以省略,当有多个云环境或者我们创建的cloud名称不是kubernetes则需要明确指定
- POD_LABEL 是在1.17.0版本后引入的一个新特性,可以自动对创建的pod进行打标签
-
执行构建
首先我们可以在要执行的k8s集群上执行如下命令观察执行构建过程中k8s云给我做了什么事
kubectl get pod -w在Jenkins界面选择刚创建的工程,点击 Build Now
对应的集群的输出
root@master:/opt/k8s/yml/jenkins# kubectl get pod -w
NAME                       READY   STATUS    RESTARTS   AGE
jenkins-68d8b54c45-gshvp   1/1     Running   0          60m
hello-pipeline-cloud-9-7n3c4-8stzj-n8g6v   0/1     Pending   0          0s
hello-pipeline-cloud-9-7n3c4-8stzj-n8g6v   0/1     Pending   0          0s
hello-pipeline-cloud-9-7n3c4-8stzj-n8g6v   0/1     ContainerCreating   0          0s
hello-pipeline-cloud-9-7n3c4-8stzj-n8g6v   1/1     Running             0          1s
hello-pipeline-cloud-9-7n3c4-8stzj-n8g6v   1/1     Terminating         0          7s
hello-pipeline-cloud-9-7n3c4-8stzj-n8g6v   0/1     Terminating         0          8s
hello-pipeline-cloud-9-7n3c4-8stzj-n8g6v   0/1     Terminating         0          9s
hello-pipeline-cloud-9-7n3c4-8stzj-n8g6v   0/1     Terminating         0          9s
可以看到k8s集群给我们创建了一个新的pod:hello-pipeline-cloud-9-7n3c4-8stzj-n8g6v,构建完成后会自动把这个pod停掉
Jenkins构建的日志
Started by user admin Running in Durability level: MAX_SURVIVABILITY [Pipeline] Start of Pipeline [Pipeline] podTemplate [Pipeline] { [Pipeline] node Still waiting to schedule task All nodes of label ‘hello-pipeline-cloud_9-7n3c4’ are offline Created Pod: hello-pipeline-cloud-9-7n3c4-8stzj-n8g6v in namespace default Agent hello-pipeline-cloud-9-7n3c4-8stzj-n8g6v is provisioned from template hello-pipeline-cloud_9-7n3c4-8stzj --- apiVersion: "v1" kind: "Pod" metadata: annotations: buildUrl: "http://jenkins/job/hello-pipeline-cloud/9/" runUrl: "job/hello-pipeline-cloud/9/" labels: jenkins: "slave" jenkins/label: "hello-pipeline-cloud_9-7n3c4" name: "hello-pipeline-cloud-9-7n3c4-8stzj-n8g6v" spec: containers: - env: - name: "JENKINS_SECRET" value: "********" - name: "JENKINS_AGENT_NAME" value: "hello-pipeline-cloud-9-7n3c4-8stzj-n8g6v" - name: "JENKINS_NAME" value: "hello-pipeline-cloud-9-7n3c4-8stzj-n8g6v" - name: "JENKINS_AGENT_WORKDIR" value: "/home/jenkins/agent" - name: "JENKINS_URL" value: "http://jenkins/" image: "jenkins/jnlp-slave:3.35-5-alpine" name: "jnlp" volumeMounts: - mountPath: "/home/jenkins/agent" name: "workspace-volume" readOnly: false nodeSelector: beta.kubernetes.io/os: "linux" restartPolicy: "Never" securityContext: {} volumes: - emptyDir: medium: "" name: "workspace-volume" Running on hello-pipeline-cloud-9-7n3c4-8stzj-n8g6v in /home/jenkins/agent/workspace/hello-pipeline-cloud [Pipeline] { [Pipeline] stage [Pipeline] { (Run shell) [Pipeline] sh + echo hello world hello world [Pipeline] } [Pipeline] // stage [Pipeline] } [Pipeline] // node [Pipeline] } [Pipeline] // podTemplate [Pipeline] End of Pipeline Finished: SUCCESS从日志中可以看到k8s集群采用默认的pod模版给我启动了一个pod,并且把我们的构建内容sh 'echo hello world'在pod对应的容器中执行了
如果默认的模版不能满足我们的要求(比如在内网工作,对应的image想用我们自己私有仓库中的镜像可以重写name是jnlp的容器模版)后面一个例子,我们会重写这个模版,并在我们自定义的容器中执行我们的构建
构建自定义podtemplage
-
在Jenkins界面新建一个item,名称hello-pipeline-selfpodtemplate, 类型选择:流水线(pipeline)
-
编辑pipeline部分

podTemplate(yaml: """ apiVersion: v1 kind: Pod metadata: labels: app: busybox spec: containers: - name: busybox image: 192.168.0.107/k8s/busybox:latest command: - cat tty: true """ ,containers: [containerTemplate(name: 'jnlp', image: '192.168.0.107/jenkins/jnlp-slave:3.35-5-alpine')] ,cloud: "kubernetes") { node(POD_LABEL) { container('busybox') { sh "hostname" } } }- yaml 通过这个字段,我们定义了一个自己的podtemplate,容器名称是busybox,并在后面使用
- containers的containerTemplate,我们重写了jnlp容器启动的镜像名称。jnlp镜像必须启动,他要和jenkins master通信,来告知构建状态,并且不能配置其它容器模版的名称为jnlp,否则会造成构建一直不会结束
- 具体的构建流程,我们通过container('busybox')指定了构建要执行的容器,这个地方我们可以根据要构建的类型,配置maven、gradle、docker等各种构建环境来配置不同的podtemplate以此满足不同的构建需求,这也是用云环境进行构建的优势
同样,我们看下k8s集群的pod创建情况
root@master:/opt/k8s/yml/jenkins# kubectl get pod -w
NAME                       READY   STATUS    RESTARTS   AGE
jenkins-68d8b54c45-gshvp   1/1     Running   0          83m


hello-pipeline-selfpodtemplate-6-ch89k-0v48m-xxsqw   0/2     Pending   0          0s
hello-pipeline-selfpodtemplate-6-ch89k-0v48m-xxsqw   0/2     Pending   0          0s
hello-pipeline-selfpodtemplate-6-ch89k-0v48m-xxsqw   0/2     ContainerCreating   0          0s
hello-pipeline-selfpodtemplate-6-ch89k-0v48m-xxsqw   2/2     Running             0          2s
hello-pipeline-selfpodtemplate-6-ch89k-0v48m-xxsqw   2/2     Terminating         0          7s
看到这次k8s集群创建的pod包含了两个容器,如果我们describe这个pod可以看到里面是我们指定的容器
Jenkins日志
Started by user admin Running in Durability level: MAX_SURVIVABILITY [Pipeline] Start of Pipeline [Pipeline] podTemplate [Pipeline] { [Pipeline] node Created Pod: hello-pipeline-selfpodtemplate-6-ch89k-0v48m-xxsqw in namespace default Still waiting to schedule task Waiting for next available executor on ‘hello-pipeline-selfpodtemplate-6-ch89k-0v48m-xxsqw’ Agent hello-pipeline-selfpodtemplate-6-ch89k-0v48m-xxsqw is provisioned from template hello-pipeline-selfpodtemplate_6-ch89k-0v48m --- apiVersion: "v1" kind: "Pod" metadata: annotations: buildUrl: "http://jenkins/job/hello-pipeline-selfpodtemplate/6/" runUrl: "job/hello-pipeline-selfpodtemplate/6/" labels: app: "busybox" jenkins: "slave" jenkins/label: "hello-pipeline-selfpodtemplate_6-ch89k" name: "hello-pipeline-selfpodtemplate-6-ch89k-0v48m-xxsqw" spec: containers: - command: - "cat" image: "192.168.0.107/k8s/busybox:latest" name: "busybox" tty: true volumeMounts: - mountPath: "/home/jenkins/agent" name: "workspace-volume" readOnly: false - env: - name: "JENKINS_SECRET" value: "********" - name: "JENKINS_AGENT_NAME" value: "hello-pipeline-selfpodtemplate-6-ch89k-0v48m-xxsqw" - name: "JENKINS_NAME" value: "hello-pipeline-selfpodtemplate-6-ch89k-0v48m-xxsqw" - name: "JENKINS_AGENT_WORKDIR" value: "/home/jenkins/agent" - name: "JENKINS_URL" value: "http://jenkins/" image: "192.168.0.107/jenkins/jnlp-slave:3.35-5-alpine" imagePullPolicy: "IfNotPresent" name: "jnlp" resources: limits: {} requests: {} securityContext: privileged: false tty: false volumeMounts: - mountPath: "/home/jenkins/agent" name: "workspace-volume" readOnly: false nodeSelector: beta.kubernetes.io/os: "linux" restartPolicy: "Never" securityContext: {} volumes: - emptyDir: medium: "" name: "workspace-volume" Running on hello-pipeline-selfpodtemplate-6-ch89k-0v48m-xxsqw in /home/jenkins/agent/workspace/hello-pipeline-selfpodtemplate [Pipeline] { [Pipeline] container [Pipeline] { [Pipeline] sh + hostname hello-pipeline-selfpodtemplate-6-ch89k-0v48m-xxsqw [Pipeline] } [Pipeline] // container [Pipeline] } [Pipeline] // node [Pipeline] } [Pipeline] // podTemplate [Pipeline] End of Pipeline Finished: SUCCESS- 可以看到jnlp对应的镜像名称变成我们指定的镜像
- pod template 的内容默认是打印出来的,可以通过配置不显示 podTemplate(showRawYaml:false,...)
遇到问题
-
追加kubernetes service account凭据时报错
HTTP ERROR 403 No valid crumb was included in the request简单解决方法,在Configure Global Security配置页面去掉CSRF Protection
