1.RecyclerView:不仅可以纵向滑动,也可以横向滑动,一个加强的LIstView。
需要在dependencies中加入
compile 'com.android.support:recyclerview-v7:25.1.0'
2.在布局中加入控件
<android.support.v7.widget.RecyclerView
    android:layout_height="match_parent"
    android:layout_width="match_parent"
    android:id="@+id/recyclerView"/>
3.同样需要一个子布局
<?xml version="1.0" encoding="utf-8"?>
<LinearLayout xmlns:android="http://schemas.android.com/apk/res/android"
    android:layout_width="match_parent"
    android:orientation="horizontal"
    android:layout_height="50dp">
<ImageView
    android:layout_height="50dp"
    android:layout_width="80dp"
    android:id="@+id/imageView"
    android:src="@mipmap/ic_launcher"/>
    <TextView
        android:id="@+id/textView"
        android:layout_height="50dp"
        android:layout_width="0dp"
        android:layout_weight="1"
        android:text="111"
        android:textColor="#000000"
        android:textSize="20dp"
        android:gravity="center_horizontal|center_vertical" />
</LinearLayout>
4.定义的适配器
public class RecyclerAdapter  extends RecyclerView.Adapter<RecyclerAdapter.MyViewHolder>{

    List<MuInfo> data;

    Context context;

    public RecyclerAdapter(List<MuInfo> data, Context context) {
        this.data = data;
        this.context = context;
    }

    @Override
    public RecyclerAdapter.MyViewHolder onCreateViewHolder(ViewGroup parent, int viewType) {

        View view=LayoutInflater.from(context).inflate(R.layout.itme_layout, parent, false);
        final MyViewHolder holder = new MyViewHolder(view);
        holder.imageView.setOnClickListener(new OnClickListener() {
            @Override
            public void onClick(View v) {
                int postion=holder.getAdapterPosition();
                Toast.makeText(context,postion+"--"+data.get(postion).getName(),Toast.LENGTH_SHORT).show();
            }
        });

        holder.MuinfoitemView.setOnClickListener(new OnClickListener() {
            @Override
            public void onClick(View v) {
                int postion=holder.getAdapterPosition();
                Toast.makeText(context,postion+"--"+data.get(postion).getName()+"****",Toast.LENGTH_SHORT).show();
            }
        });
        return holder;
    }

    @Override
    public void onBindViewHolder(RecyclerAdapter.MyViewHolder holder, final int position) {
        MuInfo muInfo=data.get(position);
        holder.textView.setText(muInfo.getName());
        holder.imageView.setImageDrawable(context.getResources().getDrawable(R.mipmap.a));


    }

    @Override
    public int getItemCount() {
        return data.size();
    }

    public class MyViewHolder extends RecyclerView.ViewHolder {
        View  MuinfoitemView;
        ImageView imageView;
        TextView textView;
        public MyViewHolder(View itemView) {
            super(itemView);
            MuinfoitemView=itemView;
            imageView= (ImageView) itemView.findViewById(R.id.imageView);
            textView= (TextView) itemView.findViewById(R.id.textView);
        }
    }
}
5.在MainActivity中实现:下面加粗的控制RecyclerView为横向滑动,如果没有这一行,则默认为纵向滑动,和普通的ListView一样。
public class MainActivity extends AppCompatActivity {

    List<MuInfo>data=new ArrayList<>();
    @Override
    protected void onCreate(Bundle savedInstanceState) {
        super.onCreate(savedInstanceState);
        setContentView(R.layout.activity_main);
        MuInfo muInfo=new MuInfo("fgehj","fghjkl");
        MuInfo muInfo1=new MuInfo("fghdfj","fghjwertkl");
        for(int i=0;i<15;i++){
            data.add(muInfo);
            data.add(muInfo1);

        }

        RecyclerView recyclerView= (RecyclerView) findViewById(R.id.recyclerView);
        LinearLayoutManager linearLayoutManager=new LinearLayoutManager(this);
        linearLayoutManager.setOrientation(LinearLayoutManager.HORIZONTAL);
        recyclerView.setLayoutManager(linearLayoutManager);
        RecyclerAdapter adapter=new RecyclerAdapter(data,getApplicationContext());
        recyclerView.setAdapter(adapter);


    }
}
6.实体类也加上吧:


public class MuInfo {

    private String name;
    private String address;

    public MuInfo(String name, String address) {
        this.name = name;
        this.address = address;
    }

    public String getName() {
        return name;
    }

    public void setName(String name) {
        this.name = name;
    }

    public String getAddress() {
        return address;
    }

    public void setAddress(String address) {
        this.address = address;
    }
}
二、
1.改变子布局:
<LinearLayout xmlns:android="http://schemas.android.com/apk/res/android"
    android:layout_width="wrap_content"
    android:orientation="vertical"
    android:layout_height="wrap_content">
<ImageView
    android:layout_height="50dp"
    android:layout_width="80dp"
    android:id="@+id/imageView"
    android:src="@mipmap/ic_launcher"/>
    <TextView
        android:id="@+id/textView"
        android:layout_height="wrap_content"
        android:layout_width="80dp"
        android:text="111"
        android:textColor="#000000"
        android:textSize="20dp"
        android:gravity="center_horizontal|center_vertical" />
</LinearLayout>
2.
for(int i=0;i<80;i++){ Random random=new Random(); int x=random.nextInt(5)+1; String s="好美的花"; for(int j=0;j<x;j++){ s=s+"好美的花"; } data.add(new MuInfo(s,s)); } RecyclerView recyclerView= (RecyclerView) findViewById(R.id.recyclerView);
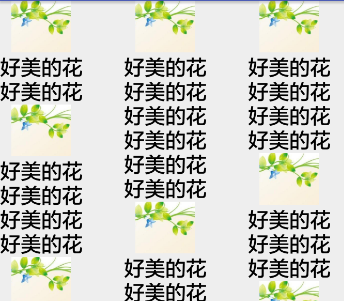
// 3:控制显示为3列 StaggeredGridLayoutManager layoutManager=new StaggeredGridLayoutManager(3,StaggeredGridLayoutManager.VERTICAL); recyclerView.setLayoutManager(layoutManager); RecyclerAdapter adapter=new RecyclerAdapter(data,getApplicationContext()); recyclerView.setAdapter(adapter);
大致如:但是滑动时,并不会出现3列滑动不一致动态效果。
三:如果实现三列,能够单独滑动?
四:RecyclerView的分割线
效果图:
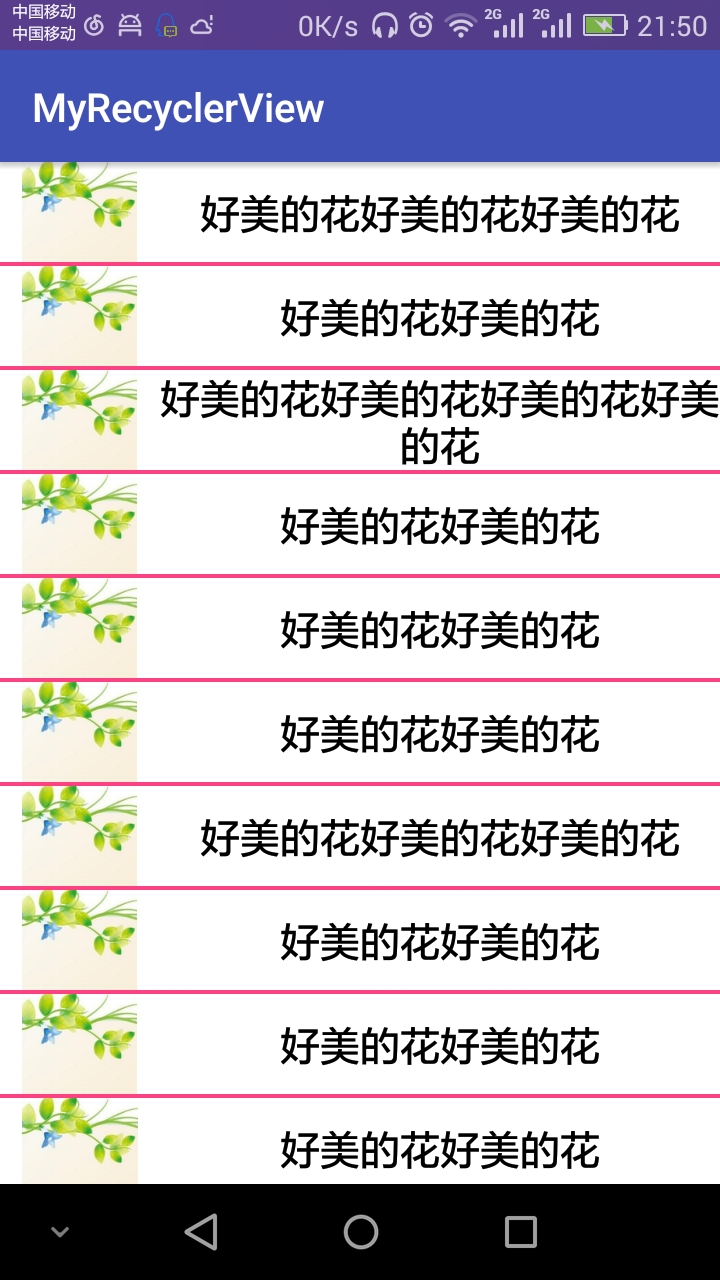
public class SpacesItemDecoration extends RecyclerView.ItemDecoration {
    private int dividerHeight;
    private Paint paint;


    public SpacesItemDecoration(Context context) {
        dividerHeight = context.getResources().getDimensionPixelSize(R.dimen.margin);
        paint=new Paint();
        paint.setColor(context.getResources().getColor(R.color.colorAccent));
    }

    @Override
    public void getItemOffsets(Rect outRect, View view, RecyclerView parent, RecyclerView.State state) {
        super.getItemOffsets(outRect, view, parent, state);
        /**
         * 类似加了一个bottom的padding
         */
        outRect.bottom = dividerHeight;
    }

    @Override
    public void onDraw(Canvas c, RecyclerView parent, RecyclerView.State state) {
        super.onDraw(c, parent, state);
        int childCount = parent.getChildCount();
        int left = parent.getPaddingLeft();
        int right = parent.getWidth() - parent.getPaddingRight();

        for (int i = 0; i < childCount - 1; i++) {
            View view = parent.getChildAt(i);
            float top = view.getBottom();
            float bottom = view.getBottom() + dividerHeight;
            /**
             * 绘制的矩形也就是从,item的左上角,到右下角,类似于背景,
             * 正好显示出一个横线,就是getItemOffsets空出来的范围
             *
             */
            c.drawRect(left, top, right, bottom, paint);
        }
    }
}
MainActivity只需要在SetAdapter后加入二行代码就可以了:
SpacesItemDecoration decoration=new SpacesItemDecoration(getApplicationContext());
        recyclerView.addItemDecoration(decoration);
上面的代码中SpacesItemDecoration如果不重写OnDraw方法,那么实现的效果只是相当于在item之间空出了距离。
也就是说在ItemDecoration中的方法:
getItemOffsets(),可以实现类似padding的效果
onDraw(),可以实现类似绘制背景的效果,item内容在上面
onDrawOver(),可以绘制在内容的上面,覆盖在item内容
onDrawOver的实现可以一试:想如下:
public class LeftAndRightTagDecoration extends RecyclerView.ItemDecoration{
    private int tagWidth;
    private Paint leftPaint;
    private Paint rightPaint;

    public LeftAndRightTagDecoration(Context context) {
        leftPaint = new Paint();
        leftPaint.setColor(context.getResources().getColor(R.color.colorAccent));
        rightPaint = new Paint();
        rightPaint.setColor(context.getResources().getColor(R.color.colorPrimary));
        tagWidth = context.getResources().getDimensionPixelSize(R.dimen.activity_horizontal_margin);
    }

    @Override
    public void onDrawOver(Canvas c, RecyclerView parent, RecyclerView.State state) {
        super.onDrawOver(c, parent, state);
        int childCount = parent.getChildCount();
        for (int i = 0; i < childCount; i++) {
            View child = parent.getChildAt(i);
            int pos = parent.getChildAdapterPosition(child);
            boolean isLeft = pos % 2 == 0;
            if (isLeft) {
                float left = child.getLeft();
                float right = left + tagWidth;
                float top = child.getTop();
                float bottom = child.getBottom();
                c.drawRect(left, top, right, bottom, leftPaint);
            } else {
                float right = child.getRight();
                float left = right - tagWidth;
                float top = child.getTop();
                float bottom = child.getBottom();
                c.drawRect(left, top, right, bottom, rightPaint);

            }
        }
    }
}
在这里 recyclerView.addItemDecoration(decoration);是可以叠加的,可以同时实现加分割线,也可以同时在左右侧加覆盖标签。
<------------------------------------------------------------------------------------------------------------------------------------------------------------------------------->
待续……
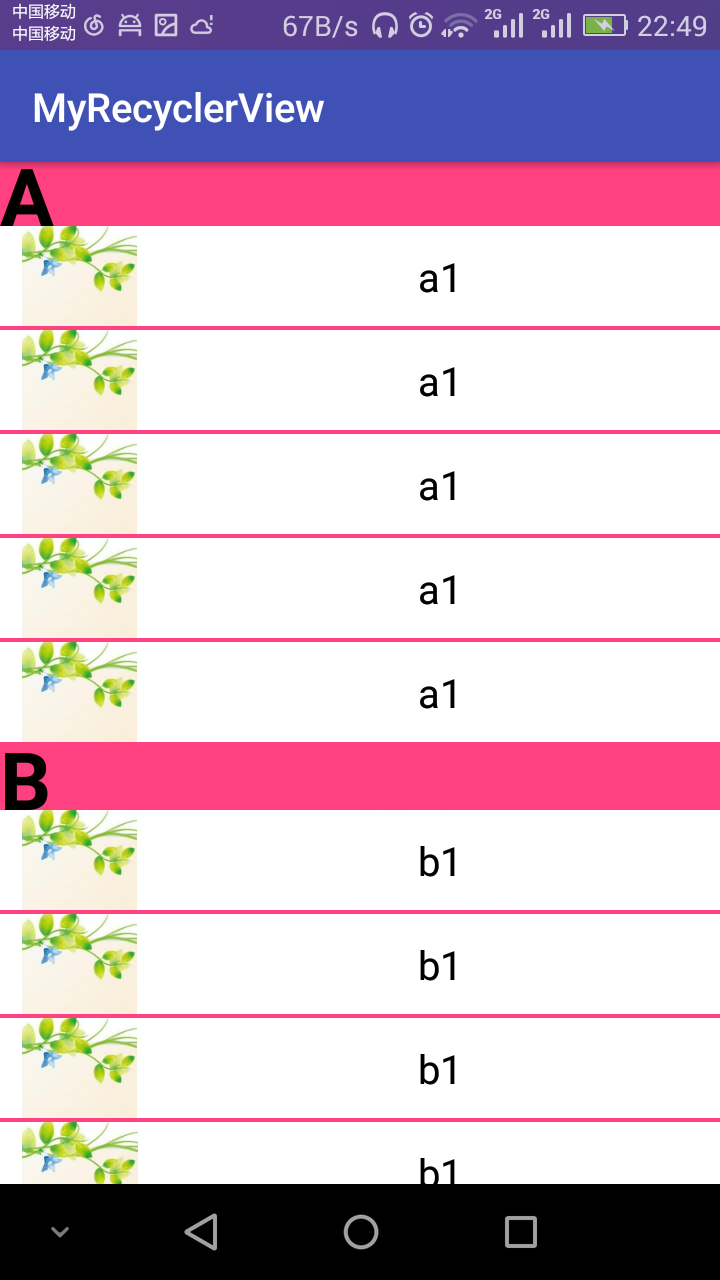
根据数据源,分组实现如图的效果:
public class SectionDecoration extends RecyclerView.ItemDecoration {
    private static final String TAG = "SectionDecoration";

    private DecorationCallback callback;
    private TextPaint textPaint;
    private Paint paint;
    private int topGap;
    private Paint.FontMetrics fontMetrics;


    public SectionDecoration(Context context, DecorationCallback decorationCallback) {
        Resources res = context.getResources();
        this.callback = decorationCallback;

        paint = new Paint();
        paint.setColor(res.getColor(R.color.colorAccent));

        textPaint = new TextPaint();
        textPaint.setTypeface(Typeface.DEFAULT_BOLD);
        textPaint.setAntiAlias(true);
        textPaint.setTextSize(80);
        textPaint.setColor(Color.BLACK);
        textPaint.getFontMetrics(fontMetrics);
        textPaint.setTextAlign(Paint.Align.LEFT);
        fontMetrics = new Paint.FontMetrics();
        topGap = res.getDimensionPixelSize(R.dimen.margin1);//32dp


    }


    @Override
    public void getItemOffsets(Rect outRect, View view, RecyclerView parent, RecyclerView.State state) {
        super.getItemOffsets(outRect, view, parent, state);
        int pos = parent.getChildAdapterPosition(view);
        Log.i(TAG, "getItemOffsets:" + pos);
        long groupId = callback.getGroupId(pos);
        if (groupId < 0) return;
        if (pos == 0 || isFirstInGroup(pos)) {//同组的第一个才添加padding
            outRect.top = topGap;
        } else {
            outRect.top = 0;
        }
    }

    @Override
    public void onDraw(Canvas c, RecyclerView parent, RecyclerView.State state) {
        super.onDraw(c, parent, state);
        int left = parent.getPaddingLeft();
        int right = parent.getWidth() - parent.getPaddingRight();
        int childCount = parent.getChildCount();
        for (int i = 0; i < childCount; i++) {
            View view = parent.getChildAt(i);
            int position = parent.getChildAdapterPosition(view);
            long groupId = callback.getGroupId(position);
            if (groupId < 0) return;
            String textLine = callback.getGroupFirstLine(position).toUpperCase();
            if (position == 0 || isFirstInGroup(position)) {
                float top = view.getTop() - topGap;
                float bottom = view.getTop();
                c.drawRect(left, top, right, bottom, paint);//绘制红色矩形
                c.drawText(textLine, left, bottom, textPaint);//绘制文本
            }
        }
    }


    private boolean isFirstInGroup(int pos) {
        if (pos == 0) {
            return true;
        } else {
            long prevGroupId = callback.getGroupId(pos - 1);
            long groupId = callback.getGroupId(pos);
            return prevGroupId != groupId;
        }
    }

    public interface DecorationCallback {

        long getGroupId(int position);

        String getGroupFirstLine(int position);
    }
}
public interface DecorationCallback {
    long getGroupId(int position);

    String getGroupFirstLine(int position);
}
MainActivity加入代码:
recyclerView.addItemDecoration(new SectionDecoration(this, new SectionDecoration.DecorationCallback() {
            @Override
            public long getGroupId(int position) {
                return Character.toUpperCase(data.get(position).getName().charAt(0));
            }

            @Override
            public String getGroupFirstLine(int position) {
                return data.get(position).getName().substring(0, 1).toUpperCase();
            }
        }));
但是上图中,A,B,C,分组标题也会随着item而不停的移动:
如何实现吸顶效果:看代码:
public class PinnedSectionDecoration extends RecyclerView.ItemDecoration {
    private static final String TAG = "PinnedSectionDecoration";

    private DecorationCallback callback;
    private TextPaint textPaint;
    private Paint paint;
    private int topGap;
    private Paint.FontMetrics fontMetrics;


    public PinnedSectionDecoration(Context context, DecorationCallback decorationCallback) {
        Resources res = context.getResources();
        this.callback = decorationCallback;

        paint = new Paint();
        paint.setColor(res.getColor(R.color.colorAccent));

        textPaint = new TextPaint();
        textPaint.setTypeface(Typeface.DEFAULT_BOLD);
        textPaint.setAntiAlias(true);
        textPaint.setTextSize(80);
        textPaint.setColor(Color.BLACK);
        textPaint.getFontMetrics(fontMetrics);
        textPaint.setTextAlign(Paint.Align.LEFT);
        fontMetrics = new Paint.FontMetrics();
        topGap = res.getDimensionPixelSize(R.dimen.margin1);


    }

    public interface DecorationCallback {

        long getGroupId(int position);

        String getGroupFirstLine(int position);
    }
    private boolean isFirstInGroup(int pos) {
        if (pos == 0) {
            return true;
        } else {
            long prevGroupId = callback.getGroupId(pos - 1);
            long groupId = callback.getGroupId(pos);
            return prevGroupId != groupId;
        }
    }

    @Override
    public void getItemOffsets(Rect outRect, View view, RecyclerView parent, RecyclerView.State state) {
        super.getItemOffsets(outRect, view, parent, state);
        int pos = parent.getChildAdapterPosition(view);
        long groupId = callback.getGroupId(pos);
        if (groupId < 0) return;
        if (pos == 0 || isFirstInGroup(pos)) {
            outRect.top = topGap;
        } else {
            outRect.top = 0;
        }
    }


    @Override
    public void onDrawOver(Canvas c, RecyclerView parent, RecyclerView.State state) {
        super.onDrawOver(c, parent, state);
        int itemCount = state.getItemCount();
        int childCount = parent.getChildCount();
        int left = parent.getPaddingLeft();
        int right = parent.getWidth() - parent.getPaddingRight();
        float lineHeight = textPaint.getTextSize() + fontMetrics.descent;

        long preGroupId, groupId = -1;
        for (int i = 0; i < childCount; i++) {
            View view = parent.getChildAt(i);
            int position = parent.getChildAdapterPosition(view);

            preGroupId = groupId;
            groupId = callback.getGroupId(position);
            if (groupId < 0 || groupId == preGroupId) continue;

            String textLine = callback.getGroupFirstLine(position).toUpperCase();
            if (TextUtils.isEmpty(textLine)) continue;

            int viewBottom = view.getBottom();
            float textY = Math.max(topGap, view.getTop());
            if (position + 1 < itemCount) { //下一个和当前不一样移动当前
                long nextGroupId = callback.getGroupId(position + 1);
                if (nextGroupId != groupId && viewBottom < textY ) {//组内最后一个view进入了header
                    textY = viewBottom;
                }
            }
            c.drawRect(left, textY - topGap, right, textY, paint);
            c.drawText(textLine, left, textY, textPaint);
        }

    }

}
MainActivity代码:
        recyclerView.addItemDecoration(new PinnedSectionDecoration(this, new PinnedSectionDecoration.DecorationCallback() {
            @Override
            public long getGroupId(int position) {
                return Character.toUpperCase(data.get(position).getName().charAt(0));
            }

            @Override
            public String getGroupFirstLine(int position) {
                return data.get(position).getName().substring(0, 1).toUpperCase();
            }
        }));
code地址:
http://pan.baidu.com/s/1eRM2XsI