redhat 8.3 的VNC 配置与其他的redhat 版本不太一样,其他版本在安装tigervnc tigervnc-server 后直接执行vncserver 就可以了, 8.3执行vncserver将会出现如下信息:
# vncserver
vncserver has been replaced by a systemd unit.
Please read /usr/share/doc/tigervnc/HOWTO.md for more information.
网上好多文章都说配置 vncserver@:1.service 里边内容大致为
[Unit]
Description=Remote desktop service (VNC)
After=syslog.target network.target

[Service]
Type=forking
WorkingDirectory=/root
User=root
Group=root

PIDFile=/root/.vnc/%H%i.pid

ExecStartPre=/bin/sh -c '/usr/bin/vncserver -kill %i > /dev/null 2>&1 || :'
ExecStart=/usr/bin/vncserver -autokill %i
ExecStop=/usr/bin/vncserver -kill %i

[Install]
WantedBy=multi-user.target
但是在redhat8.3 中执行ExecStart 中的脚本 /usr/bin/vncserver 就不能成功,所以这个方法在这里不适用。
/usr/share/doc/tigervnc/HOWTO.md 已经对配置进行里讲解,HOWTO.md 内容如下:


# What has changed
The previous Tigervnc versions had a wrapper script called `vncserver` which
could be run as a user manually to start *Xvnc* process. The usage was quite
simple as you just run
```
$ vncserver :x [vncserver options] [Xvnc options]
```
and that was it. While this was working just fine, there were issues when users
wanted to start a Tigervnc server using *systemd*. For these reasons things were
completely changed and there is now a new way how this all is supposed to work.

 # How to start Tigervnc server

## Add a user mapping
With this you can map a user to a particular port. The mapping should be done in
`/etc/tigervnc/vncserver.users` configuration file. It should be pretty
straightforward once you open the file as there are some examples, but basically
the mapping is in form
```
:x=user
```
For example you can have
```
:1=test
:2=vncuser
```

## Configure
 options
To configure Xvnc parameters, you need to go to the same directory where you did
the user mapping and open `vncserver-config-defaults` configuration file. This
file is for the default Xvnc configuration and will be applied to every user
unless any of the following applies:
* The user has its own configuration in `$HOME/.vnc/config`
* The same option with different value is configured in
  `vncserver-config-mandatory` configuration file, which replaces the default
  configuration and has even a higher priority than the per-user configuration.
  This option is for system administrators when they want to force particular
  *Xvnc* options.

Format of the configuration file is also quite simple as the configuration is
in form of
```
option=value
option
```
for example
```
session=gnome
securitytypes=vncauth,tlsvnc
desktop=sandbox
geometry=2000x1200
localhost
alwaysshared
```
### Note:
There is one important option you need to set and that option is the session you
want to start. E.g when you want to start GNOME desktop, then you have to use
```
session=gnome
```
which should match the name of a session desktop file from `/usr/share/xsessions`
directory.

## Set VNC password
You need to set a password for each user in order to be able to start the
Tigervnc server. In order to create a password, you just run
```
$ vncpasswd
```
as the user you will be starting the server for.
### Note:
If you were using Tigervnc before for your user and you already created a
password, then you will have to make sure the `$HOME/.vnc` folder created by
`vncpasswd` will have the correct *SELinux* context. You either can delete this
folder and recreate it again by creating the password one more time, or
alternatively you can run
```
$ restorecon -RFv /home/<USER>/.vnc
```

## Start the Tigervnc server
Finally you can start the server using systemd service. To do so just run
```
$ systemctl start vncserver@:x
```
as root or
```
$ sudo systemctl start vncserver@:x
```
as a regular user in case it has permissions to run `sudo`. Don't forget to
replace the `:x` by the actual number you configured in the user mapping file.
Following our example by running
```
$ systemctl start vncserver@:1
```
you will start a Tigervnc server for user `test` with a GNOME session.

### Note:
If you were previously using Tigervnc and you were used to start it using
*systemd* then you will need to remove previous *systemd* configuration files,
those you most likely copied to `/etc/systemd/system/vncserver@.service`,
otherwise this service file will be preferred over the new one installed with
latest Tigervnc.

# Limitations
You will not be able to start a Tigervnc server for a user who is already
logged into a graphical session. Avoid running the server as the `root` user as
it's not a safe thing to do. While running the server as the `root` should work
in general, it's not recommended to do so and there might be some things which
are not working properly.
下边是我的操作 redhat 8.3 配置VNC 步骤:
1. 安装VNC
yum install xdpyinfo
yum install tigervnc tigervnc-server
2.创建vncserver.users
vim /etc/tigervnc/vncserver.users

:1=root
:2=oracle
:3=tester
3.修改vncserver-config-defaults , 如果添加一行localhost ,外部不能访问
vim /etc/tigervnc/vncserver-config-defaults
session=gnome
securitytypes=vncauth,tlsvnc
desktop=sandbox
geometry=2000x1200
alwaysshared
4.修改vncserver-config-mandatory ,如果添加一行localhost ,外部不能访问
vim /etc/tigervnc/vncserver-config-mandatory
securitytypes=vncauth,tlsvnc
desktop=sandbox
geometry=2000x1200
alwaysshared
5.创建config 文件
vim $HOME/.vnc/config
session=gnome
geometry=1000x1200
6.创建vncserver.users
vim /etc/tigervnc/vncserver.users
:1=root
:2=oracle
:3=tester
7.复制vncserver@x.service 文件(这步可能可以省略)
cp /lib/systemd/system/vncserver@.service /etc/systemd/system/vncserver@:1.service
这个文件告诉你关于配置外部访问的一些信息
# The vncserver service unit file
#
# Quick HowTo:
# 1. Add a user mapping to /etc/tigervnc/vncserver.users.
# 2. Adjust the global or user configuration. See the
#    vncsession(8) manpage for details. (OPTIONAL)
# 3. Run `systemctl enable vncserver@:<display>.service`
# 4. Run `systemctl start vncserver@:<display>.service`
#
# DO NOT RUN THIS SERVICE if your local area network is
# untrusted!  For a secure way of using VNC, you should
# limit connections to the local host and then tunnel from
# the machine you want to view VNC on (host A) to the machine
# whose VNC output you want to view (host B)
#
# [user@hostA ~]$ ssh -v -C -L 590N:localhost:590M hostB
#
# this will open a connection on port 590N of your hostA to hostB's port 590M
# (in fact, it ssh-connects to hostB and then connects to localhost (on hostB).
# See the ssh man page for details on port forwarding)
#
# You can then point a VNC client on hostA at vncdisplay N of localhost and with
# the help of ssh, you end up seeing what hostB makes available on port 590M
#
# Use "nolisten=tcp" to prevent X connections to your VNC server via TCP.
#
# Use "localhost" to prevent remote VNC clients connecting except when
# doing so through a secure tunnel.  See the "-via" option in the
# `man vncviewer' manual page.


[Unit]
Description=Remote desktop service (VNC)
After=syslog.target network.target

[Service]
Type=forking
ExecStart=/usr/libexec/vncsession-start %i
PIDFile=/var/run/vncsession-%i.pid
SELinuxContext=system_u:system_r:vnc_session_t:s0

[Install]
WantedBy=multi-user.target
8.设置vnc 密码
vncpasswd
9.启动vnc
其中的3 指的是/etc/tigervnc/vncserver.users 中对应的用户, 3 就是tester
systemctl daemon-reload
systemctl stop  vncserver@:3
systemctl start vncserver@:3
systemctl status vncserver@:3
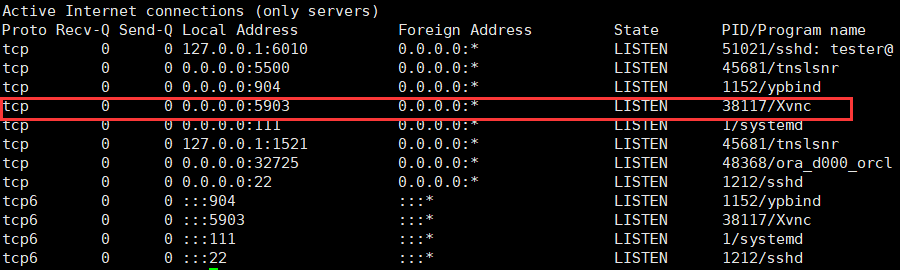
10.check
如果vncserver-config-defaults 和vncserver-config-mandator 配置了localhost,下边红框中将显示为127.0.0.1:5903 ,导致外部不能访问
netstat -tnlp
11. 外部连接
用tester执行
export  DISPLAY=:3
xhost +
其中 3 这个数字是在 /etc/tigervnc/vncserver.users 中配置,出现如下输出表示成功

到这里vnc 配置完成,可以在外部连接。
2020.12.20
GZF