BeautifulSoup是一个灵活有方便的网页解系库,处理搞笑,支持多种解析器,利用他可以不编写正贼表达式即可方便实现网页信息的提取。
解析库:

我们主要用lxml解析器
标签选择器:
# coding=utf-8
from bs4 import BeautifulSoup as bs

html = """
<html><head><title>The Dormouse's story</title></head>
<body>
<p class="title" name="dromouse"><b>The Dormouse's story</b></p>

<p class="story">Once upon a time there were three little sisters; and their names were
<a href="http://example.com/elsie" class="sister" id="link1">Elsie</a>,
<a href="http://example.com/lacie" class="sister" id="link2">Lacie</a> and
<a href="http://example.com/tillie" class="sister" id="link3">Tillie</a>;
and they lived at the bottom of a well.</p>

<p class="story">...</p>
"""

soup = bs(html, 'lxml')
print(soup.title)
print(type(soup.title))
print(soup.head)
print(type(soup.head))
print(soup.p)
print(type(soup.p))
这里我们print了soup.title、head、p三个标签以及他们的类型,结果如下:

他们的类型都是bs.elment.tag,类型,类就是标签类型,并且对于soup.p,是把第一个p标签输出,也就是说有多个相同的标签,只输出第一个
获取名称:
print(soup.title.name)

输出结果就是title
获取属性:
print(soup.title.attrs['name'])

print(soup.p['name'])

可以看到这两种方式都是相同的
获取内容:
print(soup.p.string)

嵌套选择:

也就是说从body到p,是一个嵌套的关系,p也是说,通过 .head得到的tag还可以进一步 向下索取,通过.body.p得到p标签
子节点和子孙节点(children和contents):
contents:
# coding=utf-8
from bs4 import BeautifulSoup as bs

html = """
 <html>
 <head>
  <title>
   The Dormouse's story
  </title>
 </head>
 <body>
  <p class="story">
   Once upon a time there were three little sisters; and their names were
   <a class="sister" href="http://example.com/elsie" id="link1">
    Elsie
   </a>
   ,
   <a class="sister" href="http://example.com/lacie" id="link2">
    Lacie
   </a>
   and
   <a class="sister" href="http://example.com/tillie" id="link2">
    Tillie
   </a>
   ; and they lived at the bottom of a well.
  </p>
  <p class="story">
   ...
  </p>
 </body>
</html>
"""

soup = bs(html, 'lxml')
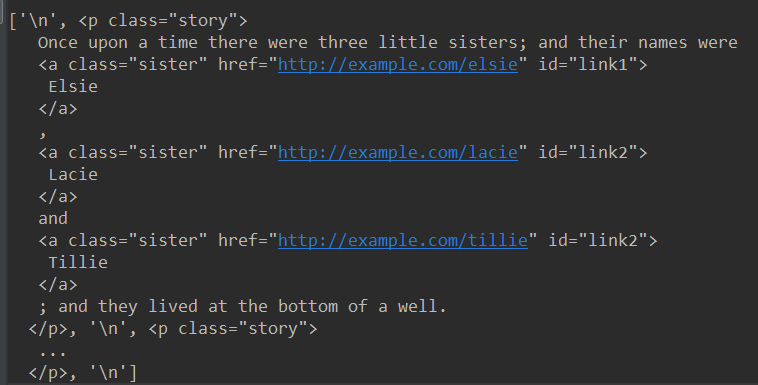
print(soup.body.contents)

可以看到contents属性返回了一个列表,整个p中的内容。把所有的换行符 标签放进了列表
children:
当我们把contents换成children:
print(soup.body.children)
contents:

它返回了一个迭代器,需要用for循环遍历使用
后代descendants:
print(soup.body.descendants)

还是一个迭代器,并且descendants是获得所有子孙节点,也就是儿子的儿子也会获得
父节点parent:
返回父节点

父节点parents:

兄弟节点siblings:

以上是标签选择器,是通过名字进行选择,但是在选择时候,往往会有很多名字相同的标签,所以我们不能完全用标签选择器进行选择,故引入标准选择器:
标准选择器:
find_all(name, attrs, recursive, text, **kwargs)
可根据标签名、属性、内容查找文档, 把所有符合条件的结果,并以列表的形式返回
name:

可以看到findall返回的列表中的每一个项哦都是tag类型
由此我们可以嵌套for循环:
for p in soup.find_all('p'):
    print(p.find_all('a'))
attrs:
print(soup.find_all(attrs={'id': 'list-1'}))
print(soup.find_all(attrs={'name': 'elements'}))
attr需要传入一个字典
并且对于某一些属性,可以直接用参数传入:
print(soup.find_all(id='list-1'))
print(soup.find_all(class_='elements'))   #class 是python的一个关键词,所以我们用class_代替class
text:
根据文本的内容选择,而它的返回值仅仅是文本的列表而不是tag


find(name, attrs, recursive, text, **kwargs)
与find_all不同是 find返回单个元素,fan_all返回所有元素。 find查找一个不存在的元素返回None
find_parent()和find_parents():
find_parent()返回所有祖先节点,find_parent()返回直接父节点。
find_next_siblings() 和 find_next_sibling()
find_next_siblings() 返回后面所有兄弟节点 find_next_sibling()返回前面一个兄弟节点
find_all_next() 和find_next()
find_all_next()返回节点后所有符合条件的节点,find_next()返回第一个符合条件的节点
find_all_previous()和find_previous()
find_all_previous()返回节点钱所有符合条件的节点,find_previous返回第一个符合条件的节点
css选择器
通过css()直接传入css选择器即可完成选择
标签(什么都不用加).属性(加点) #id(加井号)
- import requests
- from bs4 import BeautifulSoup as bs
- html = """
- <html>
- <head>
- <title>The Dormouse's story</title>
- </head>
- <body>
- <p class="title" name="dromouse">
- <b>The Dormouse's story</b>
- </p>
- <p class="story">
- Once upon a time there were three little sisters; and their names were
- <a class="mysis" href="http://example.com/elsie" id="link1">
- <b>the first b tag<b>
- Elsie
- </a>,
- <a class="mysis" href="http://example.com/lacie" id="link2" myname="kong">
- Lacie
- </a>and
- <a class="mysis" href="http://example.com/tillie" id="link3">
- Tillie
- </a>;and they lived at the bottom of a well.
- </p>
- <p class="story">
- myStory
- <a>the end a tag</a>
- </p>
- <a>the p tag sibling</a>
- </body>
- </html>
- """
- soup = bs(html, 'lxml')
- print(soup.select('p'))
- print(soup.select('p a'))
- print(type(soup.select('p')[0]))
输出结果1是一个包含所有p标签的列表 2是一个包含所有p标签下的a标签的列表,3是 ,也就是说。css选择器生成的结果就是一个tag类型的列表
同时对于soup.select('a.mysis‘表示class属性为mysis的所有标签。也即没有空格的表示有某一个属性的或者id的标签。 有空格代表是同等的
又因为select返回的是tag类型的列表,所以我们可以继续使用上面的方法获得属性即:、
- for a in soup.select('p a'):
- #方法一
- print(a['href'])
- #方法二
- print(a.attrs['href'])
以下罗列出一些css选择器的方法:(以下内容转自https://www.cnblogs.com/kongzhagen/p/6472746.html)
1、通过标签选择
- # 选择所有title标签
- soup.select("title")
- # 选择所有p标签中的第三个标签
- soup.select("p:nth-of-type(3)") 相当于soup.select(p)[2]
- # 选择body标签下的所有a标签
- soup.select("body a")
- # 选择body标签下的直接a子标签
- soup.select("body > a")
- # 选择id=link1后的所有兄弟节点标签
- soup.select("#link1 ~ .mysis")
- # 选择id=link1后的下一个兄弟节点标签
- soup.select("#link1 + .mysis")
2、通过类名查找
- # 选择a标签,其类属性为mysis的标签
- soup.select("a.mysis")
3、通过id查找
- # 选择a标签,其id属性为link1的标签
- soup.select("a#link1")
4、通过【属性】查找,当然也适用于class
- # 选择a标签,其属性中存在myname的所有标签
- soup.select("a[myname]")
- # 选择a标签,其属性href=http://example.com/lacie的所有标签
- soup.select("a[href='http://example.com/lacie']")
- # 选择a标签,其href属性以http开头
- soup.select('a[href^="http"]')
- # 选择a标签,其href属性以lacie结尾
- soup.select('a[href$="lacie"]')
- # 选择a标签,其href属性包含.com
- soup.select('a[href*=".com"]')
- # 从html中排除某标签,此时soup中不再有script标签
- [s.extract() for s in soup('script')]
- # 如果想排除多个呢
- [s.extract() for s in soup(['script','fram']
5、获取文本及属性
- html_doc = """<html>
- <head>
- <title>The Dormouse's story</title>
- </head>
- <body>
- <p class="title"><b>The Dormouse's story</b></p>
- <p class="story">Once upon a time there were three little sisters; and their names were
- <a href="http://example.com/elsie" class="sister" id="link1">Elsie</a>,
- <a href="http://example.com/lacie" class="sister" id="link2">Lacie</a> and
- <a href="http://example.com/tillie" class="sister" id="link3">Tillie</a>;
- </p>
- and they lived at the bottom of a well.
- <p class="story">...</p>
- </body>
- """
- from bs4 import BeautifulSoup
- '''''
- 以列表的形式返回
- '''
- soup = BeautifulSoup(html_doc, 'html.parser')
- s = soup.select('p.story')
- s[0].get_text() # p节点及子孙节点的文本内容
- s[0].get_text("|") # 指定文本内容的分隔符
- s[0].get_text("|", strip=True) # 去除文本内容前后的空白
- print(s[0].get("class")) # p节点的class属性值列表(除class外都是返回字符串)
6、UnicodeDammit.detwingle() 方法只能解码包含在UTF-8编码中的Windows-1252编码内容
- new_doc = UnicodeDammit.detwingle(doc)
- print(new_doc.decode("utf8"))
- # ☃☃☃“I like snowmen!”
在创建 BeautifulSoup 或 UnicodeDammit 对象前一定要先对文档调用 UnicodeDammit.detwingle() 确保文档的编码方式正确.如果尝试去解析一段包含Windows-1252编码的UTF-8文档,就会得到一堆乱码,比如: ☃☃☃“I like snowmen!”.
7 、其他
- html_doc = """<html>
- <head>
- <title>The Dormouse's story</title>
- </head>
- <body>
- <p class="title"><b>The Dormouse's story</b></p>
- <p class="story">Once upon a time there were three little sisters; and their names were
- <a href="http://example.com/elsie" class="sister" id="link1">Elsie</a>,
- <a href="http://example.com/lacie" class="sister" id="link2">Lacie</a> and
- <a href="http://example.com/tillie" class="sister" id="link3">Tillie</a>;
- </p>
- and they lived at the bottom of a well.
- <p class="story">...</p>
- </body>
- """
- from bs4 import BeautifulSoup
- '''''
- 以列表的形式返回
- '''
- soup = BeautifulSoup(html_doc, 'html.parser')
- soup.select('title') # title标签
- soup.select("p:nth-of-type(3)") # 第三个p节点
- soup.select('body a') # body下的所有子孙a节点
- soup.select('p > a') # 所有p节点下的所有a直接节点
- soup.select('p > #link1') # 所有p节点下的id=link1的直接子节点
- soup.select('#link1 ~ .sister') # id为link1的节点后面class=sister的所有兄弟节点
- soup.select('#link1 + .sister') # id为link1的节点后面class=sister的第一个兄弟节点
- soup.select('.sister') # class=sister的所有节点
- soup.select('[class="sister"]') # class=sister的所有节点
- soup.select("#link1") # id=link1的节点
- soup.select("a#link1") # a节点,且id=link1的节点
- soup.select('a[href]') # 所有的a节点,有href属性
- soup.select('a[href="http://example.com/elsie"]') # 指定href属性值的所有a节点
- soup.select('a[href^="http://example.com/"]') # href属性以指定值开头的所有a节点
- soup.select('a[href$="tillie"]') # href属性以指定值结尾的所有a节点
- soup.select('a[href*=".com/el"]') # 支持正则匹配