高德地图调用方法
VUE调用高德地图通常有三种方式:
- 饿了么提供的地图组件:vue-amap
- @Jim Liu提供的地图组件:@amap/amap-vue(参考文章:为你的Vue项目加上高德地图)
- 高德官方的 JS API
在写成本文之前,本人尝试过上面全部的三种方法。但因水平有限,VUE只是初窥门径,使用vue-amap时总是报'AMap not defined'错误,F5刷新后地图就无法显示。使用@amap/amap-vue则一切顺利,非常好用,但后续开发需要的热力图功能不知如何实现,所以最终决定采用官方的JS API。
使用 JS API 调用高德地图
加载 JS API
- 在public/index.html中加入:
<script src="https://webapi.amap.com/maps?v=1.4.15&key=您申请的key值&callback=init"></script>
- 在vue.config.js中加入configureWebpack节点(实测不加也无妨,学艺不精,不知其中缘由):
module.exports = {
    // ...
    configureWebpack: {
        externals: {
            'AMap': 'AMap' // 高德地图JS API
        }
    },
}
将官方demo转换为vue代码
-
放置地图

-
初始化map对象
-
放置汽车标记
-
绘制轨迹
完整代码如下:
<template>
<div>
<div id="container"></div>
<div class="input-card">
<h4>轨迹回放控制</h4>
<div class="input-item">
<input type="button" class="btn" value="开始动画" id="start" @click="startAnimation()" />
<input type="button" class="btn" value="暂停动画" id="pause" @click="pauseAnimation()" />
</div>
<div class="input-item">
<input type="button" class="btn" value="继续动画" id="resume" @click="resumeAnimation()" />
<input type="button" class="btn" value="停止动画" id="stop" @click="stopAnimation()" />
</div>
</div>
</div>
</template>
<script>
export default {
mounted() {
this.initMap();
},
beforeDestroy() {
this.map && this.map.destroy();
},
data() {
return {
map: null,
marker: null,
lineArr: [
[116.478935, 39.997761],
[116.478939, 39.997825],
[116.478912, 39.998549],
[116.478912, 39.998549],
[116.478998, 39.998555],
[116.478998, 39.998555],
[116.479282, 39.99856],
[116.479658, 39.998528],
[116.480151, 39.998453],
[116.480784, 39.998302],
[116.480784, 39.998302],
[116.481149, 39.998184],
[116.481573, 39.997997],
[116.481863, 39.997846],
[116.482072, 39.997718],
[116.482362, 39.997718],
[116.483633, 39.998935],
[116.48367, 39.998968],
[116.484648, 39.999861]
]
};
},
methods: {
initMap() {
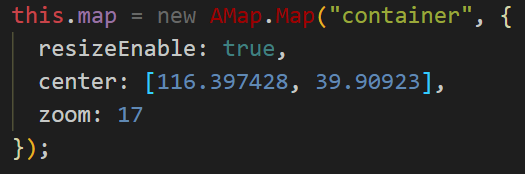
this.map = new AMap.Map("container", {
resizeEnable: true,
center: [116.397428, 39.90923],
zoom: 17
});
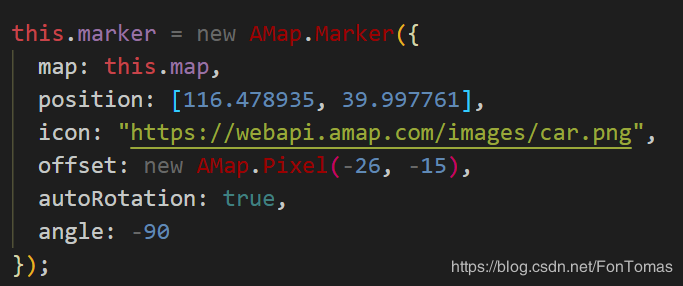
this.marker = new AMap.Marker({
map: this.map,
position: [116.478935, 39.997761],
icon: "https://webapi.amap.com/images/car.png",
offset: new AMap.Pixel(-26, -15),
autoRotation: true,
angle: -90
});
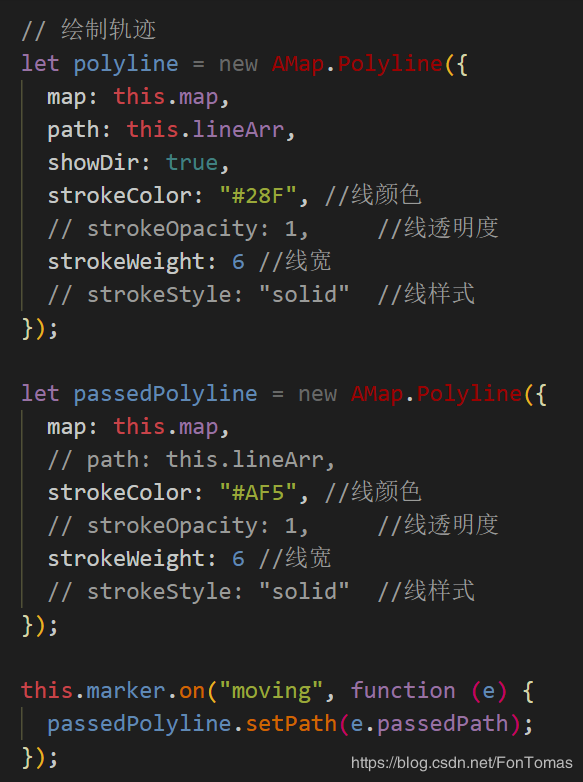
// 绘制轨迹
let polyline = new AMap.Polyline({
map: this.map,
path: this.lineArr,
showDir: true,
strokeColor: "#28F", //线颜色
// strokeOpacity: 1, //线透明度
strokeWeight: 6 //线宽
// strokeStyle: "solid" //线样式
});
let passedPolyline = new AMap.Polyline({
map: this.map,
// path: this.lineArr,
strokeColor: "#AF5", //线颜色
// strokeOpacity: 1, //线透明度
strokeWeight: 6 //线宽
// strokeStyle: "solid" //线样式
});
this.marker.on("moving", function (e) {
passedPolyline.setPath(e.passedPath);
});
this.map.setFitView();
},
startAnimation() {
this.marker.moveAlong(this.lineArr, 200);
},
pauseAnimation() {
this.marker.pauseMove();
},
resumeAnimation() {
this.marker.resumeMove();
},
stopAnimation() {
this.marker.stopMove();
}
}
};
</script>
<style lang="less" scoped>
@import url('https://a.amap.com/jsapi_demos/static/demo-center/css/demo-center.css');
#container {
height: 500px;
100%;
}
.input-card .btn {
margin-right: 1.2rem;
9rem;
}
.input-card .btn:last-child {
margin-right: 0;
}
</style>
启动项目,一切正常!