Dialogs
对话框通常是一个显示在当前活动前面的小窗口。下面的活动失去焦点而由对话框接受所有的用户交互。对话框通常被用来当做通知或者运行中的应用程序相关的短暂活动。
Android API支持下面的对话框对象类型:
- 警告对话框AlertDialog
这个对话框管理0,1,2,或3个按钮,和/或一个可包含复选框和单选按钮的可选项列表。这个警告对话框能够组建大多数用户界面而且是推荐使用的对话框类型。 - 进度对话框ProgressDialog
用来显示一个进度轮或进度条。因此它是警告对话框的扩展,它也支持按钮。 - 日期选择对话框DatePickerDialog
一个允许用户选择日期的对话框。 - 时间选择对话框TimePickerDialog
一个允许用户选择时间的对话框。
如果你想定制你自己的对话框,你可以在基础Dialog对象或任何上面列举的子类对话框上进行扩展并定义一个新的布局。
Showing a Dialog
对话框经常作为活动Activity的一部分来创建和显示。你通常应该从活动的onCreateDialog(int) 回调方法里创建对话框。当你使用这个回调函数时,Android系统会有效的设置这个活动为每个对话框的所有者,从而自动管理每个对话框的状态并挂靠到活动上。这样,每个对话框继承这个活动的特定属性。比如,当一个对话框打开时,菜单键显示为这个活动定义的选项菜单,音量键修改活动使用的音频流。
注意: 如果你决定在onCreateDialog()方法之外创建一个对话框,它将不会被附着到活动上。不过,你可以通过setOwnerActivity(Activity)把它附着到一个活动上。
当你想要显示一个对话框时,调用showDialog(int) 方法并传递一个唯一标识这个对话框的整数。
当对话框第一次被请求时,Android从你的活动中调用onCreateDialog(int),你应该在这里初始化这个对话框Dialog。这个回调方法被传以和showDialog(int)相同的ID。当你创建这个对话框后,在方法的最后返回这个对象。
在对话框被显示之前,Android还调用了可选的回调函数onPrepareDialog(int, Dialog). 如果你想在每一次对话框被打开时改变它的任何属性,你可以定义这个方法。这个方法在每次打开对话框时被调用,而onCreateDialog(int) 仅在对话框第一次打开时被调用。如果你不定义onPrepareDialog(),那么这个对话框将保持和上次打开时一样。这个方法也被传递以对话框的ID,和在onCreateDialog()中创建的对话框对象。
定义onCreateDialog(int) 和 onPrepareDialog(int, Dialog) 回调函数的最佳方法是使用一个switch 语句来检查传递进来的id 参数。每个case 应该检查一个唯一的对话框ID然后创建和定义相应的对话框。比如,想象一下一个游戏使用两个不同的对话框:一个用来指示这个游戏已经暂停而另一个来指示游戏结束。首先,为每个对话框定义一个整数:
|
1
2
|
static final int DIALOG_PAUSED_ID = 0;static final int DIALOG_GAMEOVER_ID = 1; |
然后,为每一个ID用一个switch case定义这个onCreateDialog(int) 回调函数:
|
1
2
3
4
5
6
7
8
9
10
11
12
13
14
|
protected Dialog onCreateDialog(int id) { Dialog dialog; switch(id) { case DIALOG_PAUSED_ID: // do the work to define the pause Dialog break; case DIALOG_GAMEOVER_ID: // do the work to define the game over Dialog break; default: dialog = null; } return dialog;} |
注意: 在这个例子里,case语句没有具体内容,因为这超出了本章讨论范围。
当是时候显示其中之一的对话框时,使用对话框ID调用showDialog(int):
|
1
|
showDialog(DIALOG_PAUSED_ID); |
Dismissing a Dialog
当你准备关闭对话框时,你可以通过对这个对话框调用dismiss()来消除它。如果需要,你还可以从这个活动中调用dismissDialog(int) 方法,这实际上将为你对这个对话框调用dismiss() 方法.
如果你想使用onCreateDialog(int) 方法来管理你对话框的状态(就如同在前面的章节讨论的那样),然后每次你的对话框消除的时候,这个对话框对象的状态将由该活动保留。如果你决定不再需要这个对象或者清除该状态是重要的,那么你应该调用removeDialog(int)。这将删除任何内部对象引用而且如果这个对话框正在显示,它将被消除。
Using dismiss listeners
如果你希望你的应用程序在一个对话框消亡的时候执行一些流程,那么你应该附着一个on-dismiss侦听器到对话框上。
首先定义DialogInterface.OnDismissListener 接口。这个接口只有一个方法,onDismiss(DialogInterface),将在对话框消亡的时候被调用。然后简单的传递你的OnDismissListener 实现给setOnDismissListener()。
然而, 请注意对话框也可以被“取消”。这是一个表明对话框被用户显示取消的特殊情况。这将在用户按“返回”按钮时发生,或者这个对话框显示的调用cancel() (也许通过对话框上的一个“取消”按钮)。当一个对话框被取消时,这个OnDismissListener 依然会被通知到,但是如果你希望在对话框被显示取消时被通知到(而不是通常的消除方式),那么你应该通过setOnCancelListener()注册一个DialogInterface.OnCancelListener 。
Creating an AlertDialog
一个警告对话框是对话框的扩展类。它能够构建大多数对话框用户界面并且是推荐使用的对话框类型。你应该在具备如下特性的时候使用它:
- 一个标题
- 一个文本消息
- 1个,2个或3个按钮
- 一个可选项列表(可选的复选框或单选按钮)
为了创建一个警告对话框,使用AlertDialog.Builder 子类。通过AlertDialog.Builder(Context)获取一个构造器然后使用这个类的公共方法来定义警告对话框的所有属性。当得到构造器后,通过create().方法来获取警告对话框对象。
下面的题目说明了如何使用AlertDialog.Builder类来定义不同的警告对话框属性。如果你在onCreateDialog()回调函数中使用下面的代码,你可以返回结果对话框对象来显示它。
Adding buttons
为了创建一个如下图所示的包含并行按钮的警告对话框,使用set...Button() 方法:

|
1
2
3
4
5
6
7
8
9
10
11
12
13
14
|
AlertDialog.Builder builder = new AlertDialog.Builder(this);builder.setMessage("Are you sure you want to exit?") .setCancelable(false) .setPositiveButton("Yes", new DialogInterface.OnClickListener() { public void onClick(DialogInterface dialog, int id) { MyActivity.this.finish(); } }) .setNegativeButton("No", new DialogInterface.OnClickListener() { public void onClick(DialogInterface dialog, int id) { dialog.cancel(); } });AlertDialog alert = builder.create(); |
首先,为这个对话框添加一个消息setMessage(CharSequence)。然后,开始函数链并设置该对话框为不能取消not cancelable (因此用户不能使用返回按钮关闭这个对话框)。对每个按钮,使用任一set...Button() 方法,比如setPositiveButton(),该方法接受按钮名称以及一个定义用户选中按钮后所采取动作的DialogInterface.OnClickListener。
注意: 你仅可以为这个警告对话框添加其中一种按钮类型。也就是,你不能包含多个“确定”按钮。这限制了可能的按钮数目只能是3个:确定(positive),中立(neutral)和否定(negative)。这些名字和你按钮的实际功能是技术上无关的,但是应该可以帮助你记录做了什么。
Adding a list
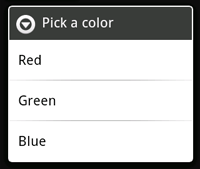
为了创建一个带有可选项列表的警告对话框,如下边所示,可使用setItems()方法:

|
1
2
3
4
5
6
7
8
9
|
final CharSequence[] items = {"Red", "Green", "Blue"};AlertDialog.Builder builder = new AlertDialog.Builder(this);builder.setTitle("Pick a color");builder.setItems(items, new DialogInterface.OnClickListener() { public void onClick(DialogInterface dialog, int item) { Toast.makeText(getApplicationContext(), items[item], Toast.LENGTH_SHORT).show(); }});AlertDialog alert = builder.create(); |
首先,用setTitle(CharSequence)方法给对话框添加一个标题。然后,添加用setItems()添加一个可选项列表,该列表接受一组显示的items和一个DialogInterface.OnClickListener 来定义用户选中按钮后所采取动作。
Adding checkboxes and radio buttons
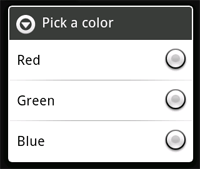
要在对话框里创建一个多选项列表(checkboxes)或者单选项(radio buttons),可分别调用setMultiChoiceItems() 和setSingleChoiceItems() 方法。如果你在onCreateDialog()回调函数中创建这些可选列表,Android会帮你管理列表状态。只要这个活动是激活的,对话框会记住之前选中的items,但如果用户退出这个活动,用户选择将丢失。
注意: 为了在用户离开或暂停这个活动的时候能够保存选择,你必须通过活动生命期Activity Lifecycle来恰当的保存和恢复设置。为了永久保存选项,即使活动进程被完全终止,你需要使用数据存储Data Storage技术。
要创建如下边所示的一个包含单选项列表的警告对话框,使用前面例子中相同的代码,不过需要把setItems()方法替换为setSingleChoiceItems()。

|
1
2
3
4
5
6
7
8
9
|
final CharSequence[] items = {"Red", "Green", "Blue"};AlertDialog.Builder builder = new AlertDialog.Builder(this);builder.setTitle("Pick a color");builder.setSingleChoiceItems(items, -1, new DialogInterface.OnClickListener() { public void onClick(DialogInterface dialog, int item) { Toast.makeText(getApplicationContext(), items[item], Toast.LENGTH_SHORT).show(); }});AlertDialog alert = builder.create(); |
setSingleChoiceItems() 的第二个参数是一个checkedItem整型数值,指示了最小选择值为0的缺省选择项的位置。“-1”代表不会有默认选择项。
Creating a ProgressDialog
进度对话框ProgressDialog是AlertDialog类的一个扩展,可以为一个未定义进度的任务显示一个旋转轮形状的进度动画,或者为一个指定进度的任务显示一个进度条。这个对话框也能提供按钮,比如一个取消下载的按钮。
可以简单的通过调用ProgressDialog.show()方法来显示一个进度对话框。比如, 可以很简单的得到下边显示的进度对话框,而不必通过onCreateDialog(int)回调管理这个对话框,如下所示:

|
1
2
|
ProgressDialog dialog = ProgressDialog.show(MyActivity.this, "", "Loading. Please wait...", true); |
第一个参数是应用程序上下文Context,第二个是对话框标题(此处为空),第三个是信息,最后这个参数表明进度是否是不确定的(这只和创建进度条有关,下一章会有描述)。
进度对话框的缺省类型是一个旋转轮,如果你想创建一个间隔进度,需要更多的代码,如下章所述。
Showing a progress bar
使用动画进度条显示进度:
- 用类构造器初始化进度对话框,ProgressDialog(Context)。
- 用setProgressStyle(int)方法设置进度风格为"STYLE_HORIZONTAL"以及设置其它属性,比如消息。
- 当你准备显示这个对话框时,调用show()或者从onCreateDialog(int)回调中返回ProgressDialog。
- 你可以通过调用setProgress(int)设置当前进度百分比或者调用incrementProgressBy(int)方法增加进度值。
比如,你的设置可能看起来像这样:
|
1
2
3
4
5
|
ProgressDialog progressDialog;progressDialog = new ProgressDialog(mContext);progressDialog.setProgressStyle(ProgressDialog.STYLE_HORIZONTAL);progressDialog.setMessage("Loading...");progressDialog.setCancelable(false); |
设置很简单。大多数创建代码也用来更新进度。你可能意识到创建另外一个线程来完成这个进度报告的工作是有必要的,进度通过一个对象返回给活动的用户界面线程。如果你对如何通过一个Handler使用另外的线程不熟悉,请参见下面的例子:
这个例子使用了另外一个线程来跟踪进程进度(计数到100)。这个线程在每次进度更新时通过一个句柄Handler发回一条消息Message。主活动然后更新进度对话框。
|
1
2
3
4
5
6
7
8
9
10
11
12
13
14
15
16
17
18
19
20
21
22
23
24
25
26
27
28
29
30
31
32
33
34
35
36
37
38
39
40
41
42
43
44
45
46
47
48
49
50
51
52
53
54
55
56
57
58
59
60
61
62
63
64
65
66
67
68
69
70
71
72
73
74
75
76
77
78
79
80
81
82
83
84
85
86
87
88
89
90
91
92
93
94
|
package com.example.progressdialog;import android.app.Activity;import android.app.Dialog;import android.app.ProgressDialog;import android.os.Bundle;import android.os.Handler;import android.os.Message;import android.view.View;import android.view.View.OnClickListener;import android.widget.Button;public class NotificationTest extends Activity { static final int PROGRESS_DIALOG = 0; Button button; ProgressThread progressThread; ProgressDialog progressDialog; /** Called when the activity is first created. */ public void onCreate(Bundle savedInstanceState) { super.onCreate(savedInstanceState); setContentView(R.layout.main); // Setup the button that starts the progress dialog button = (Button) findViewById(R.id.progressDialog); button.setOnClickListener(new OnClickListener(){ public void onClick(View v) { showDialog(PROGRESS_DIALOG); } }); } protected Dialog onCreateDialog(int id) { switch(id) { case PROGRESS_DIALOG: progressDialog = new ProgressDialog(NotificationTest.this); progressDialog.setProgressStyle(ProgressDialog.STYLE_HORIZONTAL); progressDialog.setMessage("Loading..."); progressThread = new ProgressThread(handler); progressThread.start(); return progressDialog; default: return null; } } // Define the Handler that receives messages from the thread and update the progress final Handler handler = new Handler() { public void handleMessage(Message msg) { int total = msg.getData().getInt("total"); progressDialog.setProgress(total); if (total >= 100){ dismissDialog(PROGRESS_DIALOG); progressThread.setState(ProgressThread.STATE_DONE); } } }; /** Nested class that performs progress calculations (counting) */ private class ProgressThread extends Thread { Handler mHandler; final static int STATE_DONE = 0; final static int STATE_RUNNING = 1; int mState; int total; ProgressThread(Handler h) { mHandler = h; } public void run() { mState = STATE_RUNNING; total = 0; while (mState == STATE_RUNNING) { try { Thread.sleep(100); } catch (InterruptedException e) { Log.e("ERROR", "Thread Interrupted"); } Message msg = mHandler.obtainMessage(); Bundle b = new Bundle(); b.putInt("total", total); msg.setData(b); mHandler.sendMessage(msg); total++; } } /* sets the current state for the thread, * used to stop the thread */ public void setState(int state) { mState = state; } }} |
Creating a Custom Dialog
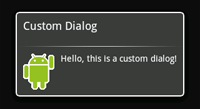
如果你想为对话框做一个自定义的设计,你可以为对话框窗口创建自己的布局和部件元素。当你定义好布局后,传递根视图对象或者布局资源ID给setContentView(View) 方法。
比如,创建如下图所示对话框:

- 创建一个XML布局以custom_dialog.xml保存:
这个XML在一个LinearLayout里定义了一个ImageView 和一个TextView.123456789101112131415161718<LinearLayoutxmlns:android="http://schemas.android.com/apk/res/android"android:id="@+id/layout_root"android:orientation="horizontal"android:layout_width="fill_parent"android:layout_height="fill_parent"android:padding="10dp"><ImageViewandroid:id="@+id/image"android:layout_width="wrap_content"android:layout_height="fill_parent"android:layout_marginRight="10dp"/><TextViewandroid:id="@+id/text"android:layout_width="wrap_content"android:layout_height="fill_parent"android:textColor="#FFF"/></LinearLayout> - 设置上面这个布局作为对话框的内容视图并为这个ImageView和TextView元素定义内容:
实例化对话框后,用setContentView(int)设置你的自定义布局作为这个对话框的内容视图,以布局资源ID作为参数。现在这个对话框有一个已定义的布局,你可以用findViewById(int)方法从布局中抓取视图对象。12345678Context mContext = getApplicationContext();Dialog dialog =newDialog(mContext);dialog.setContentView(R.layout.custom_dialog);dialog.setTitle("Custom Dialog");TextView text = (TextView) dialog.findViewById(R.id.text);text.setText("Hello, this is a custom dialog!");ImageView image = (ImageView) dialog.findViewById(R.id.image);image.setImageResource(R.drawable.android); - 就这样了。你现在可以显示该对话框了。
以基类对话框创建的对话框必须有一个标题。如果你不调用setTitle(),那么标题占用的空间保持为空,但仍然可见。如果你根本不想要一个标题,那你应该使用警告对话框AlertDialog来创建你的自定义对话框。 然而,因为警告对话框可以很简单的通过AlertDialog.Builder 类来创建,你并不需要访问上面使用的setContentView(int) 方法。相反,你必须使用setView(View)。这个方法接受一个视图View 对象,所以你需要在XML中扩充布局的根视图。
要扩充XML布局,用getLayoutInflater() 或getSystemService()方法获取LayoutInflater,然后调用 inflate(int, ViewGroup),这里第一个参数是布局资源ID而第二个参数是根视图的ID。在此处,你可以使用扩充布局来查找视图对象和为ImageView和TextView元素定义内容。然后实例化AlertDialog.Builder 并调用setView(View)为该对话框设置扩充布局。
下面是一个例子,在一个警告对话框中创建自定义布局:
|
1
2
3
4
5
6
7
8
9
10
11
12
13
|
AlertDialog.Builder builder;AlertDialog alertDialog;Context mContext = getApplicationContext();LayoutInflater inflater = (LayoutInflater) mContext.getSystemService(LAYOUT_INFLATER_SERVICE);View layout = inflater.inflate(R.layout.custom_dialog, (ViewGroup) findViewById(R.id.layout_root));TextView text = (TextView) layout.findViewById(R.id.text);text.setText("Hello, this is a custom dialog!");ImageView image = (ImageView) layout.findViewById(R.id.image);image.setImageResource(R.drawable.android);builder = new AlertDialog.Builder(mContext);builder.setView(layout);alertDialog = builder.create(); |
在你的自定义布局中使用警告对话框可以让你利用警告对话框的内置特性比如管理按钮,可选列表,一个标题,一个图标等。