我们知道使用Delphi快速开发,很大的一方面就是其强大的VCL控件,另外丰富的第三方控件也使得Delphi程序员更加快速的开发出所需要的程序。在此不特别介绍一些概念,只记录自己学习开发控件的步骤。假设我们要开发一个画直线的控件,那么我们从下面开始做:
1.菜单栏→Component→New Component,在弹出的对话框中按照提示添加:
Ancestor type 父类:TGraphicControl [Controls]
Class Name 类名:TLineTo
Palette Page 面板页:Samples
Unit file name 单元文件名:E:/练习/我做的控件/TLineTo.pas
Search path 搜索路径:E:/练习/我做的控件 (添加上面保存控件的路径)
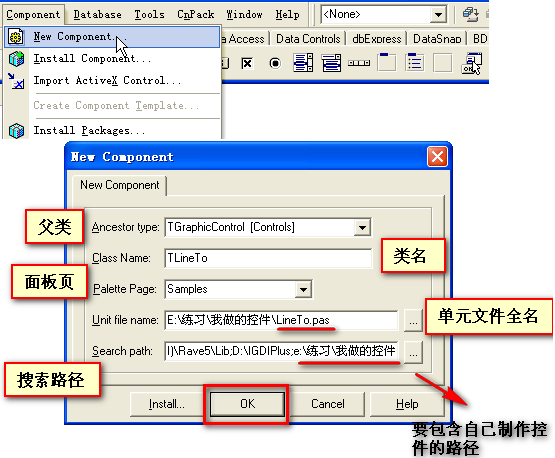
按OK完成,系统自动帮我们创建好LineTo.pas文件,内容如下:
interface
uses
SysUtils, Classes, Controls;
type
TLineTo = class(TGraphicControl)
private
{ Private declarations }
protected
{ Protected declarations }
public
{ Public declarations }
published
{ Published declarations }
end;
procedure Register;
implementation
procedure Register;
begin
RegisterComponents('Samples', [TLineTo]);
end;
end.
2.我们创建的TLineTo派生自TGraphicControl,而TGraphicControl又派生自TControl,那么图像控件TGraphicControl源代码又是什么呢,Ctrl按住并点击TGraphicControl,进入观看源代码:
private
FCanvas: TCanvas;
procedure WMPaint(var Message: TWMPaint); message WM_PAINT;
protected
procedure Paint; virtual;
property Canvas: TCanvas read FCanvas;
public
constructor Create(AOwner: TComponent); override;
destructor Destroy; override;
end;
可以看到父类TGraphicControl的Paint是虚函数,子类必须覆盖实现Paint函数方法。要做画线控件,我们简单来句MoveTo,LineTo就可以了,源代码如下:
interface
uses
SysUtils, Classes, Controls;
type
TLineTo = class(TGraphicControl)
private
{ Private declarations }
protected
procedure Paint; override;
public
{ Public declarations }
published
{ Published declarations }
end;
procedure Register;
implementation
procedure Register;
begin
RegisterComponents('Samples', [TLineTo]);
end;
procedure TLineTo.Paint;
begin
with Canvas do
begin
MoveTo(0, 0);
LineTo(Self.Width, Self.Height);
end;
end;
end.
保存文件,关闭文件。
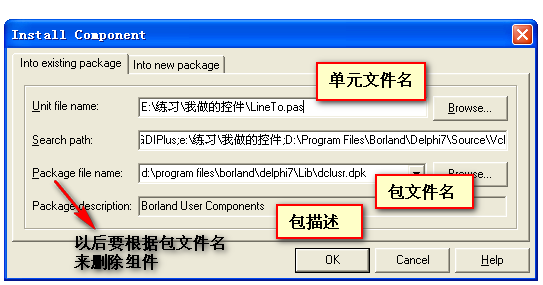
3.接下来安装组件,菜单栏→Component→Install Component,弹出对话框,浏览加入刚才制作的组件全路径位置,记住第三项包文件名,以后卸载需要使用,点击“OK”安装。如下图所示:
弹出确认对话框,点“Yes”继续安装。安装完毕,弹出消息对话框,提示包已经安装完成,新组件LineTo.TlineTo已经注册完成。在面板Samples就可以看到新组件LineTo,如下图所示:
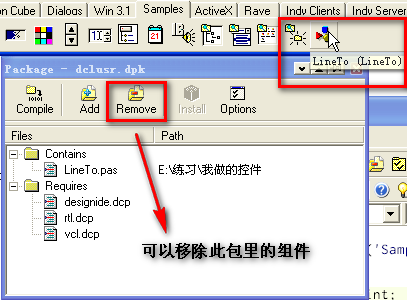
关闭dclusr.dpk文件,弹出对话框,询问是否保存(Save changes to project dclusr?)按“Yes”安装完成退出。
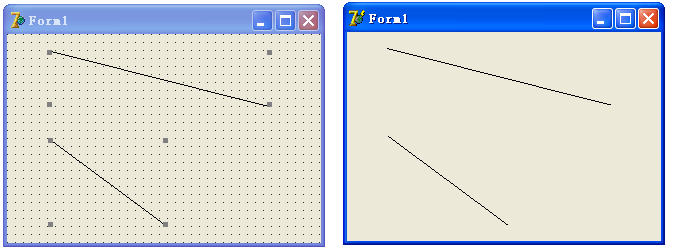
4.测试组件,菜单栏→File→New→Application,从Samples面板拖动LineTo控件到窗体上,可以看到控件上从左上角到右下角画出了一条直线,设计期和运行后的界面如下图所示:
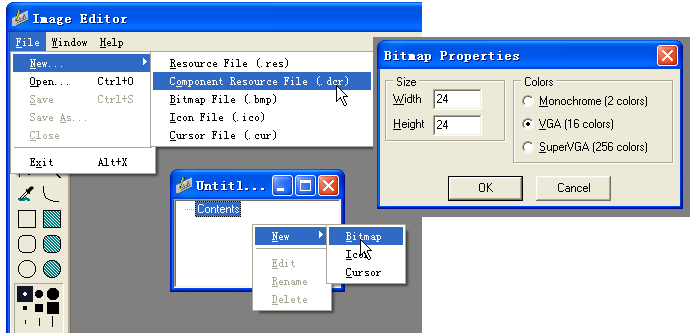
5.默认的控件图标不具有其所代表的特点,我们使用Delphi 7下的Image Editor编辑控件图标,菜单栏→File→New→Component Resource File (.dcr),在Contents上右键→New→Bitmap,设置Bitmap属性,大小为24x24,VGA(16 colors),然后在生成的Bitmap1上右键→Rename,重命名跟控件类名一样,并且都大写,为TLINETO,然后双击它,就出现空白位图对话框,在里面绘制图标,如下图所示:
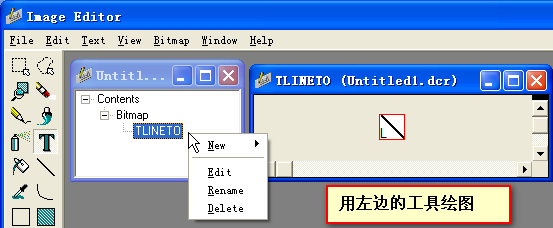
然后保存到跟制作的画线控件一样的路径下,名称为LineTo.dcr。
6.卸载控件,再重新安装以测试图标是否会更新。在菜单栏→File→Open...→dclusr.dpk,在其Contains下选中LineTo.pas,然后点上面的Remove,再选中LineTo,按“ok”,弹出确认移除对话框,单击”Yes“,再点击下Compile,那么面板Samples上的LineTo就消失了。保存dclusr.dpk退出。再重新安装一遍控件,安装完成后的图标如下图所示:
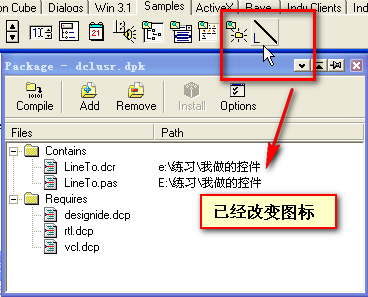
制作简单的画线控件先到这里,下次再加强此控件,接着学习。
http://blog.csdn.net/akof1314/article/details/6208097