方法一:
下载swiper:
npm install swiper --save-dev
swiper4.0使用入口:http://www.swiper.com.cn/usage/index.html;
html:

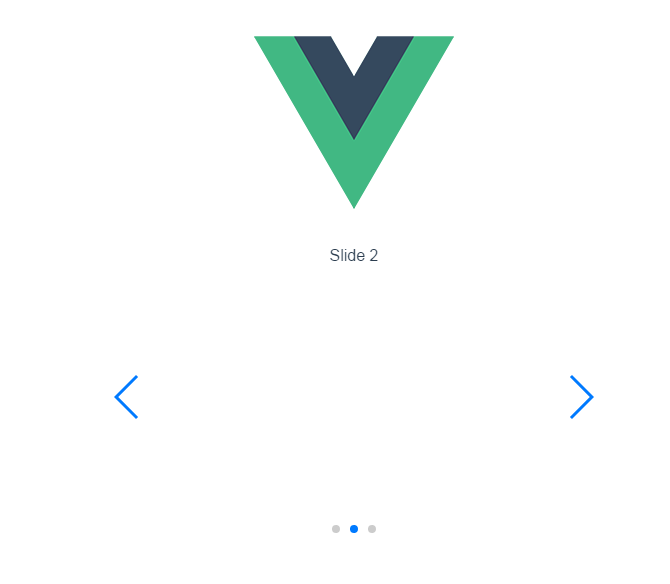
<div class="swiper-container">
    <div class="swiper-wrapper">
        <div class="swiper-slide">Slide 1</div>
        <div class="swiper-slide">Slide 2</div>
        <div class="swiper-slide">Slide 3</div>
    </div>
    <!-- 如果需要分页器 -->
    <div class="swiper-pagination"></div>

    <!-- 如果需要导航按钮 -->
    <div class="swiper-button-prev"></div>
    <div class="swiper-button-next"></div>

    <!-- 如果需要滚动条 -->
    <div class="swiper-scrollbar"></div>
</div>
在需要使用swiper的组件里引入swiper,swiper的初始化放在mounted里(可以把官网例子的启动 var mySwiper = 删掉);
js:
<script>
import Swiper from 'swiper';
export default {
  name: 'HelloWorld',
  data () {
    return {
      msg: 'Welcome to Your Vue.js App'
    }
  },
  mounted(){
     new Swiper ('.swiper-container', {
    loop: true,
    // 如果需要分页器
    pagination: '.swiper-pagination',
    // 如果需要前进后退按钮
    nextButton: '.swiper-button-next',
    prevButton: '.swiper-button-prev',
    // 如果需要滚动条
    scrollbar: '.swiper-scrollbar',
  })
  }
}
</script>
css:
在main.js里引入css
import 'swiper/dist/css/swiper.css';
然后我们在用到swiper的组件里写点样式
<style scoped>
 .swiper-container {
         500px;
        height: 300px;
        margin: 20px auto;
    }
</style>
-----------------------------------我是分割线-----------------------------------------------------------
方法二:
1.安装vue-cli
参考地址:https://github.com/vuejs/vue-cli
如果不使用严格语法需要在后三项打no;(加了挺头疼的,老是报错,但是对自己的代码规范性也是有很大的帮助的)
2.swiper下载示例代码
参考地址:http://www.swiper.com.cn/usage/index.html
一:单个组件使用:
3.在刚下载好的vue-cli里的helloworld.vue进行代码编写。
3.1html部分:
 1 <template>
 2   <div class="hello">
 3     <div class="swiper-container">
 4     <div class="swiper-wrapper">
 5         <div class="swiper-slide">Slide 1</div>
 6         <div class="swiper-slide">Slide 2</div>
 7         <div class="swiper-slide">Slide 3</div>
 8     </div>
 9     <!-- 如果需要分页器 -->
10     <div class="swiper-pagination"></div>
11
12     <!-- 如果需要导航按钮 -->
13     <div class="swiper-button-prev"></div>
14     <div class="swiper-button-next"></div>
15
16     <!-- 如果需要滚动条 -->
17     <div class="swiper-scrollbar"></div>
18 </div>
19   </div>
20 </template>
3.2 js部分:
这里使用import引入swiper.js文件;
swiper的启动放在mounted里执行;
<script>
import'../assets/js/swiper.min.js'
export default {
  name: 'HelloWorld',
  data () {
    return {
      msg: 'Welcome to Your Vue.js App'
    }
  },
  mounted(){
     var mySwiper = new Swiper ('.swiper-container', {
    loop: true,
    // 如果需要分页器
    pagination: '.swiper-pagination',
    // 如果需要前进后退按钮
    nextButton: '.swiper-button-next',
    prevButton: '.swiper-button-prev',
    // 如果需要滚动条
    scrollbar: '.swiper-scrollbar',
  })
  }
}
</script>
3.3css部分:
 1 <style scoped>
 2 @import'../assets/css/swiper.min.css';
 3     body {
 4         margin: 0;
 5         padding: 0;
 6     }
 7     .swiper-container {
 8          500px;
 9         height: 300px;
10         margin: 20px auto;
11     }
12
13
14     </style>
4.看似大工告成,这时候会报错:
Uncaught TypeError: Cannot assign to read only property 'exports' of object '#<Object>'
这个错误查文档说是:
在webpack打包的时候,可以在js文件中混用require和export。但是不能混用import 以及module.exports。
因为webpack 2中不允许混用import和module.exports
我们只需要吧.babelrc文件里的第11行代码插件项"plugins": ["transform-runtime"],中的transform-runtime删掉即可;
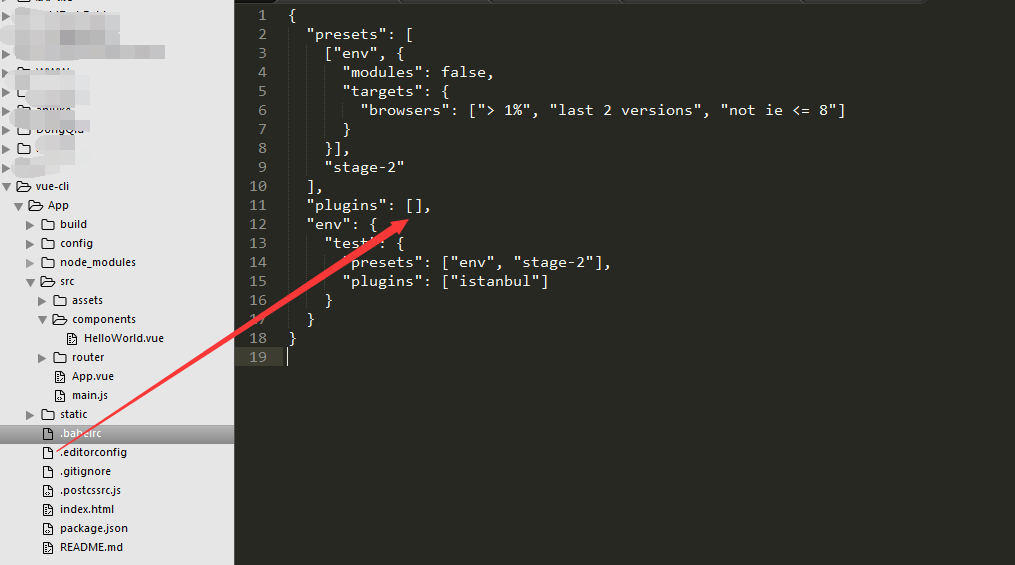
 1 {
 2   "presets": [
 3     ["env", {
 4       "modules": false,
 5       "targets": {
 6         "browsers": ["> 1%", "last 2 versions", "not ie <= 8"]
 7       }
 8     }],
 9     "stage-2"
10   ],
11   "plugins": [],
12   "env": {
13     "test": {
14       "presets": ["env", "stage-2"],
15       "plugins": ["istanbul"]
16     }
17   }
18 }
5.好了问题解决;
二:全局使用:
6.当然也可以全局使用swiper;代码如下;
还是在刚才的helloworld.vue进行代码编写;只是去掉js和css文件的引入!
helloworld.vue代码:
 1 <template>
 2   <div class="hello">
 3     <div class="swiper-container">
 4     <div class="swiper-wrapper">
 5         <div class="swiper-slide">Slide 1</div>
 6         <div class="swiper-slide">Slide 2</div>
 7         <div class="swiper-slide">Slide 3</div>
 8     </div>
 9     <!-- 如果需要分页器 -->
10     <div class="swiper-pagination"></div>
11
12     <!-- 如果需要导航按钮 -->
13     <div class="swiper-button-prev"></div>
14     <div class="swiper-button-next"></div>
15
16     <!-- 如果需要滚动条 -->
17     <div class="swiper-scrollbar"></div>
18 </div>
19   </div>
20 </template>
21
22 <script>
23
24 export default {
25   name: 'HelloWorld',
26   data () {
27     return {
28       msg: 'Welcome to Your Vue.js App'
29     }
30   },
31   mounted(){
32      var mySwiper = new Swiper ('.swiper-container', {
33     loop: true,
34     // 如果需要分页器
35     pagination: '.swiper-pagination',
36     // 如果需要前进后退按钮
37     nextButton: '.swiper-button-next',
38     prevButton: '.swiper-button-prev',
39     // 如果需要滚动条
40     scrollbar: '.swiper-scrollbar',
41   })
42   }
43 }
44 </script>
45
46 <!-- Add "scoped" attribute to limit CSS to this component only -->
47 <style scoped>
48
49     body {
50         margin: 0;
51         padding: 0;
52     }
53     .swiper-container {
54          500px;
55         height: 300px;
56         margin: 20px auto;
57     }
58
59
60     </style>
main.js文件代码:

常见报错解决:
Uncaught TypeError: Cannot assign to read only property 'exports' of object '#<Object>'
.babelrc文件里的插件项"plugins": ["transform-runtime"],中的transform-runtime删掉即可;
.