
11月8日Spring官方已经强烈建议使用Spring Authorization Server替换已经过时的Spring Security OAuth2.0,距离Spring Security OAuth2.0结束生命周期还有小半年的时间,是时候做出改变了。目前Spring Authorization Server已经进入生产就绪阶段。今天跟着胖哥的节奏搞一搞Spring Authorization Server授权服务器框架。
目前Spring Security的体系
在目前的Spring Security 5.x中将OAuth2.0 Client和OAuth2.0 Resource Server进行了模块化。
Spring Security是一定要引入的。
        <dependency>
            <groupId>org.springframework.boot</groupId>
            <artifactId>spring-boot-starter-security</artifactId>
        </dependency>
如果你要增加OAuth2.0 Client支持,可以引入:
        <dependency>
            <groupId>org.springframework.boot</groupId>
            <artifactId>spring-boot-starter-oauth2-client</artifactId>
        </dependency>
如果需要OAuth2.0 Resource Server支持,可以引入:
        <dependency>
            <groupId>org.springframework.boot</groupId>
            <artifactId>spring-boot-oauth2-resource-server</artifactId>
        </dependency>
现在如果你要增加OAuth2.0 Authorization Server支持的话,额外引入下面的依赖就可以了:
        <dependency>
            <groupId>org.springframework.security</groupId>
            <artifactId>spring-security-oauth2-authorization-server</artifactId>
        <!--  截至现在版本  -->
            <version>0.2.0</version>
        </dependency>
至此OAuth2.0三大模块齐活了。
Spring Authorization Server
我们的重点还是回到Spring Authorization Server上,目前该项目已经具备生产就绪能力。研究了几天后,简单出了一个DEMO,来帮助希望学习该框架的同学来理解它。
DEMO的流程
本DEMO将对OAuth 2.0的授权码模式(authorization_code)进行演示。这里分两个项目;
- oauth2-client项目,顾名思义作为OAuth2.0 Client,发起对授权服务器的请求授权。
- oauth2-server项目,基于Spring Authorization Server搭建的授权服务器,提供授权服务。
用户首先通过/oauth2/authorization/{registrationId}端点向oauth2-client发起请求:
GET /oauth2/authorization/felord HTTP/1.1
Host: 127.0.0.1:8080
被OAuth2AuthorizationRequestRedirectFilter拦截后组装成下面的请求链接向授权服务器oauth2-server发起授权码授权:
GET /oauth2/authorize?response_type=code&client_id=felord-client&scope=message.read%20message.write&state=0CI0ziUDEnqMgqW0nzRNRCzLrs-9IMbqJzGZ47Zb0gY%3D&redirect_uri=http://127.0.0.1:8080/foo/bar HTTP/1.1
Host: localhost:9000
授权服务器oauth2-server拦截到该请求后,会先检查发起该请求的当前用户是否认证。如果没有认证就抛出401,跳到授权服务器的登录页面,然后用户执行了登录:
POST /login HTTP/1.1
Host: localhost:9000
Content-Type: application/x-www-form-urlencoded

username=felord&password=password&_csrf=301a7baf-9e9a-4b17-acd4-613c809bf7f5
成功登录后进行了302跳转,继续执行/oauth2/authorize授权请求。这时会判断授权请求是否需要用户授权确认,在本DEMO中用户授权是需要二次确认的,会跳转到下面这个页面:
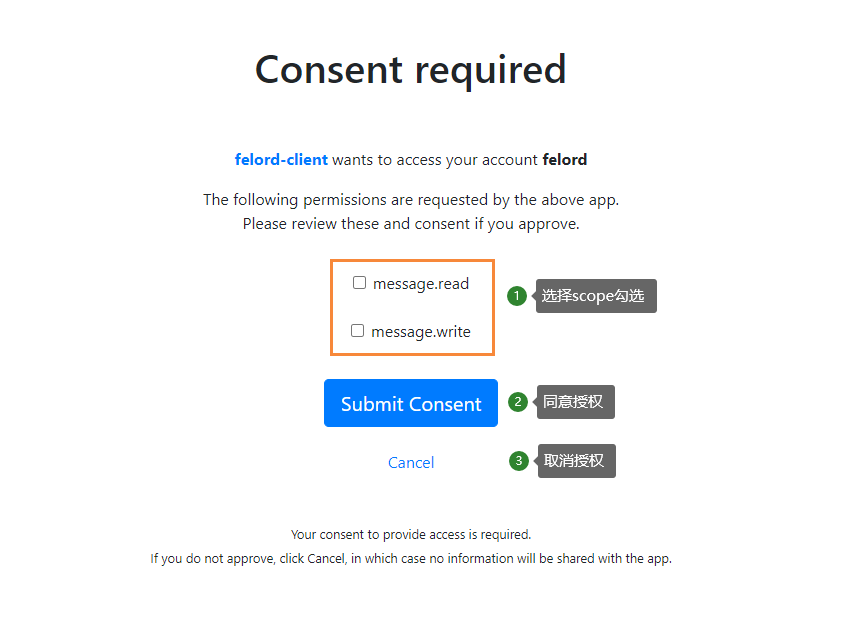
同意授权后,授权服务器会调用redirect_uri并携带一个code和state向oauth2-client发起请求:
GET /foo/bar?code=MCSJnvhXNyjilBaCyw1sCrrArWk1bzsEdxe5Z3EFbkdLwp8ASmum62n4M7Tz45VNpp_16IWboBnXlgG3LEfgN7MQqkf0-vVZufGrQpvRioRcBbesAiawMt4cspTk06ca&state=-fRunxjpG0aziPXnfcW1Iw1Fy_5_NwlUAgxABPOfAb8= HTTP/1.1
Host: 127.0.0.1:8080
oauth2-client的OAuth2AuthorizationCodeGrantFilter拦截到redirect_uri后向授权服务器发起/oauth2/token请求:
POST /oauth2/token?grant_type=authorization_code&code=MCSJnvhXNyjilBaCyw1sCrrArWk1bzsEdxe5Z3EFbkdLwp8ASmum62n4M7Tz45VNpp_16IWboBnXlgG3LEfgN7MQqkf0-vVZufGrQpvRioRcBbesAiawMt4cspTk06ca&redirect_uri=https://127.0.0.1:8080/foo/bar HTTP/1.1Host: localhost:9000Authorization: Basic bWVzc2FnaW5nLWNsaWVudDpzZWNyZXQ=
这里采用的认证方式是
client-authentication-method: client_secret_basic方式,详见OAuth2.0协议。
授权服务器将Token返回给客户端,完成请求,认证客户端信息如下:
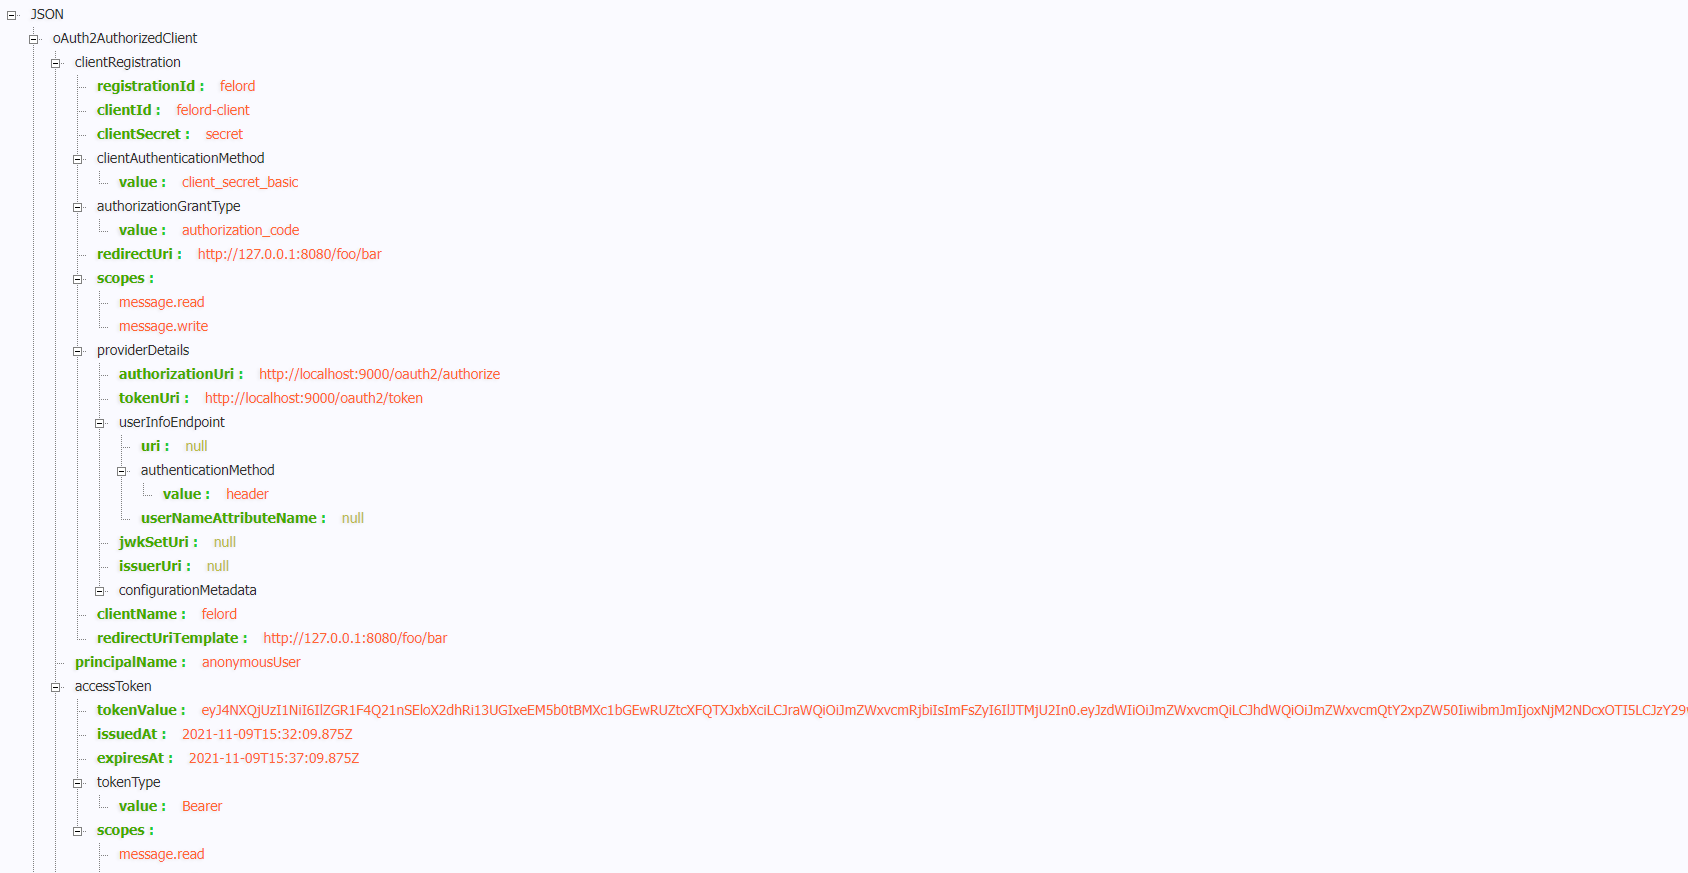
到此基于Spring Authorization Server整个授权码流程完成了。
DEMO地址:https://gitee.com/felord/spring-security-oauth2-tutorial
关注公众号:Felordcn 获取更多资讯