在Android开发中,经常需要在界面上弹出一些对话框,用来提示用户输入信息或者让用户做出选择,这就是Android中的对话框功能。
那么如何来实现这些对话框功能呢?在Android中,对话框是使用Dialog类来实现。其中,Alertialog用于实现警告对话框;ProgressDialog用于实现带进度条的对话框;DatePickerDialog用于实现日期选择对话框;TimePickerDialog用于实现时间选择对话框。
关于DatePickerDialog和TimePickerDialog的使用,http://www.cnblogs.com/menlsh/archive/2013/02/23/2923867.html)中做了详细介绍。在本篇博文中,我将以一个实例演示如何使用Alertialog和ProgressDialog对话框。
1.AlertDialog.Builder类
在Android开发中,可以通过使用AlertDialog.Builder类来实现自定义的警告对话框。在使用AlertDialog.Builder类创建对话框的时候,通常需要用到以下的一些常用方法:
(1)setTitle(); //设置对话框标题
(2)setIcon(); //设置对话框图标
(3)setMessage(); //设置对话框内容
(4)setItems(); //设置要在对话框中显示的项目列表
(5)setView(); //设置自定义的对话框样式
(6)setSingleChoiceItems(); //设置对话框显示一个单选框
(7)setMultiChoiceItems(); //设置对话框显示一系列的复选框
(8)setPositiveButton(); //设置对话框显示一个“确定”按钮
(9)setNeutralButton(); //设置对话框显示一个“退出”按钮
(10)setNegativeButton(); //设置对话框显示一个“取消”按钮
(11)create(); //创建一个AlertDialog对话框
(12)show(); //显示对话框
了解了以上这些创建AlertDialog对话框时的常用方法之后,我们就可以很容易的创建出一个AlertDialog对话框了,具体实现的源码如下:
1  Dialog dialog = new AlertDialog.Builder(this)
2        .setTitle("登录提示")
3        .setIcon(R.drawable.questionmark)
4        .setMessage("是否登录?")
5        .setPositiveButton("确定", this)
6        .setNeutralButton("退出", this)
7        .create();
8
9    dialog.show();
其中,我们为AlertDialog对话框设置了标题为“登录提示”,设置了对话框图标(从drawable中加载),设置了对话框的内容为“是否登录?”,并为对话框设置了两个按钮(一个“确定”和一个“退出”按钮)。程序运行后的效果如图1所示。
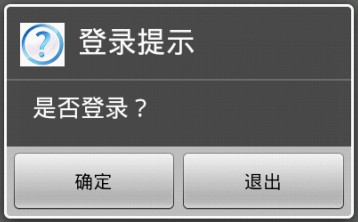
图1 登录提示界面
2.按键监听
在如图1所示的AlertDialog对话框中,有两个按钮:一个“确定”和一个“退出”按钮,我们需要对这两个按钮进行事件监听,以响应用户的不同操作。
要实现对AlertDialog对话框中的按钮事件监听也很容易,我们只需要继承DialogInterface.OnClickListener接口,并实现DialogInterface.OnClickListener接口中的onClick()抽象方法即可。具体实现方法如下:
 1 /*
 2       * Function     :    事件监听处理
 3       * Param        :    dialog对话框对象;which对话框中按钮对象
 4       * Author       :       */
 5      public void onClick(DialogInterface dialog, int which) {
 6          switch (which) {
 7          case DialogInterface.BUTTON_POSITIVE:            //点击“确定”进入登录界面
 8              loginDialog = new LoginDialog(this);
 9              break;
10          case DialogInterface.BUTTON_NEUTRAL:             //点击“退出”
11              this.finish();
12              break;
13          }
14      }
可以看出,在如图1所示的登录提示界面点击“确定”将跳转到登录界面(关于登录界面的实现随后会介绍),点击“退出”将通过使用finish当前Activity的方法消去登录提示界面。
3.自定义AlertDialog对话框式样
通过以上的方法只能实现一些固定式样的AlertDialog对话框,那么如何来实现自定义的AlertDialog对话框式样呢?下面我们就以登录界面为例实现一个简单的自定义AlertDialog对话框。
实现后的登录界面如图2所示。
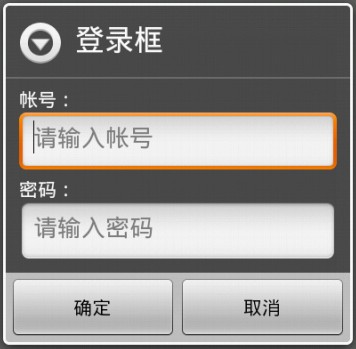
图2 登录界面
可以看出,在自定义的AlertDialog对话框中,我们加入了两个TextView控件(用来显示“帐号:”和“密码:”)以及两个EditText控件(用来输入“帐号”和“密码”)。
如何将这些控件加入到自定义的AlertDialog对话框中呢?
首先,我们需要创建一个xml布局文件来加载这些控件。这里,我创建了一个名为“logindialog.xml”的布局文件。在该布局文件中完成对上述四个控件的布局即可,具体的实现方法如下:
 1 <?xml version="1.0" encoding="utf-8"?>
 2    <LinearLayout xmlns:android="http://schemas.android.com/apk/res/android"
 3          android:orientation="vertical"
 4          android:layout_width="match_parent"
 5          android:layout_height="wrap_content"    >
 6
 7          <TextView
 8              android:id="@+id/text_username"
 9              android:layout_width="match_parent"
10              android:layout_height="wrap_content"
11              android:layout_marginLeft="10dp"
12              android:gravity="left"
13              android:text="帐号:"
14              android:textColor="#FFFFFF"    ></TextView>
15
16          <EditText
17              android:id="@+id/edit_username"
18              android:layout_width="match_parent"
19              android:layout_height="wrap_content"
20              android:layout_marginLeft="10dp"
21              android:layout_marginRight="10dp"
22              android:gravity="left"
23              android:hint="请输入帐号"
24              android:inputType="none"
25              android:digits="abcdefghigklmnopqrstuvwxyz1234567890_"    ></EditText>
26
27          <TextView
28              android:id="@+id/text_password"
29              android:layout_width="match_parent"
30              android:layout_height="wrap_content"
31              android:layout_marginLeft="10dp"
32              android:gravity="left"
33              android:text="密码:"
34              android:textColor="#FFFFFF"    ></TextView>
35
36          <EditText
37              android:id="@+id/edit_password"
38              android:layout_width="match_parent"
39              android:layout_height="wrap_content"
40              android:layout_marginLeft="10dp"
41              android:layout_marginRight="10dp"
42              android:gravity="left"
43              android:hint="请输入密码"
44              android:inputType="textPassword"
45              android:digits="1234567890"    ></EditText>
46
47    </LinearLayout>
完成xml布局文件的编写之后,我们需要将该xml文件动态加载并转化为View对象,然后通过AlertDialog.Builder类的setView()方法将该View对象加载进来,就可以完成自定义AlertDialog对话框的创建了。具体的实现方法如下:
  public LoginDialog (Context context) {
 7
 8         this.mContext = context;
 9
10         //动态加载布局生成View对象
11         LayoutInflater layoutInflater = LayoutInflater.from(mContext);
12         View longinDialogView = layoutInflater.inflate(R.layout.logindialog, null);
13
14         //获取布局中的控件
15         mUserName = (EditText)longinDialogView.findViewById(R.id.edit_username);
16         mPassword = (EditText)longinDialogView.findViewById(R.id.edit_password);
17
18         //创建一个AlertDialog对话框
19         longinDialog = new AlertDialog.Builder(mContext)
20             .setTitle("登录框")
21             .setView(longinDialogView)                //加载自定义的对话框式样
22             .setPositiveButton("确定", this)
23             .setNeutralButton("取消", this)
24             .create();
25
26         longinDialog.show();
27     }
其中,通过mUserName = (EditText)longinDialogView.findViewById(R.id.edit_username);语句,我们可以获得帐号输入控件。通过mPassword = (EditText)longinDialogView.findViewById(R.id.edit_password);语句,我们可以获得密码输入控件。从而进一步获取这两个EditText中的内容,判断后用以进行下一步的操作。
4.带进度条的对话框ProgressDialog
在如图2所示的登录界面中,输入正确的用户名和密码之后,点击“确定”,将跳转到登录等待界面,如图3所示。

图3 登录等待界面
显然可见,在图3所示的登录等待界面中有一个圆形的进度条(当然也可以加载一个长条形的进度条)。要显示一个如图3所示的带进度条的对话框也很简单,创建一个ProgressDialog对象并调用ProgressDialog类的show()方法进行显示即可。
ProgressDialog类的show()方法有四种形式,如图4所示。

图4 ProgressDialog类的show()方法
这里,我们选用最后一种方式实现带进度条的对话框的显示,具体实现方法如下:
1   //显示一个带进度条的对话框
2   //Author : 博客园-依旧淡然
3   mProgressDialog = ProgressDialog.show(mContext, "请等待", "正在登录......", true);
通过以上的方法,就可以显示出来一个如图3所示的带有进度条的对话框了。
相关资料:
Android对话框(Dialog)大全
http://www.cnblogs.com/salam/archive/2010/11/15/1877512.html
Android的AlertDialog详解
http://www.2cto.com/kf/201205/131876.html
Android开发中Dialog对话框的使用
http://www.cctime.com/html/2011-12-1/20111211018584013.htm
AlertDialog中获取控件的值
http://blog.163.com/ygq_hcl/blog/static/16242380520122815815902/