系列文章导航
1 组件介绍
组件是Vue.js最强大的功能之一。组件是可复用的Vue实例,且带有一个名字,通过组件封装可重用的代码,在较高层面上,组件是自定义元素。
2 组件注册
1.1 组件注册方式1
组件名对应标签名,标签名不允许出现大写字母,因此组件名包含多个单词时需要采用kebab-case (短横线分隔命名) 命名。
组件名称中如果用了大写字母,使用组件的时候需要转成kebab-case方法,例如组件名为:uniStatusBar,使用组件的时候<uni-status-bar></uni-status-bar>
组件模板代码必须是单个跟元素。
<!DOCTYPE html>
<html>
    <head>
        <meta charset="utf-8">
        <title></title>
        <script src="vue.js" type="text/javascript" charset="utf-8"></script>
    </head>
    <body>
        <div id="app">
            <button-counter>组件1</button-counter>
            <button-counter>组件2</button-counter>
        </div>
        <script type="text/javascript">
            // 1、创建组件
            var myComponent = Vue.extend({
          // 组件内部数据
                data:function() {
                    // data是一个函数
                    return {
                        count:0
                    }
                },
                // 组件模板
                template:'<button @click="count++">You clicked me {{ count }} times.</button>'
            });
            // 2、注册组件
            Vue.component('button-counter',myComponent);
            var app = new Vue({
                // 挂载元素 - 作用范围
                el: '#app',
                // vue数据
                data: {
                }
            });
        </script>
    </body>
</html>
1.2 组件注册方式2
<!DOCTYPE html>
<html>
    <head>
        <meta charset="utf-8">
        <title></title>
        <script src="vue.js" type="text/javascript" charset="utf-8"></script>
    </head>
    <body>
        <div id="app">
            <button-counter>组件1</button-counter>
            <button-counter>组件2</button-counter>
        </div>
        <script type="text/javascript">
            // 1、定义和注册合并
            Vue.component('button-counter', {
                // 组件内部数据
                data: function() {
                    // data是一个函数
                    return {
                        count: 0
                    }
                },
          // 组件模板
                template: '<button @click="count++">You clicked me {{ count }} times.</button>'
            });
            var app = new Vue({
                // 挂载元素 - 作用范围
                el: '#app',
                // vue数据
                data: {}
            });
        </script>
    </body>
</html>
1.3 组件嵌套注册
<!DOCTYPE html>
<html>
    <head>
        <meta charset="utf-8">
        <title></title>
        <script src="vue.js" type="text/javascript" charset="utf-8"></script>
    </head>
    <body>
        <div id="app">
            <parent></parent>
        </div>
        <script type="text/javascript">
            //定义子组件
            var child = Vue.extend({
                template: '<button @click.stop="subCount++">我是子组件{{subCount}}</button>',
                data: function() {
                    return {
                        subCount: 1
                    }
                }
            });
            // 定义父组件
            Vue.component('parent', {
                data: function() {
                    // 一定要返回数据
                    return {
                        count: 0
                    }
                },
                //定义组件内所用到的子组件
                components: {
                    'child':child
                },
                template: '<button @click="count++">我是父组件{{count}} - <child></child></button>'
            });
            var app = new Vue({
                // 挂载元素 - 作用范围
                el: '#app',
                // vue数据
                data: {

                }
            });
        </script>
    </body>
</html>
两个按钮可以单独点击:子组件事件加了.stop防止冒泡。
运行效果:

3 Props的使用
3.1 通过Props公开组件属性
属性名对应标签属性,标签的属性名不允许出现大写字母,因此属性名包含多个单词时需要采用kebab-case (短横线分隔命名) 命名。
Props公开的属性是父组件传递给子组件的,当父组件数据发生变更的时候子组件一起变更,因此在子组件内不要对传入的数据变量进行修改。
当父组件需要向子组件传递数据时,需要在子组件内通过props向外公开接收的属性列表。
<!DOCTYPE html>
<html>
    <head>
        <meta charset="utf-8">
        <title></title>
        <script src="vue.js" type="text/javascript" charset="utf-8"></script>
    </head>
    <body>
        <div id="app">
            <!-- 生成组件 -->
            <button-counter title="组件1">组件1</button-counter>
            <button-counter title="组件2">组件2</button-counter>
            <!-- 通过v-for生成多个组件 -->
            <button-counter v-for="post in posts" :start="post.id" :title="post.title">组件2</button-counter>
        </div>
        <script type="text/javascript">
            // 1、定义和注册合并
            Vue.component('button-counter', {
                data: function() {
                    // 一定要返回数据
                    return {
                        count: 0
                    }
                },
                // 对外公开的属性,也可以用简化方式 props: ['title','start']
                props: {
                    title: {
                        type:String,
                        required: true,
                        default: "默认title"
                    },
                    start:{
                        type:Number
                    }
                },
                template: '<div><button @click="count++">You clicked {{title}} {{start}} {{ count }} times.</button></div>'
            });
            var app = new Vue({
                // 挂载元素 - 作用范围
                el: '#app',
                // vue数据
                data: {
                    posts: [
                        {id: 1,title: 'My journey with Vue'},
                        {id: 2,title: 'Blogging with Vue'},
                        {id: 3,title: 'Why Vue is so fun'}
                    ]
                }
            });
        </script>
    </body>
</html>
3.2 Props的方方面面
1) 普通方式
props: ['title', 'likes', 'isPublished', 'commentIds', 'author']
2) 类型限定方式
props: {
  title: String,
  likes: Number,
  isPublished: Boolean,
  commentIds: Array,
  author: Object,
  callback: Function,
  contactsPromise: Promise // or any other constructor
}
3) 复杂限定方式
Vue.component('my-component', {
  props: {
    // 基础的类型检查 (`null` 和 `undefined` 会通过任何类型验证)
    propA: Number,
    // 多个可能的类型
    propB: [String, Number],
    // 必填的字符串
    propC: {
      type: String,
      required: true
    },
    // 带有默认值的数字
    propD: {
      type: Number,
      default: 100
    },
    // 带有默认值的对象
    propE: {
      type: Object,
      // 对象或数组默认值必须从一个工厂函数获取
      default: function () {
        return { message: 'hello' }
      }
    },
    // 自定义验证函数
    propF: {
      validator: function (value) {
        // 这个值必须匹配下列字符串中的一个
        return ['success', 'warning', 'danger'].indexOf(value) !== -1
      }
    }
  }
})
4) 单向数据流
所有的 prop 都使得其父子 prop 之间形成了一个单向下行绑定:父级 prop 的更新会向下流动到子组件中,但是反过来则不行。这样会防止从子组件意外改变父级组件的状态,从而导致你的应用的数据流向难以理解。
额外的,每次父级组件发生更新时,子组件中所有的 prop 都将会刷新为最新的值。这意味着你不应该在一个子组件内部改变 prop。如果你这样做了,Vue 会在浏览器的控制台中发出警告。
4 子组件事件
4.1 通过$emit公开组件事件
$emit参数值中不允许出现大写字母,因此事件名需要采用kebab-case (短横线分隔命名) 命名。
以下两种情况要用到$emit:
1) 当子组件某事件触发时,要执行父组件的某个事件处理方法时
2) 当要把子组件的数据传递给父组件时
采用$emit方式,代码实例如下:
<!DOCTYPE html>
<html>
    <head>
        <meta charset="utf-8">
        <title></title>
        <script src="vue.js" type="text/javascript" charset="utf-8"></script>
    </head>
    <body>
        <div id="app">
            <!-- 使用组件时 绑定组件对外公开的事件的事件处理方法-->
            <button-counter @outer-event="receiveSub1">组件1</button-counter>
            <div>父组件的值:{{pValue}}</div>
            <button-counter @outer-event="receiveSub2">组件2</button-counter>
            <div>父组件的值:{{pValue}}</div>
        </div>
        <script type="text/javascript">
            // 1、定义和注册合并
            Vue.component('button-counter', {
                data: function() {
                    return {
                        count: 0
                    }
                },
                methods:{
                    // 组件内的事件处理方法
                    onClick:function(){
                        this.count++;
                        // 通过$emit('组件对外公开的事件名'),调用公开事件绑定的事件处理函数,并向外传递数据
                        this.$emit("outer-event",this.count);
                    }
                },
                template: '<div><button @click="onClick">You clicked {{ count }} times.</button></div>'
            });
            var app = new Vue({
                // 挂载元素 - 作用范围
                el: '#app',
                // vue数据
                data: {
                    pValue:0
                },
                methods:{
                    // 组件外的事件处理方法,该方法通过组件内的事件调用
                    receiveSub1:function(c){
                        console.info("父组件1的方法被子组件调用了"+c);
                        // 变更父组件的值
                        this.pValue = c;
                    },
                    receiveSub2:function(c){
                        console.info("父组件2的方法被子组件调用了"+c);
                        this.pValue = c;
                    }
                }
            });
        </script>
    </body>
</html>
两个子组件共享父组件的值,当单击第一个组组件4次后,运行效果如下:
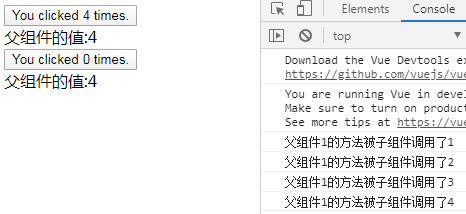
核心代码
子组件方法内:this.$emit('自定义事件', data.ids)

组件使用时:<组件名  @自定义事件='父组件的方法'/>
4.2 在组件上使用v-model
v-model是Props和事件的结合,用来实现父组件和子组件的双向通信。
一个组件上的 v-model 默认会利用名为 value 的 props和名为 input 的事件,为了防止冲突,也可以通过组件的model选项来自己定义。
<!DOCTYPE html>
<html>
    <head>
        <meta charset="utf-8">
        <title></title>
        <script src="vue.js" type="text/javascript" charset="utf-8"></script>
    </head>
    <body>
        <div id="app">
            <!-- 使用组件时 绑定组件对外公开的事件的事件处理方法-->
            <button-counter v-model="pValue">组件1</button-counter>
            <div>父组件的值:{{pValue}}</div>
            <button-counter>组件2</button-counter>
            <div>父组件的值:{{pValue}}</div>
        </div>
        <script type="text/javascript">
            // 1、定义和注册合并
            Vue.component('button-counter', {
                data: function() {
                    return {
                        count: 0
                    }
                },
                props:{
                    value_me:{
                        default:""
                    }
                },
                // 通过model声明
                // v-model所绑定变量的值会传递给子组件的value_me变量
                // 子组件对开公开的事件input_me,通过input_me事件可以实现向外层v-model绑定变量传值
                model:{
                    prop:'value_me',
                    event:'input_me'
                },
                methods:{
                    onChange:function(e){
                        console.info(e.target.value);
                        // 外部不需要提供方法绑定子组件的事件,$emit的第二个参数值会传递给v-model所绑定的变量
                        this.$emit('input_me',e.target.value);
                    }
                },
                template: '<div><input type="text" :value="value_me" @change="onChange($event)" /><br/><span>子组件内的值:{{value_me}}</span></div>'
            });
            var app = new Vue({
                // 挂载元素 - 作用范围
                el: '#app',
                // vue数据
                data: {
                    pValue:""
                }
            });
        </script>
    </body>
</html>
4.3 将原生组件绑定到组件上
在组件使用的时候,直接在组件标签上绑定原生事件是不生效的,如果要把该原生事件绑定到组件内的某个表单上,需要在表单上增加 v-on="$listeners" 属性值。
直接在组件内的input上绑定focus也可以的,不清楚该语法使用场景是啥。
<!DOCTYPE html>
<html>
    <head>
        <meta charset="utf-8">
        <title></title>
        <script src="vue.js" type="text/javascript" charset="utf-8"></script>
    </head>
    <body>
        <div id="app">
            <!-- 使用组件时 绑定组件对外公开的事件的事件处理方法-->
            <button-counter v-model="pValue" @focus="onFocus">组件1</button-counter>
            <div>父组件的值:{{pValue}}</div>
            <button-counter>组件2</button-counter>
            <div>父组件的值:{{pValue}}</div>
        </div>
        <script type="text/javascript">
            // 1、定义和注册合并
            Vue.component('button-counter', {
                data: function() {
                    return {
                        count: 0
                    }
                },
                props: {
                    value_me: {
                        default: ""
                    }
                },
                // 通过model声明
                // v-model所绑定变量的值会传递给子组件的value_me变量
                // 子组件对开公开的事件input_me,通过input_me事件可以实现向外层v-model绑定变量传值
                model: {
                    prop: 'value_me',
                    event: 'input_me'
                },
                methods: {
                    onChange: function(e) {
                        console.info(e.target.value);
                        // 外部不需要提供方法绑定子组件的事件,$emit的第二个参数值会传递给v-model所绑定的变量
                        this.$emit('input_me', e.target.value);
                    }
                },
                template: '<div><input type="text" :value="value_me" @change="onChange($event)" v-on="$listeners" /><br/><span>子组件内的值:{{value_me}}</span></div>'
            });
            var app = new Vue({
                // 挂载元素 - 作用范围
                el: '#app',
                // vue数据
                data: {
                    pValue: ""
                },
                methods: {
                    onFocus: function() {
                        console.info("触发onFocus");
                        this.pValue="获取光标了"
                    }
                }
            });
        </script>
    </body>
</html>
5 插槽分发内容
在组件模板代码中可以创建插糟(占位符),在组件使用的时候,可以向组件内部的插槽填充内容,实现组件展示内容的个性化定制。
5.1 不具名slot插槽
<!DOCTYPE html>
<html>
    <head>
        <meta charset="utf-8">
        <title></title>
        <script src="vue.js" type="text/javascript" charset="utf-8"></script>
    </head>
    <body>
        <div id="app">
            <!-- 使用组件时 绑定组件对外公开的事件的事件处理方法-->
            <my-component></my-component>
            <my-component>父容器填充内容</my-component>
        </div>
        <script type="text/javascript">
            // 1、定义和注册合并
            Vue.component('my-component', {
                template: '<div><slot>第一个插槽默认内容</slot><button>子组件<slot>第二个插槽默认内容</slot></button><slot>第三个插槽默认内容</slot></div>'
            });
            var app = new Vue({
                // 挂载元素 - 作用范围
                el: '#app'
            });
        </script>
    </body>
</html>
使用组件是,组件内的内容自动填充到所有不具名的插槽中,可以有多个不具名插糟,运行效果:

5.2 具名slot插槽
<!DOCTYPE html>
<html>
    <head>
        <meta charset="utf-8">
        <title></title>
        <script src="vue.js" type="text/javascript" charset="utf-8"></script>
    </head>
    <body>
        <div id="app">
            <!-- 使用组件时 绑定组件对外公开的事件的事件处理方法-->
            <my-component><span slot="begin">父容器给begin的内容{{pValue}}</span>默认填充内容</my-component>
            <my-component><span slot="end">父容器给end的内容</span>父容器填充内容</my-component>
        </div>
        <script type="text/javascript">
            // 1、定义和注册合并
            Vue.component('my-component', {
                data:function() {
                    return {
                        cValue:"4567"
                    }
                },
                template: '<div><slot name="begin">begin插槽默认内容</slot><button>子组件<slot>center插槽默认内容</slot></button><slot name="end">end插槽默认内容</slot></div>'
            });
            var app = new Vue({
                // 挂载元素 - 作用范围
                el: '#app',
                data:{
                    // 外部组件的变量
                    pValue:"1234"
                }
            });
        </script>
    </body>
</html>
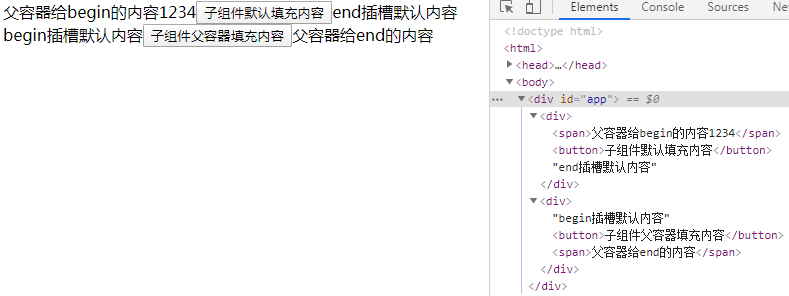
运行效果:
填充内容里边可以使用外层组件的数据,不能使用组件内的数据。
父级模板里的所有内容都是在父级作用域中编译的;子模板里的所有内容都是在子作用域中编译的。
v2.6.0之后,用v-slot替代了slot和slot-scope这两个指令。
通过v-slot设定插槽名称,v-slot必须应用在template标记上,修改后代码如下:
            <my-component><template v-slot="begin">父容器给begin的内容{{pValue}}</template>默认填充内容</my-component>
            <my-component><template v-slot="end">父容器给end的内容</template>父容器填充内容</my-component>
5.3 让父级代码中使用组件内的数据
有时让插槽内容能够访问子组件中才有的数据是很有用的。
实例代码如下:
<!DOCTYPE html>
<html>
    <head>
        <meta charset="utf-8">
        <title></title>
        <script src="vue.js" type="text/javascript" charset="utf-8"></script>
    </head>
    <body>
        <div id="app">
            <!-- 使用组件时 绑定组件对外公开的事件的事件处理方法-->
            <my-component><template v-slot="begin">父给begin的内容{{pValue}}}</template>默认填充内容</my-component>
            <!-- 通过v-slot:插糟名="引用分享数据的变量名",名称可以随便起 -->
            <my-component><template v-slot:begin="slotProps">{{slotProps.cValue}}-{{slotProps.user.firstName}}</template></my-component>
        </div>
        <script type="text/javascript">
            // 1、定义和注册合并
            Vue.component('my-component', {
                data: function() {
                    return {
                        cValue: "内部变量",
                        user:{
                            firstName:'wang',
                            lastName:'zhirui'
                        }
                    }
                },
                // 对应插糟上一定要通过v-bind:对外属性名,或者简写方式 :对外属性名,公开要对外分享得内部数据
                template: '<div><slot name="begin" v-bind:cValue="cValue" :user="user">begin默认内容</slot><button>子组件<slot>center默认内容</slot></button><slot name="end">end默认内容</slot></div>'
            });
            var app = new Vue({
                // 挂载元素 - 作用范围
                el: '#app',
                data: {
                    // 外部组件的变量
                    pValue:"外部变量"
                },
                created:function(){
                    console.info("12121")
                }

            });
        </script>
    </body>
</html>
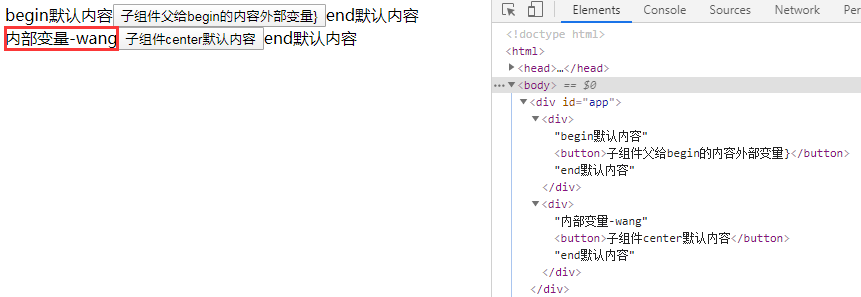
那个插槽分享出去的,那个插槽才可以使用
运行效果:
5.4 v-slot的相关情况
1)独占默认插槽的缩写语法:废弃template标签直接加载组件上
<current-user v-slot:default="slotProps">
  {{ slotProps.user.firstName }}
</current-user>
<current-user v-slot="slotProps">
  {{ slotProps.user.firstName }}
</current-user>
2)名称直接带表达式
<current-user v-slot="{ user }">
  {{ user.firstName }}
</current-user>
3)名称重命名
<current-user v-slot="{ user: person }">
  {{ person.firstName }}
</current-user>
4)变更属性内容
<current-user v-slot="{ user = { firstName: 'Guest' } }">
  {{ user.firstName }}
</current-user>
5.5 动态插槽名
变量名不能有大写字母。
<!DOCTYPE html>
<html>
    <head>
        <meta charset="utf-8">
        <title></title>
        <script src="vue.js" type="text/javascript" charset="utf-8"></script>
    </head>
    <body>
        <div id="app">
            <!-- 使用组件时 绑定组件对外公开的事件的事件处理方法-->
            <my-component><template v-slot="begin">父给begin的内容{{pValue}}}</template>默认填充内容</my-component>
            <!-- 通过v-slot:插糟名="公开分享数据的引用变量名" -->
            <my-component><template v-slot:[slotname]="slotProps">{{slotProps.cValue}}-{{slotProps.user.firstName}}</template></my-component>
        </div>
        <script type="text/javascript">
            // 1、定义和注册合并
            Vue.component('my-component', {
                data: function() {
                    return {
                        cValue: "内部变量",
                        user:{
                            firstName:'wang',
                            lastName:'zhirui'
                        }
                    }
                },
                // 对应插糟上一定要通过v-bind:对外属性名,或者简写方式:对外属性名,公开要对外分享得内部数据
                template: '<div><slot name="begin" v-bind:cValue="cValue" :user="user">begin默认内容</slot><button>子组件<slot>center默认内容</slot></button><slot name="end">end默认内容</slot></div>'
            });
            var app = new Vue({
                // 挂载元素 - 作用范围
                el: '#app',
                data: {
                    // 外部组件的变量
                    pValue:"外部变量",
                    slotname:"begin"
                },
                created:function(){
                    console.info("12121")
                }

            });
        </script>
    </body>
</html>
5.5 具名插槽的缩写
v-slot 也有缩写,即把参数之前的所有内容 (v-slot:) 替换为字符 #。例如 v-slot:header 可以被重写为 #header: