Nagios通常由一个主程序(Nagios)、一个插件程序(Nagios-plugins)和四个可选的ADDON(NRPE、NSCA、NSClient++和NDOUtils)组成。Ngios的监控工作都是通过插件实现的,因此,Nagios和Nagios-plugins是服务器端工作所必须的组件,而四个ADDON中
1、NRPE:用来监控远程linux/unix主机上执行脚本插件以实现对这些主机资源的监控
2、NSCA:用来让被监控的远程linux/unix主机主动将监控信息发送给Nagios服务器(这在冗余监控模式中特别要用到)
3、NSClient++:用来监控windows主机是安装在windows主机上的组件
4、NDOUtils:是用来将Nagios的配置信息和个event产生的数据存入数据库,以实现这些数据的快速检索和处理
这四个ADDON(附件)中,NRPE和NSClient++工作与客户端,NDOUtils工作于服务器端,而NSCA则于鏊同事安装在服务器端和客户端
nagios安装
一、安装nagios需要的rpm包:
# yum -y install httpd php mysql-devel php-mysql
二、添加nagios运行所需要的用户和组
# groupadd nagcmd
# useradd -G nagcmd nagios
# passwd nagios
把apache加入到nagcmd组,以便于在通过web interface操作nagios时能够具有足够的权限
# usermod -a -G nagcmd apache
三、编译nagios:
# tar -zxvf nagios-3.5.0.tar.gz
# ./configure --sysconfdir=/etc/nagios --with-command-group=nagcmd --enable-event-broker
# make all
# make install
# make install-init
# make install-commandmode
# make install-config
在httpd的配置文件目录(conf.d)中创建nagios的Web程序配置文件
# make install-webconf
--sysconfdir=/etc/nagios 配置文件的位置
--enable-event-broker 可以使用你NDOUtils连接mysql数据库的
四、为email指定您想用来接收nagios警告信息的邮件地址,默认是本机的nagios用户
# vim /etc/nagios/objects/contacts.cfg
五、创建一个登录nagios web程序的用户,这个账号在以后通过web登陆nagios认证是所用:
# htpasswd -c /etc/nagios/htpasswd.users nagiosadmin
六、selinux会组织cgi脚本的运行,要么关闭selinux
# setenforce 0
或者执行下面的两个命令
# chcon -R -t httpd_sys_content_t /usr/local/nagios/sbin
# chcon -R -t httpd_sys_content_t /usr/local/nagios/share
启动apache服务:
# /etc/init.d/httpd start
七、如果源码安装apache是遇到如下问题
./configure --prefix=/usr/local/apache 报错
error: Bundled APR requested but not found at ./srclib/. Download and unpack the corresponding apr and apr-util packages to ./srclib/.
解决方法
cp -fr apr-1.4.8 ./httpd-2.4.6/srclib/apr
cp -fr apr-util-1.5.2 ./httpd-2.4.6/srclib/apr-util
./configure --prefix=/usr/local/apache 继续报错
解决办法安装pcre
安装pcre报错error: You need a C++ compiler for C++ support.
安装c++编译器
yum install -y gcc gcc-c++
八、编译、安装nagios-plugins
nagios的所有监控工作都是通过插件完成的,因此,在启动nagios之前还需要为其安装官方提供的插件
# tar zxvf nagios-plugins-1.4.16.tar.gz
# cd nagios-plugins-1.4.16
# ./configure --with-nagios-user=nagios --with-nagios-group=nagios
# make
# make install
九、将nagios添加到服务列表中并设置为开机自启动
# chkconfig --add nagios
# chkconfig nagios on 2345
十、启动nagios
# /etc/init.d/nagios start
到此为止nagios的页面就可以访问了可以登录
利用nrpe监控linux主机
一、安装nagios-plugins
# tar -zxvf nagios-plugins-1.4.16.tar.gz
# cd nagios-plugins-1.4.16
# useradd -s /sbin/nologin -r nagios
# ./configure --with-nagios-user=nagios --with-nagios-group=nagios
# make all
# make install
二、安装nrpe
# tar -zxvf nrpe-2.15.tar.gz
# cd nrpe-2.15
# ./configure --with-nrep-user=nagios --with-nrpe-group=nagios --with-nagios-user=nagios --with-nagios-group=nagios --enable-command-args --enable-ssl
# make all
# make install-plugin
# make install-daemon
# make install-daemon-config
三、启动nrpe进程
# /usr/local/nagios/bin/nrpe -c /usr/local/nagios/etc/nrpe.cfg –d
四、编写nrped启动脚本,设置开机自启动
# vim /etc/init.d/nrped 加入如下内容
#!/bin/sh
nrpe_num=`ps aux | grep /bin/nrpe | grep -v grep | wc -l`
case $1 in
start)
if [ $nrpe_num -eq 1 ]
then
echo "Error:nrpe is running."
else
/usr/local/nagios/bin/nrpe -c /usr/local/nagios/etc/nrpe.cfg -d
echo "nrpe started successfully."
fi
;;
stop)
if [ $nrpe_num -eq 1 ]
then
nrpe_pid=`ps aux | grep /bin/nrpe | grep -v grep | awk '{print $2}'`
kill -9 $nrpe_pid
echo "nrpe stoped successfully."
else
echo "Error:nrpe is stoping."
fi
;;
restart)
if [ $nrpe_num -eq 1 ]
then
nrpe_pid=`ps aux | grep /bin/nrpe | grep -v grep | awk '{print $2}'`
kill -9 $nrpe_pid
echo "nrpe stoped successfully."
/usr/local/nagios/bin/nrpe -c /usr/local/nagios/etc/nrpe.cfg -d
echo "nrpe started successfully."
else
echo "Error:nrpe is stoping"
/usr/local/nagios/bin/nrpe -c /usr/local/nagios/etc/nrpe.cfg -d
echo "nrpe started successfully."
fi
esac
赋予nrped执行权限:
# chmod 755 nrped
# chkconfig --add nrped
# chkconfig --list nrped
如果2345是关闭
# chkconfig --level 2345 nrped on
五、服务端也要安装nrpe
# ./configure --sysconfdir=/etc/nagios --with-nrep-user=nagios --with-nrpe-group=nagios --with-nagios-user=nagios --with-nagios-group=nagios --enable-command-args --enable-ssl
本人习惯:服务端的配置文件全部都在etc目录下,client端的文件一般放在源码文件中,所以在服务端编译的时候都指定了配置文件的路径,而在客户端并未指定配置文件目录
其余部分和client端一样
利用NSClient++监控windows主机
需要准备的插件:
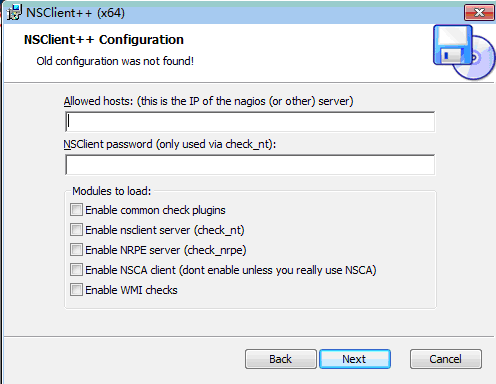
NSClient++-0.3.8-x64

Allowed hosts:允许谁检测
NSClient password:fanjinbao;通过什么密码来监控
运行NSClient++后检查是否开启了12489的端口
