建造者模式(Configuration)
构造者模式的定义是“将一个复杂对象的构建与它的表示分离,使得同样的构建过程可以创建不同的表示。”,它属于创建类模式,一般来说,如果一个对象的构建比较复杂,超出了构造函数所能包含的范围,就可以使用工厂模式和Builder模式,相对于工厂模式会产出一个完整的产品,Builder应用于更加复杂的对象的构建,甚至只会构建产品的一个部分。
构建Configuration对象过程
在Mybatis环境的初始化过程中,SqlSessionFactoryBuilder会调用XMLConfigBuilder读取所有的MybatisMapConfig.xml和所有的*Mapper.xml文件,构建Mybatis运行的核心对象Configuration对象,然后将该Configuration对象作为参数构建一个SqlSessionFactory对象。
其中XMLConfigBuilder在构建Configuration对象时,也会调用XMLMapperBuilder用于读取*Mapper文件,而XMLMapperBuilder会使用XMLStatementBuilder来读取和build所有的SQL语句。
在这个过程中,有一个相似的特点,就是这些Builder会读取文件或者配置,然后做大量的XpathParser解析、配置或语法的解析、反射生成对象、存入结果缓存等步骤,这么多的工作都不是一个构造函数所能包括的,因此大量采用了建造者模式来解决。
创建Cache对象的场景
在mybatis初始化mapper映射文件的过程中,为<cache>节点创建Cache对象的方式就是构造者模式。其中CacheBilder为建造者角色,Cache对象是产品角色,可以看CacheBuilder的源码来理解:

// 该类就是构造者
public class CacheBuilder {
  // 这几个属性就是为生成产品对象需要的字段
  private String id;
  private Class<? extends Cache> implementation;
  private List<Class<? extends Cache>> decorators;
  private Integer size;
  private Long clearInterval;
  private boolean readWrite;
  private Properties properties;

  public CacheBuilder(String id) {
    this.id = id;
    this.decorators = new ArrayList<Class<? extends Cache>>();
  }
  // 以下这几个方法就是构造者在生成产品对象时,需要使用到的几个具体模块方法。可以根据这几个方法的不同组合,生成不同的Cache对象
  public CacheBuilder implementation(Class<? extends Cache> implementation) {
    this.implementation = implementation;
    return this;
  }

  public CacheBuilder addDecorator(Class<? extends Cache> decorator) {
    if (decorator != null) {
      this.decorators.add(decorator);
    }
    return this;
  }

  public CacheBuilder size(Integer size) {
    this.size = size;
    return this;
  }

  public CacheBuilder clearInterval(Long clearInterval) {
    this.clearInterval = clearInterval;
    return this;
  }

  public CacheBuilder readWrite(boolean readWrite) {
    this.readWrite = readWrite;
    return this;
  }

  public CacheBuilder properties(Properties properties) {
    this.properties = properties;
    return this;
  }
  // 这个方法就是构造者生成产品的具体方法 返回的Cahce对象就是产品角色
  public Cache build() {
    setDefaultImplementations();
    Cache cache = newBaseCacheInstance(implementation, id);
    setCacheProperties(cache);
    if (PerpetualCache.class.equals(cache.getClass())) { // issue #352, do not apply decorators to custom caches
      for (Class<? extends Cache> decorator : decorators) {
        cache = newCacheDecoratorInstance(decorator, cache);
        setCacheProperties(cache);
      }
      cache = setStandardDecorators(cache);
    }
    return cache;
  }
}
装饰器模式(Cache)
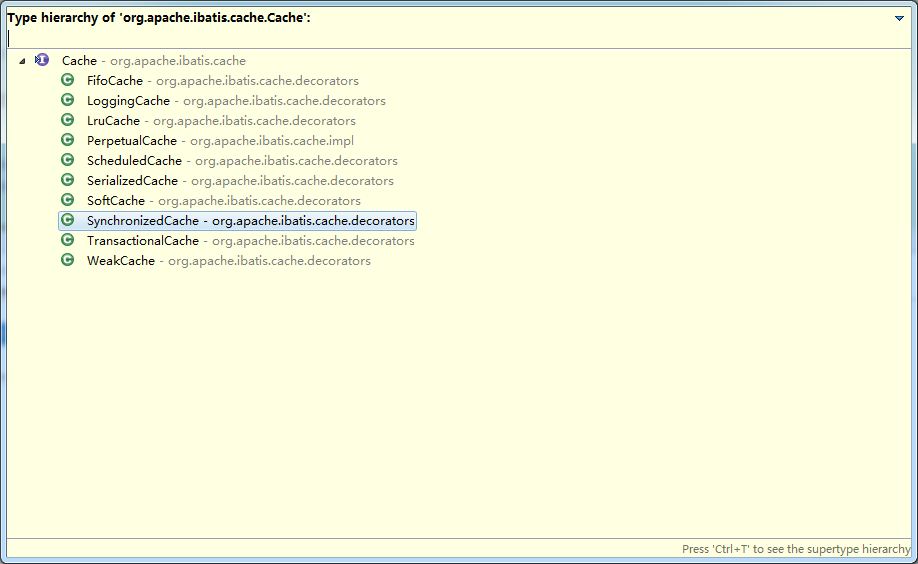
Cache接口的实现有多个,但是大部分都是装饰器,只有PerpetualCache提供了Cache接口的基本实现,其他的装饰器都是在PerpetualCache的基础上提供了一些额外的功能,通过各种组合后满足一个特定的需求。如图:
简单工厂模式(SqlSessionFactory)
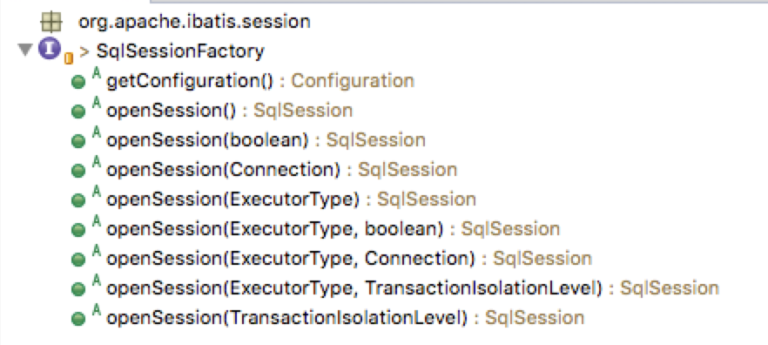
在Mybatis中比如SqlSessionFactory使用的是工厂模式,该工厂没有那么复杂的逻辑,是一个简单工厂模式。
SqlSession可以认为是一个Mybatis工作的核心的接口,通过这个接口可以执行执行SQL语句、获取Mappers、管理事务。类似于连接MySQL的Connection对象。

private SqlSession openSessionFromDataSource(ExecutorType execType, TransactionIsolationLevel level,
            boolean autoCommit) {
        Transaction tx = null;
        try {
            final Environment environment = configuration.getEnvironment();
            final TransactionFactory transactionFactory = getTransactionFactoryFromEnvironment(environment);
            tx = transactionFactory.newTransaction(environment.getDataSource(), level, autoCommit);
            final Executor executor = configuration.newExecutor(tx, execType);
            return new DefaultSqlSession(configuration, executor, autoCommit);
        } catch (Exception e) {
            closeTransaction(tx); // may have fetched a connection so lets call
                                    // close()
            throw ExceptionFactory.wrapException("Error opening session.  Cause: " + e, e);
        } finally {
            ErrorContext.instance().reset();
        }
    }
这是一个openSession调用的底层方法,该方法先从configuration读取对应的环境配置,然后初始化TransactionFactory获得一个Transaction对象,然后通过Transaction获取一个Executor对象,最后通过configuration、Executor、是否autoCommit三个参数构建了SqlSession。
单例模式(ErrorContext)
ErrorContext:用于记录每个线程的执行环境错误信息。
LogFactory:提供给整个Mybatis使用的日志工厂,用于获得针对项目配置好的日志对象。

public class ErrorContext {

    private static final ThreadLocal<ErrorContext> LOCAL = new ThreadLocal<ErrorContext>();

    private ErrorContext() {
    }

    public static ErrorContext instance() {
        ErrorContext context = LOCAL.get();
        if (context == null) {
            context = new ErrorContext();
            LOCAL.set(context);
        }
        return context;
    }
代理模式(*)(MapperProxy)
代理模式可以认为是Mybatis的核心使用的模式,正是由于这个模式,我们只需要编写Mapper.java接口,不需要实现,由Mybatis后台帮我们完成具体SQL的执行。
当我们使用Configuration的getMapper方法时,会调用mapperRegistry.getMapper方法,而该方法又会调用mapperProxyFactory.newInstance(sqlSession)来生成一个具体的代理:

public class MapperProxyFactory<T> {

 private final Class<T> mapperInterface;
 private final Map<Method, MapperMethod> methodCache = new ConcurrentHashMap<Method, MapperMethod>();

 public MapperProxyFactory(Class<T> mapperInterface) {
   this.mapperInterface = mapperInterface;
 }

 public Class<T> getMapperInterface() {
   return mapperInterface;
 }

 public Map<Method, MapperMethod> getMethodCache() {
   return methodCache;
 }

 @SuppressWarnings("unchecked")
 protected T newInstance(MapperProxy<T> mapperProxy) {
   return (T) Proxy.newProxyInstance(mapperInterface.getClassLoader(), new Class[] { mapperInterface },
       mapperProxy);
 }

 public T newInstance(SqlSession sqlSession) {
   final MapperProxy<T> mapperProxy = new MapperProxy<T>(sqlSession, mapperInterface, methodCache);
   return newInstance(mapperProxy);
 }

}
在这里,先通过T newInstance(SqlSession sqlSession)方法会得到一个MapperProxy对象,然后调用T newInstance(MapperProxy<T> mapperProxy)生成代理对象然后返回。
public class MapperProxy<T> implements InvocationHandler, Serializable {

 @Override
 public Object invoke(Object proxy, Method method, Object[] args) throws Throwable {
   try {
     if (Object.class.equals(method.getDeclaringClass())) {
       return method.invoke(this, args);
     } else if (isDefaultMethod(method)) {
       return invokeDefaultMethod(proxy, method, args);
     }
   } catch (Throwable t) {
     throw ExceptionUtil.unwrapThrowable(t);
   }
   final MapperMethod mapperMethod = cachedMapperMethod(method);
   return mapperMethod.execute(sqlSession, args);
 }
非常典型的,该MapperProxy类实现了InvocationHandler接口,并且实现了该接口的invoke方法。
通过这种方式,我们只需要编写Mapper.java接口类,当真正执行一个Mapper接口的时候,就会转发给MapperProxy.invoke方法,而该方法则会调用后续的sqlSession.cud>executor.execute>prepareStatement等一系列方法,完成SQL的执行和返回。
组合模式(SqlNode)
SqlNode和各个子类ChooseSqlNode。
Mybatis支持动态SQL的强大功能,比如下面的这个SQL:

<update id="update" parameterType="org.format.dynamicproxy.mybatis.bean.User">
   UPDATE users
   <trim prefix="SET" prefixOverrides=",">
       <if test="name != null and name != ''">
           name = #{name}
       </if>
       <if test="age != null and age != ''">
           , age = #{age}
       </if>
       <if test="birthday != null and birthday != ''">
           , birthday = #{birthday}
       </if>
   </trim>
   where id = ${id}
</update>
在这里面使用到了trim、if等动态元素,可以根据条件来生成不同情况下的SQL;
在DynamicSqlSource.getBoundSql方法里,调用了rootSqlNode.apply(context)方法,apply方法是所有的动态节点都实现的接口:
public interface SqlNode {
 boolean apply(DynamicContext context);
}
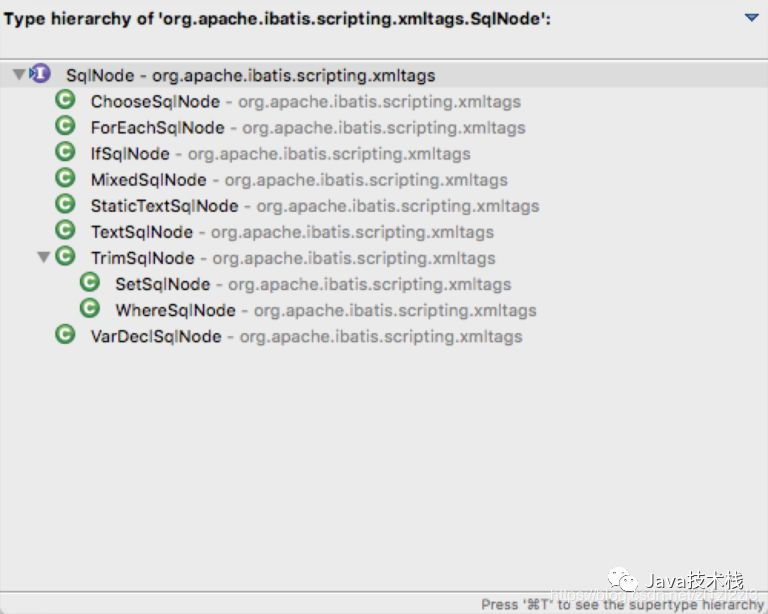
对于实现该SqlSource接口的所有节点,就是整个组合模式树的各个节点:
组合模式的简单之处在于,所有的子节点都是同一类节点,可以递归的向下执行,比如对于TextSqlNode,因为它是最底层的叶子节点,所以直接将对应的内容append到SQL语句中:
@Override
 public boolean apply(DynamicContext context) {
   GenericTokenParser parser = createParser(new BindingTokenParser(context, injectionFilter));
   context.appendSql(parser.parse(text));
   return true;
 }
但是对于IfSqlNode,就需要先做判断,如果判断通过,仍然会调用子元素的SqlNode,即contents.apply方法,实现递归的解析。
@Override
 public boolean apply(DynamicContext context) {
   if (evaluator.evaluateBoolean(test, context.getBindings())) {
     contents.apply(context);
     return true;
   }
   return false;
 }
模板模式(BaseExecutor)
模板方法模式是所有模式中最为常见的几个模式之一,是基于继承的代码复用的基本技术。
在Mybatis中,sqlSession的SQL执行,都是委托给Executor实现的,Executor包含以下结构:
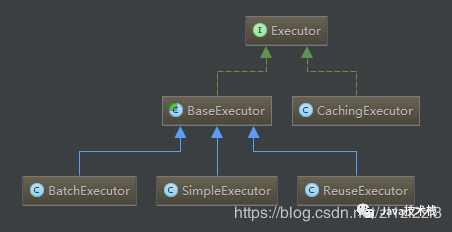
其中的BaseExecutor就采用了模板方法模式,它实现了大部分的SQL执行逻辑,然后把以下几个方法交给子类定制化完成:
protected abstract int doUpdate(MappedStatement ms, Object parameter) throws SQLException;

protected abstract List<BatchResult> doFlushStatements(boolean isRollback) throws SQLException;

protected abstract <E> List<E> doQuery(MappedStatement ms, Object parameter, RowBounds rowBounds,
     ResultHandler resultHandler, BoundSql boundSql) throws SQLException;
该模板方法类有几个子类的具体实现,使用了不同的策略:
-
简单SimpleExecutor:每执行一次update或select,就开启一个Statement对象,用完立刻关闭Statement对象。(可以是Statement或PrepareStatement对象)
-
重用ReuseExecutor:执行update或select,以sql作为key查找Statement对象,存在就使用,不存在就创建,用完后,不关闭Statement对象,而是放置于Map<String, Statement>内,供下一次使用。(可以是Statement或PrepareStatement对象)
-
批量BatchExecutor:执行update(没有select,JDBC批处理不支持select),将所有sql都添加到批处理中(addBatch()),等待统一执行(executeBatch()),它缓存了多个Statement对象,每个Statement对象都是addBatch()完毕后,等待逐一执行executeBatch()批处理的;BatchExecutor相当于维护了多个桶,每个桶里都装了很多属于自己的SQL,就像苹果蓝里装了很多苹果,番茄蓝里装了很多番茄,最后,再统一倒进仓库。(可以是Statement或PrepareStatement对象)
比如在SimpleExecutor中这样实现update方法:
@Override
public int doUpdate(MappedStatement ms, Object parameter) throws SQLException {
   Statement stmt = null;
   try {
     Configuration configuration = ms.getConfiguration();
     StatementHandler handler = configuration.newStatementHandler(this, ms, parameter, RowBounds.DEFAULT, null,
         null);
     stmt = prepareStatement(handler, ms.getStatementLog());
     return handler.update(stmt);
   } finally {
     closeStatement(stmt);
   }
 }
适配器模式(Log)
适配器模式(Adapter Pattern) :将一个接口转换成客户希望的另一个接口,适配器模式使接口不兼容的那些类可以一起工作,其别名为包装器(Wrapper)。适配器模式既可以作为类结构型模式,也可以作为对象结构型模式。
在Mybatsi的logging包中,有一个Log接口:

/**
* @author Clinton Begin
*/
public interface Log {

 boolean isDebugEnabled();

 boolean isTraceEnabled();

 void error(String s, Throwable e);

 void error(String s);

 void debug(String s);

 void trace(String s);

 void warn(String s);

}
该接口定义了Mybatis直接使用的日志方法,而Log接口具体由谁来实现呢?Mybatis提供了多种日志框架的实现,这些实现都匹配这个Log接口所定义的接口方法,最终实现了所有外部日志框架到Mybatis日志包的适配:
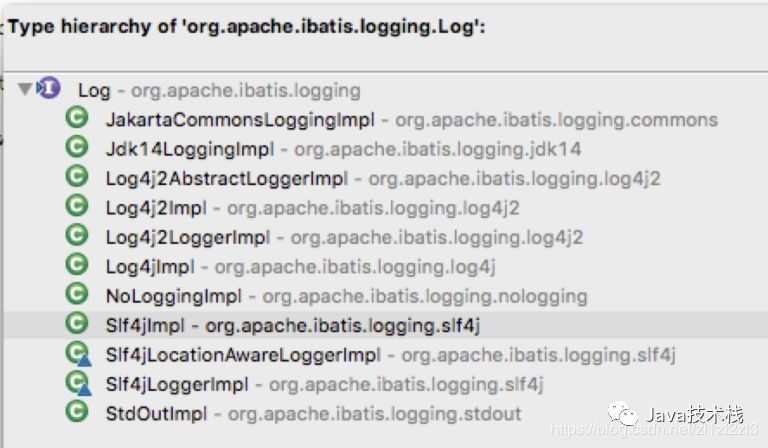
比如对于Log4jImpl的实现来说,该实现持有了org.apache.log4j.Logger的实例,然后所有的日志方法,均委托该实例来实现。

public class Log4jImpl implements Log {

 private static final String FQCN = Log4jImpl.class.getName();

 private Logger log;

 public Log4jImpl(String clazz) {
   log = Logger.getLogger(clazz);
 }

 @Override
 public boolean isDebugEnabled() {
   return log.isDebugEnabled();
 }

 @Override
 public boolean isTraceEnabled() {
   return log.isTraceEnabled();
 }

 @Override
 public void error(String s, Throwable e) {
   log.log(FQCN, Level.ERROR, s, e);
 }

 @Override
 public void error(String s) {
   log.log(FQCN, Level.ERROR, s, null);
 }

 @Override
 public void debug(String s) {
   log.log(FQCN, Level.DEBUG, s, null);
 }

 @Override
 public void trace(String s) {
   log.log(FQCN, Level.TRACE, s, null);
 }

 @Override
 public void warn(String s) {
   log.log(FQCN, Level.WARN, s, null);
 }

}
迭代器模式
迭代器(Iterator)模式,又叫做游标(Cursor)模式。GOF给出的定义为:提供一种方法访问一个容器(container)对象中各个元素,而又不需暴露该对象的内部细节。
Java的Iterator就是迭代器模式的接口,只要实现了该接口,就相当于应用了迭代器模式。
Mybatis的PropertyTokenizer是property包中的重量级类,该类会被reflection包中其他的类频繁的引用到。这个类实现了Iterator接口,在使用时经常被用到的是Iterator接口中的hasNext这个函数。
